background image

 English  


-18- 

NOTE


z


The possible number of shots and recording time depend on the storage size, resolution and 
quality settings and the subject of the image to be captured. 


Possible Number of Recordable Images 

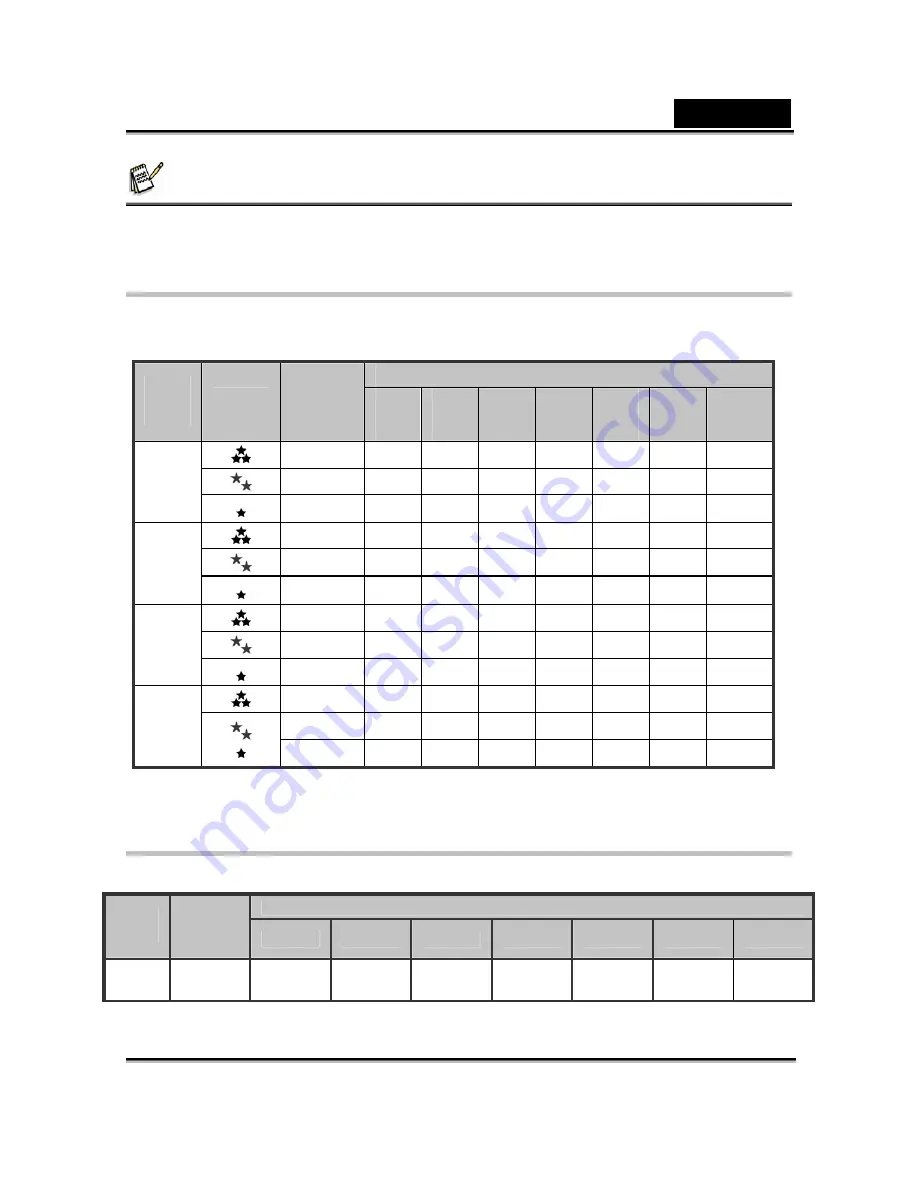
The table shows the approximate shots that you can capture at each setting based on the 
capacity of the internal memory and the SD card. Built-in 16MB internal memory (14 MB 
available for image storage)   

SD Card Capacity 


Image 

size


Quality


Internal 

Memory 


32 

MB

64 

MB

128

MB

256

MB

512 

MB


GB


GB


8  18 37 77 157 

316 634 


13 29 60 123

250 

502 

1006

3072  

x  

2304 


10 25 

53 

109

221

445 

894 

1792


4 11 

24 

51 

104

210 

422 

846 


18 39 81 165

334 

670 

1343

2560 

1920 


13 32 

68 

141

286

576 

1156 

2317


10 23 

49 

101

205

413 

830 

1663


15 36 

77 

159

323

651 

1307 

2618

1600 

x  

1200 


26 62 

131

270

547

1102 

2211 

4429


38 90 

191

392

795

1601 

3213 

6437

53 124

262

538

1091

2198 

4410 

8835

640  

x  

480 


76 177

374

769

1557

3135 

6291 

12604

* The above data shows the standard testing results. The actual capacity varies according to the 
shooting conditions and settings. 
 

Approximate Duration of Recording Time 

The table below indicates the approximate duration of recording time depending on the 
capacity of the SD memory card. 

SD card capacity 


Image 
size 


Internal 
Memory 


32MB  

64MB 

128MB 

256MB 

512MB  

1GB  

2GB 

320  

x 240 

00:00:26 00:00:57 00:01:56

00:03:56

00:07:55

00:15:52 00:31:48 01:03:39

* The values for the recording time may vary depending on the shooting conditions and settings. 

Summary of Contents for P7533

Page 1: ...ction against harmful interference in a residential installation This equipment generates uses and can radiate radio frequency energy and if not installed and used in accordance with the instructions...

Page 2: ...e purpose of explanation and may differ from the actual design of your camera 4 The manufacturer assumes no liability for any errors or discrepancies in this user manual 5 For driver updates you can c...

Page 3: ...o contact with your body or clothes rinse with fresh water If the internal fluid has entered your eyes consult a physician to receive treatment A camera is a precision instrument Do not drop it strike...

Page 4: ...attery and discharge it for at least one complete cycle before use The battery may feel warm after long period of continuous use of the camera or the flash This is normal and not a malfunction The cam...

Page 5: ...ETTING STARTED 14 TURNING THE POWER ON OFF 14 CHOOSING THE SCREEN LANGUAGE 15 SETTING THE DATE AND TIME 15 FORMATTING AN SD MEMORY CARD OR INTERNAL MEMORY 16 PHOTOGRAPHY MODE 17 SHOOTING IMAGES THE BA...

Page 6: ...e 26 Deleting selected images 27 PROTECTING IMAGES VIDEO CLIPS 27 Protecting Images 27 To cancel the protection 28 SETTING THE DPOF 28 PICTBRIDGE FUNCTION 29 Connecting the camera to the printer 29 SE...

Page 7: ...G FILES FROM YOUR DIGITAL 35 CAMERA TO COMPUTER 35 STEP 1 CONNECT THE DIGITAL CAMERA TO YOUR COMPUTER 36 STEP 2 DOWNLOAD IMAGES OR VIDEO CLIPS 36 USING THE DIGITAL CAMERA AS A WEB CAMERA 37 STEP 1 INS...

Page 8: ...upport up to 2GB PictBridge support Package Contents Carefully unpack your kit box and ensure that you have the following items In the event that any item is missing or if you find any mismatch or dam...

Page 9: ...mer LED Rear View 1 Focus switch Macro mode Normal mode 2 USB terminal 3 Tripod socket 4 Battery SD card cover 5 OK OK button Zoom button 6 Arrow button Down MODE mode button 7 Arrow button Right Flas...

Page 10: ...eye Reduction Forced Flash Flash Off 4 Focus area 5 Image size 3072 x 2304 2560 x 1920 1600 x 1200 640 x 480 6 Possible number of shots 7 Quality Fine Standard Economy 8 Date and time 9 Self timer ico...

Page 11: ...icator if present 3 Battery power indicator 4 Playback information Video Playback 1 Playback mode 2 Video mode 3 Total recorded time 4 SD memory card indicator if present 5 Battery power indicator 6 P...

Page 12: ...y Removing the Battery Open the battery SD card cover and then release the battery lock lever When the battery has come out a little slowly pull it out the rest of the way Charging the Battery With th...

Page 13: ...rd cannot be inserted check the orientation 4 Close the battery SD memory card cover lock firmly NOTE z Be sure to format an SD memory card with this digital camera before using it Refer to the sectio...

Page 14: ...nking red The self timer function is activated GETTING STARTED Follow the steps below to set the date display style current date and time Turning the Power On Off Load the batteries and insert an SD m...

Page 15: ...n Setting the Date and Time Follow these steps to set the date display style current date and time 1 Slide the lens cover open until it clicks to turn on the camera The camera mode default preview is...

Page 16: ...mat with the buttons then press the OK button 4 Select Execute with the buttons then press the OK button To cancel formatting select Cancel and press the OK button 5 To exit from the menu press contin...

Page 17: ...ypes of images you want to shoot These settings affect the number of images that can be stored in memory or on a memory card Higher resolution and higher quality images provide finer detail but cause...

Page 18: ...8 39 81 165 334 670 1343 2560 X 1920 13 32 68 141 286 576 1156 2317 10 23 49 101 205 413 830 1663 15 36 77 159 323 651 1307 2618 1600 x 1200 26 62 131 270 547 1102 2211 4429 38 90 191 392 795 1601 321...

Page 19: ...e and press the shutter button to capture the image NOTE z The digital magnification ranges from 1 0x to 4 0x z As you record video clips the zoom function cannot be activated Setting Focus Images can...

Page 20: ...low light conditions When taking photographs the red eye phenomenon can be reduced by asking the subject person to look at the digital camera or get as close to the digital camera as possible Forced...

Page 21: ...or example when the contrast different between light and dark between the subject and the background is extremely large The EV compensation value can be set in the range from 2 0EV to 2 0EV 1 Slide th...

Page 22: ...e shooting scene There are six available modes in the scene mode A Auto Select this mode to adjust point and shoot action Sport Select this mode when you want to photograph fast moving subjects Night...

Page 23: ...captured one at a time 1 Slide the lens cover open until it clicks to turn on the camera 2 Press the MODE button twice to enter playback mode The last recorded image appears on the LCD monitor 3 Use...

Page 24: ...age press the button to adjust the display area NOTE The magnification factors range from 1x to 4x within 7 stages 1 0x 1 5x 2 0x 2 5x 3 0x 3 5x and 4 0x Thumbnail Display This function allows you to...

Page 25: ...ow starts 5 To stop the slide show during playback press the OK button NOTE z You can adjust the slide show display interval within the range of 3 Sec 5 Sec 10 Sec z The Auto Off function does not ope...

Page 26: ...ayback the video clips on the computer we recommend you to use Windows Media Player 9 0 WMP 9 0 or later You can download WMP version from www microsoft com If the video can t playback in WMP 9 0 you...

Page 27: ...OK button The deletion menu is displayed 4 Select Select with the buttons then press the OK button The images are displayed in the thumbnail display The icon will also be displayed 5 Select the image...

Page 28: ...protection has been executed Setting the DPOF DPOF Digital Print Order Format allows you to embed printing information on your memory card By using DPOF you can select an image to be printed and then...

Page 29: ...p DPOF settings NOTE z The date that is printed on the photo is the date set on the camera To print the correct date on the photo set the date on the camera before you photograph the image Refer to Se...

Page 30: ...e to set the size of image you wish to print The options may vary depending on the type of printer being used Press the OK button to confirm 4 Select Paper Type to choose the type of paper you wish to...

Page 31: ...h the buttons then press the OK button to enter its respective menu 4 Select the desired setting with the buttons then press the OK button 5 To exit from the menu press the button Size This sets the s...

Page 32: ...This sets the color of the image that will be photographed Standard Vivid Sepia Monochrome Saturation To capture an image your camera offers you three different degrees of color to match with your re...

Page 33: ...exit from the menu press the button EV Refer to EV in the Camera Menu for further details White balance Refer to White Balance in the Camera Menu for further details Playback Menu In the mode set whic...

Page 34: ...tails Setup Menu Set your camera s operating environment You can select according to your preference for the camera settings in Setup of Capture Video Playback Menu Navigate the options you wish to co...

Page 35: ...tablish a USB connection between the camera and your computer you can use your computer to share recorded images or video clips with your family or friends via e mail or post them on the web In order...

Page 36: ...y launch Step 2 Download images or video clips When the digital camera is turned on and connected to your computer it is considered to be a disk drive just like a floppy disk or CD You can download tr...

Page 37: ...lusively for Windows The Web camera function is not supported for Mac platforms 1 Insert the enclosed CD ROM into your CD ROM drive 2 When the welcome screen appears click DRIVER for Web Cam Follow th...

Page 38: ...k the Place Call button 4 Type the e mail address or the network address of the computer that you are calling 5 Click Call The person that you are calling must also have Windows NetMeeting running and...

Page 39: ...ter Flash Auto off fill in Red eye reduction Flash Range 0 6m 2 5m LCD monitor 2 4 LTPS LCD High resolution 115K pixels display Self timer 2 sec 10 sec 10 2 second delay Exposure compensation Auto Man...

Page 40: ...urn the power back on or charge the batteries The image is not captured when the shutter button is pressed The camera is in Playback mode Memory is full Toggle the MODE button to the camera mode Trans...

Reviews: