background image

ENGLISH


III. Charging the rechargeable batteries 

1111. Charging the Wireless Tablet rechargeable batteries

. Charging the Wireless Tablet rechargeable batteries

. Charging the Wireless Tablet rechargeable batteries

. Charging the Wireless Tablet rechargeable batteries    

Test  your  wireless  stylus  pen  in  the  tablet  working  area,  if  it  doesn't  work,  use  new  batteries  or  charge  the 
rechargeable batteries of the wireless tablet using the micro USB cable and plug it into your PC.


When the green LED of the wireless tablet LED is blinking when the pen tip is hovering or in the working area 
above the tablet, the tablet will be out of power within 30 minutes.


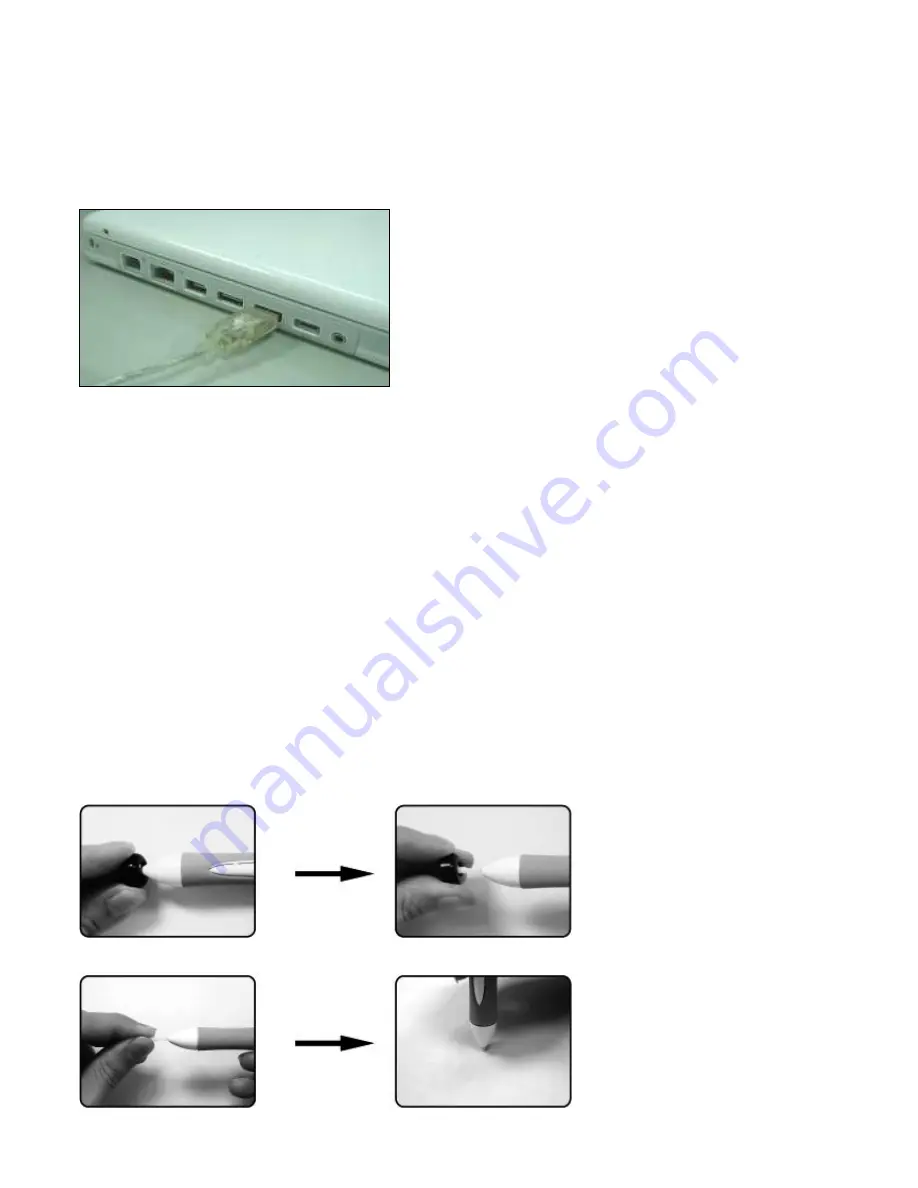
To charge the rechargeable batteries inside the tablet, plug the micro USB cable into your PC.


When charging the batteries, the red LED of the tablet will be blinking, it will stay on when the batteries are 
completed charged. You can remove the micro USB cable from your PC and the tablet.


NoteDO NOT charge your tablet if you are not using rechargeable batteries, it may cause fire, 
explosion or burst.


Do not mix or use different types of batteries at the same time such as LI-Ion, Alkaline, etc; 
and remember do not put the batteries in the wrong direction. 


IV. Storing the Digital pen and changing the Pen Battery & Tip


1. 

1. 

1. 

1. Storing the digital pen properly

Storing the digital pen properly

Storing the digital pen properly

Storing the digital pen properly


To store the digital pen, make sure that the tip does not touch anything, especially, do not let the pen stand in 
a cup or penholder with the tip down. It is recommended to place the pen in a pen holder or store it with the 
pen tip pointing upward, or place it horizontally with the pen tip free of any other objects. 
    
2222. . . . Changi

Changi

Changi

Changing the wireless stylus pen tip

ng the wireless stylus pen tip

ng the wireless stylus pen tip

ng the wireless stylus pen tip    

A: Pull out the pen tip from the digital pen by using the Pen Clip.. 


B: Push the pen tip into the digital pen. 


Summary of Contents for EasyPen M406W

Page 1: ...ENGLISH EasyPen M406W User Manual For Windows 7 Vista XP...

Page 2: ...handwriting Note If you cannot enable the handwriting mode in MSN Messenger download the relevant handwriting Note If you cannot enable the handwriting mode in MSN Messenger download the relevant hand...

Page 3: ...c and and and and r r r remember do not put the batteries in the wrong emember do not put the batteries in the wrong emember do not put the batteries in the wrong emember do not put the batteries in t...

Page 4: ...12 Resume Resume Resume Resume b b b button utton utton utton 13 13 13 13 Pen clip Pen clip Pen clip Pen clip slot slot slot slot 6 1 6 1 6 1 6 1 After you reboot your computer move the cordless pen...

Page 5: ...ss key before you use the digital pen before you use the digital pen before you use the digital pen before you use the digital pen If you have not used the digital pen for five minutes press the Resum...

Page 6: ...ated at the lower right corner of the screen You may also adjust the pressure sensitivity of the pen by determining the scope of the tablet s working area or re program the hot cells of your pen table...

Page 7: ...ouse to it The programmable group includes Click Group Click Scroll Lock etc Office Group Copy Save Undo etc System Group My Computer My pictures Media Player etc Browser Group Back Forward Refresh et...

Page 8: ...Use the pen to draw point click and sign as you wish 2 2 2 Mouse Mode Relative mode Use the pen as a traditional mouse 2 2 2 1 Cursor Speed Adjustment In Mouse mode you may move the cursor speed betwe...

Page 9: ...you can adjust pressure sensitivity Move the slider in the sensitivity bar to adjust the levels There is a test area to draw a line by pressing the pen tip on the tablet pad Simply chose the function...

Page 10: ...the tablet picture 3 2 For Tablet express keys definition You may choose any Click Group Click Scroll Lock etc Office Group Copy Save Undo etc System Group My Computer My pictures Media Player etc Br...

Page 11: ...1 AlI Full Area Select the largest possible working area depends on the tablet size 3 4 2 Part Programmable Area Allows you to define the dimensions for top bottom left and right Define the size by in...

Page 12: ...ire and press Apply to activate it 3 6 Default Tap on the Default button to return to the manufacturer settings 3 7 Change the length of sleep time Move the slider in the Sleep Time bar to adjust the...

Page 13: ...ENGLISH 3 9 2 50 power 3 9 3 Battery low...

Page 14: ...ENGLISH 3 9 4 Charging the rechargeable batteries 3 10 Wireless tablet is not connected to your PC...

Page 15: ...ENGLISH 4 Advance 4 1 Change interface language You can click any column for the language of your preference Click Apply to activate it...

Page 16: ...String You can click on the column not showing the OSD string click Apply to activate it The OSD string shows the function of any express key or button on the pen barrel which is normally at the lowe...

Page 17: ...micro USB cable from your PC and the tablet Note DO NOT charge your tablet if you are not using rechargeable batteries it may cause fire explosion or burst Do not mix or use different types of batteri...

Page 18: ...aced by an incorrect type Dispose of used batteries according to the instructions V V V VI I I I Question Answer Question Answer Question Answer Question Answer Question 1 How can I get the latest upd...

Page 19: ...right of the screen it means the driver failed in startup and there could be an incompatible issue 6 2 Check My Computer Properties Hardware Device Manager if you see an exclamation mark it means the...

Page 20: ...which can be determined by turning the equipment off and on the user is encouraged to try correct the interference by one or more of the following measures 1 Reorient the receiving antenna 2 Increase...

Reviews: