background image


WETIF Industrie EDV 

Telefon DE 

+49 8142 448976-0 

Senserstraße 3 

Telefon AT 

+43 664 28 68 223 

D - 82140 Olching 

[email protected] www.wetif.com 


    Techn. Änderungen ohne Vorankündigung und Irrtum vorbehalten. Alle Rechte geschützt. 
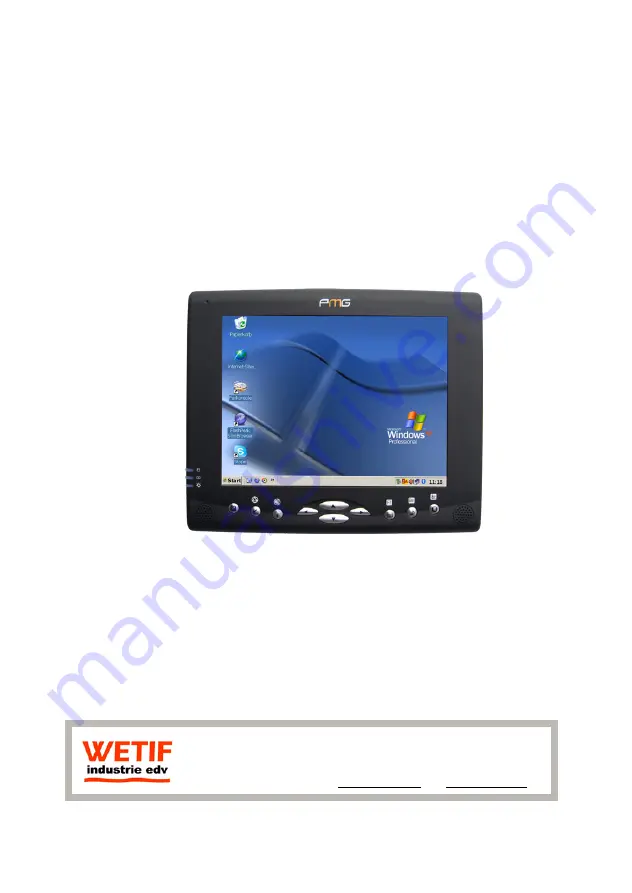


User Manual PMG84


Summary of Contents for PMG84

Page 1: ...DV Telefon DE 49 8142 448976 0 Senserstraße 3 Telefon AT 43 664 28 68 223 D 82140 Olching info wetif com www wetif com Techn Änderungen ohne Vorankündigung und Irrtum vorbehalten Alle Rechte geschützt User Manual PMG84 ...

Page 2: ...nt is furnished under a License Agreement This Agreement specifies permitted and prohibited uses of this product Trademarks Microsoft Windows Windows logo Windows XP Microsoft Internet Explorer MS MSN Outlook and Microsoft Office are registered trademarks of the Microsoft Corporation in the United States and or other countries All other product names and registered and or unregistered trademarks i...

Page 3: ...ogress The ideal range for safe operation of the computer is from 100 240V AC 1 AC Power Cord 2 AC Adapter 3 DC Direct Current Cord Warning Using the AC adapter to power other devices can damage the adapter or the device This AC adapter is only designed for use with the product Be sure to only use the AC adapter that comes provided with this product or a compatible option from the manufacturer Oth...

Page 4: ...e Ersatz nur durch denselben oder einem vom Hersteller empfohlenem ähnlichen Typ Entsorgung gebrauchter Batterien nach Angaben des Herstellers 4 Swedish Explosionsfara vid felaktigt batteribyte Använd samma batterityp eller en ekvivalent typ som rekommenderas av apparattillverkaren Kassera använt batteri enligt fabrikantens instruktion 5 Danish Lithiumbatteri Eksplosionsfare ved fejlagtig håndteri...

Page 5: ...technician for help Use of shielded cord is required to comply with Class B limits in Subpart B of Part 15 of the FCC rules Do not make any changes or modifications to the equipment unless otherwise specified in the manual If such changes or modifications should be made you could be required to stop operation of the equipment FCC Caution 1 The device complies with Part 15 of the FCC rules Operatio...

Page 6: ... Optimal Performance from the Stylus Pen 9 CHAPTER 2 10 SYSTEM OVERVIEW 10 Front View of the Computer 11 Right Side View of the Computer 14 Left Side View of the Computer 15 Top View of the Computer 16 Bottom View of the Computer 17 Rear View and Build In Back Stand 17 CHAPTER 3 18 PROTECTING AND MAINTAINING 18 Caring for Your Computer 19 Routine Care 19 Caring for the Battery 19 Caring for the AC...

Page 7: ...28 CHAPTER 4 30 SPECIFICATIONS SOFTWARE 31 Specifications and Standard Features 31 Warranty 34 Software 35 Using the WETIF Onscreen Keyboard 35 Using the WLAN Utility Winbond Wireless Utility 38 Using the Bluetooth Utility BlueSoleil TM 40 Enabling Bluetooth Devices 43 Using Handwriting Recognition Pensoft Pro 45 Using the Smart Panel to Calibrate and Rotate the Screen 46 Using The Front Panel Hot...

Page 8: ......

Page 9: ...s Discover the computer s unparalleled in the field versatility for efficiently and reliably coordinating a myriad of tasks without costing a fortune We have already pre installed the operating system together with all necessary drivers to use all capabilities and functions immediately after start up For more information about this product or all available accessories we advise you to visit our we...

Page 10: ...AP PT TE ER R 1 1 G Ge et tt ti in ng g S St ta ar rt te ed d Chapter Preview Unpacking and setting up the Product Packing list Power Supply Using the Battery Using the AC Adapter The Back Stand The Stylus Pen ...

Page 11: ...the box as you may need it and all of the packing materials for future shipping 2 Inspect the contents for damage If you find any irregularities or anything appears to be missing contact your Dealer immediately Check that the following components are included in the box Packing List 1 The Computer Unit 6 Power Cord 2 This User Manual 7 VGA extension Cable 3 System Recovery USB Stick optional 8 3M ...

Page 12: ...uture you should not have to access the battery pack unless you wish to replace it with a fresh one Note 1 The Battery LED lights green when charging and will turn off when the battery is fully charged 2 When charging the first time it is recommended that the battery be allowed to charge for no less than four hours 3 It will take a longer time to complete the charging process if the user is using ...

Page 13: ...ce the battery in water or near a fire Do not subject the battery to unusual forces such as hitting it stepping on it or dropping it Do not attempt to open or service the battery pack Only replace the battery with the same model or one of compatible design The External Battery Charger optional The external battery charger is an optional peripheral of the computer for battery recharging The user is...

Page 14: ...adapter that comes provided with this product or a compatible option from the manufacturer Other adapters may cause damage to the computer and will not be covered under the warranty Grasp the adapter plug and not the cord when unplugging the adapter from an electrical outlet If the power cord becomes damaged exposed or frayed etc replace with a new AC adapter Using a damaged cord may cause an elec...

Page 15: ...to the stand ensuring that the back stand is securely in place Docking the Back Stand Fold the stand against the back cover of the computer refer to Fig 2 The Stylus Pen The stylus pen emulates all of the functions of a standard mouse and can be effortlessly used in place of a mouse and a standard keyboard The stylus pen tucks into a designated holder on the lower left side of the computer ...

Page 16: ...from the screen quickly between taps To select an item as you normally right click on an external mouse Press the tip of the stylus pen on the item and hold it until the pop up menu appears then tap the choice You can also use the stylus pen to write characters symbols and draw pictures using additional handwriting software for example Windows XP Painter The five basic stylus pen operations and th...

Page 17: ... hold a pen or pencil when writing on paper Hold the computer securely when mobile and using the stylus pen Lift and tap the stylus pen quickly between double taps Avoid using the stylus pen to push the computer buttons For the most reliable operations hold the stylus pen and tap vertically perpendicular to the LCD display ...

Page 18: ...r contains illustrations highlighting each external component and its respective functions Chapter Preview Front view of the Computer Right side view of the Computer Left side view of the Computer Top view of the Computer Bottom view of the Computer Rear view and Build In Back Stand ...

Page 19: ...eyboard see chapter 4 Data can also be entered via a USB keyboard plugged into the USB port on the left side of the computer The computer s USB ports support most USB keyboards and pointing devices 2 Internal Microphone Effortless input of monaural sound recording 3 Status LEDs LED Indicator Relevant Component Description Orange Flashing Hard Drive Disk Accessing Green Off Battery Battery Availabl...

Page 20: ... Description in Bios Utility 1 Delete Launch CMOS Setup Utility 2 Y Yes Confirmation 3 N No Confirmation 4 Move Select Item 5 Move Select Item 6 Move Select Item 7 Move Select Item 8 PgUp PgDn Change Value 9 Enter Selection Confirmation 10 Esc Exit Return Navigating applications in Microsoft Windows XP Environments Use the quick reference table below to identify each button s default setting Users...

Page 21: ...ition 3 Invokes Wireless Utility 4 Left Arrow 5 Up Arrow 6 Down Arrow 7 Right Arrow 8 Starts the Onscreen Keyboard 9 Enter Key 1 10 Voice Recording Start Stop 1 Rotate Key to Next Level 2 Warm Start Ctrl Alt Delete 3 Disables Enables Speaker 4 Left Arrow 5 Up Arrow 6 Down Arrow 7 Right Arrow 8 F1 Function Key 9 Enter Key 2 10 Esc Key ...

Page 22: ...mera Optional on models P8N CAM or P8N SRCAM The build in 1 3M pixels CMOS camera module supports auto reverse function Images can be captured and disseminated instantaneously Images will reverse automatically as soon as the camera rotates more than 100 degrees Right Side View of the Computer 11 PCMCIA Slot Use only type II PCMCIA cards 12 Network Jack RJ45 Interfaces with an Ethernet 10 100 Base ...

Page 23: ...C Direct Current end of the AC Adapter into this jack for external power and battery recharging Before plugging in the power cord you must first verify that the external power voltage is appropriate for your geographical area 25 VGA Out mini Port This port connects an external VGA display monitor to the computer using the supplied VGA cable 26 Stylus Pen The stylus pen can be used to activate the ...

Page 24: ...rophone plugs in here 33 External Headphone out Jack Connect devices such as headphones or speakers to this jack 34 Infra Red Enables infra red devices such as PDAs cell phones Tablet PCs and other compatible devices to interact with the computer via infra red 35 USB 2 0 Port Permits hot plugging of USB peripheral devices to the computer The USB ports support most USB mouse and keyboard devices ...

Page 25: ...h the computer Each cell comes equipped with short circuit over charge over discharge and over current protection Rear View and Built In Back Stand Opening the Built In Stand To use the built in stand to prop up the computer pull it away from the computer housing Docking the built in Stand Fold the stand against the back cover of the computer ...

Page 26: ...t ti in ng g M Ma ai in nt ta ai in ni in ng g Chapter Preview Caring for your Computer Restoring the Operating System The System BIOS Utility Adjusting the Resolutions for the Computer s Display and an External Display Enabling The IrDA Function ...

Page 27: ...e internal components Avoid using and storing the computer in locations exposed to extreme temperature fluctuations likely condensation or direct sunlight Keep the device away from moisture such as exposure to liquids or precipitation Only operate the device with the battery pack installed even when using external power This ensures the computer will have the sufficient power to maintain and save ...

Page 28: ...r before unplugging it from the electrical outlet Caring for the Touch Screen Display Never spray liquids of any kind directly onto the display screen or allow excess liquid to drip into the device Never place anything on the display screen that could cause damage to the LCD display for example drinks and food Never scratch the surface of the LCD display with any sharp or damaging objects Avoid ex...

Page 29: ...he ac adapter 3 Place the enclosed WETIF restore key in the USB slot 4 Turn the system on 5 The system will now boot from this WETIF restore key and come with a notification stating that all software and data will be lost by continuing After reading and thus accepting this you can hit any key up down enter to continue In case your system does not boot from the USB key please change the boot sequen...

Page 30: ... by WETIF Attention The restore may only be used to reinstall the Operating System onto the original system You can also use this procedure if you encounter a malfunction using the tablet and want to verify if the problem is caused by the software data on the system First always make a backup of your software and data on an extern storage device If the problem persists after the restore you can co...

Page 31: ...he system settings may cause the computer to become unstable or compromise its performance Initiating and Navigating the Setup Utility Press button 1 on the front panel of the computer or the Delete key on an external keyboard during system startup before the OS Operating System begins to load Refer to the Front Panel Button descriptions in Chapter 2 for navigating applications in the System BIOS ...

Page 32: ...rts should be no more than 1 meter apart with no obstructions in between Noise from nearby equipment can cause transmission errors 2 Open Wireless Link to check the status of communications in Control Panel z Printing to an infrared printer Install your printer and assign it to the infrared port Users can then print from the applications as you would to any other printers z Transferring files thro...

Page 33: ... Check that the existing LAN supports Ethernet 10Base T 10Mbps or 100 Base TX 100Mbps connections 2 Plug the LAN cable not supplied into the built in Network Jack LAN Port The cable must have an RJ 45 connector 3 Windows automatically detects and sets up a LAN connection To edit settings open Network and Dial up Connections in Control Panel See Windows Help for information about setting up and usi...

Page 34: ...hone and does not work with party lines Some of these connections may result in excess electrical voltage and could cause a malfunction in the internal modem Check the telephone line type prior to connecting the phone line z Special restrictions in certain countries 1 Many countries impose a blackout period after a modem repeatedly fails to connect to a service provider The number of failed attemp...

Page 35: ...ed software T Commands User can control many aspects of modem operation using modem AT commands Open Phone and Modem Options in Control Panel On the modem tab select Properties Users can type AT commands on the advanced tab in the space for Extra settings z Important Safety Information When using the computer with a telephone connection always follow basic safety precautions to reduce the risk of ...

Page 36: ...lution of an External Display 1 Plug the VGA cord into the VGA output port Plug the other end of the cord into the external CRT Display or Projector 2 Use one of the following two options to open Monitor Properties in the dialog box 2 1 Click the right button of the mouse on the desktop and select Properties from the menu or 2 2 Click the Start button and select Control Panel Double click the Disp...

Page 37: ...C CH HA AP PT TE ER R 4 4 S Sp pe ec ci if fi ic ca at ti io on ns s W Wa ar rr ra an nt ty y S So of ft tw wa ar re e Chapter Preview Specifications and Standard Features Warranty Software ...

Page 38: ...isplay 8 4 inch TFT SVGA 800x600 262k colors RGB 6 bits LCD Touch Panel Screen Factory Option Sunny Readable Screen model P8N SR Graphics The integrated UMA 64 MB AGP 8X LVDS 2D 3D graphics and the External VGA Monitor port supports up to 1600 x 1200 resolution depending on the external monitor s capability resolution and color depth settings Pointing Device Touch Panel Screen and Stylus Pen Input...

Page 39: ...oard Sound 16Bit Stereo Full Duplex External volume controls via hot key setting Firmware MPEG 2 decoder CMOS Camera on models P8N CAM or P8N SRCAM 1 3M Pixels CMOS Camera Module Support Auto Reverse Function Battery 6 cell 4400mAh Removable Lithium Ion Battery Pack Short circuit over charge over discharge over current and abuses protected Power Supply External AC Adapter 175g AC Input 100 240V 50...

Page 40: ...reen Off Battery Available Solid Battery Charging Power LED Blue Solid System Powered On Software Adobe Reader The WLAN Utility Wireless LAN Configuration Tool Plus The Bluetooth Utility BlueSoleilTM The Smart Panel for Screen Rotation and Audio Recording The Front Panel Hot Key Utility Options Handwriting Recognition Pensoft Pro Software Notes MyMemo Mobility Weight 940g without battery 340g Dime...

Page 41: ...ou will need if the EasyBook is defect damaged or requires service Keep your WETIF Warranty booklet in a safe place and do not destroy or lose this document as it contains important information for support and service Have the booklet at hand when contacting WETIF for support or service Should your EasyBook require repair or replacement please consult your WETIF Warranty booklet for the best way t...

Page 42: ...g hit until another key or the same modifier key has been hit E g To enter A capital a first hit the Shift key and then the A key z Keys There are two kinds of keys buttons The bigger keys are used for typing and executing command like volume control and launching applications The smaller keys called control keys are normally located at the top of the boards are to control the Onscreen Keyboard z ...

Page 43: ...hen a side of the moving board comes nearby the side of another board and the sides are of the same size the moving board will snap onto the other board While moving the main board the boards snapped onto it will move along To snap a board onto the main board the non main board should be moved toward the main board Application keys volume control launching applications Function keys F1 F12 Numeric...

Page 44: ...ting When the user switches locale the onscreen keyboard will change layout on the fly For example A user is working on two documents one in French using Azerty keyboard layout and one in Chinese using Qwerty keyboard with Chinese captions When the user switches between the documents so will the Onscreen Keyboard switch its layout z Control Window Select another color scheme change sound and see t...

Page 45: ...y SSID The Service Set Identifier also known as the Network Name must be unique to distinguish itself as a particular wireless network Channel Frequency The radio channel used by wireless devices within the network for communication This field is significant only in the Ad hoc mode Users can specify the operating radio frequency channel if they are the creator of the wireless network It is no need...

Page 46: ...ode Encryption None or WEP Contact the network administrator for network information z Status Users can select an available network from the Site Survey Panel then click Status for the network status and information z Information The system information for Winbond Wireless Utility and the related USB Wireless Adapter ...

Page 47: ...View Menu My Bluetooth Menu My Services Menu Tools Menu Help Menu z File Menu Hide Hide the BlueSoleil Window Connections are still maintained Always on Top Keeps the BlueSoleil Window on top Exit Exit BlueSoleil z View Menu Main Window Show the BlueSoleil Main Window Service Window Show the BlueSoleil Service Window Arrange Devices Arrange remote devices by Device Name Address or Type Refresh Dev...

Page 48: ...local Bluetooth service Properties Configure the properties for the local Bluetooth service z Tools Menu My Bluetooth Shortcuts Select a shortcut to connect or delete Find Device Search for a device by Device Name and Address and click Find The specified device will appear highlighted in the Main Window Add New Device Add a remote device by entering the Bluetooth device address Add Device from His...

Page 49: ... the connected HID BlueSoleil will reconnect in the instance of connection loss except however the unplugged HID My Bluetooth Device Recommended for advanced users only z Help Menu Contents and Index F1 Access BlueSoleil Help Online About BlueSoleil Information about your computer s version of BlueSoleil ...

Page 50: ...s Step 3 BlueSoliel will display all available devices on the screen Right click the corresponding remote device icon and select Pair Device from the menu Make sure the Bluetooth Setting Button of the Device is active if not retry Step 4 Type the Passkey and click OK to confirm After the Bluetooth device has been successfully configured with the computer the remote device icon will display a red c...

Page 51: ...on and select Connect and then Bluetooth Human Interface Device Service from the menu Be sure the Bluetooth Setting Button on the Device is active if not retry Step 6 BlueSoliel will display the link between local and remote devices indicating that the connection was successful ...

Page 52: ...User could use F11 to quickly toggle between Handwriting Mouse mode Displays all of the options available to the user The system will put the words which are close to the handwriting to the selected words area after each recognition Users can tag the selected word to correct the recognition z System Configuration Main Menu Options Recognition Tab Configures alphabet numbers and symbols Pen Tab Con...

Page 53: ...t Panel Utilities to launch the program The following will appear Tap or click and the box to the right will appear Select Cal 4 Point and a red flashing X will appear in the lower left corner of the screen then tap or click the X and hold it until the green X appears Follow the same steps to finish the other three red X calibration Note Make sure to calibrate the screen before your first screen r...

Page 54: ...n The following panel will appear if the user installs the software setup procedure oneself Users have to install Microsoft NET Framework before the first installation of Hot Key Smart Panel Utilities Select Yes to install Microsoft NET Framework immediately or users can download Microsoft NET Framework from Microsoft website later ...

Page 55: ...ot Key Smart Panel Utilities to launch the program The following Primary Panel will appear Switches to secondary level functions The following Secondary Panel will appear Switches to third level functions The following Third Panel will appear Switches to primary level functions z Launch a Program via Primary Secondary and Third Panels Tag the icon twice to launch the program ...

Page 56: ...udio Start Stop z Secondary Level Functions Switches to third level functions System Warm Reboot Ctrl Alt Delete Disables Enables Speakers Function Key F1 Input Enter Escape Esc z Third Level Functions Switches to primary level functions Windows Media Player Disables Enables Wireless LAN Function Invoke User Defined Program Scroll Page Up Input Enter ...

Page 57: ...able Application Virtual Key Use top down menu to select a simulating function Application Use Brow to select an executable application Parameters Specify the parameters for the above application Description Describe the function of the above application Save Save the User Defined Information z The First Installation Please refer to the descriptions of The First Installation for Using the Smart Pa...

Page 58: ......

Page 59: ...WETIF Industrie EDV Telefon DE 49 8142 448976 0 Senserstraße 3 Telefon AT 43 664 28 68 223 D 82140 Olching info wetif com www wetif com Techn Änderungen ohne Vorankündigung und Irrtum vorbehalten Alle Rechte geschützt ...

Page 60: ... T 8 Power management T 9 Projectors T 10 The projector does not display an image T 10 The projector image is cut off T 10 The computer screen turns off T 10 Resetting the projector T 10 USB T 11 Video Display T 12 No video display on the LCD T 12 Unsatisfactory video display on the LCD display T 12 External monitors issues T 12 Viruses Worms and Spyware T 13 Symptoms of infection T 13 Wireless Ne...

Page 61: ...een by the operating system 2 Verify that both Bluetooth profiles match one another The Bluetooth devices have to share the same profile to communicate Consult the Bluetooth device manual to find the profile required for the communication 3 Verify that the Bluetooth devices are switched on 4 Verify that both Bluetooth devices are paired For security reasons both Bluetooth devices need to be paired...

Page 62: ...alled make sure that Obtain an IP address automatically and Obtain DNS server address automatically are checked if using DHCP To verify this highlight the TCP IP protocol and select Properties Note Only use a Static IP Address if the network Service Provider requires one 3 Verify the TCP IP address 3 1 Click Start select Programs select Accessories and then click Command Prompt 3 2 Type the comman...

Page 63: ...tes 32 time 1ms TTL 128 Ping statistics for 127 0 0 1 Packets Sent 4 Received 4 Lost 0 0 loss Approximate round trip times in milli seconds Minimum 0ms Maximum 0ms Average 0ms 5 Install the latest Service Packs for Operating System or Network Client if necessary It may be necessary to install Service Packs for either the operating system or for any additional network clients that may be installed ...

Page 64: ...f available 4 Remove all surge protectors cable extensions switch boxes etc and use direct connections to power and phone lines 5 Apply critical Microsoft Windows updates and patches 6 Scan all the files on the system with an anti virus software using the vendor s latest virus definitions 7 Scan the system for spyware using the anti spyware software s latest definitions 8 Record all error messages...

Page 65: ...rather than a specific hardware fault Around the world there is a variance in the signal quality of the dial tone which causes a report of no dial tone detection Disable the dial tone detection to correct no dial tone detected by modem error 4 Verify that the latest driver has been installed properly 5 Verify that no other software that accesses COM ports is running when the operating system loads...

Page 66: ...or port replicator 6 Remove all devices and then test for system power with minimal devices attached Disconnect the AC adapter Remove the battery pack Remove any externally or internally installed options and other devices Wait for 30 seconds before reconnecting the devices and power sources System does not run on battery power 1 Verify the power and battery status indicator 2 Remove and reseat th...

Page 67: ...are software s latest definitions 6 Verify the driver and firmware versions are the latest for attached hardware This can be verified at the manufacturer s Web site if available 7 Remove any attached hardware and device drivers For testing purposes temporarily disconnect any devices one at a time Ensure all attached hardware is Advanced Power Management APM or Advanced Configuration and Power Inte...

Page 68: ...y the projector has an optimal resolution with which it works best Consult the projector s documentation to find the optimal resolution and set the computer s display properties accordingly The computer screen turns off The computer probably has a built in feature that turns off the screen after a period of inactivity to conserve the battery power Disable the power saving feature that turns off th...

Page 69: ... device and the drivers and then reinstalling the USB device and the latest drivers 4 Verify the USB device works on another machine if available 5 Verify another USB device if available works on this machine 6 Verify that the USB device is USB 1 1 or 2 0 compliant Plugging specific USB 1 1 compliant devices into a USB 2 0 compliant port will cause that the device should function normally but at a...

Page 70: ... time dots or pixels is characteristic of thin film transistor TFT liquid crystal display LCD technology due to manufacturing process for such technology irrespective of manufacturer If your LCD has defective pixels it should not be considered faulty until the number of defective pixels meets or exceeds the number listed in the Pixel policy criteria External monitors issues 1 Verify the cabling an...

Page 71: ...unprotected computers that are logged on the Internet within a half hour All computers have ports that are used to communicate with their own peripherals and with the outside world Hackers can seize control and attack these well known ports Like a backdoor these ports must be secured and locked with firewall software to keep out intruders and to protect the system from attack Symptoms of infection...

Page 72: ...tructures such as load bearing walls or metal partitions 4 Check the SSID the wireless network name and security settings 5 Verify the hardware compatibility with the Access Point Often vendors of Access Points will add features to improve their product Unfortunately these extra features are not always compatible with all hardware Consult the product documentation for the Access Point about the po...

Page 73: ...select Programs select Accessories and then click Command Prompt 8 2 Type the command ping 127 0 0 1 This will send a message to the internal network stack on the machine You should see a response like this Pinging 127 0 0 1 with 32 bytes of data Reply from 127 0 0 1 bytes 32 time 1ms TTL 128 Reply from 127 0 0 1 bytes 32 time 1ms TTL 128 Reply from 127 0 0 1 bytes 32 time 1ms TTL 128 Reply from 1...

Reviews: