background image

12

6. Adjust distance between nozzle and platform (continued):

A

B

C

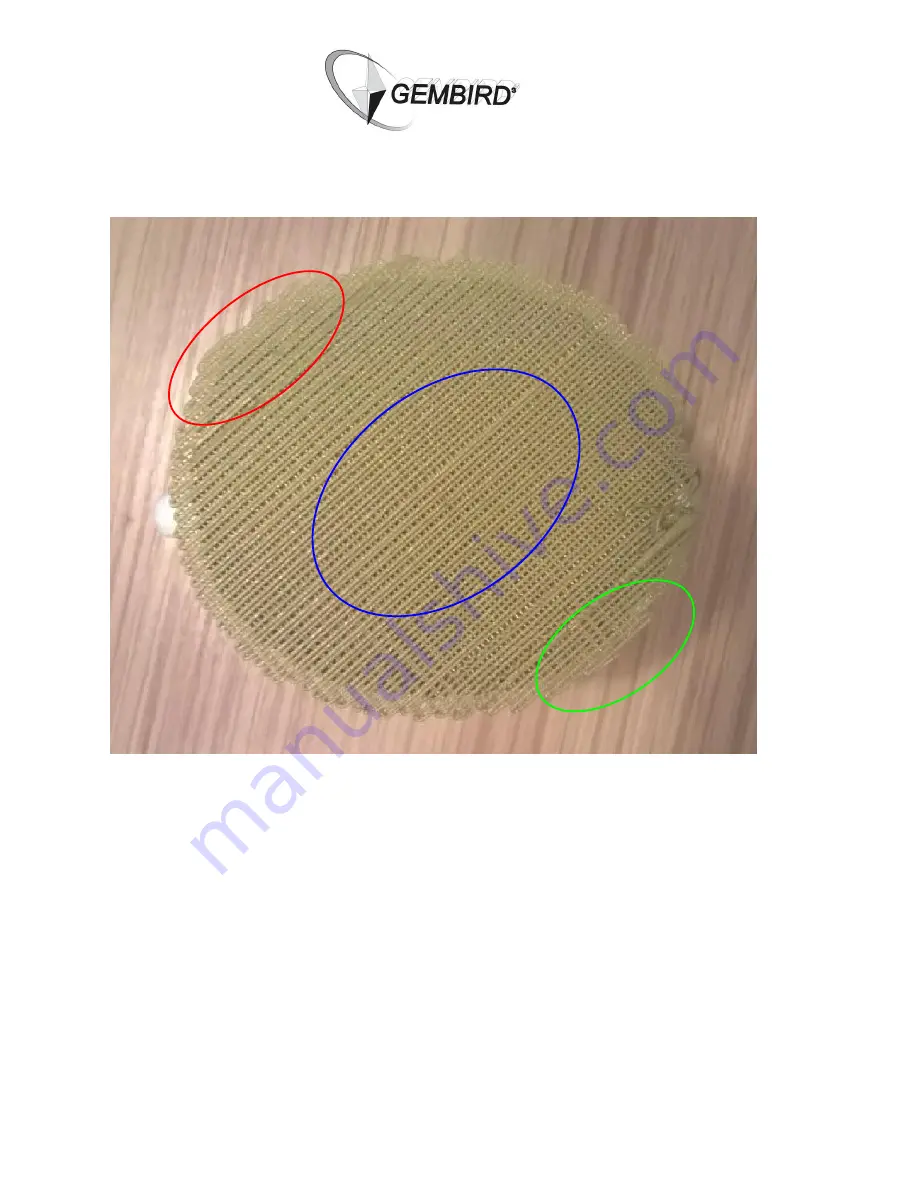
You can judge on the distance between the nozzle and the platform also from the first layers printed 
(see the picture 12 above): 

A

area: The printed filament is too thick, that means the nozzle is too close to platform.The solution is to 

increase the distance (see picture 11 above).

B

area: The filament is printed symmetrically, that means the distance between the nozzle and platform 

is optimal. 

C

area. The printed filament is too sparse, that means the nozzle is too far from the  platform.The 

solution is to decrease the distance (see picture 11 above).

(picture 12)

Summary of Contents for 3DP-D8-01

Page 1: ...Manual Model 3DP D8 01 3D Printer ...

Page 2: ...dy surface far from the air conditioners doors or windows The room temperature should be between 19 and 28 Celsius LED screen Press button SD card Knob Nozzle part Platform Power switch Print platform Power connector Nozzle parts Nozzle Filament holder Air outlet Filament pipe Nozzle wire ...

Page 3: ...lay status information Before printing Temperature setting Z move distance Speed percentage can be set 20 110 Over 110 might badly influence the print quality During printing Time spent printing Printing ready percentage Nozzle current temperature The X Y coordinates Control knob LED Display screen SD card ...

Page 4: ...is xxxxx2 gcode xxxxx1 gcode Main Move 10 mm Move 1 mm Move 0 1 mm Prepare Prepare Move X Move X Move axis Move X Move Y Move Z Extruder Move X Move Y Move Z Extruder Move axis X 000 0 Y 000 0 X 000 0 Y 000 0 Z 000 0 Extruder 000 0 000 0 X 000 0 Y 000 0 Z 000 0 Printing menu Info Screen Cool down Cool down Tune Pause print Main Nozzle 0 Nozzle2 0 Stop print ...

Page 5: ...5 Prepare printer to work 1 Install the filament roll Use the filament holder picture 4 to install the filament roll as shown on the pictures 5 and 6 picture 5 picture 4 Fillament holder picture 6 ...

Page 6: ...e filament To install the fillament roll follow pictures 7 and 8 Press the button and put the fillament to the corresponding hole at the same time as shown on pictures 9 10 picture 10 picture 8 picture 9 picture7 ...

Page 7: ...each a certain temperature first Choose from the menu Prepare Move Axis Move 0 1 mm Extrude And then turn control knob to adjust the extrusion 4 Test the extrusion To make sure the filament reaches the nozzle tip you can choose to print the file input gcode located on SD card supplied with the printer This file will make sure the filament reaches the nozzle automatically Filament ...

Page 8: ...e nozzle is too close to the platform Replace the masking tape in this case 3M Blue Tape is a good choice The distance between the nozzle and the platform can be adjusted by the screws as shown on picture 11 picture11 You can check the distance after the adjustment by choosing auto home from the menu ...

Page 9: ...d filament is too thick that means the nozzle is too close to platform The solution is to increase the distance see picture 11 above B area The filament is printed symmetrically that means the distance between the nozzle and platform is optimal C area The printed filament is too sparse that means the nozzle is too far from the platform The solution is to decrease the distance see picture 11 above ...

Page 10: ...the blue button and pull out the white tube first Then pull out the filament from the tube If you wish to change printing colors you would have to replace the filament Note please warm the nozzle to over 190 degrees Celsius before you start replacing the filament otherwise it cannot be pulled out properly Right side of the printer Left side of the printer Solution 1 Keep pressing the button while ...

Page 11: ...cratch www tinkercad com or scan the object you wish to replicate www trimensional com 2 Use slicing software to prepare a G code file We supply KISSlicer on the SD card Or use any 3rd party slicing software 3 Copy G code file to SD card and insert the SD card into the printer 5 Some patience Depending on the size of your model it might take quite a while before it is printed 6 Add some color Even...

Page 12: ...Handleiding Model 3DP D8 01 3D Printer ...

Page 13: ...geplaatst ver van airconditioners deuren of ramen De ruimte temperatuur moet tussen 19 en 28 Celsius zijn LED scherm Filament knop SD kaart Draaiknop Nozzle huis Platform Aan knop Print platform Stroom kabel Nozzle Nozzle huis Filament houder Ventilatie opening Filament buis Nozzle tube ...

Page 14: ...informatie Voor het printen Temperatuur instelling Z positie Snelheid percentage Kan ingesteld worden 20 110 Meer dan 110 kan de print kwaliteit negatief beinvloeden Tijdens het printen Tijd van het printen Percentage gereed printopdracht Nozzle huidige temperatuur De X Y coordinaten Draaiknop LED scherm SD kaart ...

Page 15: ...Move axis xxxxx2 gcode xxxxx1 gcode Main Move 10 mm Move 1 mm Move 0 1 mm Prepare Prepare Move X Move X Move axis Move X Move Y Move Z Extruder Move X Move Y Move Z Extruder Move axis X 000 0 Y 000 0 X 000 0 Y 000 0 Z 000 0 Extruder 000 0 000 0 X 000 0 Y 000 0 Z 000 0 Print menu Info Screen Cool down Cool down Tune Pause print Main Nozzle 0 Nozzle2 0 Stop print ...

Page 16: ...5 Voorbereiding voor printen 1 Filament aansluiten Gebruik de filament houder afbeelding 4 om de filament te installeren zoals op de foto s 5 en 6 afbeelding 5 afbeelding 4 Fillament houder afbeelding 6 ...

Page 17: ...oor het installeren van de filament zie afbeeldingen 7 en 8 Druk op de knop en stop het filament tegelijkertijd in het corresponderende gaatje Zoals te zien op afbeeldingen 9 en 10 afbeelding 10 afbeelding 8 afbeelding 9 afbeelding 7 ...

Page 18: ...nozzle moet eerst een bepaalde temperatuur bereiken Kies in het menu Bereid Move Axis Move 0 1 mm Extrude En draai de knop om de extrusie aan te passen 4 De extrusie testen Om ervoor te zorgen dat de filament de nozzle tip bereikt kunt u ervoor kiezen om het bestand input gcode op SD kaart met de printer meegeleverd te printen Dit bestand zal ervoor zorgen dat de filament nozzle automatisch bereik...

Page 19: ... dan is de nozzle te dicht bij het platform Vervang altijd de afplaktape als deze is beschadigd De afstand tussen nozzle en platform kan aangepast worden met de schroeven zie afbeelding 11 afbeelding 11 U kunt de afstand na de afstelling controleren door te kiezen voor auto home in het menu ...

Page 20: ...rinte filament is te dik dat betekend dat de nozzle te dicht bij het platform staat De oplossing is om de afstand te vergroten zie afbeelding 11 B De filament symmetrisch geprint dat betekend dat de afstand tussen nozzle en platform optimaal is C De filament is te dun Dat betekend dat de afstand tussen nozzle en platform te groot is Verklein deze afstand zie afbeelding 11 afbeelding 12 ...

Page 21: ...ken en trek eerst aan de witte tube Vervolgens trekt u de filament uit de tube Indien u andere kleuren wilt gebruiken voor het printen moet het filament vervangen worden Belangrijk Verwarm de nozzle tot 190 graden Celsius voordat de oude filament wordt vervangen anders kan het filament niet goed worden verwijderd Rechter zijde van de printer Linker zijde van de printer Oplossing 1 Blijf op de knop...

Page 22: ...ad com of scan het object die u wilt dupliceren www trimensional com 2 Gebruik slicing software om een G code bestand te genereren Wij leveren KISSlicer op de SD kaart Of u kunt ook andere slicing software gebruiken 3 Kopieer het G code bestand naar de SD kaart Stop de SD kaart in de printer 5 Even geduld Het hangt af van het grootte van het model wat geprint moet worden maar het duurt wel enige t...

Page 23: ... eu FR BE Déclaration de conformité Le produit est contrôlé et rempli les exigences des directives nationales et de la directive EMC 2004 108 EC La conformité CE a été démontrée et les déclarations correspondantes sont déposées chez le fabricant a www gembird eu DE Konformitätserklärung Dieses Produkt wurde getestet und stimmt mit den grundlegenden Anforderungen der Richtlinie EMC 2004 108 EC über...

Page 24: ...en accu s dienen als klein chemisch afval afgeleverd te worden bij toegewezen afvalverzamelpunten zie www afvalgids nl U dient ervoor te zorgen dat de batterijen accu s leeg zijn en dus geen stroom meer kunnen leveren Let op de batterijen accu s dienen onbeschadigd ingeleverd te worden Gooi dit product niet weg in uw vuilnisbak Dit kan zowel het milieu als de menselijke gezondheid schade toebrenge...

Page 25: ...oducts Die Garantie beträgt 24 Monate ab Verkaufsdatum an den Endverbraucher Das Kaufdatum und der Gerätetyp sind durch eine maschinell erstellte Kaufquittung zu belegen Bitte bewahren Sie Ihren Kaufbeleg daher für die Dauer der Garantie auf da er Voraussetzung für eine eventuelle Reklamation ist Innerhalb der Garantiezeit werden alle Mängel wahlweise durch den Hersteller entweder durch Instandset...

Page 26: ...de la garantie car elle est nécessaire pour toute réclamation Au cours de la période de garantie tous les défauts doivent être remplacé aux frais du fabricant soit par la réparation ou la remplacement de la pièce défectueuse ou l ensemble du produit Les travaux effectués sous garantie ne prolongent pas la période de garantie ni ne commencent pas une nouvelle période de garantie Le fabricant se rés...

Page 27: ...________ Адрес и телефон фирмы продавца ________________________________________________ М П С условиями гарантии ознакомлен и согласен Продавец _____________ Покупатель _____________ 1 Гарантійне обслуговування надається протягом терміну гарантії при наявності Гарантійного талону заповненого належним чином та виробу в повній комплектації 2 Гарантійне обслуговування не підтримується в разі порушен...

Page 28: ...some firmware and or software which is licensed under the GNU General Public License The source code of this firmware and or software will be made available upon written request Please contact us at postmaster gembird nl to obtain it Gembird Europe BV ...

Reviews: