background image

navigation

Navigation

preset edit menu upgrade 


Page9

 release 

notes

Genesys series

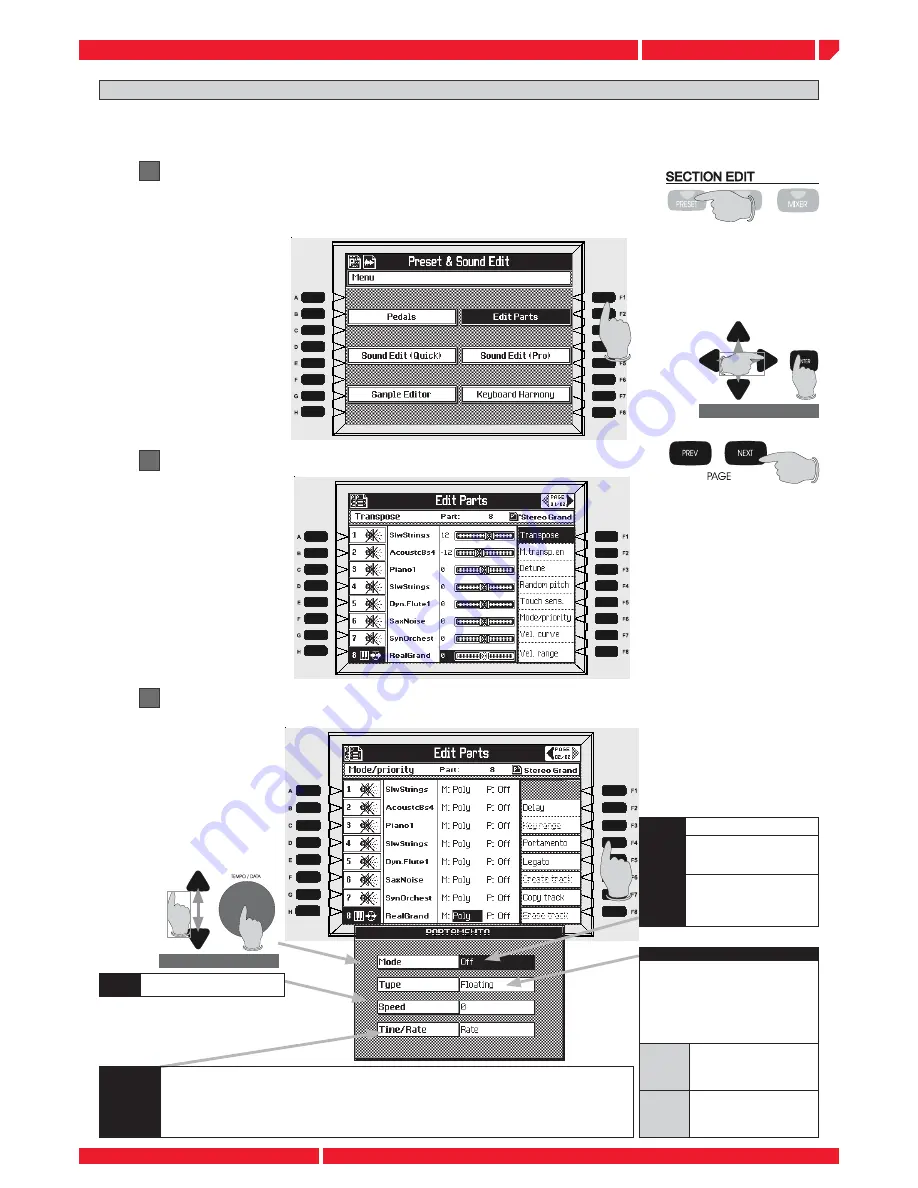
EDIT PARTS MENU: PORTAMENTO

To select the EDIT PARTS menu press F2 or use the CURSOR to select the EDIT 
PARTS, and the press ENTER to confi rm.

1

Enter the EDIT PARTS menu by pressing the PRESET button in the panel and 
then the function button [F2] 

2

Press the button [PAGE NEXT] on the panel to select the Page 2 control menu

This feature allows you to play a selected part (instrument sound) from a PRESET using the PORTAMENTO 
feature.  The portamento is a feature typically associated with acoustic instruments (i.e. violin, human voice, 
trombone) providing a frequency shift sliding effect, between two different notes (pitch). 

3

Press the function button [F4] PORTAMENTO, the control menu will appear 
on the screen 

MODE

OFF

 no portamento

NORMAL

 portamento creates 

a pitch slide whenever a new 
note is played. 

LEGATO

 activates the 

portamento effect only when 
a note is played while another 
note is still being held.

TYPE

This feature only applies when, during the 
course of sliding from one note to another, 
you play an new note somewhere in 
between the two, (which begins a separate 
portamento, [pitch slide] of it’s own). The 
TYPE setting controls where this new slide will 
commence from

Floating 

The new portamento will commence 
from the pitch which the previous 
portamento had reached when the 
new key was pressed. 

Re-Start

The new portamento will 
commence from the ultimate 
destination of the previous 
portamento.

TIME RATE

This control affects the way that the SPEED setting is interpreted. Setting this parameter to 

TIME

, the SPEED value 

controls the actual amount of time it takes to slide from any note to any other note regardless of the “distance” 
in pitch between the two. Thus the time taken to slide between any two notes will always be the same. Setting to 

RATE

, the SPEED value controls the amount of pitch change per second. This means that the time it takes to slide 

from one note to another depends entirely on the “distance” it has to travel between the two. This means that the 
time taken to slide between any two notes will be different depending on which notes are played.

SPEED 

Adjust the time taken for the 
pitch slide to occur.

Summary of Contents for genesys s

Page 1: ...D I G I T A L K E Y B O A R D S release notes Genesys series Genesys Genesys Pro with hard disk kit Genesys s Genesys s Genesys series Genesys series Genesys grand ensemble Genesys xp English...

Page 2: ......

Page 3: ...e5 Edit parts menu upgrade page8 Edit parts menu l r mode page8 Edit parts menu portamento page9 Edit parts menu legato page10 Play list programming upgrade page11 Standard midifile editing upgrade pa...

Page 4: ...ze is normally archived in a CD 2 Upgrade patch It consists of debug and optimization of the system without update the musical resource Normally the upgrade patch can be downloaded from our website an...

Page 5: ...ct the AS1 MIDI Out to the Genesys MIDI In as a main connection It is also possible to connect a second MIDI cable from the Genesys MIDI Out to the AS1 MIDI In This connection is facultative and serve...

Page 6: ...arabic scales EXAMPLE Pressing now any of the AS1 function button 1 12 the corresponding note pitch will be realtime altered in oriental style 1 4 of tone The led of the pressed button will be ON indi...

Page 7: ...lt set up is ALL This mean that detuning one note with the AS1 ALL the same notes and ALL the instruments used in your performance will be detuned even those triggered by the accompani ment tracks Exa...

Page 8: ...the remaining locations from 2 to 8 Description B Assign the USER SCALE to a Programmable Pad CREATE AN USER SCALE 3 Select KEYBOARD SCALE in the menu with the DOWN CURSOR then select USER1 by rotati...

Page 9: ...can be stored in one of the internal MEMORIES or stored in realtime by using the LOCK function F8 Please refer to the relative section in the owner manual ASSIGN A USER SCALE TO A PROGRAMMABLE PAD 1...

Page 10: ...ss the function button B or ENTER to enter the menu 2 DAMPER SOFT and SOSTENUTO can not be assigned to the single switch pedal in MULTIPEDAL mode NOTE Select MULTIPEDAL in the pedal 1 field 3 Press th...

Page 11: ...deactivates the Arranger Fade In Out Activates deactivates the Fade In Out function Tempo Increases the Tempo setting by one unit at a time Tempo Decreases the Tempo setting by one unit at a time Pun...

Page 12: ...MENU L R Mode MODE PRIORITY TRACK VALUE POLY The track play polyphonic MONO L The track play in monophonic mode with left priority MONO R The track play in monophonic mode with right priority MONO T...

Page 13: ...e only applies when during the course of sliding from one note to another you play an new note somewhere in between the two which begins a separate portamento pitch slide of it s own The TYPE setting...

Page 14: ...l now enabled 2 Press the button PAGE NEXT on the panel to select the Page 2 control menu 1 Enter the EDIT PARTS menu pressing the PRESET button in the panel and then the function button F2 This funct...

Page 15: ...first time you enable the function the display will show a screen like this The new play list title appears in the screen now press ENTER 6 Select any file from the hard disk using the CURSOR then pr...

Page 16: ...elect any of the DB LIST song files 12 For a faster song selection can be used the UP DOWN CURSOR the PAGE PREV NEXT Buttons the DIAL Select the songs the list Press ENTER to confirm the selection the...

Page 17: ...abled Select another song during the PLAY LOVE ME TENDER in the example by simply moving the CURSOR on it Once DANCING QUEEN will be finish to play LOVE ME TENDER will be automatically select but not...

Page 18: ...inter nal hard disk Allows to add music files al ready present in the DB list Allows to modify the number artist title attributes of the files Shifts a position up down a selected file in the play li...

Page 19: ...n 1 in this example select the MUTE DEMUTE function by rotating the DIAL The default mute channel is assigned to the 4 the track and the relative Midi channel where the lead track is memorized usuall...

Page 20: ...sed In this way the O S V 1 02 allows to edit midifiles music parameters without the meta event data are missing C Save the edited midifile Floppy CD Hard Disk From To Hard Disk LOCATE THE MIDIFILE TO...

Page 21: ...DIT area to access the VOLUME set up page As well as the function button F1 will recall the VOLUME page in case a different parameter has been previuosly selected The main screen visualize the tracks...

Page 22: ...ACK Select the midi track you want to change the sound using the UP DOWN CURSOR or the function buttons A H The selected track is visualized in reverse To the track n 1 is currently assigned the sound...

Page 23: ...he edited midifile It is possible to create a new midifile subfolder into the main MIDIFILE folder using the NEW FOLDER G command IMPORTANT NOTE in order to save the modified midifile sound map in a c...

Page 24: ...DIFILE TO EDIT Now see the second option of this editing procedure please refer to page 16 then the midifile you want to edit is already stored in the internal Genesys hard disk 4 Press STORE to confi...

Page 25: ...wo interesting functions 2 The SAMPLE EDITOR main page now appears in the screen The SAMPLE EDITOR main page show you the location from n 1 to n 8 the locations allows you to load user samples 3 Using...

Page 26: ...cally assigning each of the samples you have already loaded in the list its separate range of keys It arranges the samples in order according to the source note of each sample the key on the keyboard...

Page 27: ...note could not be automati cally recognized by the instrument In this case select the ROOT note field on the display then input the ROOT note manually by rotating the DIAL The sample ROOT note is the...

Page 28: ...ss the button F8 AUTO ASSIGN After a few seconds each sample is automatically assigned to a keyboard zone Save the multisample by pressing the function button F2 SAVE 6 For the details about the SAVE...

Page 29: ...use with a MIDI accordion SELECTING BASS SPLIT Enabling the accordion set up 1 the BASS SPLIT mode allows you to play your accordion in real time without the arrangements playing the active voice pres...

Page 30: ...RDION 2 The ACCORDION set up 2 works without the MIDI common channel activation In this case all the realtime MIDI channels of the Genesys are re arranged in order to lead the three accordion sections...

Page 31: ...p data of the instrument Preset Style preset User style User sounds etc 1 Press the DISK button on the panel and select RAM The display shows in the column on the right the folders containing the edit...

Page 32: ...ralmusic S p A Via delle Rose 12 47842 S Giovanni in Marignano RN Italy Tel 39 0541 959511Fax 39 0541 957404 www generalmusic com Specifications are subject to change without prior notice PRINTED IN I...

Reviews: