


D
IRECTION
5750007-1EN, R
EV
. 1
LOGIQ E10 B
ASIC
S
ERVICE
M
ANUAL
8 - 46
Section 8-6 - Replacing Covers and Bumpers
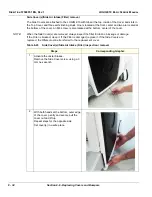
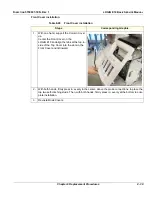
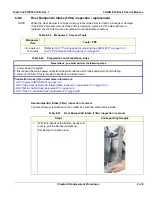
Rear Cover/Air Exhaust removal
The Rear Cover is attached to the LOGIQ E10 with four self-tapping screws, two on each side. These
mounting screws are screwed into plastic. Use care during installation, DO NOT overtighten.
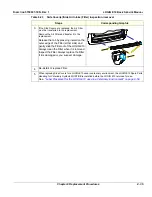
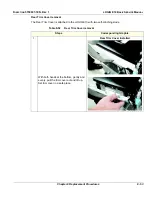
Table 8-42 Rear Cover/Air Exhaust removal
Steps
Corresponding Graphic
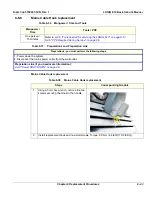
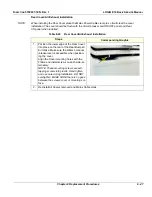
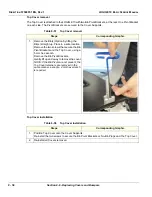
1.
Remove the two Phillips screws on each
side of the Rear Cover that secure the rear
cover to the Frame.
Lift the Rear Cover away.
Summary of Contents for LOGIQ E10
Page 1: ...LOGIQ E10 Basic Service Manual 5750007 1EN Rev 1 Version R1 2018 GENERAL ELECTRIC COMPANY...
Page 2: ......
Page 4: ...DIRECTION 5750007 1EN REVISION REV 1 LOGIQ E10 BASIC SERVICE MANUAL ii...
Page 5: ...DIRECTION 5750007 1EN REV 1 LOGIQ E10 BASIC SERVICE MANUAL iii...
Page 6: ...DIRECTION 5750007 1EN REVISION REV 1 LOGIQ E10 BASIC SERVICE MANUAL iv...
Page 7: ...DIRECTION 5750007 1EN REV 1 LOGIQ E10 BASIC SERVICE MANUAL v...
Page 8: ...DIRECTION 5750007 1EN REVISION REV 1 LOGIQ E10 BASIC SERVICE MANUAL vi...
Page 9: ...DIRECTION 5750007 1EN REV 1 LOGIQ E10 BASIC SERVICE MANUAL vii...
Page 10: ...DIRECTION 5750007 1EN REVISION REV 1 LOGIQ E10 BASIC SERVICE MANUAL viii...
Page 11: ...DIRECTION 5750007 1EN REV 1 LOGIQ E10 BASIC SERVICE MANUAL ix...
Page 12: ...DIRECTION 5750007 1EN REVISION REV 1 LOGIQ E10 BASIC SERVICE MANUAL x...
Page 13: ...DIRECTION 5750007 1EN REV 1 LOGIQ E10 BASIC SERVICE MANUAL xi...
Page 14: ...DIRECTION 5750007 1EN REVISION REV 1 LOGIQ E10 BASIC SERVICE MANUAL xii...
Page 34: ...DIRECTION 5750007 1EN REV 1 LOGIQ E10 BASIC SERVICE MANUAL xxxii Hardware Kit 9 49...
Page 776: ...DIRECTION 5750007 1EN REV 1 LOGIQ E10 BASIC SERVICE MANUAL Index 4...
Page 777: ......


