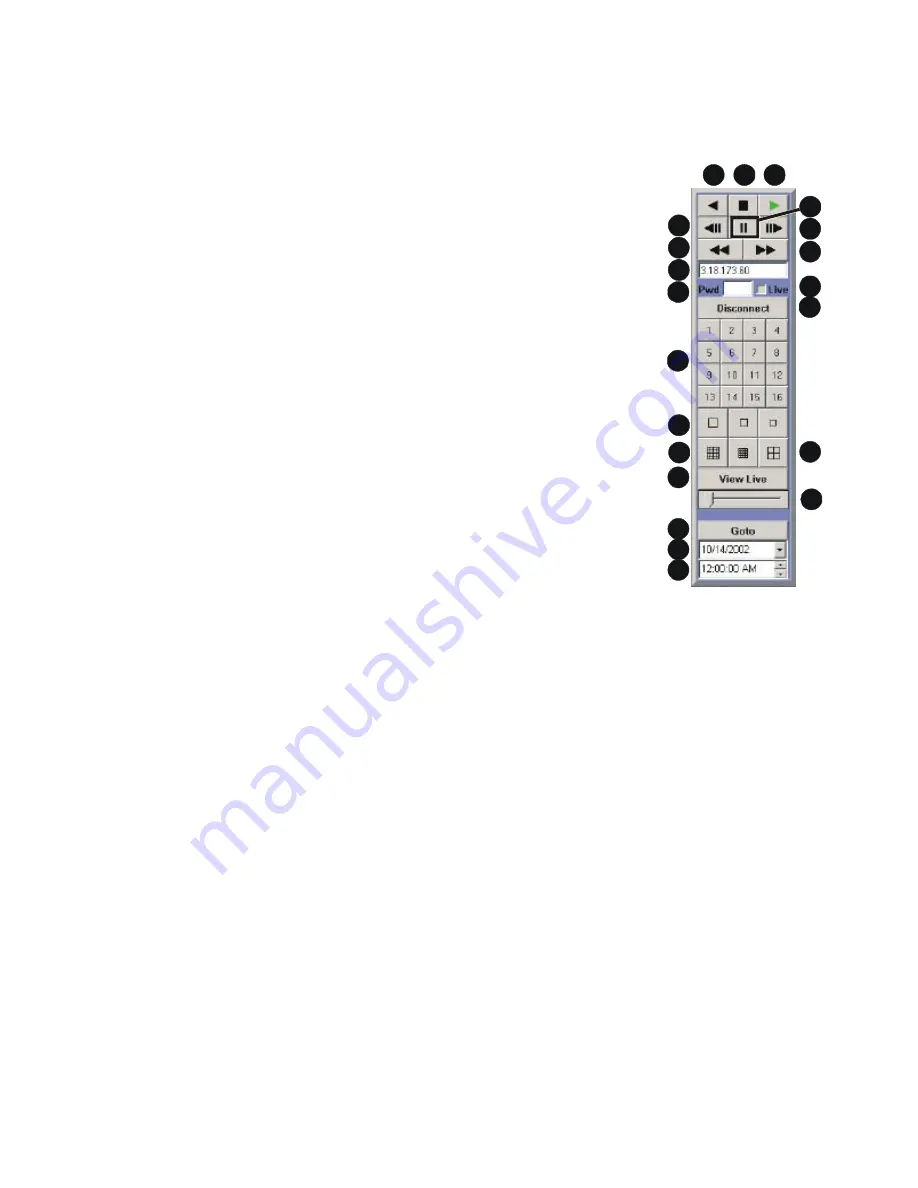
The Button Panel
1. Play Backward button:
Click on this button to playback video in
reverse.
2. Stop button:
Click on this button to halt all playback operations. The
Play Pointer Slider Bar moves to the start of data.
3. Play Forward button:
Click on this button to playback video.
4. Single Frame Rewind button:
Click on this button to rewind the video a
single frame.
5. Pause button:
Pauses playback until the Pause button is pressed
again. Clicking any of the buttons, except Stop will also resume
playback. The Play Pointer slider bar stays at the current position while
paused.
6. Single Frame Advance button:
Click on this button to advance the
video a single frame.
7. Rewind button:
Click on this button to perform high-speed reverse
playback.
8. Fast Forward button:
Click on this button to perform high-speed
playback.
9. IP Address Field:
Enter the unit’s IP address.
10. Password Field:
Enter the unit’s password, if necessary.
1
2
3
4
6
7
8
9
14
15
18
19
20
21
17
16
12
13
11
10
5
11. Live check box:
Click in this box to enable live viewing before connecting.
12. Connect/Disconnect button:
Click on this button(s) to connect to the unit.
13. Number buttons:
Press any of these buttons to call up individual cameras for display. When
connected to a unit that has more than 16 cameras, click on one of the multiscreen buttons to cycle
through the remaining cameras.
14. Single Camera Display Size:
Choose from Small, Medium, or Large.
15. 16-way Multiscreen button:
Choose from a Medium 16-way, or Large 16-way.
16. 4-way Multiscreen button:
Selects a Large 4-way display.
17. View Live Button:
Click on this button while connected to view live video.
18. Play Pointer Slider Bar:
The Play Pointer slider bar advances to the right to indicate the playback
position on the disk. The user can drag the bar to navigate forward or backward.
19. Goto Button:
Click on this button to go to the selected date for the drop down time and date boxes.
20. Drop down Date Selection Menu:
Click on this field to display a graphic calendar to select a date to
view.
21. Time Selection Menu:
Click on the Up or Down Arrows to select a specific time to view.
The Drop Down Volume List Box
Click on the arrow to display a list of available disk volumes on the connected unit. Click on the volume to
select.
Summary of Contents for DSR-2000e
Page 1: ...DSR 2000e ...
Page 14: ......
Page 44: ......
Page 54: ......
Page 64: ......
Page 66: ...Function Setting WINS Disabled Audio Record Setting Off ...


