


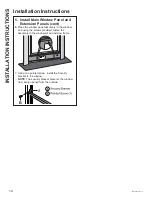


4
49-5000544 Rev. 4
Features and appearance will vary.
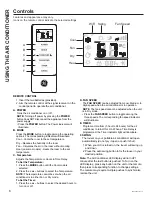
Lights next to the buttons on the air conditioner control panel indicate the selected settings.
A. Control Panel Display
Displays the Set Temperature in degrees Fahrenheit or
degrees Celsius, or the hours remaining in a Time Delay.
B. Power Button
Turns the air conditioner on or off.
NOTE
: Turning off power by pressing the
Power
button
does NOT disconnect the appliance from the power
supply.
Press the
Power
Button. The power indicator and
7HPSHUDWXUHGLVSOD\ZLOO,OOXPLQDWH6HOHFWGHVLUHG
settings. After one minute, the display lights will turn off.
Press any button on the unit or the remote, the display
will illuminate. Then press corresponding buttons to
change unit function.
Note:
if changing functions from the remote, it may
require multiple presses to synchronize remote to the unit.
C. Mode Button
Press the
Mode
button to toggle among the operating
options. The corresponding indicator will illuminate:
Cool
– Cools the room to the set temperature
Fan
– Circulates the air in the room without cooling
Dry
– Reduces the humidity in the room
Heat
RQVRPHDWVWKHURRPWRWKHVHW
temperature
D. Fan Speed Button
The fan speed can be adjusted from Low, Medium, to
High speed when the air conditioner is in operation.
NOTE
: The fan speed cannot be adjusted when the unit
is in Dry or Sleep modes.
Press the
Fan
speed button to toggle among the three
speeds. The corresponding fan speed indicator will
illuminate.
E. Timer / Temperature Set Controls
Adjusts the Temperature or Hours in Time Delay.
To Set the Temperature:
1. Press the
Mode
button until the Cool mode is
selected.
2. Press the
Up Arrow
or
Down Arrow
buttons to select
the desired temperature.
NOTE
: The temperature cannot be set when the air
conditioner is in either Fan or Dry mode.
NOTE:
The Up Arrow and Down Arrow buttons, when
pressed at the same time, allow you to select between
displaying the temperature in ºF or ºC.
F. Timer Button
3URJUDPDWLPHIURPKRXUWRKRXUVIRUWKHDLU
conditioner to turn Off or On. When a Time Delay is
programmed, the Timer indicator light will illuminate.
While the air conditioner is operating:
1. Press the
Timer
button.
2. Press the
Up/Down Arrow
buttons to select the
number of hours you want the air conditioner to
continue to operate before turning Off.
NOTE:
Wait approximately 5 seconds for the Turn-Off
time to be saved.
While the air conditioner is off:
1. Press the
Timer
button.
2. Press the
Up/Down Arrow
buttons to select the
number of hours you want the air conditioner to
remain off before turning On.
NOTE
: Wait approximately 5 seconds for the Turn-On
time to be saved.
To cancel the timer:
• Press the Timer button once, the hours remaining will
flash, press the timer button again and the timer will be
canceled.
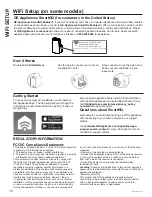
To turn on WiFi:
1. Press and hold the
Timer
button for 3 seconds to turn
on the WiFi function.
Refer to the “WiFi Set up” section for more information
on how to connect your Portable AC to your router and
installing the HQ App.
G. Sleep
Press the
Sleep
button to activate sleep mode, press
again to cancel.
The fan speed will automatically change to low speed
and cannot be adjusted. The temperature will rise after
2 and 4 hours to ensure your comfort overnight.
H. Auto Swing
The louver on your portable air conditioner will open
automatically when you turn it on (do not pry it open or
SXVKLWVKXW
1. When your AC is turned on, the louver will swing up
and down.
2. You can press the
Auto Swing
button to fix the louver
in your desired position
Controls
USING THE
AIR CONDITIONER
F
G
RQVRPHPRGHOV
A
C
B
D
E
H


