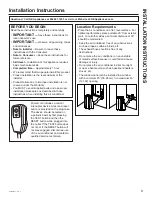
background image

4

49-5000544   Rev. 4

Las luces al lado de las teclas de toque en el panel de control del acondicionador de aire indicarán los ajustes 
seleccionados. Las funciones y el aspecto pueden variar.

USO 

DEL

 ACONDICIONADOR 

DE AIRE

Controles

A.  Pantalla del Panel de Control


Exhibe la Temperatura Configurada en grados Fahrenheit o 
en grados Celsius, o las horas restantes en Time Delay.

B.  Botón de Encendido 

Activa 

ON/OFF

 en el acondicionador de aire. 

NOTA

: Apagar el encendido presionando el botón Power  

NO desconecta el electrodoméstico del suministro de 
corriente. 
Presione el botón 

Power 

(Encendido). La pantalla del 

indicador de encendido y temperatura se iluminará; 
seleccione las configuraciones deseadas luego de un 
minuto una vez que las luces de Display (Pantalla) se hayan 
apagado. Presionar cualquier botón de la unidad o unidad 
remota hará que la pantalla se ilumine. Luego presione los 
botones correspondientes para cambiar la función de la 
unidad. 

Nota:

 Si se cambian las funciones desde el control remoto, 

se podrá requerir presionar botones varias veces para 
sincronizar el control remoto con la unidad. 

C.  Botón de Modo 

Presione el botón 

Mode

 para pasar a través de las opciones 

de funcionamiento. El indicador correspondiente se 
iluminará: 

Cool

±5HIULJHUDODVDODHQODWHPSHUDWXUDFRQILJXUDGD


Dry

±5HGXFHODKXPHGDGGHODVDOD


Fan

±+DFHFLUFXODUHODLUHGHODVDODVLQUHIULJHUDU


Heat

HQDOJXQRVPRGHORV±FDOLHQWDODKDELWDFLyQSDUD

ajustar la temperatura.

D.  Botón de Velocidad del Ventilador


La velocidad del ventilador se podrá ajustar desde Low, 

LJKFXDQGRHODFRQGLFLRQDGRUGHDLUHVH

encuentre en funcionamiento. 

NOTA

: La velocidad del ventilador no se podrá ajustar 

cuando la unidad se encuentre en los modos DRY o Sleep. 
•  Presione el botón de velocidad 

Fan

 para alternar entre las 

tres velocidades. El indicador de velocidad del ventilador 
correspondiente se iluminará.

E.  Controles de Configuración del Temporizador / 

Temperatura


$MXVWD7HPSHRXUVHQ7LPH'HOD\

To Set the Temperature:


3UHVLRQHHOERWyQ0RGHKDVWDTXHVHVHOHFFLRQHHOPRGR

Cool.

3UHVLRQHORVERWRQHV8S$UURZR'RZQ$UURZSDUD

seleccionar la temperatura deseada.

NOTA

: La temperatura no se podrá configurar cuando el 

acondicionador de aire se encuentre en el modo Fan o en 
Dry.

NOTA:

/RVERWRQHV8S$UURZ\'RZQ$UURZFXDQGR

se presionen al mismo tiempo, le permitirán realizar la 
selección para exhibir la temperatura en °F o °C. 

F.  Botón del Temporizador


3URJUDPHXQWLHPSRGHVGHKRUDKDVWDKRUDVSDUDTXHHO

acondicionador se configure en Off u On. Cuando se programe 

Time Delay

, la luz indicadora de Timer se iluminará. 

Mientras el acondicionador de aire se encuentre en 
funcionamiento:


3UHVLRQHHOERWyQ

Timer

2.  Presione los botones 

Up/Down Arrow

 para seleccionar 

la cantidad de horas que desea que el acondicionador de 
aire continúe funcionando antes de que se apague.

NOTA:

(VSHUHDSUR[LPDGDPHQWHVHJXQGRVKDVWDTXHHO

tiempo de Apagado quede registrado.

Mientras el acondicionador de aire se encuentre apagado:


3UHVLRQHHOERWyQ

Timer

2.  Presione los botones 

Up/Down Arrow

 para seleccionar 

la cantidad de horas que desea que el acondicionador de 
aire permanezca apagado antes de encender el mismo.

NOTA

(VSHUHDSUR[LPDGDPHQWHVHJXQGRVKDVWDTXHHO

tiempo de Encendido quede registrado.

Para cancelar el temporizador:


•  Presione el botón 

Timer

 una vez; el indicador de horas 

restantes parpadeará; presione el botón del temporizador 
nuevamente y el temporizador se cancelará.
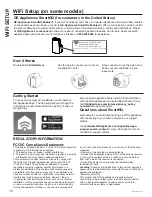
Encienda el WiFi:


0DQWHQJDSUHVLRQDGRHOERWyQ7LPHUGXUDQWHVHJXQGRV

para encender la función WiFi.

&RQVXOWHODVHFFLyQGH³&RQILJXUDFLyQGHO:L)L´SDUD

acceder a más información sobre cómo conectar su 
acondicionador de aire portátil a su enrutador e instalar la 

DSO4

G.  Sleep (Inactivo)


Presione el botón Sleep para activar el modo de inactividad, 
y presione el mismo nuevamente para cancelarlo. 
La velocidad del ventilador pasará de forma automática a 
velocidad baja y no se podrá ajustar. La temperatura se 
incrementará luego de entre 2 y 4 horas, a fin de asegurar 
su confort durante la noche.

H.  Auto Swing (Balanceo Automático)


La rejilla de su acondicionador de aire portátil se abrirá de 
forma automática cuando lo encienda (no la abra con fuerza 
ni la presione para su cierre). 

&XDQGRVXDFRQGLFLRQDGRUGHDLUHHVWpHQFHQGLGROD

rejilla realizará el balanceo hacia arriba y abajo.

8VWHGSXHGHSUHVLRQDUHOERWyQ$XWR6ZLQJSDUDILMDUOD

rejilla en la posición deseada.

F

G


(on some models)

A

C

B

D

E

+

Summary of Contents for APLS07

Page 1: ...AIR CONDITIONER Portable Room 49 5000544 Rev 4 10 23 APCD07 APWD07 APCD08 APWD08 APSD08 APCD10 APWD10 APXD10 APLS07 APLS08 APLS10 APLH10 IMPORTANT SAFETY INFORMATION 3 CONTROLS 4 CARE AND CLEANING 7 I...

Page 2: ...s into every GE Appliances product and we think you will too Among other things registration of your appliance ensures that we can deliver important product information and warranty details when you n...

Page 3: ...r to clean other than those recommended by the manufacturer The appliance shall be stored in a room without continuously operating ignition sources for example open flames an operating gas appliance o...

Page 4: ...desired temperature NOTE The temperature cannot be set when the air conditioner is in either Fan or Dry mode NOTE The Up Arrow and Down Arrow buttons when pressed at the same time allow you to select...

Page 5: ...dehumidifying effects To set the Dry mode Press the MODE button until the Dry indicator light is lit Q WKH U PRGH D VHW WHPSHUDWXUH ZLOO QRW EH GLVSOD HG After Dry mode has been set the display will c...

Page 6: ...perature NOTE The temperature cannot be set when the air conditioner is in either Fan or Dry mode To Set the Timer 1 Press the or buttons to select the desired hours to turn on or off D FAN SPEED The...

Page 7: ...ust particles trapped in the filter 5 Reinstall the filters onto the panels 6 Replace both filter panels 7 Plug in or reconnect power CLEANING 1 Unplug or disconnect power 2 Use only a soft cloth damp...

Page 8: ...E AND CLEANING Internal Water Tank The Water Full indicator FL on the control panel GLVSOD LOOXPLQDWHV ZKHQ WKH LQWHUQDO ZDWHU WDQN KDV filled with condensed water The unit will not cool until the tan...

Page 9: ...these instructions for local inspector s use IMPORTANT Observe all governing codes and ordinances Note to Installer Be sure to leave these instructions with the Consumer Note to Consumer Keep these in...

Page 10: ...es PARTS INCLUDED Appearance may vary 1 2 3 4 8 7 5 6 9 10 11 12 3 Exhaust Hose Assembly Remote Control DWWHULHV Phillips head screwdriver 1RW QFOXGHG TOOLS YOU WILL NEED Window Mounting Kit 1 pc 20 C...

Page 11: ...dow openings Appearance may vary Window Opening 20 Center Panel Only LQGRZ 2SHQLQJ HQWHU 3DQHO WHQVLRQ LQGRZ 2SHQLQJ HQWHU 3DQHO WHQVLRQ LQGRZ 2SHQLQJ HQWHU 3DQHO DQG WHQVLRQV LQGRZ 2SHQLQJ HQWHU 3DQH...

Page 12: ...hose WARNING Excessive Weight Hazard Use two or more people to move and install air conditioner Failure to do so can result in back or other injury 3 Assemble Exhaust Hose Assembly and Mount to Back o...

Page 13: ...8VH WKH IRDP VWULSV DQG EUDFNHWV SURYLGHG WR secure the extension panels that will fit the window opening Double Hung Window Sliding Window Installation Instructions INSTALLATION INSTRUCTIONS 5 Instal...

Page 14: ...ension Panels cont 6 Place the window panel assembly in the window and using the screws provided fasten the assembly to the window sill and window frame 7 Using one pointed screw install the Security...

Page 15: ...mote control is not working Batteries are dead Replace the batteries Batteries are installed incorrectly Make sure the batteries are inserted in the correct position Air conditioner is working but the...

Page 16: ...elect Models Only 7KLV SURGXFW KDV L L FDSDELOLW DQG UHTXLUHV QWHUQHW connectivity and a wireless router to enable interconnection with an Energy Management System and or with other external devices s...

Page 17: ...ecting facilities Failure of the product resulting from modifications to the product or due to unreasonable use including failure to provide reasonable and necessary maintenance Replacement of house f...

Page 18: ...at are available while your warranty is still in effect You can purchase it on line anytime GE Appliances Services will still be there after your ZDUUDQW H SLUHV Q WKH 86 GEAppliances com extended war...

Page 19: ...neral Electric Company Fabricado bajo licencia de marca MANUAL DEL PROPIETARIO Y INSTRUCCIONES DE INSTALACI N INFORMACI N IMPORTANTE DE SEGURIDAD 3 CONTROLES 4 CUIDADO Y LIMPIEZA 7 INSTRUCCIONES DE IN...

Page 20: ...y creemos que usted tambi n Entre otras cosas el registro de su electrodom stico asegura que podamos entregarle informaci n importante del producto y detalles de la garant a cuando los necesite Regis...

Page 21: ...ongelaci n o para limpiar no use ning n m todo que no sea el recomendado por el fabricante Este electrodom stico deber ser guardado en una sala donde no haya fuentes de encendido continuas por ejemplo...

Page 22: ...temperatura deseada NOTA La temperatura no se podr configurar cuando el acondicionador de aire se encuentre en el modo Fan o en Dry NOTA RV ERWRQHV 8S UURZ RZQ UURZ FXDQGR se presionen al mismo tiemp...

Page 23: ...ra de DRY Seco est encendida En el modo DRY Seco no se mostrar una temperatura configurada 8QD YH FRQILJXUDGR HO PRGR 5 6HFR OD SDQWDOOD YROYHUi D mostrar la temperatura ambiente NOTA Si pasa de una c...

Page 24: ...a arriba o hacia abajo para seleccionar la temperatura NOTA La temperatura no se puede fijar si el acondicionador GH DLUH HVWi HQ HO PRGR DQ 9HQWLODGRU R 5 Deshumidificar D FAN SPEED La funci n FAN SP...

Page 25: ...ORV SDQHOHV 6 Reemplace ambos paneles de los filtros 7 Enchufe o vuelva conectar la corriente LIMPIEZA HVHQFKXIH R GHVFRQHFWH HO VXPLQLVWUR GH HQHUJtD 2 til solamente un pa o dulce humedecido con agua...

Page 26: ...ecuado o hasta un drenaje en el piso Aseg rese de usar un recipiente grande se recomienda uno de 3 galones o m s y monitoree el nivel de agua del recipiente de forma continua La unidad no se apagar cu...

Page 27: ...del inspector local IMPORTANTE Observe todos los c digos y rdenes de ley Nota al instalador VHJ UHVH GH GHMDU HVWDV instrucciones con el consumidor Nota al consumidor RQVHUYH HVWDV LQVWUXFFLRQHV para...

Page 28: ...5 6 9 10 11 12 3 8Q GHVWRUQLOODGRU GH HVWUHOOD No incluido HERRAMIENTAS QUE NECESITAR S Ensamble de la Manguera de Salida Control Remoto Pilas 2 LW GH 0RQWDMH WLSR 9HQWDQD SLH D 3DQHO HQWUDO GH SLH D...

Page 29: ...variar EHUWXUD GH 9HQWDQD GH Panel Central nicamente EHUWXUD GH 9HQWDQD GH D 3DQHO HQWUDO WHQVLyQ GH EHUWXUD GH 9HQWDQD GH D 3DQHO HQWUDO WHQVLyQ GH EHUWXUD GH 9HQWDQD GH D 3DQHO HQWUDO WHQVLRQHV GH...

Page 30: ...guera de salida aproximadamente GHVGH FDGD H WUHPR WRUQLOOH ORV DGDSWDGRUHV sobre los extremos de la manguera girando en sentido horario hasta que queden asegurados Inserte el adaptador redondo en la...

Page 31: ...laci n 9HQWDQD FRQ Dos Ganchos 9HQWDQD RUUHGL D 3DQHO GH 9HQWDQD Principal 3DQHO GH 9HQWDQD Principal 45Principal y los Paneles Extensibles cont Para ventanas de vinilo nicamente Dir jase al paso 6 si...

Page 32: ...ensamble del panel de ventana en la ventana y usando los tornillos provistos ajuste el ensamble al alf izar de la ventana y al marco de la ventana 8WLOL DQGR XQ WRUQLOOR GH SXQWD LQVWDOH HO VRSRUWH GH...

Page 33: ...nsertadas de forma incorrecta Aseg rese de que las pilas se inserten en la posici n correcta El acondicionador de aire est funcionando perola habitaci n no se enfr a La temperatura de la habitaci n es...

Page 34: ...PD GH DGPLQLVWUDFLyQ GH HQHUJtD R FRQ RWURV GLVSRVLWLYRV sistemas o aplicaciones externos C mo Funciona HVFDUJXH OD SOLFDFLyQ GH 6PDUW 4 8VH OD DSOLFDFLyQ SDUD FRQHFWDU VX acondicionador de aire para...

Page 35: ...ada contacte a su vendedor minorista o instalador Usted es responsable de brindar instalaciones de conexi n el ctrica adecuadas DOOD GHO SURGXFWR FRPR UHVXOWDGR GH PRGLILFDFLRQHV VREUH el mismo o debi...

Page 36: ...t n disponibles mientras su garant a a n est vigente La puede adquirir en cualquier momento a trav s de Internet Los Servicios de GE Appliances a n HVWDUiQ DOOt FXDQGR VX JDUDQWtD FDGXTXH Q 88 GEAppli...

Reviews: