background image

15    |    Advanced programming - building a macro

Building a macro

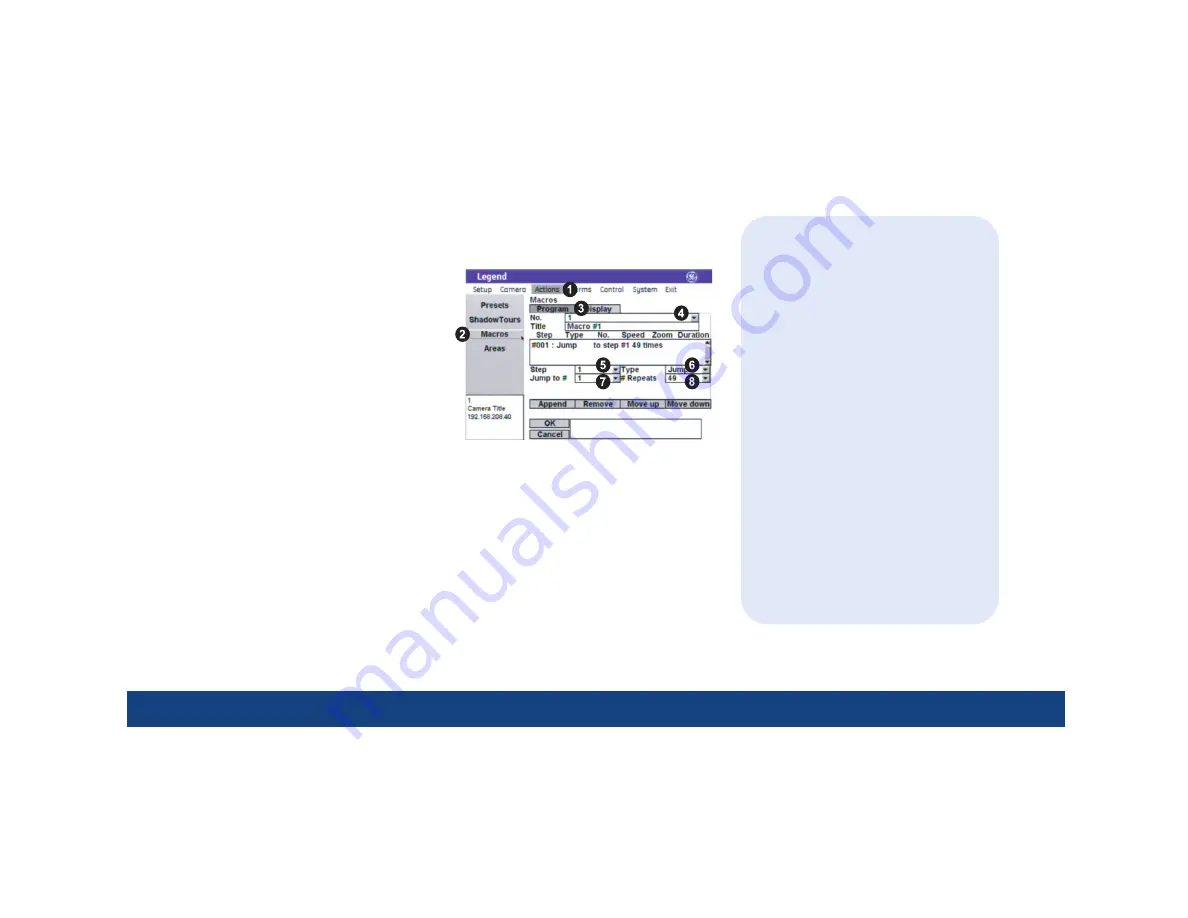
Macros are programmed routines. You can program up to 32 macros per dome and each macro can
contain up to 16 steps.

To program a macro:
1. Access the menus (page 5).
2. Select 

Actions

Macros

, and the 

Program

 tab.

3. Select a macro number.
4. Macros have no steps initially. You can add

and program steps one at a time or you can
add up to 16 steps and go back to program
them. Select the 

Append

 button to add steps.

Note:

Select a step and select the 

Remove

 button to

remove individual steps that you do not want.

5. Select a step number that you want to program or reprogram.
6. Select an action for the selected step using the options in the 

Type

 drop-down box. The step

type selected determines what additional options are available.

7. Select the specific number for the selected action. For example, preset number 14.
8. If you selected a jump as the action for the step, also select how many times you want the

jump step to repeat.

9. If you selected a preset or tour as the action for the step, also select: first, the speed for how

fast the camera will move to that preset or tour, and second, the transition of the video on the
monitor screen (freeze or zoom out) while the camera moves to that preset or tour. See 

TIPs

.

10. If you selected a preset or relay as the action for the step, also select the duration for how

long the action for the step continues.

11. If you selected a relay as the action for the step, also select whether the relay is to be set to its energized state (check box checked) or not. See 

TIPs

.

12. Complete steps 4 through 11 for additional steps in the macro.
13. Complete steps 3 through 11 for additional macros.

TIPs

When changing settings on any program-
ming page, you need to confirm the new
settings by selecting 

OK

 on that page.

The macro list shows the defined steps
for the macro in sequential order.

The 

Append

 button adds one step to the

bottom of a macro’s list of steps.

The 

Remove

 button deletes the currently

selected step from the macro.

The 

Move up

 and 

Move down

 buttons

move the currently selected step up or
down one step in the macro list each
time 

they are

 selected.

The 

Freeze

 option freezes the last image

on the monitor screen while the camera
is moving.

The 

Zoom out

 option zooms the camera

out before it moves, remains zoomed out
while the camera is moving, and
reestablishes the zoom setting when the
camera arrives at its destination.

Energized relay states are closed for
normally open connections and open for
normally closed connections.

Summary of Contents for Security Lend Camera

Page 1: ...g Legend Quick Guide GE Security...

Page 2: ...igating 5 Introduction TIP You ll find special items such as Tips and Cautions in the page margins These items make setup and basic operation easier Copyright 2005 GE Security Inc All rights reserved...

Page 3: ...2 VDC BIAS SWITCH 7 8 9 10 6 5 3 2 1 4 RS485 A B A B AUDIO KEYPAD RS485 RS485 A B RS422 IN RS422 OUT SPEAKER SHIELD SPEAKER REMOVABLE TERMINAL STRIP EARTH GROUND 7 8 9 10 6 5 3 2 1 4 POWER 12 VDC BIAS...

Page 4: ...ple conductor cable instead of individual single pair cables If heaters are present route all cables away from them ETHERNET COAXIAL VIDEO INTERCONNECT CARD DATA 2 I C 3 I C 4 I C 5 I C 6 O C N O N C...

Page 5: ...or positions A through F For the PROTOCOL switch the values are as follows Switch Value 0 GE Digiplex RS 422 4800 baud 1 GE Impac RS 485 9600 baud 2 For future use 3 For future use 4 For future use 5...

Page 6: ...ey until you hear a beep and the programming code display appears on the keypad s LCD 2 Press the 9 5 1 and seq seq keys 3 Press 3 on keypads of version 1 2 09 or later to select CAMERA If using a key...

Page 7: ...ands using the joystick While controlling live video the joystick is a video controller When the joystick is a video controller you will use the keys of the keypad to enter commands Joystick as simula...

Page 8: ...ss store store on the keypad 3 Press the number keys on the keypad that correspond to the preset number you want to assign for this view 4 Press store store again 5 Optional Verify your individual pre...

Page 9: ...manual for details ShadowTours You have a total of 16 ShadowTours totaling 20 minutes that you can define for each dome A ShadowTour is a tour that the camera learns stores in memory by recording your...

Page 10: ...rmance conditions Menu tree The menu tree guides you to the dome s programmable features Self explanatory features have been collapsed Setup Camera Actions Alarms Control System Memory Privacy Masks P...

Page 11: ...t in the same tilt hemisphere positive or negative You can set them in either tilt hemisphere but you cannot cross hemispheres meaning that you cannot pass the bottommost point or turn the camera upsi...

Page 12: ...the first scenario you must issue a command to return to the Auto setting of Exposure Control Using the iris key on the keypad manually adjusts the camera s iris setting or shutter speed overriding th...

Page 13: ...the alarms from the highest to the lowest 12 Advanced programming alarms TIP When changing settings on any program ming page you need to confirm the new settings by selecting OK on that page Alarms Y...

Page 14: ...ou need to confirm the new settings by selecting OK on that page Most keypads have a limited number of preset numbers they can call which will limit how many commands can be remapped If you are using...

Page 15: ...for complete details when necessary Moving titles Most titles are defaulted to align down the center of the screen and across the bottom See System defaults on page 17 You can however move titles to...

Page 16: ...eo on the monitor screen freeze or zoom out while the camera moves to that preset or tour See TIPs 10 If you selected a preset or relay as the action for the step also select the duration for how long...

Page 17: ...hear a beep and the programming code display appears on the keypad s LCD 2 At the ENTER PROGRAMMING CODE display enter the reset access code by pressing 1 4 7 6 and seq 3 At the RESET TO DEFAULTS disp...

Page 18: ...an limits Off Passcodes Off blank Phase adjustment 50 Phase lock enabled Off System defaults Programming settings Default Power on Off Preset title duration Infinite Privacy mask color Gray Relay 1 Re...

Page 19: ...he dome on page 16 I can t get the programming interface to close Reset cycle the power to the dome by turning the power off then on See Resetting the dome on page 16 Index presets 7 privacy masks 11...

Reviews: