LaserPro C180 User Manual
65
Paper Size (Paper Page)
The paper size represents your total work area. Ensure that the paper size is never set greater than
the C180’s worktable area of 18" x 12" (458 mm x 309 mm). The X value represents the length and the
Y value represents the width.
NOTE
When using the optional rotary attachment system and with the Rotary Fixture option
checked, the X value represents the length of your working piece. The Y value will be
changed to Diameter, which represents the diameter of your working piece (at the
position you wish to engrave).
Unit (Paper Page) [DEFAULT SETTING: Metric (mm)]
Here you can set your preferred measurement standard in which you would like use with the C180
print driver. You can choose between metric or imperial standards.
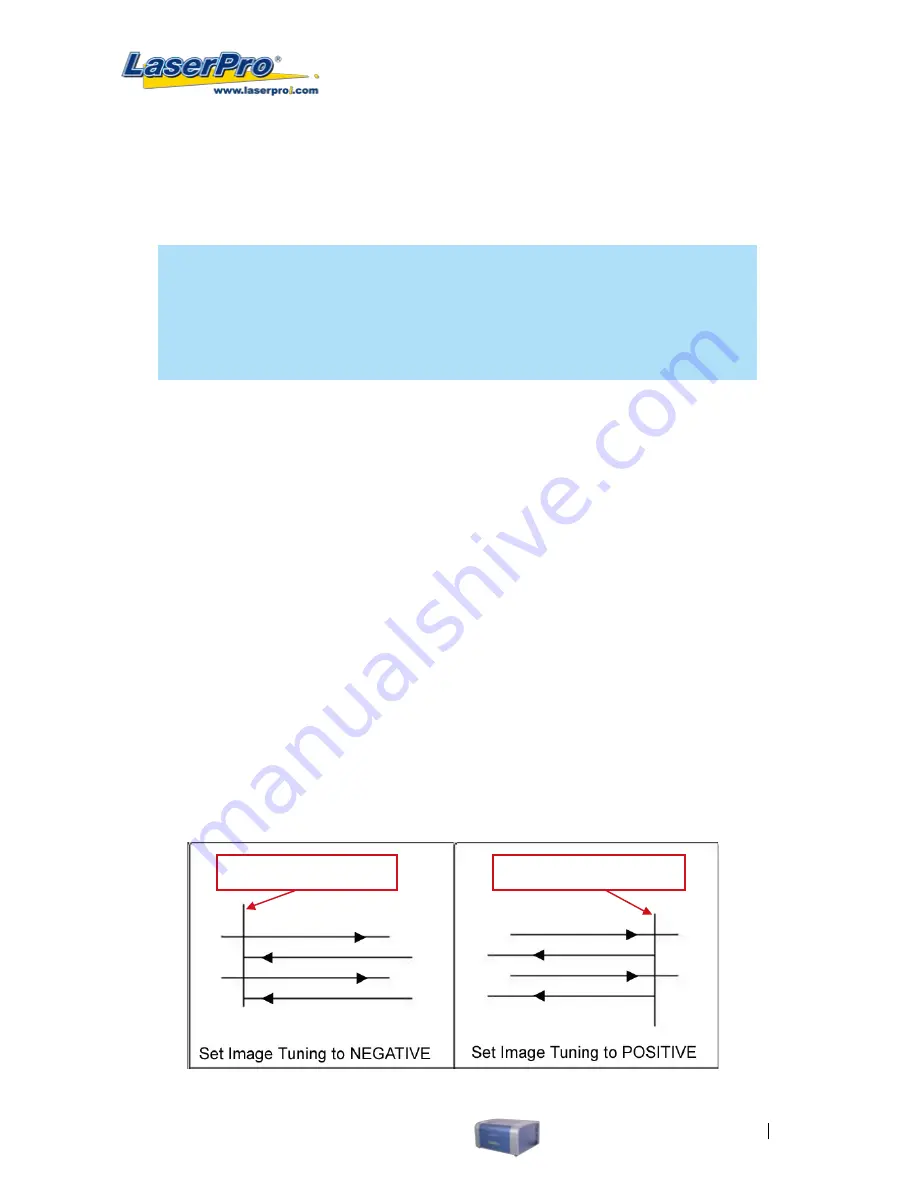
Image Tuning (Paper Page) [DEFAULT SETTING: 0]
In the event that you are processing extremely fine and detailed designs requiring near-microscopic
edge-to-edge precision, you will need to adjust the image tuning setting. To adjust this setting, we
recommend you engrave a small black square design as a sample and apply a magnifying glass to the
engraved results.
When you look at your engraved test square under a magnifying glass, you may notice the edges of
your square may be slightly offset, with every consecutive engraved even or odd line protruding
past the square’s ideal edge. This occurrence may occur on the left or right side of the square and can
be compensated for by the image tuning setting. In the diagram below, the arrows refer to the direction
the laser head is moving to generate that engraved line. If the first and every other line protrude to the
left of the square’s ideal edge, you will want to set the image tuning to a negative value. If the first and
every other consecutive line protrude to the right of the square’s ideal edge, you will want to set the
image tuning to a positive value. The further the protruding lines are from the square’s ideal edge, the
larger you will need to set the Image Tuning value to compensate.
Square’s Left Edge
Square’s Right Edge (Ideal)
Summary of Contents for LaserPro C180
Page 1: ......
Page 2: ......
Page 6: ......
Page 22: ......
Page 64: ...58 LaserPro C180 User Manual...
Page 78: ......
Page 86: ......
Page 106: ......
Page 107: ...LaserPro C180 User Manual 101 Chapter 9 Basic Troubleshooting 9...


