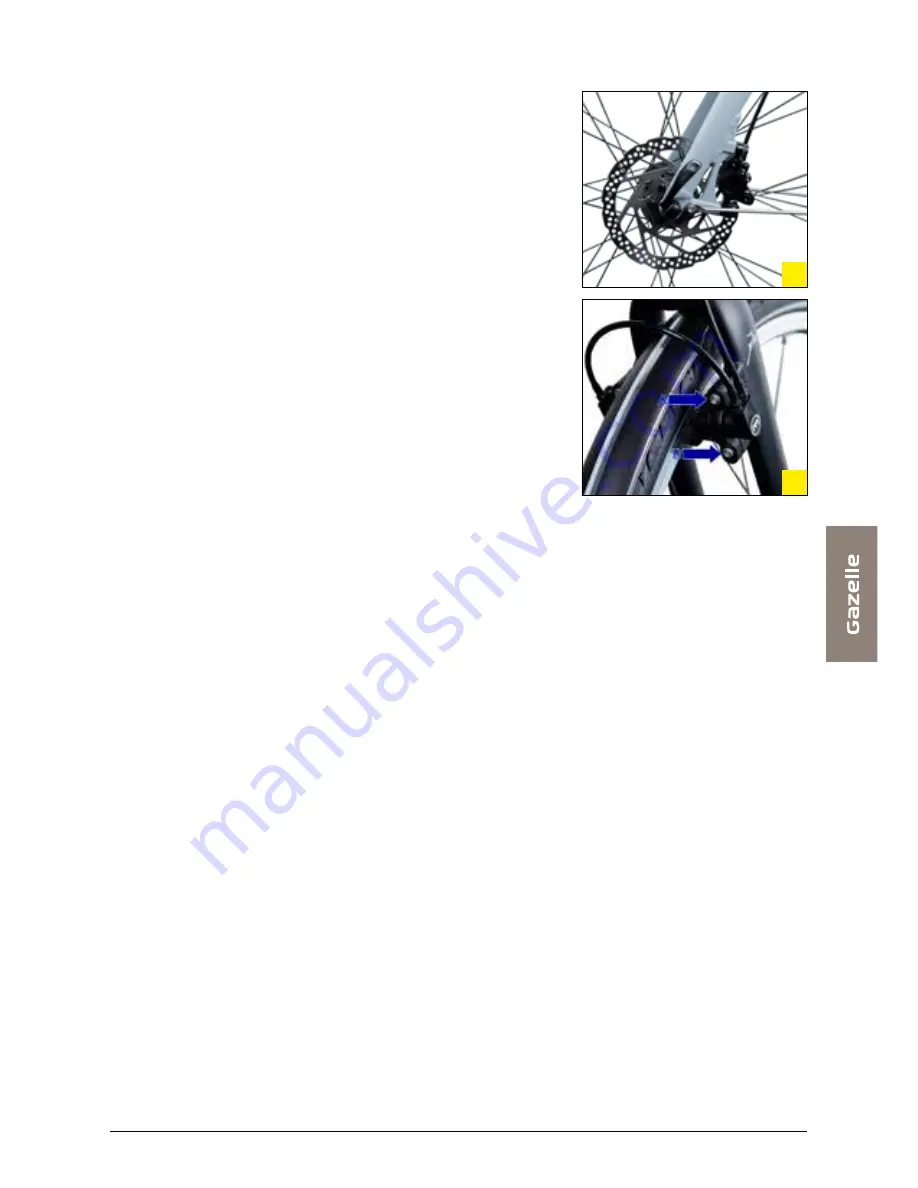
background image

Hydraulic brakes

Gazelle bikes can be equipped with hydraulic disc brakes 

(fig. 56)

 or hydraulic rim brakes 

(fig. 57)

.

A disc brake consists of 2 moving brake blocks. A 
reduction in braking power can be an indication of air in 
the brake lines; you need to make your way to your Gazelle 
specialist for this.

If you have hydraulic rim brakes, check the brake blocks on 
a regular basis. If the blocks are worn down to the bottom 
of the grooves 

(to around half a millimetre)

 then they need 

to be replaced.

Unscrew the brake cylinder mount top bolt 

(A)

 first using a 

Torx T25 wrench and remove it. Unscrew the bottom bolt 

(B)

 next using the same Torx wrench so the brake cylinder 

can rotate by a quarter turn. You can now remove the brake 
block and replace it.

Once you have replaced the brake blocks, you press the 
brakes against the rim so the brake blocks are positioned 
parallel to the rim. Check the brake blocks to ensure they 
press straight on the rim. Take care to ensure that the brake 
units are not skewed, but aligned to each other.

Press the brake lever carefully and tighten the bolts once 
the brake blocks are pressed in around 2 mm from the rim. 
Observe the specified tightening torques!

NB
•   Brake discs must be kept free from oil, grease or wax!
•   If you have traces of oil on the levers or brake lines, 

you need to make your way as soon as possible to your 
Gazelle specialist, since this can indicate a leak!

Coaster brake

If you notice a reduction in the stopping power of your 
coaster brake, then refer to your Gazelle specialist. 
Maintenance and any repairs of this brake system are 
specialist jobs which can only be done properly by a 
specialist.

56

57

21

Summary of Contents for Orange C330 HMB

Page 1: ...User manual...

Page 2: ......

Page 3: ...ers you a long warranty You will find our warranty terms and conditions in the Safety Warranty manual see www gazellebikes co uk service and warranty manuals In order to be able to derive optimum enjo...

Page 4: ...ion 7 2 Maintenance 7 3 Repairs 7 4 Belt drive adjustment 7 5 Belt drive maintenance 8 Chain case 9 Bottom bracket cranks and pedals 9 1 Maintenance 9 2 Repairs 10 Bike stand 11 Wheels 11 1 Adjustment...

Page 5: ...set If you detect any play while riding your bike you are best going straight to your Gazelle specialist If you carry on cycling too long with defects this can only make the problems worse and ultimat...

Page 6: ...road cycle trails Urban touring and children s bikes can be used in traffic and on paved roads Neither the manufacturer nor the Gazelle specialist can be held liable for improper use of the bike espe...

Page 7: ...3 you unscrew bolt C using a 6 mm Allen key This bolt is exposed when you lift the lever To adjust the height of the Switch SL fig 4 stem you unscrew bolts D using a 5 mm Allen key You can now adjust...

Page 8: ...t of the stem itself you unscrew bolt A by a couple of turns using a 6 mm Allen key see figs 8 and 9 You will then need to give it the bolt couple of taps with a rubber hammer You will now be able to...

Page 9: ...eriod of use the headset may get a little loose If this is the case you will need to visit your Gazelle specialist who has the knowledge and tools available to remedy the problem at once Should you be...

Page 10: ...secured with a small bolt see figs 11 and 12 If you would like to rotate your grips a little around the handlebars you will need to unscrew bolt A slightly first using a 4 mm Allen key Once you have...

Page 11: ...e sure that the tension is equal in both suspension units Internal headset suspension You set suspension stiffness by means of the small bolt under the head tube between the two legs of the fork see f...

Page 12: ...mechanism as it moves up and down thus reducing its effectiveness That is why the suspension needs to be cleaned regularly under the rubber gaiters as well The suspension is best kept clean using a m...

Page 13: ...wered by a bottle dynamo you need to click it onto the tyre sidewall first Gazelle front lights are switched on via the on off slide or rotary switch See figures 16 to 24 for a summary of all front li...

Page 14: ...ear lighting The latest generation of Gazelle rear lights has been designed to last a long time The LED lights consume very little power and have a very long lifespan The use of batteries to power rea...

Page 15: ...s Spanning Brasa Gazelle BE Vision Axa Spark and Gazelle No 7 only have an on and off setting operated using the button A Do you have a Spanning Brasa light This light has an indicator on it Once the...

Page 16: ...ou Gazelle specialist can check this out for you and replace the defective components as necessary Rear light Rear lights on Gazelle bikes are fitted with LED bulbs with a very long lifespan However i...

Page 17: ...e you fit the batteries with the orientation shown in the rear light Also be sure to use Alkaline batteries exclusively since they don t leak thus precluding damage If your rear light with the new bat...

Page 18: ...all the way without applying the brakes fully then you will need to tension the cable using the adjusting screw fig 52 A on the brake lever mount on the handlebar Unscrew the adjusting screw by a cou...

Page 19: ...eplacing them check the gap between the brake blocks and the rim If this is excessive you will have insufficient braking power if it is too small they can rub against the rim Use an ideal gap of 2 mm...

Page 20: ...l keeps on spinning without sticking then you have adjusted the brake correctly otherwise the wheel will stop abruptly In the latter case you will need to back the nut off again by one or more turns T...

Page 21: ...ck and replace it Once you have replaced the brake blocks you press the brakes against the rim so the brake blocks are positioned parallel to the rim Check the brake blocks to ensure they press straig...

Page 22: ...ually in the right gear Next check whether the coloured bars on the shifter unit see figs 59 and 61 are in line If this is not the case turn the adjusting screw A on the shifter unit fig 59 or on the...

Page 23: ...e button fig 62 A on the Harmony H8 controller and hold it down until the rear hub starts to shift usually 5 7 seconds After that release the button Keep on pedalling gently while the system shifts se...

Page 24: ...rocket You need to keep on pedalling when shifting gears on a derailleur bike It is desirable however to ease up on the pedal pressure while shifting 6 4 Derailleur gear adjustment Start by removing t...

Page 25: ...ent position on the derailleur Adjustment is as described above NB The chain should follow a straight line as far as possible This means that shifting to some combinations is pointless and causes need...

Page 26: ...u should remove the worst of the dirt with a brush you can then pour a special chain or derailleur cleaning fluid onto it In addition ensure that there is no dirt left behind between the sprockets eit...

Page 27: ...reases the chain tension see fig 71 On some models you can access the chain directly on other bikes you will need to remove the end cap from the chain case first In chapter 8 chain cases you can read...

Page 28: ...ce to an object resting on the belt when you park the bike Insufficient tension can cause skipping When skipping the belt teeth slide over the sprockets and it feels like wheel spin to the cyclist Ski...

Page 29: ...s which have been picked up Wet washing In order to remove stubborn dirt biodegradable bike cleaning products freely available in the trade can also be used since the belt is resistant to soap Spray t...

Page 30: ...he end cap off the top lip using a screwdriver see figs 76 and 77 After that you can unclip the end cap off the bottom lip by hand You can then slide the cap rearwards The Gazelle Balance chain case c...

Page 31: ...76 79 Balance 81 Flowline 78 80 77 Linea 87 Cadena 84 86 83 Finura 85 Delgado 82 31...

Page 32: ...ause the pedal spindle will bend a little with the passage of time due to the force exerted on it If the pedals themselves or the cranks are damaged following a fall for instance they will need to be...

Page 33: ...elo and Power Click see figs 93 to 97 Press the button in or slacken the screw screws you can then adjust the height If the stand uses screws you need to tighten them again after you have adjusted the...

Page 34: ...o repairing a broken spoke If there is a broken spoke the wheel can distort which increases the likelihood of more spokes breaking The hub is the heart of the wheel If there is play in a wheel or if i...

Page 35: ...n disconnect the hub by unscrewing the connector between the cable and the chain If you have a Shimano Nexus 3 internal hub gear then you can remove the shifter unit from the hub axle with a bolt Now...

Page 36: ...opposite side of the wheel counterclockwise you can now remove the shifter unit as well Leave the cable on the shifter unit otherwise you will lose the correct adjustment To refit the rear wheel back...

Page 37: ...d 6 bar The exact recommended tyre pressure is shown on your tyre sidewall If you are not using your Gazelle for an extended period during the winter for instance it can have an adverse effect on your...

Page 38: ...nd then let all the air out of the tube and dry it off Clean the area around the hole thoroughly with a small piece of emery cloth Next apply a coating of solution sparingly and allow it to dry for a...

Page 39: ...again If the tyre has been fitted correctly inflate the tyre and then tighten the valve nut securely Screw the dust cap onto the valve and you are ready to go If the hole in your inner tube is too bi...

Page 40: ...en your saddle is set too low If you go frequently on long sporty rides then you are best angling the nose of the saddle slightly downwards If you use your bike mainly for short trips then it is usual...

Page 41: ...n t do so your saddle can suddenly shift while you are on the move You must never adjust the saddle while riding the bike Do not set your saddle too high The min mark on the seatpost must never come o...

Page 42: ...bike be sure not to damage the controls on the handlebars and remove loose items such as bags before you set about cleaning the bike Paintwork Every Gazelle bike has as many as four coats of paint Th...

Page 43: ...components for example Thus if you give the stainless steel components a light coating of acid free petroleum jelly now and then you will prevent them from corroding over time Should any rust spots n...

Page 44: ...tube mounting Do not use a child seat to carry children unless it is EN 14344 approved If you are still in doubt as to the exact type and or brand of seat obtain advice from your Gazelle specialist NB...

Page 45: ...n our website www gazellebikes co uk 19 Theft prevention Nearly all Gazelle bikes are supplied with an ART approved security lock In addition to this every frame is given a unique frame number You wil...

Page 46: ...ke lever 15 Headset 16 Headset nameplate 17 Front fork 18 Integral front light 19 Spoke 20 Rim 21 Webbing 22 Front hub 23 Valve 24 Suspension front fork 25 Front brake 26 Down tube 27 Pedal 28 Crank 2...

Page 47: ...Headset nameplate 15 Front light 16 Front fork 17 Webbing 18 Spoke 19 Rim 20 Hub 21 Valve 22 Front brake 23 Down tube 24 Pedal 25 Crank 26 Front derailleur 27 Bottom bracket 28 Seat tube 29 Chain guar...

Page 48: ...Steel 12 15 Nm Aluminium 30 40 Nm Shimano 20 25 Nm Headset nut 35 45 Nm Dynamo 8 10 Nm Hub axle nuts front wheels 20 27 Nm Hub axle nuts rear wheels Sturmey Archer 20 27 Nm Hub axle nuts rear wheels 3...

Page 49: ...have a wider gear range that the Nexus hubs This means that the NuVinci hub has a shorter low gear and a longer top gear than the Nexus hub The wider the gear range the lower the speed at which you c...

Page 50: ...t how you can get pleasure out your new Gazelle bike for as long as possible and how you can carry out maintenance and any minor repairs yourself However do not take unnecessary risks when doing so If...

Page 51: ...51...

Page 52: ...Royal Dutch Gazelle Koninklijke Gazelle Wilhelminaweg 8 6951 BP Dieren The Netherlands Postal address Postbus 1 6950 AA Dieren The Netherlands www gazellebikes co uk GAZ_ALG_EN_17 1...

Reviews: