background image

Replacing the system board          

67

5

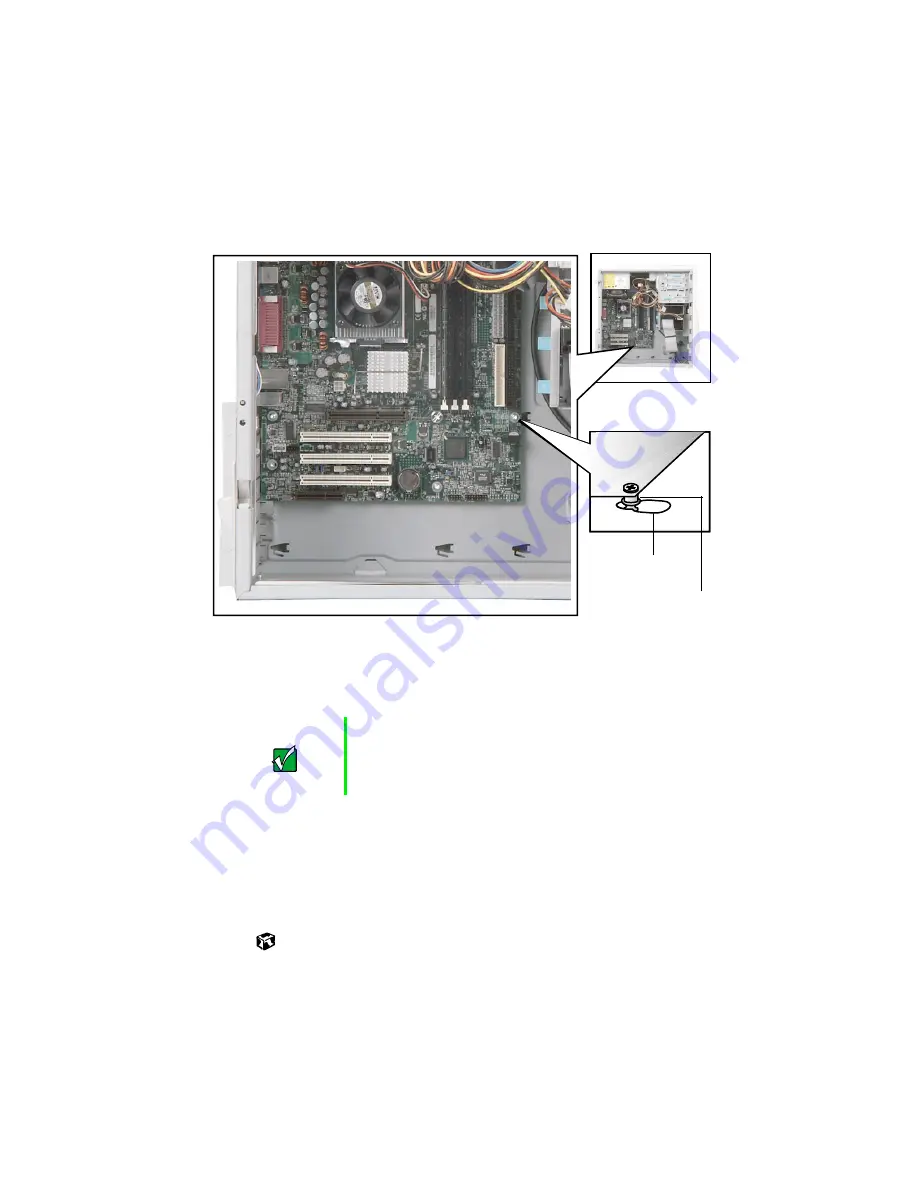
Remove the system board by sliding the board toward the front of the 
case. The system board standoffs slide out of the keyhole slots.

6

Slide the new system board into the keyhole slots and lock it into place 
with the thumbscrew.

7

Connect the power and data cables.

8

Install the expansion cards by following the procedure in “To replace, 
add, or reseat an expansion card:” on page 61.

9

Close the case by following the procedure “To close the Gateway 
Mid-Tower case:” on page 51
.

Important

The new system board must have special standoffs 
(

pem studs

) mounted on the bottom of the board. If 

necessary, use the standoffs from the original system 
board.

Standoff

Keyhole slot

Summary of Contents for E-3600

Page 1: ...Gateway E 3600 System Manual October 2001...

Page 2: ......

Page 3: ...computer 16 Restarting your computer 17 3 Working with the Gateway Desktop case 19 Preventing static electricity discharge 19 Opening and closing 21 Adding or replacing drives 23 Preparing to add or...

Page 4: ...settings 83 Changing the power scheme 83 Changing advanced power settings 85 Activating Hibernate mode 86 Installing an Uninterruptable Power Supply in Windows XP 87 Protecting your computer from viru...

Page 5: ...rive problems 112 Hard drive problems 113 Memory and processor problems 114 Modem problems 115 Peripheral adapter problems 116 Printer problems 117 Video problems 118 Error messages 120 Beep codes 122...

Page 6: ...vi...

Page 7: ...ered options to select and messages that appear on your monitor are printed in bold User s Guide Names of publications are printed in italic Viewpoint All references to front back left or right on the...

Page 8: ...your computer or other Gateway products Some types of information you can access are Hardware driver and program updates Technical tips Service agreement information Technical documents and component...

Page 9: ...ides basic information about your Gateway computer Read this chapter to find out Where components and connectors are located What accessories are available These illustrations show typical computer sy...

Page 10: ...Your Gateway Computer Gateway Desktop front CD DVD drive CD DVD eject button Diskette eject button Diskette drive Power button USB ports 3 5 inch internal or external drive expansion bay System audio...

Page 11: ...management on page 81 CD DVD drive Use a CD drive for installing programs playing audio CDs and accessing data Use a DVD drive for installing programs playing audio CDs and DVDs and accessing data CD...

Page 12: ...he power supply is always set to this when the computer is operating in the United States In other areas of the world such as Europe the utility power is supplied at 230 volts at 50 Hz If the computer...

Page 13: ...Plug powered speakers an external amplifier or headphones into this jack This jack is color coded green Microphone jack Plug a microphone into this jack This jack is color coded red USB ports Plug USB...

Page 14: ...6 Checking Out Your Gateway Computer Gateway Mid Tower front CD DVD drive CD DVD eject button Diskette eject button Diskette drive Power button USB ports...

Page 15: ...D drive tray Diskette eject button Press this button to eject an inserted diskette Diskette drive Use this drive to store smaller files on diskettes Power button Press this button to turn the power on...

Page 16: ...y Computer Gateway Mid Tower back Cover release levers Network jack Monitor port Parallel port Serial port USB ports Keyboard port Mouse port Voltage switch Power connector Line in jack Microphone jac...

Page 17: ...mouse into this port Keyboard port Plug a PS 2 keyboard into this port Network jack Plug an Ethernet 10 100 network cable into this jack USB ports Plug USB Universal Serial Bus devices such as a USB k...

Page 18: ...g an external VGA monitor into this port Cover release levers Use the cover release levers to open the side panel for access to the inside of the case For more information on opening your case see Ope...

Page 19: ...lets you monitor the status of your system hardware Monitored information includes internal temperature fan speed voltage and chassis intrusion to alert you in case of tampering The features of the ha...

Page 20: ...12 Checking Out Your Gateway Computer...

Page 21: ...urge protected power strip helps protect against AC power fluctuations Protect your computer from extreme temperature and humidity Do not expose your computer to direct sunlight heater ducts or other...

Page 22: ...ed the computer components to a power strip make sure all the computer components are turned off then turn on the power strip 2 Turn on the monitor 3 Turn on any other components connected to the comp...

Page 23: ...rating system documentation for specific questions regarding the operating system To complete the operating system setup 1 After the computer starts the start up wizard opens Continue by clicking Next...

Page 24: ...The setup is complete Turning off your computer To turn off your computer In Windows XP click Start then click Turn Off Computer then Turn Off Windows shuts down and turns off your computer OR In Wind...

Page 25: ...ot responding 2 In Windows XP Windows Me Windows 2000 or Windows 98 select the program that is not responding OR In Windows NT click Task Manager then select the program that is not responding 3 Close...

Page 26: ...18 System Setup...

Page 27: ...electronics stores and attach it to a bare metal part of the computer Touch a bare metal surface on the back of the computer Caution ESD can permanently damage electrostatic discharge sensitive compo...

Page 28: ...ing foam Remove components from their antistatic bags only when you are ready to use them Do not lay components on the outside of antistatic bags because only the inside of the bags provide electrosta...

Page 29: ...arge precautions disconnect the power cord and all other cables 3 Drain any residual power from the computer by pressing the power button 4 Remove the two thumbscrews Warning To avoid exposure to dang...

Page 30: ...the Gateway Desktop case 5 Slide the case cover back and away from the front of the case 6 Lift the case cover up and off of the case 7 When you are finished working replace the case cover by reversin...

Page 31: ...documentation for information on configuring the drive setting any jumpers on the drive and attaching cables to the drive If you are installing a drive that requires a controller card install the car...

Page 32: ...s connected to the drive Use the diskette drive connector cable to connect the diskette drive Use the standard IDE connector cable to connect IDE devices such as CD drives and standard IDE hard drives...

Page 33: ...ives To add or replace a CD DVD or diskette drive 1 Open the case by following the procedure To open and close the Gateway Desktop case on page 21 2 If you are adding a new drive pull up on the three...

Page 34: ...a drive disconnect the drive cables noting their locations and orientation You will reconnect the cables after you install the new drive 5 Remove the shipping screw then unlock the drive bay by slidin...

Page 35: ...further instructions 8 Slide the new drive into the drive bay until it settles into the indentation then lock it into place by sliding the release lever toward the front of the case 9 Replace the shi...

Page 36: ...teway Desktop case on page 21 2 Disconnect the drive cables noting their locations and orientation You will reconnect the cables after you install the new drive See the drive manual for further instru...

Page 37: ...uctions 5 Rotate the new drive into the bay then lock it into place by sliding the release lever in toward the back of the case 6 Connect the drive cables according to the instructions in the drive ma...

Page 38: ...rd To replace add or reseat an expansion card 1 Open the case by following the procedure To open and close the Gateway Desktop case on page 21 2 Disconnect any cables that are attached to the card not...

Page 39: ...ut do not bend the card sideways 5 Install the new card into the expansion slot You can slightly seesaw the card end to end to help insert the card but do not bend the card sideways Caution Do not tou...

Page 40: ...ing the expansion card retention tab inward 7 Reconnect any cables to the card 8 Close the case by following the procedure To open and close the Gateway Desktop case on page 21 9 Refer to the guide th...

Page 41: ...pply 1 Open the case by following the procedure To open and close the Gateway Desktop case on page 21 2 Disconnect the power supply cables from all components noting their locations and orientation Yo...

Page 42: ...34 Working with the Gateway Desktop case 4 Remove the fan cover...

Page 43: ...Replacing the power supply 35 5 Remove the power supply screws Power supply screws...

Page 44: ...ing it toward the front of the case then up 7 Install the new power supply into the case by reversing the actions you took in this procedure 8 Reconnect the power supply cables 9 Close the case by fol...

Page 45: ...sktop case on page 21 2 Swing the case retention arm out and remove the fan cover 3 Remove all of the expansion cards by following the procedure To replace add or reseat an expansion card on page 30 4...

Page 46: ...38 Working with the Gateway Desktop case 5 Remove the green thumbscrew using a screwdriver coin or your fingers System board retention screw...

Page 47: ...standoffs slide out of the keyhole slots 7 Slide the new system board into the keyhole slots and lock it into place with the thumbscrew Important The new system board must have special standoffs pem s...

Page 48: ...op case 8 Connect the power and data cables 9 Install the expansion cards by following the procedure in To replace add or reseat an expansion card on page 30 10 Close the case by following the procedu...

Page 49: ...o add or replace DIMMs 1 Turn off the computer and disconnect the power cord modem cable if installed and all external peripheral devices 2 Remove the cover See Opening and closing on page 21 and Prev...

Page 50: ...rt the new DIMM into the socket 7 Gently press the DIMM into the socket until it is firmly seated Inserting the DIMM automatically locks the socket latches on each end of the DIMM 8 Close the case by...

Page 51: ...c or dangerous waste Warning There is a danger of explosion if the battery is incorrectly replaced Replace the battery only with the same or equivalent type recommended by the manufacturer Dispose of...

Page 52: ...ge 73 3 Turn off the computer disconnect the power cord modem cable if installed and all external peripheral devices 4 Remove the cover See Opening and closing on page 21 and Preventing static electri...

Page 53: ...y in the socket with the positive pole up Make sure you have pressed the battery down far enough for it to contact the base of the socket it should snap into place 8 Close the case by following the in...

Page 54: ...46 Working with the Gateway Desktop case...

Page 55: ...t electronics stores and attach it to a bare metal part of the computer Touch a bare metal surface on the back of the computer Caution ESD can permanently damage electrostatic discharge sensitive comp...

Page 56: ...king foam Remove components from their antistatic bags only when you are ready to use them Do not lay components on the outside of antistatic bags because only the inside of the bags provide electrost...

Page 57: ...ns disconnect the power cord and all other cables 3 Drain any residual power from the computer by pressing the power button 4 For stability place the computer on its side 5 Remove the shipping screw t...

Page 58: ...50 Working with the Gateway Mid Tower case 6 Swing the side panel away from the case...

Page 59: ...sing 51 To close the Gateway Mid Tower case 1 For more stability place the computer on its side 2 Make sure all of the internal cables are arranged inside the case so they will not be pinched when you...

Page 60: ...Gateway Mid Tower case 3 Align the door tabs into the case notches 4 Swing the side panel toward the case until the release levers lock 5 Return the computer to its upright position 6 Reconnect the ca...

Page 61: ...documentation for information on configuring the drive setting any jumpers on the drive and attaching cables to the drive If you are installing a drive that requires a controller card install the car...

Page 62: ...drives and standard IDE hard drives Use the 80 conductor IDE cable to connect DMA 100 compatible hard drives Adding or replacing drives Use these procedures to replace 5 25 inch drives such as CD DVD...

Page 63: ...Adding or replacing drives 55 3 If you are adding a new drive press in on the two bezel release tabs then swing open the front bezel...

Page 64: ...a new drive remove the EMI shield for the bay into which you are installing the new drive 5 If you are replacing a drive disconnect the drive cables noting their locations and orientation You will re...

Page 65: ...ping screw installed next to the release lever remove the screw then unlock the drive bay by sliding the release lever back toward the back of the case 7 If you are replacing a drive remove the old dr...

Page 66: ...drive bay until it settles into the indentation then lock it into place by sliding the release lever toward the front of the case 10 If you removed a shipping screw replace the screw 11 Connect the d...

Page 67: ...dure To open the Gateway Mid Tower case on page 49 2 Return the case to its upright position 3 Disconnect the drive cables noting their locations and orientation You will reconnect the cables after yo...

Page 68: ...bay 5 Set any jumpers on the new drive See the drive manual for further instructions 6 Slide the new drive in and lock it into place by sliding the release lever in toward the inside of the case 7 Co...

Page 69: ...expansion card 1 Open the case by following the procedure To open the Gateway Mid Tower case on page 49 2 For more stability place the computer on its side 3 Disconnect any cables that are attached to...

Page 70: ...sen the card but do not bend the card sideways 6 While holding the retention cover open install the new card into the expansion slot You can slightly seesaw the card end to end to help insert the card...

Page 71: ...en secure the expansion card retention cover with the card retention cover thumb screw 8 Reconnect any cables to the card 9 Close the case by following the procedure To close the Gateway Mid Tower cas...

Page 72: ...ase by following the procedure To open the Gateway Mid Tower case on page 49 2 Return the computer to its upright position 3 Disconnect the power supply cables from all components noting their locatio...

Page 73: ...nt of the case then outward 6 Install the new power supply into the case by reversing the actions you took in Step 4 then lock the new power supply into place by flipping the power supply retention cl...

Page 74: ...ase on page 49 2 Remove all of the expansion cards by following the procedure To replace add or reseat an expansion card on page 61 3 Disconnect the power and data cables from the system board noting...

Page 75: ...the thumbscrew 7 Connect the power and data cables 8 Install the expansion cards by following the procedure in To replace add or reseat an expansion card on page 61 9 Close the case by following the p...

Page 76: ...irst To add or replace DIMMs 1 Turn off the computer and disconnect the power cord modem cable if installed and all external peripheral devices 2 Remove the cover See Opening and closing on page 49 an...

Page 77: ...new DIMM into the socket 7 Gently press the DIMM into the socket until it is firmly seated Inserting the DIMM automatically locks the socket latches on each end of the DIMM 8 Close the case by follow...

Page 78: ...l of toxic or dangerous waste Warning There is a danger of explosion if the battery is incorrectly replaced Replace the battery only with the same or equivalent type recommended by the manufacturer Di...

Page 79: ...Turn off the computer disconnect the power cord modem cable if installed and all external peripheral devices 4 Remove the cover See Opening and closing on page 49 and Preventing static electricity dis...

Page 80: ...ew battery in the socket with the positive pole up Make sure you have pressed the battery down far enough for it to contact the base of the socket it should snap into place 8 Close the case by followi...

Page 81: ...racteristics The settings are stored in battery backed RAM and are retained even when the power is off Important The computer starts very quickly If your monitor requires time to warm up you may not s...

Page 82: ...ow and down arrow keys select items in the menu The left arrow and right arrow keys move you between the menus ENTER either moves you to a submenu screen when a selected item is preceded by or activat...

Page 83: ...ettings related to your computer hardware and configuration Advanced gives you access to information and settings for computer resources hardware and computer configuration Security gives you access t...

Page 84: ...w version from a diskette To update the BIOS you need to perform the following tasks in sequence 1 Create a bootable diskette 2 Save the current BIOS settings 3 Create the BIOS update diskette 4 Updat...

Page 85: ...the CMOS settings to the BIOS defaults or to erase a misplaced or forgotten password For more information on the location and use of the configuration jumper see BIOS configuration jumper settings on...

Page 86: ...78 Using the BIOS Setup Utility...

Page 87: ...evels and cause data loss or computer damage Protect your computer and peripherals by connecting them to a surge suppressor which will absorb voltage surges and help prevent them from reaching your co...

Page 88: ...ver some electrical sources include more line noise than normal Line noise can also be a problem if your computer is located near or shares a circuit with a device that causes electromagnetic interfer...

Page 89: ...energy when the system is not in use Standby while your computer is in Standby mode it switches to a low power state where devices such as the monitor and drives turn off and the entire system uses le...

Page 90: ...nd By OR In Windows Me Windows 2000 or Windows 98 click Start then select Shut Down Stand By then click OK On Enter Hibernate mode must be enabled In Windows XP click Start then click Turn Off Compute...

Page 91: ...or create a custom power scheme Advanced power settings let you assign different power saving modes to the power button Changing the power scheme To change the power scheme 1 In Windows XP click Start...

Page 92: ...Power Options Properties dialog box opens 3 Select a power scheme from the Power Scheme list OR Set the timers for System standby Turn off monitor and Turn off hard disks then save your custom power...

Page 93: ...dow opens OR In Windows Me Windows 2000 or Windows 98 click Start then select Settings then Control Panel The Control Panel window opens If you do not see the Power Options or Power Management icon cl...

Page 94: ...art then select Settings then Control Panel The Control Panel window opens If you do not see the Power Options or Power Management icon click view all Control Panel options 2 Click Double click the Po...

Page 95: ...n In Windows XP click Start then click Turn off computer then hold the Shift key down while clicking Standby OR In Windows Me Windows 2000 or Windows 98 click Start then Shut Down Hibernate then OK In...

Page 96: ...Computer 3 Click the UPS tab 4 Click Select The UPS Selection dialog box opens 5 Select the manufacturer and model of the UPS device 6 Click the serial port where the UPS device is attached 7 Click F...

Page 97: ...ded from the Internet Checking all programs for viruses before installing them Disabling macros on suspicious Microsoft Word and Excel files These programs will warn you if a document that you are ope...

Page 98: ...30 seconds 3 Turn on the computer and rescan for the virus To update Norton AntiVirus 1 Click Start then select All Programs Norton AntiVirus then LiveUpdate Norton AntiVirus The LiveUpdate wizard ope...

Page 99: ...ace 1 In Windows XP click Start then select My Computer OR In Windows Me Windows 2000 or Windows 98 double click the My Computer icon 2 Right click the drive that you want to check for available file...

Page 100: ...r window opens OR In Windows Me Windows 2000 or Windows 98 double click the My Computer icon The My Computer window opens 2 Right click the hard drive that you want to delete files from then select Pr...

Page 101: ...ard drive so that Windows does not use them If you use your computer several hours every day you probably want to run Error checking or ScanDisk once a week If you use your computer less frequently on...

Page 102: ...lick Start For help press F1 Windows checks the drive for errors This process may take several minutes 6 Correct any problems that are found by following the on screen instructions After Windows has f...

Page 103: ...the information stored on the drive can improve hard drive performance While the Disk Defragmenter program is running do not use your keyboard or mouse because using them may continuously stop and re...

Page 104: ...b 4 Click Defragment Now 5 If Disk Defragmenter does not start automatically click Start or Defragment 6 Disk Defragmenter shows its progress on the screen When finished Disk Defragmenter asks if you...

Page 105: ...uld back up your files regularly to a writable CD if you have a CD R or CD RW drive or to diskettes Use a backup device such as a CD R CD RW or Zip drive to do a complete hard drive backup If you do n...

Page 106: ...s Accessories System Tools then Scheduled Tasks The Scheduled Tasks window opens 2 Double click Add Scheduled Task The Scheduled Tasks Wizard opens 3 Click Next then select the Scheduled Task Wizard o...

Page 107: ...s Use a damp lint free cloth to clean the computer and other parts of your system Do not use abrasive or solvent cleaners because they can damage the finish on components Your computer is cooled by ai...

Page 108: ...a little water on the cloth never directly on the screen and wipe the screen with the cloth OR If your computer screen is not an LCD panel use a soft cloth and window cleaner to clean the monitor scr...

Page 109: ...ring on the bottom of the mouse counter clockwise 3 Remove the retaining ring and mouse ball 4 Remove any dust lint or dirt from the mouse ball with a soft cloth 5 Clean the mouse rollers with a cotto...

Page 110: ...stall LANDesk Client Manager 1 In the C DMI folder on your hard drive double click the Setup icon to launch the install wizard 2 Follow the instructions that appear on the screen If you are prompted f...

Page 111: ...re documentation or see the online help for your operating system for specific instructions Keeping a record of system configuration Some operating systems allow you to print a summary of the configur...

Page 112: ...104 Managing Your Computer...

Page 113: ...ning on the computer make sure that The power cord is connected to the AC power in connector and an AC outlet The AC outlet is supplying power If a power strip is used it is turned on and the circuit...

Page 114: ...ter yourself make sure you are properly grounded before opening the computer case For more information on preventing electrostatic damage to the computer see Preventing static electricity discharge on...

Page 115: ...ct and reconnect the cables Close the case as described on page 21 for the Gateway Desktop or on page 49 for the Gateway Mid Tower then turn on the computer Turn off the computer remove the cover and...

Page 116: ...check box is not selected In Windows Me Windows 2000 Windows 98 and Windows NT double click the speaker icon in the lower right corner of the taskbar and make sure that the Master Out CD Audio MIDI D...

Page 117: ...e The CD drive needs to be added as new hardware In the Control Panel window double click Add New Hardware Follow the on screen instructions for adding the drive The secondary IDE device may be disabl...

Page 118: ...uter is still non responsive press and hold in the power button for 5 seconds to turn the computer off Turn the computer back on and follow the on screen instructions The heatsink is not properly seat...

Page 119: ...is not plugged in or connected properly Make sure the cable is plugged in correctly The mouse driver did not load when the computer started Load the appropriate mouse driver manually or contact Gatewa...

Page 120: ...se Solution The diskette is not IBM formatted Make sure the diskette you are trying to use is IBM compatible If it is try reformatting it If it is not get a compatible diskette The diskette is corrupt...

Page 121: ...gured properly Consult the hard drive user s guide for instructions on how to configure the drive Configure the drive correctly The drive cables are not connected properly Open the computer and make s...

Page 122: ...e new memory configuration The memory was installed incorrectly Make sure the memory is seated and oriented correctly A memory chip is faulty Replace the card with the faulty chip Third party diagnost...

Page 123: ...w hardware The modem is not connected to a live phone jack Make sure the line connected to the modem is working and plugged into the appropriate port on the modem line port The phone jack is in use If...

Page 124: ...set incorrectly Check the address configuration of the adapter card and make sure that it does not conflict with another card in the computer The card was not configured through the software Configur...

Page 125: ...ed between the printer and the computer Check the connector and cable for bent or broken pins The printer is not designated as the default printer If the printer that you are trying to print to is not...

Page 126: ...is damaged Check the connector and cable for bent or damaged pins The monitor brightness and contrast controls are turned down Adjust the brightness and contrast knobs to the center position System b...

Page 127: ...ideo type should be selected along with a supported resolution Check your monitor and video controller documentation for details Probable cause Solution The monitor controls are not properly adjusted...

Page 128: ...Incompatible Corresponding drive is not an ATAPI device Run Setup to make sure device is selected correctly A Drive Error No response from diskette drive Cache Memory Bad An error occurred when testin...

Page 129: ...failed Memory Size Decreased Memory size has decreased since the last boot If no memory was removed then memory may be bad Memory Size Increased Memory size has increased since the last boot If no mem...

Page 130: ...s of short tones For more information on the beep codes issued check the documentation for that external device There are several POST routines that issue a POST terminal error and shut down the syste...

Page 131: ...m Short Beeps Description 1 Refresh failure 2 Parity cannot be reset 3 First 64 KB memory failure 4 Timer not operational 5 Not used 6 8042 GateA20 cannot be toggled 7 Exception interrupt error 8 Disp...

Page 132: ...124 Troubleshooting...

Page 133: ...duct near water or a heat source such as a radiator Set up the system on a stable work surface The product should be operated only from the type of power source indicated on the rating label If your c...

Page 134: ...battery on the system board There is a danger of explosion if the CMOS battery is replaced incorrectly Replace the battery with the same or equivalent type recommended by the manufacturer Dispose of b...

Page 135: ...Increase the separation between the equipment and receiver Connect the equipment to an outlet on a different circuit from that to which the receiver is connected Consult the dealer or an experienced...

Page 136: ...lephone company may request that you disconnect the equipment until the problem is resolved The telephone company may make changes in its facilities equipment operations or procedures that could affec...

Page 137: ...e line individual service may be extended by means of a certified connector assembly The customer should be aware that compliance with the above conditions may not prevent degradation of service in so...

Page 138: ...ds CTR 21 1998 Attachment requirements for pan European approval for connection to the analogue Public Switched Telephone Networks PSTNs of TE excluding TE supporting voice telephony services in which...

Page 139: ...sidential area or an adjacent area thereto and conforms to the standards set by the Voluntary Control Council for Interference by Information Technology Equipment aimed at preventing radio interferenc...

Page 140: ...network services This equipment shall not be set up to make automatic calls to the Telecom 111 Emergency Service Some parameters required for compliance with Telecom s Telepermit requirements are depe...

Page 141: ...ss 1 Laser Products under a US Department of Health and Human Services DHHS Radiation Performance Standard Should the unit ever need servicing contact an authorized service location Warning Use of con...

Page 142: ...formation with regard to proper grounding of the mast and supporting structure grounding of the lead in wire to an antenna discharge unit size of grounding conductors location of antenna discharge uni...

Page 143: ...keep from touching such power lines or circuits Contact with them could be fatal Reference Grounding component 1 Electric service equipment 2 Power service grounding electrode system NEC Art 250 Part...

Page 144: ...in the business slogan are registered trademarks and black and white spotted box logo GATEWAY Gateway Astro Gateway Work Gateway Connected touch pad Gateway Connected music player Gateway Cyber Ware G...

Page 145: ...oard uses the Intel i82845 chipset The system board supports SDRAM DIMM system memory Intel Pentium 4 processor with 100 MHz 400 MT s front side bus Ultra ATA 66 100 drives Advanced Configuration and...

Page 146: ...138 Reference Data System board layout The following illustration shows the system board divided into two sections Section 1 2 1 A B F E D C G L K J I H M...

Page 147: ...Internal front speaker connector E Communication Network Riser CNR expansion slot reserved F Front panel audio connector G Intrusion detection switch connector H BIOS configuration jumper block I PCI...

Page 148: ...140 Reference Data Section 2 O M R Q P N L J S A B G F E D C H I K...

Page 149: ...E BGA 478 Zero Insertion Force ZIF socket F Auxiliary power connector G Rear case fan connector H Diskette cable connector I Power supply cable connector J Personal System 2 PS 2 mouse port K PS 2 ke...

Page 150: ...ion 1 on page 138 Setting Jumper placement When used Normal For normal operation The BIOS uses current configuration information and passwords 1 2 position Configure For clearing passwords The BIOS Se...

Page 151: ...es rates Frequency response 20 Hz to 20 kHz 0 1 dB LAN Subsystem Integrated Intel Kinnereth 10 100 Mbit sec Ethernet LAN BIOS Intel AMI BIOS Flash BIOS for easy updates from diskette Hard drive interf...

Page 152: ...pliers to Gateway specifications and may vary from similarly marketed products Communication Network Riser CNR expansion slot 1 reserved Environment Operating temperature 10 C to 35 C 50 F to 95 F Hum...

Page 153: ...battery installing 43 70 removing 43 70 replacing 43 70 troubleshooting 106 warnings 43 70 beep codes 122 bezel removing 25 replacing 25 BIOS updating 76 BIOS Setup utility 73 menus 75 navigating thr...

Page 154: ...3 5 inch 23 53 replacing CD DVD 23 53 replacing diskette 23 53 replacing hard 23 53 supported types 23 53 E electrostatic discharge ESD 19 47 error messages 120 Error checking 93 Ethernet jack 5 9 exi...

Page 155: ...ard cleaning 100 port 5 9 troubleshooting 110 L LANDesk Client Manager installing 102 restoring 102 line conditioners 80 line in jack 5 9 line out jack 5 9 M magnetic fields protecting your computer 1...

Page 156: ...de 81 84 surge suppressors 79 uninterruptible power supply UPS 80 power button 3 7 82 power supply installing 33 64 removing 33 64 replacing 33 64 printer parallel port 5 9 troubleshooting 117 process...

Page 157: ...g computer 3 7 starting the computer 14 startup diskette creating 103 static electricity 19 47 surge suppressors 79 system recovery 103 system board configuration jumper 77 installing 37 66 removing 3...

Page 158: ...supply UPS 80 updating the BIOS 76 USB port 3 5 7 9 utility software BIOS Setup utility 73 V video troubleshooting 118 virus 89 protecting against 89 removing with Norton AntiVirus 89 voltage switch 4...

Reviews: