background image

28

          Replacing and Adding System Components

Replacing the hard drive

 To replace the hard drive:

1

Turn off the computer and disconnect the power cord, modem cable (if 
installed), and all external peripheral devices.

2

Remove the cover. (See “Removing the cover” on page 17 and “Static 
electricity precautions” on page 15.)

3

Locate the hard drive.

4

Remove the power and data cables from the back of the drive, noting 
their locations and orientations. (You will reconnect these cables after you 
install the new drive.)

5

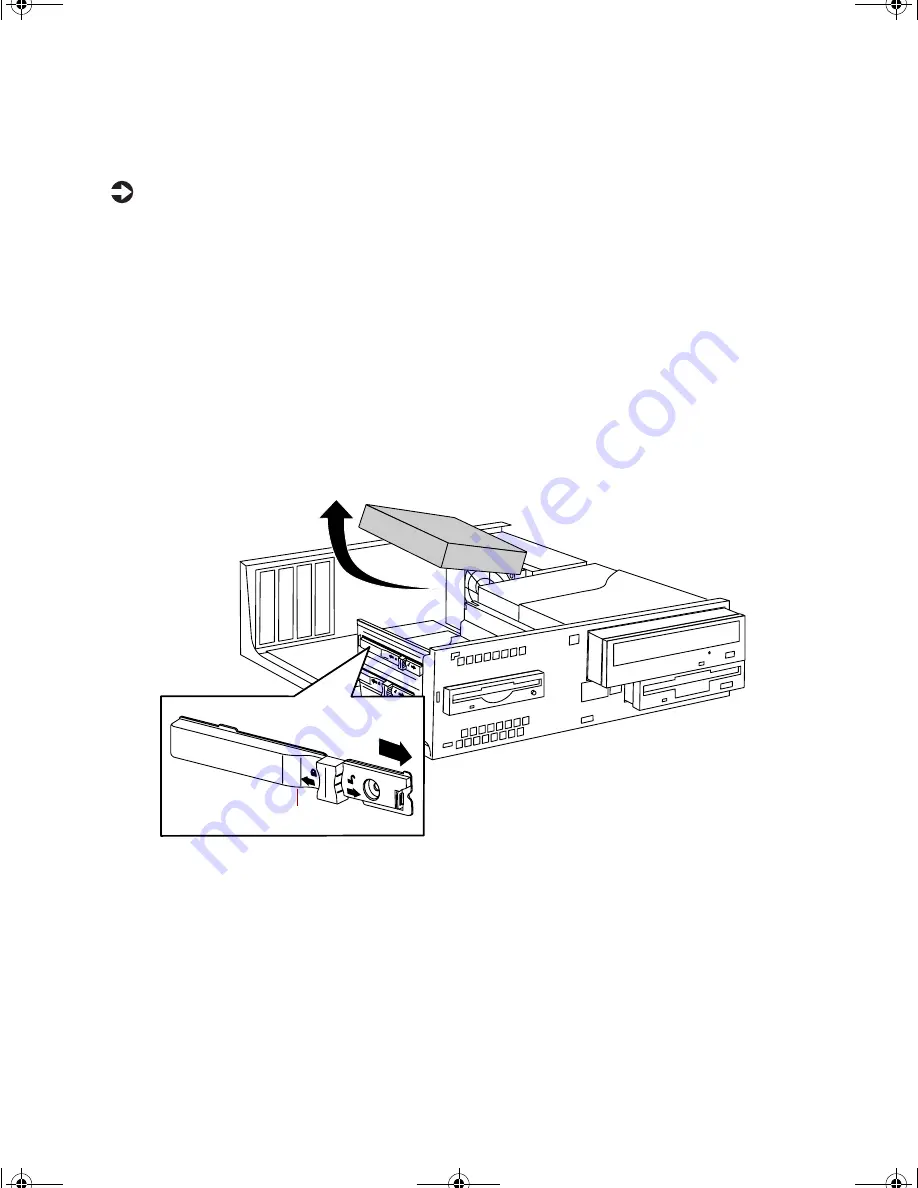
Slide the locking clip toward the front of the chassis to release the drive 
as shown by the arrow beside the unlock icon on the locking clip.

6

Lift the left edge of the drive, then pull the drive off of the pins on the 
right side of the drive bay and lift it out of the chassis.

7

Place the old drive in an antistatic bag or container.

8

Set the drive jumpers on the new drive to the appropriate settings (refer 
to your drive documentation for jumper settings).

Locking clip

8506999.book  Page 28  Friday, December 15, 2000  8:22 AM

Summary of Contents for E-1600

Page 1: ...Gateway E 1600 Desktop System Manual January 2001 8506999 book Page i Friday December 15 2000 8 22 AM...

Page 2: ...ng from any defect or omission in this manual even if advised of the possibility of such damages In the interest of continued product development Gateway reserves the right to make improvements in thi...

Page 3: ...ng off your computer 12 Restarting your computer 13 3 Case Access 15 Static electricity precautions 15 Opening the case 16 Removing the cover 17 Removing the bezel 18 Closing the case 18 Replacing the...

Page 4: ...49 Hard drive management practices 49 Protecting your computer from viruses 52 Checking system health with LANDesk 53 System recovery 53 Creating a startup diskette 53 Keeping a record of system conf...

Page 5: ...69 Beep codes 71 A Safety and Regulatory Information 73 B Reference Data 85 Specifications 85 System specifications 86 Mechanical specifications 86 Environmental specifications 87 Electrical specific...

Page 6: ...iv 8506999 book Page iv Friday December 15 2000 8 22 AM...

Page 7: ...messages that appear on your monitor are printed in bold User s Guide Names of publications are printed in italic Viewpoint All references to front rear left or right on the computer are based on the...

Page 8: ...eway products Some types of information you can access are Hardware driver and program updates Technical tips Service agreement information Technical documents and component information Frequently ask...

Page 9: ...deo controller using main memory for video memory Intel 810e chipset Two PCI slots that support half length low profile PCI expansion cards One 3 5 inch diskette drive one CD drive and one hard drive...

Page 10: ...om 3 5 inch 1 44 MB diskettes Diskette drive activity LED glows when the diskette drive reads from or writes to a diskette Headphone jack lets you connect a set of headphones to the integrated audio c...

Page 11: ...profile PCI expansion cards Microphone in jack connects a microphone RJ 45 LAN connector connects the network cable Serial COM port connects a serial device Video port connects the monitor interface c...

Page 12: ...ports connect Plug and Play devices that are automatically configured when they are plugged into the computer Line out audio jack connects audio devices such as speakers 8506999 book Page 4 Friday Dec...

Page 13: ...the computer until it rests vertically on its left side 3 Lift the front of the computer rocking it back and place the plastic stand under the front of the computer 4 Lower the front of the computer a...

Page 14: ...CI connectors B Internal speaker connector not used C CD audio connector D Audio connectors E Headphone connector F Telephony connector A B C D E F G H I J K L M N O P Q R S T U V W 8506999 book Page...

Page 15: ...attery V Chassis intrusion connector W BIOS configuration jumper J6A1 Heceta IV hardware management Heceta IV is an integrated data acquisition system that lets you monitor the status of your system h...

Page 16: ...8 System Features 8506999 book Page 8 Friday December 15 2000 8 22 AM...

Page 17: ...ip helps protect against AC power fluctuations Protect your computer from extreme temperature and humidity Do not expose your computer to direct sunlight heater ducts or other heat generating objects...

Page 18: ...ure all the computer components are turned off then turn on the power strip 2 Turn on the monitor 3 Turn on any other components connected to the computer such as speakers a printer or a scanner 4 Tur...

Page 19: ...pens Continue by clicking Next 2 Type the requested information in the appropriate text boxes When you have finished typing the information continue by clicking Next 3 Continue following the instructi...

Page 20: ...on 3 Turn off the monitor and peripherals Important For other operating systems such as Windows 2000 refer to the appropriate operating system software manual for setup instructions Warning When you t...

Page 21: ...select the program that is not responding 3 Close the program by clicking End Task 4 If the computer does not respond turn off the computer power wait ten seconds and turn the power on again As a par...

Page 22: ...14 System Setup 8506999 book Page 14 Friday December 15 2000 8 22 AM...

Page 23: ...unding wrist strap available at most electronics stores 2 Turn off the computer power 3 Discharge any static electricity by touching a bare metal surface on the back of the case 4 Unplug all power cor...

Page 24: ...omponents of the computer you must open the case which has two removable parts A chassis cover that surrounds the sides and top of the system A front faceplate bezel that covers the front of the syste...

Page 25: ...wer cords 2 If the case is secured by a chassis lock unlock the chassis 3 Remove the thumbscrew on the back of the case 4 Using the handles on each side of the cover pull the cover toward the back of...

Page 26: ...from the chassis 2 Lift the bezel until the tabs clear the holes in the chassis Remove the bezel Closing the case Replace the chassis cover as soon as you finish installing or removing components so...

Page 27: ...ir holes Replacing the cover To replace the chassis cover 1 Place the cover on the computer making sure the hole for the thumbscrew is at the back of the chassis 2 Slide the cover toward the front of...

Page 28: ...20 Case Access 8506999 book Page 20 Friday December 15 2000 8 22 AM...

Page 29: ...entation for information on configuring the drive setting any jumpers on the drive and attaching cables to the drive If you are installing a drive that requires a controller card install the card befo...

Page 30: ...patible hard drives Replacing the CD drive To replace the CD drive 1 Turn off the computer and disconnect the power cord modem cable if installed and all external peripheral devices 2 Remove the cover...

Page 31: ...cturer s documentation for instructions 8 Slide the new CD drive into the open drive bay 9 Slide the locking clip toward the back of the computer to lock the CD drive into place 10 Reconnect the power...

Page 32: ...ck of the drive noting their locations and orientations You will reconnect these cables after you install the new drive 4 Disengage the locking clip by sliding the locking clip toward the front of the...

Page 33: ...cessible 3 5 inch drive bay to install a 3 5 inch drive such as a tape drive or a Zip drive To install an additional drive 1 Turn off the computer and disconnect the power cord modem cable if installe...

Page 34: ...jumpers to the appropriate settings refer to your drive documentation for jumper settings Caution Your computer was designed to adhere to electromagnetic interference requirements and the EMI shield i...

Page 35: ...de the locking clip toward the back of the chassis to secure the drive in the bay 10 Connect the power and data cables to the back of the drive 11 Close the case by following the instructions on page...

Page 36: ...tions and orientations You will reconnect these cables after you install the new drive 5 Slide the locking clip toward the front of the chassis to release the drive as shown by the arrow beside the un...

Page 37: ...ke sure that the data and power connectors on the drive face the interior of the chassis 11 Slide the locking clip toward the back of the chassis to secure the drive in place 12 Connect the power and...

Page 38: ...ze or type because the BIOS automatically detects this information DIMMs must be installed in the lowest numbered slot first To add or replace DIMMs 1 Turn off the computer and disconnect the power co...

Page 39: ...pherals the modem cable and the power cord then turn on the computer Replacing the processor The computer is compatible with the Pentium III or Celeron socketed processors with 66 100 or 133 MHz front...

Page 40: ...modem cable if installed and all external peripheral devices 2 Remove the cover See Removing the cover on page 17 and Static electricity precautions on page 15 3 If your computer includes an air duct...

Page 41: ...clip and moving the top of the hinged portion toward the processor 6 Unhook the other end of the metal clip 7 Lift the heatsink straight up and off of the processor Caution The processor may be hot if...

Page 42: ...ft the old processor straight up and out of the socket To install the new processor 1 Hold the new processor over the empty processor socket and verify that pin 1 on both the processor and the socket...

Page 43: ...cessor fan cable if present to the fan connector on the system board 5 If your computer included an air duct replace the air duct over the power supply fan 6 Close the case See Closing the case on pag...

Page 44: ...cate the card you want to remove and disconnect any cables that may connect it to other parts of the computer then remove the screw that secures the card in the slot and pull the card out of the slot...

Page 45: ...menus before replacing the battery Replacing the battery resets the BIOS Setup utility to its default values When disposing of used batteries check local and national laws regarding disposal of toxic...

Page 46: ...on page 15 5 Locate the battery on the system board see System board on page 6 The battery is circular and has the positive pole mark on the top 6 Using your finger or a small flat bladed screwdriver...

Page 47: ...autions on page 15 3 Remove all expansion cards from the system board See Adding or replacing expansion cards on page 35 4 If your computer includes an air duct remove the air duct covering the power...

Page 48: ...l 9 Slide the system board toward the left side of the chassis to clear the fan on the power supply then lift the system board out of the chassis 10 Remove the memory from the old system board and pla...

Page 49: ...expansion cards 9 Close the case by following the instructions on page 18 10 Reconnect peripherals the modem cable and the power cord then turn on the computer Replacing the power supply To remove the...

Page 50: ...the new power supply in position in the chassis and about an inch away from the back panel 4 Slide the power supply back to engage the tab on the bottom of the chassis with the slot in the bottom of...

Page 51: ...e power is off Open the BIOS Setup utility by restarting the computer then pressing F1 before the operating system starts Important The Gateway E 1600 system starts up very quickly Most monitors requi...

Page 52: ...e you between the menus ENTER either moves you to a submenu screen when a selected item is preceded by or activates a selected field ESC closes the screen you are in and returns you to the previous sc...

Page 53: ...ou access to options for exiting the BIOS Setup utility Refer to the help box on the right side of the BIOS Setup screens for information about menu items Updating the BIOS If you need a new version o...

Page 54: ...trols the ability to write to the BIOS firmware For normal operation place a jumper on pins 1 and 2 of J6A1 To configure the BIOS settings and display the maintenance menu place a jumper on pins 2 and...

Page 55: ...s or computer damage Protect your computer and peripherals by connecting them to a surge suppressor which will absorb voltage surges and prevent them from reaching your computer When purchasing a surg...

Page 56: ...a circuit with a device that causes electromagnetic interference such as a television or a motor Some surge suppressors and uninterruptible power supplies include simple line conditioning capabilitie...

Page 57: ...Also use Check Disk if you have any hard drive problems To use Check Disk 1 Double click the My Computer icon The My Computer window opens 2 Right click the drive you want to check 3 Select Propertie...

Page 58: ...e or tape drive and delete the files from your hard drive You can use the software that came with your tape backup drive or your large capacity disk drive to back up the files You can also back up fil...

Page 59: ...emory cache and a disk cache Files in the memory cache are removed when you turn off your computer Files are saved in the disk cache until the space designated for the cache is full See your browser H...

Page 60: ...ime because they are activated by a certain date or time Protect your computer from viruses by Using an anti virus program to check files and programs that are on diskettes attached to e mail messages...

Page 61: ...ine Help for more information If you need to restore LANDesk from the System Restoration CD and are prompted for a password type lowtco and press ENTER System recovery Take advanced precautions that w...

Page 62: ...p you troubleshoot your system Refer to the software documentation or see the online help for your operating system for specific instructions Using your System Restoration CD The System Restoration CD...

Page 63: ...should drop into your hand If it does not gently shake the mouse until the ball drops out of the socket 4 Use adhesive tape to pick up any dust or lint on the surface of the ball 5 Wipe away dirt or l...

Page 64: ...Use a damp lint free cloth to clean the computer case monitor case keyboard speakers and other parts of your computer Avoid abrasive or solvent cleaners because they can damage the finish on your comp...

Page 65: ...ure that The power cord is connected to the AC power in connector and an AC outlet The AC outlet is supplying power If a power strip is used it is turned on and the circuit breaker is set The voltage...

Page 66: ...ems If you have problems after installing the new battery try each of the items listed below Turn off the computer and make sure that all exterior cords and cables are attached and secured to the corr...

Page 67: ...o the line out jack to test the output If they work replace the speakers The sound card may not be installed correctly Open the computer then reseat the sound card Make sure the cables are connected p...

Page 68: ...the BIOS Setup utility program From the Advanced IDE Configuration menu set the IDE Controller to Both and the Secondary IDE Master to Auto The CD cables are not installed correctly Open the computer...

Page 69: ...cking key then turn off the computer wait for a few seconds then turn the computer back on The keyboard is not plugged in or connected properly Make sure the cable is plugged in correctly Something sp...

Page 70: ...s not IBM formatted Make sure the diskette you are trying to format is IBM compatible If it is try reformatting it If it is not get a compatible diskette The diskette is corrupted Run Check Disk on th...

Page 71: ...ure all cables to the controller card are connected correctly Some computers do not have IDE controller cards because the IDE controller is built into the system board The drive controller is not seat...

Page 72: ...dding the device The modem is not connected to a live phone jack Make sure the line connected to the modem is working and plugged into the appropriate port on the modem line port The phone jack is in...

Page 73: ...d cable for bent or broken pins The printer is not designated as the default printer If the printer that you are trying to print to is not the default printer make sure you have selected it through th...

Page 74: ...nnector and cable for bent or damaged pins The monitor brightness and contrast controls are turned down Adjust the brightness and contrast knobs to the center position A DIMM is not seated properly in...

Page 75: ...no bent pins or broken wires The display setup is incorrect In the Control Panel window Start Settings Control Panel double click Display and check the settings The correct video type should be selec...

Page 76: ...ded speakers microwave ovens fluorescent lights and metal beams or shelves The monitor needs to be degaussed Turn off the computer and monitor for at least a half hour then restart the computer Many m...

Page 77: ...rive ATAPI Incompatible The corresponding drive is not an ATAPI device Run Setup to make sure the device is selected correctly A Drive Error No response from the diskette drive Cache Memory Bad An err...

Page 78: ...the keyboard is connected properly KB Interface Error The keyboard interface test failed Memory Size Decreased The memory size has decreased since the last boot If no memory was removed then some mem...

Page 79: ...ystem if they fail Before shutting down the system the terminal error handler issues a beep code signifying the test point error This beep code consists of one long tone and a series of short tones If...

Page 80: ...t be toggled 7 Exception interrupt error 8 Display memory Read Write error 9 Not used 10 CMOS shutdown register test error 11 Invalid BIOS for example POST module not found Short Beeps Description 850...

Page 81: ...rating label If your computer has a voltage selector switch make sure that the switch is in the proper position for your area The voltage selector switch is set at the factory to the correct voltage O...

Page 82: ...rer Dispose of batteries according to the manufacturers instructions When the computer is turned off a small amount of electrical current still flows through the computer Always unplug all power cords...

Page 83: ...ectar la fuente de alimentaci n SAFETY STEPS Whenever you remove the chassis covers to access the inside of the computer follow these steps 1 Turn off all peripheral devices connected to the computer...

Page 84: ...microprocesador y el disipador de calor pueden estar a n calientes Tambi n conviene tener en cuenta que en el chasis o en el tablero puede haber piezas cortantes o punzantes Por ello se recomienda pr...

Page 85: ...sult the dealer or an experienced radio TV technician for help Use only shielded cables to connect peripherals to the computer Accessories This equipment has been tested and found to comply with the l...

Page 86: ...elephone company will provide advance notice in order for you to make necessary modifications to maintain uninterrupted service This equipment cannot be used on telephone company provided coin service...

Page 87: ...electrical ground connections of the power utility telephone lines and internal metallic water pipe computer if present are connected together This precaution may be particularly important in rural a...

Page 88: ...the approval does not of itself give an unconditional assurance of successful operation on every PSTN termination point In the event of problems you should contact Gateway customer support Japanese u...

Page 89: ...nt shall not be set up to make automatic calls to the Telecom 111 Emergency Service Some parameters required for compliance with Telecom s Telepermit requirements are dependent on the equipment PC ass...

Page 90: ...charge unit size of grounding conductors location of antenna discharge unit connection to grounding electrodes and requirements for the grounding electrode Lightning protection For added protection of...

Page 91: ...lectric service equipment 2 Power Service grounding electrode system NEC Art 250 Part H 3 Ground clamps 4 Grounding conductors NEC Section 810 21 5 Antenna discharge unit NEC Section 810 20 6 Ground c...

Page 92: ...84 Safety and Regulatory Information 8506999 book Page 84 Friday December 15 2000 8 22 AM...

Page 93: ...ded in the following tables The typical configurations are E 1600 SE 700 MHz Celeron processor 64 MB system memory single DIMM 10 GB 4500 rpm Quantum hard drive LE 500 monitor Floppy drive 48x LG CD d...

Page 94: ...ur ATAPI IDE devices hard drives CD drives LS 120 drives using two onboard PCI IDE adapters The chassis provides space for as many as three ATAPI IDE devices and a diskette drive Diskette drive Disket...

Page 95: ...150 F 5 to 35 C 41 to 95 F derated 0 5 C for every 1000 ft 305 m Humidity Nonoperating Operating wet bulb 95 relative noncondensing at 30 C 86 F Not to exceed 33 C 91 4 F with diskette drive or hard...

Page 96: ...2 1 byte Fast A20 and PIC 00A0 00A1 2 bytes PIC 00B2 00B3 2 bytes Reserved 00C0 00DF 32 bytes DMA 00F0 1 byte Numeric data processor 0170 0177 8 bytes Secondary IDE channel 01F0 01F7 8 bytes Primary I...

Page 97: ...ytes Secondary bus master IDE registers 96 contiguous bytes starting on a 128 byte divisible boundary ICH2 ACPI TCO 64 contiguous bytes starting on a 64 byte divisible boundary D810eGB board resource...

Page 98: ...0000 EFFFF 64 KB Reserved 800 K 896 K C8000 DFFFF 96 KB Available high DOS memory open to the PCI bus 640 K 800 K A0000 C7FFF 160 KB Video memory and BIOS 639 K 640 K 9FC00 9FFFF 1 KB Extended BIOS da...

Page 99: ...ort if present otherwise user available 13 Reserved math coprocessor 14 Primary IDE if present otherwise user available 15 Secondary IDE if present otherwise user available DMA Channel Data Width Reso...

Page 100: ...92 Reference Data 8506999 book Page 92 Friday December 15 2000 8 22 AM...

Page 101: ...4 supported speakers 1 avoiding static electricity 15 B back panel features 3 backing up files 50 battery installing 37 location 7 removing 37 replacing 37 troubleshooting 58 warnings 37 beep codes 7...

Page 102: ...assis intrusion 7 COM port 3 7 DIMM slots 7 diskette drive 7 expansion cards 6 front panel 7 internal speaker 6 keyboard port 3 7 LAN port 3 7 line out 4 LPT port 7 main power 7 memory slots 7 microph...

Page 103: ...environmental specifications 87 error messages 69 expansion card connector location 6 installing 35 removing 35 replacing 35 troubleshooting 64 F fan processor connector location 7 FAQ frequently aske...

Page 104: ...ain board 41 memory 30 power supply 42 processor 34 RAM 30 system board 40 tower stand 5 internal speaker connector location 6 interrupts used 90 J jumper BIOS configuration location 7 setting 46 K Ke...

Page 105: ...lel port location 3 7 PCI slots location 3 6 port audio out 4 COM 3 7 I O 86 keyboard 3 7 LAN 3 7 line out 4 LPT 3 7 microphone 3 monitor 3 mouse 3 7 network 3 7 parallel 3 7 printer 3 7 RJ 11 7 seria...

Page 106: ...y 37 CD drive 22 chassis cover 19 CPU 34 DIMM 30 diskette drive 24 expansion card 35 front bezel 19 hard drive 28 heatsink 32 35 main board 39 41 memory 30 power supply 41 42 processor 34 RAM 30 syste...

Page 107: ...eight 86 system board features 6 installing 40 removing 39 replacing 39 40 System Restoration CD 54 T telephony connector location 6 temperature operating 87 storing 87 temporary files deleting 50 tes...

Page 108: ...rt location 3 7 troubleshooting 66 67 viruses protecting computer 52 removing 52 voltage maximum 87 selector switch location 3 W warning battery 37 general safety 73 laser statement 82 weight of syste...

Reviews: