background image

32

Using the Gateway 210 Projector

www.gateway.com

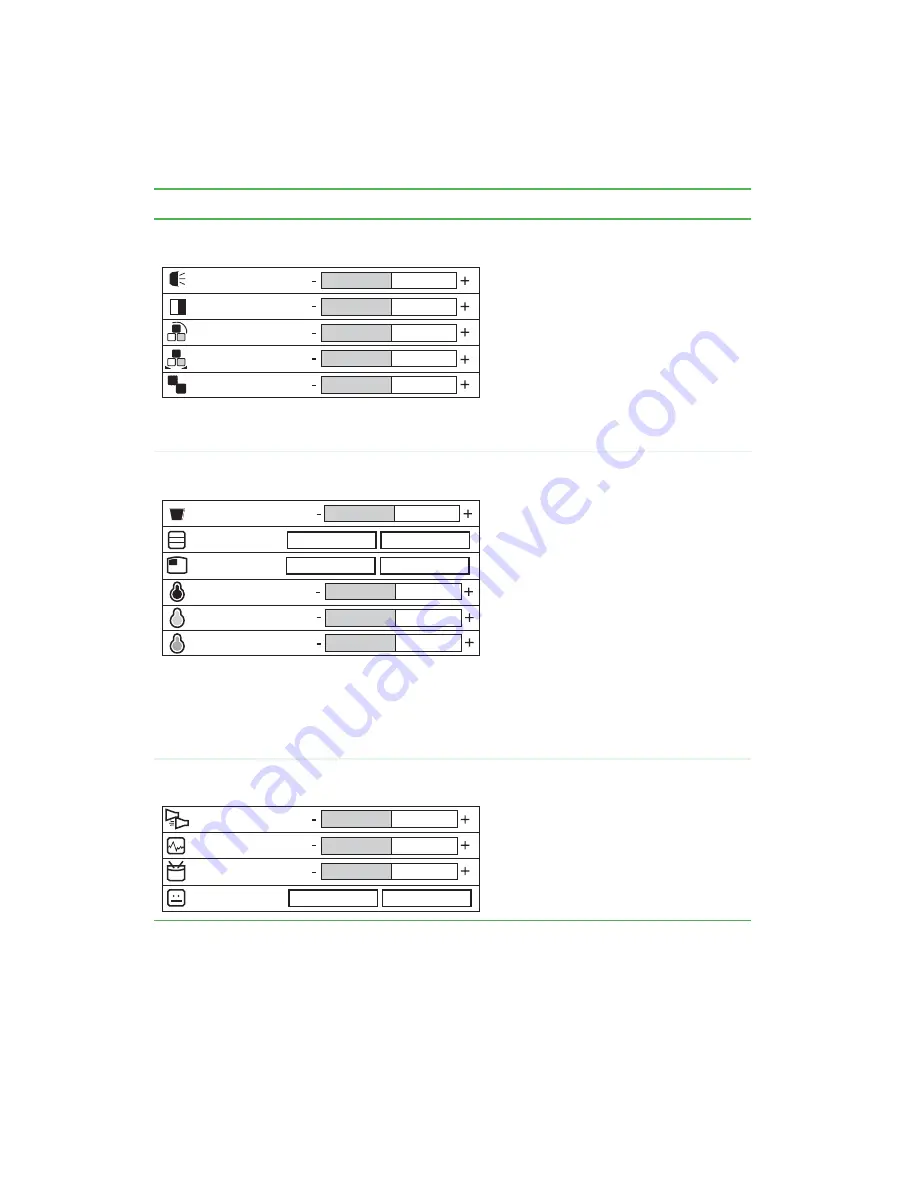
VIDEO MODE - Image

Brightness.

 Adjusts the brightness of 

the display image.

You may need to readjust brightness after 
the projector has warmed up.

Contrast.

 Adjusts the contrast of the 

display image.

Color Hue.

 Changes the display image 

from black and white to color.

Saturation.

 Adjusts the balance between 

red and green color levels.

Sharpness.

 Adjusts the sharpness of the 

display image.

VIDEO MODE - Display

Keystone.

 Corrects a display image that 

is wider at the top or at the bottom.

Do not use when displaying text or 
spreadsheets to eliminate text distortion.

Proportion.

 Switches between a display 

image mode of 4:3 or 16:9.

User Color.

 Activates individual red, 

green, or blue color correction controls.

User Red.

 Customizes the red color 

levels.

User Green.

 Customizes the green color 

levels.

User Blue.

 Customizes the blue color 

levels.

Color Temp.

 Increases the red or blue 

tint of the display image.

Audio

Volume.

 Turns the overall volume of the 

projector up or down.

Treble.

 Turns the treble volume up or 

down.

Bass.

 Adjusts the medium and low audio 

frequencies.

Mute.

 Mutes the projector’s audio.

OSD Menu

Description

Brightness

Contrast

Color Hue

Saturation

128

128

6

Sharpness

128

128

Keystone

Proportion

0

User Color

User Red

User Green

User Blue

123

123

123

4:3

16:9

Yes

No

Volume

Treble

Bass

Mute

16

8

8

Yes

No

Summary of Contents for 210

Page 1: ...Gateway 210 Projector Gateway 210 Projector user sguide user sguide Setup Connecting ...

Page 2: ...www gateway com ...

Page 3: ...18 Connecting components 20 Connecting to your computer 20 Connecting to a DVD player or VCR 23 Connecting to a satellite dish 27 Operating the projector 29 Starting the projector 29 OSD options 30 Shutting down the projector 34 Maintaining the projector 35 Changing the lamp module 35 Cleaning the projector 39 Accessories 40 Troubleshooting 41 First steps 41 Common problems and solutions 42 Specif...

Page 4: ...ii ...

Page 5: ...his guide to find out how to Use the projector safely Use the remote control Set up and connect the projector Start and turn off the projector Use the On screen display OSD menus Replace the lamp module Troubleshoot typical hardware problems ...

Page 6: ...adjust for best display image Easy Keystone correction for distorted images Component video compatibility Before using your projector read the following safety instructions For a complete list of safety precautions see Important safety information on page 47 Warning Do not cover the lens while the lamp is on Warning To project your eyes do not look into the projector s light source Warning Make su...

Page 7: ...3 Projector front www gateway com Projector front Item Description Projection lens Projects the image on the screen Projection lens ...

Page 8: ...4 Using the Gateway 210 Projector www gateway com Projector back Item Description M1DA port Connects the video adapter to the projector M1DA port ...

Page 9: ... zoom the display image Adjustor foot release button Press to release the adjustor foot on the bottom of the projector For more information see Setting up the projector on page 18 Kensington lock slot Connect a Kensington cable lock to this slot to secure the projector to an object Kensington lock Adjustor foot release button Zoom wheel Focus ring ...

Page 10: ...6 Using the Gateway 210 Projector www gateway com Projector right Item Description Power connector Plug a power cable into this connector Power connector ...

Page 11: ...7 Projector top www gateway com Projector top Indicator Power Auto Enter Menu Power button Menu button Focus ring Zoom wheel Indicator buttons Auto Enter button Infrared remote sensor ...

Page 12: ... to move between menu options OSD inactive Press to select the video input source buttons Press to adjust menu options Power button Press to turn the power off and on Menu button Press to view the OSD Press again to exit Auto Enter button OSD active Press to select menu options OSD inactive Press to automatically select the best video settings for the current video source Infrared remote sensor Pi...

Page 13: ...anging the lamp module on page 35 Adjustor foot Press the button on the right side of the projector to release the adjustor foot For more information see Setting up the projector on page 18 Lens cap Protects the projector lens Ceiling mount connector Connect the projector to a ceiling mount Lens cap Ceiling mount connector Adjustor foot Lamp access panel ...

Page 14: ...10 Using the Gateway 210 Projector www gateway com Video adapter front Item Description M1DA connector Connects the video adapter to the projector M1DA connector ...

Page 15: ...11 Video adapter back www gateway com Video adapter back Thumbscrew VGA port Thumbscrew S Video port Video port Audio L port Audio out port Audio R port Audio in port USB port ...

Page 16: ...page 25 Video port Plug the video yellow connector from a composite video cable into this port For more information see To connect the projector to a DVD player or VCR using composite video on page 23 Audio L port Plug the white audio connector from a composite video cable into this port For more information see To connect the projector to a DVD player or VCR using composite video on page 23 Audio...

Page 17: ...al outlet or surge protector VGA cable When the video adapter is connected to the projector connect this cable to send the video signal from your computer to the projector USB cable When the video adapter is connected to the projector use this cable to connect your computer to the projector so you can use the remote control as a mouse Audio in out cable When the video adapter is connected to the p...

Page 18: ...s cable to connect a video component such as a DVD player or VCR to the projector The video signal is split into two signals black and white and color This type of cable produces a better picture than the single connector from the composite video cable This cable provides no audio output Component video cable When the video adapter is connected to the projector use this cable to connect a video co...

Page 19: ...mote control should not exceed 29 5 feet 9 meters for the remote control to function correctly To insert batteries in the remote control 1 Remove the battery compartment cover 2 Insert two AAA batteries into the battery compartment Make sure that the and symbols match the and symbols inside the battery compartment 3 Replace the battery compartment cover ...

Page 20: ...way 210 Projector www gateway com Remote front Power button Laser button Source button Freeze ESC Left mouse button Pg Up Pg Down button Enter Right mouse button Auto button buttons Menu button Blank button Mode button ...

Page 21: ...o advance to the next page of your presentation Menu Press to view the OSD Press again to exit For more information about the OSD options see OSD options on page 30 Blank Press to view a plain blue screen Press again to restore the display image Auto Press to automatically adjust the display image to the best settings for the video source Source Press to view the current video input source and swi...

Page 22: ...tor 1 Connect the video adapter to the back of the projector and tighten the two thumbscrews 2 Place the projector on a sturdy cart or table close to other components you plan to connect to the projector and an electrical outlet 3 Point the projector lens towards a blank wall or projection screen ...

Page 23: ...ght side of the projector to release the adjustor foot so you can adjust the tilt angle of the projector 5 Plug the power cable into the power connector on the left side of the projector then plug the other end into a correctly grounded electrical outlet or surge protector ...

Page 24: ...ting to a satellite dish on page 27 Connecting to your computer To connect the projector to your computer 1 Plug the VGA cable into the blue VGA port on the back of the video adapter then plug the other end into the blue video port on the back of your computer Tips Tricks If you are connecting to a notebook you may need to make adjustments to the notebook s display settings to view the display ima...

Page 25: ...components www gateway com 2 If you want to use the remote control as a mouse plug the USB cable into the USB port on the back of the video adapter then plug the other end into a USB port on the back of your computer ...

Page 26: ...Projector www gateway com 3 If your presentation contains an audio track plug the audio cable into the Audio In port on the back of the video adapter then plug the other end into the Audio Out port on the back of your computer ...

Page 27: ...w these instructions If you are using S Video to connect the DVD player or VCR go to To connect the projector to a DVD player or VCR using S Video on page 25 To connect the projector to a DVD player or VCR using composite video 1 Plug the yellow red and white composite cable connectors into the corresponding ports on the back of the video adapter ...

Page 28: ...24 Using the Gateway 210 Projector www gateway com 2 Plug the yellow red and white connectors on the other end into the corresponding line out ports on the back of the DVD player or VCR ...

Page 29: ...com To connect the projector to a DVD player or VCR using S Video 1 Plug the S Video cable connector into the S Video port on the back of the video adapter then plug the other end into the S Video port on the back of the DVD player or VCR ...

Page 30: ...o the corresponding ports on the back of the video adapter then plug the red and white connectors on the other end to the corresponding ports on the back of the DVD player or VCR Tips Tricks If you are using the composite cable for your audio cable connections make sure that you do not plug in the yellow video connector ...

Page 31: ... dish To connect the projector to a satellite dish 1 Plug the component cable connector into the VGA port on the back of the projector then plug the green blue and red connectors on the other end into the corresponding ports on the back of the satellite dish receiver ...

Page 32: ...he corresponding ports on the back of the video adapter then plug the red and white connectors on the other end to the corresponding ports on the back of the satellite dish receiver Tips Tricks If you are using the composite cable for your audio cable connections make sure that you do not plug in the yellow video connector ...

Page 33: ...n the connected components After all components are running allow about 30 seconds for the display image to appear If the power LED is not steady green or you do not see a display image check the connections For more troubleshooting information see Troubleshooting on page 41 3 Use the focus ring and zoom wheel to adjust the display You can also use the on screen display OSD to make additional disp...

Page 34: ...n OSD option To adjust the OSD settings 1 Press the Menu button The OSD menu opens 2 Press or to highlight an OSD option on the main navigation bar on the left of the OSD menu then press the button 3 Press or to highlight a control then press the Enter button 4 Press or to adjust the control to the desired level 5 Press the Menu button to return to the main navigation bar on the left of the OSD me...

Page 35: ...s visible on the screen background Phase Removes any horizontal distortion and clears or sharpens the displayed characters V Position Adjusts the display image up and down H Position Adjusts the display image left and right Proportion Switches between a display image mode of 4 3 or 16 9 User Color Activates individual red green or blue color correction controls User Red Customizes the red color le...

Page 36: ...s to eliminate text distortion Proportion Switches between a display image mode of 4 3 or 16 9 User Color Activates individual red green or blue color correction controls User Red Customizes the red color levels User Green Customizes the green color levels User Blue Customizes the blue color levels Color Temp Increases the red or blue tint of the display image Audio Volume Turns the overall volume...

Page 37: ...mp timer after replacing the lamp module Auto Adjust Automatically adjusts the display image to the ideal settings for the display source Reset All Returns all settings to the factory defaults Source Type Switches between available video input sources Language Language Changes the language of the OSD menu Choose between English German French Italian Spanish Portuguese Japanese Traditional Chinese ...

Page 38: ...ponents 2 Press the power button on the projector A warning message appears 3 Press the power button again to turn off the projector 4 Wait until the fan stops then disconnect the power cable Warning The projector needs a 120 second cool down period Do not disconnect the power cable until the fan stops or you may damage the projector ...

Page 39: ...le 1 Turn off the projector and wait for the fan to stop 2 Disconnect the power cord and all other external cables 3 Let the projector lamp cool completely approximately 30 minutes 4 Turn the projector over so the bottom is facing up Warning To prevent electric shock do not open the projector case There are no user replaceable parts inside Contact Gateway Technical Support for service or repair Wa...

Page 40: ...36 Using the Gateway 210 Projector www gateway com 5 Remove the lamp access panel screw then press down on the access panel lock to remove the access panel ...

Page 41: ...37 Maintaining the projector www gateway com 6 Remove the three lamp module retaining screws 7 Unsnap the lamp removal handle then lift the lamp module straight up out of the lamp bay ...

Page 42: ...that the cable connections line up with the connectors in the lamp bay 9 Replace the three lamp module retaining screws 10 Replace the lamp bay access panel then replace the access panel screw 11 Turn the projector over 12 Connect the power cable and all external cables Important Make sure that the lamp bay access panel is securely in place If the access panel is not securely in place the projecto...

Page 43: ...With the projector turned off and unplugged brush the dust away from the vents with a damp cloth Be careful not to drip any water into the vents Do not attempt to clean dust from the inside the projector Cleaning the projector lens Always turn off the projector and wait for it to cool before cleaning it Use a soft cloth and glass cleaner to clean the projector lens Squirt a little cleaner on the c...

Page 44: ... M1DA cable kit Gateway has a M1DA cable kit that lets you connect the projector to Your computer without the video adaptor High end HD compatible video equipment Network module Gateway has a network module that attaches to the projector so you can access and run presentations from your local network Portable projection screens Gateway has portable projection screens available so you can get the b...

Page 45: ... guide does not correct the problem contact Gateway Technical Support at 800 846 2303 Before calling Gateway Technical Support Have your customer ID serial number and order number available along with a detailed description of your problem including the exact text of any error messages and the steps you have taken Make sure that the projector is nearby at the time of your call The technician may h...

Page 46: ...Make sure that all components are connected correctly and securely To make sure that all component connections are correct see Connecting components on page 20 If you are connected to a notebook make sure that the notebook s display settings were changed so the display image is viewed through the projector See the documentation that came with your notebook for information about changing display se...

Page 47: ...mage to the ideal settings for the display source Use the focus ring to manually focus the display image Use the OSD menus to adjust the image settings For more information see OSD options on page 30 Reposition the projector to get a better angle on the projection screen Remote control does not work Make sure that you are less than 29 5 feet 9 meters of the infrared remote sensors on the front and...

Page 48: ...way 210 projector Resolution 1024 768 XGA Aspect ratio 4 3 or 16 9 Brightness 1500 lumens Zoom ratio 1 2 1 Lamp 150 W VIP lamp Power supply AC 100 240 V 2 2 A 50 60 Hz automatic Power consumption 220 W max Dimensions W H D 9 01 2 72 7 60 inches 229 69 193 mm Weight 3 5 lbs 1 6 Kg Operating temperature 41 F 95 F 5 C 35 C Certifications UL 1950 ...

Page 49: ... and may vary from similarly marketed products Distance to Screen Minimum Display Size Maximum Display Size 55 inches 1 4 m 35 inches 0 89 m 41 inches 1 04 m 78 inches 2 0 m 49 inches 1 25 m 58 inches 1 47 m 157 inches 4 0 m 99 inches 2 52 m 116 inches 2 95 m 236 inches 6 0 m 149 inches 3 79 m 174 inches 4 42 m 393 inches 10 0 m 248 inches 6 30 m 290 inches 7 37 m ...

Page 50: ...46 Using the Gateway 210 Projector www gateway com ...

Page 51: ...y of information technology equipment However to ensure safe use of this product it is important that the safety instructions marked on the product and in the documentation are followed Warning Always follow these instructions to help guard against personal injury and damage to the Gateway projector Warning Laser Radiation Do not stare into the laser beam ...

Page 52: ...tension cord with this projector make sure that the total ampere rating on the products plugged into the extension cord does not exceed the extension cord ampere rating If the projector is connected to a product fitted with a TV Tuner cable or satellite receiver card make sure that the antenna or cable system is electrically grounded to provide some protection against voltage surges and buildup of...

Page 53: ...or more of the following measures Reorient or relocate the receiving antenna Increase the separation between the equipment and receiver Connect the equipment to an outlet on a different circuit from that to which the receiver is connected Consult the dealer or an experienced radio TV technician for help Compliance Accessories The accessories associated with this equipment are shielded video cable ...

Page 54: ...stry Canada Le présent appareil numérique n émet pas de bruits radioélectriques dépassant les limites applicables aux appareils numériques de Classe B prescrites dans le règlement sur le brouillage radioélectrique édicté par Industrie Canada Laser Radiation California Proposition 65 Warning Warning Laser Radiation Do not stare into the laser beam Warning This product contains chemicals including l...

Page 55: ... black and white spotted box logo GATEWAY Gateway Astro Gateway Work Gateway Connected touch pad Gateway Connected music player Gateway Cyber Ware Gateway Education Ware Gateway Flex Case Gateway Gaming Ware Gateway GoBack Gateway Gold Gateway Learning Ware Gateway Magazine Gateway Micro Server Gateway Money Ware Gateway Music Ware Gateway Networking Solutions Gateway Online Network O N solution G...

Page 56: ...52 Appendix Safety Regulatory and Legal Information www gateway com ...

Page 57: ...www gateway com ...

Page 58: ...l outlet 3 Point the projector lens towards a blank wall or projection screen 4 Plug the VGA cable into the blue VGA port on the back of the video adapter then plug the other end into the blue video port on the back of your computer 5 Plug the power cable into the power connector on the left side of the projector then plug the other end into a correctly grounded electrical outlet or surge protecto...

Reviews: