


31
PIPS II Owners Manual and Users Guide
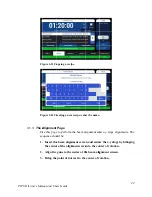
4.
Plug the PIPS II into the main power socket. Do not load a specimen
post just yet.
5.
Rotate the microscope objective turret to the 2x position.
Adjust the focus knob to clearly view the hex shape at the top of the piston.
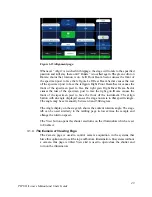
2.3.6.
Aligning the Stereo Microscope
The microscope is shipped pre-aligned so the hex shape at the top of the
piston should appear concentric with the microscope field-of-view. Keep in
mind the field-of-view is a true image such that if a gap exists between the
post and the field-of-view at the 6 o-clock position, the microscope must be
shifted toward the rear of the PIPS II for centering.
NOTE:
Alignment should be performed only when the PIPS II is under
vacuum and the piston can be lowered into the chamber.
If alignment is necessary, the tools required are a 1.5 mm and a 3.0 mm hex
wrench and the small spanner wrench all supplied in the accessory kit.
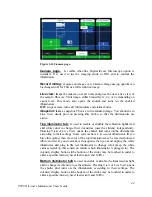
To Setup for Alignment
1.
Insert a copper specimen post into the top of the piston to use as a
target.
2.
Turn on the Reflection Illuminator.
3.
Determine the direction the microscope must move to properly center
the target.
Front-to-back alignment
1.
Loosen sufficiently the two socket-head screws on the pivoting slide.
Use the 3.0 mm hex wrench to loosen the two screws. This will permit the
microscope to slide back and forth with minimal side motion.
2.
Center the specimen post; tighten the two screws.
Be sure the two socket-head screws are tight before proceeding.