


Operation
Dimple Grinder User’s Guide
19
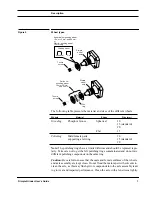
4.7 Polishing
When grinding has reduced the specimen thickness to within a few microns of
the final thickness, the grinding wheel is replaced with a felt polishing wheel.
Generally, a polishing treatment improves the final specimen quality obtainable
with subsequent ion milling.
To polish
1. Remove the grinding wheel and wipe the axle with a clean lens tissue.
If the contamination is difficult to remove, lightly moisten the tissue with
water or a solvent (e.g., acetone).
Caution: Do not flood the male taper with solvents to clean the axle as this may
flush grit or compounds into the axle assembly and lead to bearing wear and
impair performance.
2. Remove the specimen mount from the Turntable.
Thoroughly clean the specimen of all grinding compound. Use a cotton
swab and distilled water followed by flushing with acetone.
3. Carefully mount the polishing wheel onto the axle.
4. Place the specimen mount back onto the Turntable and center using the
microscope.
Precise centering is unnecessary for the final polishing step.
5. Set a higher rotational speed for polishing and set a load of about 30 g.
6. Apply a small quantity of 2–4 µm diamond paste to both the felt wheel
and specimen.
Note: Take care not to get the felt polishing rings contaminated and do not mix
different polishing compounds on the same ring.
7. Gently lower the polishing wheel onto the specimen.
Polish until the surface finish is improved (normally requires only a few
minutes).
8. Use a new felt wheel and repeat with 0.05-µm alumina.
Polish until the surface is free of scratches produced by the 2–4 µm diamond
paste.
Note: The softness of the felt polishing wheels makes the measuring system
inaccurate. From time to time, monitor the polishing progress with the stereo
Summary of Contents for 656
Page 2: ...Part Number 656 82002...
Page 6: ...iv Dimple Grinder User s Guide...
Page 10: ...viii Dimple Grinder User s Guide...
Page 42: ...Spares and Consumables 32 Dimple Grinder User s Guide...
Page 44: ...I 2 Dimple Grinder User s Guide...
Page 48: ......