


Operation
Dimple Grinder User’s Guide
11
•
Set grinding by final specimen thickness.
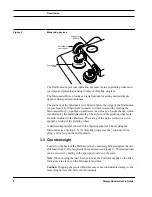
Both methods are based on the interaction of the Micrometer Drive and the ana-
log Dial Indicator.
The Dimple Depth digital display shows the desired dimple depth set by lower-
ing the end face of the Micrometer Drive.
The analog Dial Indicator shows the progress of grinding and displays the thick-
ness of specimen material remaining to be removed.
When the Dial Indicator stylus makes contact with the micrometer end face,
grinding is terminated by the AutoTerminator, which will automatically switch
off the wheel and specimen turntable motors (see Figure 8).
The rate of removal of material by grinding depends on several factors. Gener-
ally, increasing the load and/or grinding wheel speed will increase the rate of
material removal. However, this will also produce a thicker damaged layer. It
should also be noted that some hard metals work harden significantly and these
are best dimpled at a slow speed with reduced load.
Grinding by Dimple Depth
This method is used when very thin (<20µm) specimens are being dimpled.
The Micrometer is first zeroed on the upper surface of the specimen and the
desired dimple depth is set with the Micrometer Drive and value read on the
digital display.
The initial thickness of the specimen must be known
.
This method is the most accurate way to grind specimens but it is necessary to
zero the Micrometer for each specimen.
See Section 4.5 for more detailed instruction on this method.
Grinding by Final Specimen Thickness
This method is less accurate than the “dimple depth” method and is not recom-
mended for very thin specimens.
The Micrometer is first zeroed on the upper surface of a specimen mount
with-
out any specimen
. The mount is replaced with a mount with a specimen and the
desired amount of material to be removed is dialed in using the Micrometer
Drive.
The advantages of this method are the initial thickness of the specimen need not
be ascertained and the Micrometer is zeroed only once when dimpling a number
of specimens.
Summary of Contents for 656
Page 2: ...Part Number 656 82002...
Page 6: ...iv Dimple Grinder User s Guide...
Page 10: ...viii Dimple Grinder User s Guide...
Page 42: ...Spares and Consumables 32 Dimple Grinder User s Guide...
Page 44: ...I 2 Dimple Grinder User s Guide...
Page 48: ......