


Operation
12
Dimple Grinder User’s Guide
The disadvantages are the inaccuracies that are not taken into account, i.e., spec-
imen mount may not seat at precisely the same height each time; the main “vari-
able” thickness of the mounting wax.
See Section 4.6 for more detailed instruction on this method.
4.1 Adjusting Zero of Dial Indicator
Note
: The zero of the Dial Indicator should always be checked prior to dim-
pling. The care with which the zero is set will determine the accuracy of the
measuring systems.
To zero the Dial Indicator
1. Raise the Platform to the upright position,
Remove the specimen mount (if any) from the Magnetic Turntable.
Check that both motors (
T
ABLE
and
A
RM
buttons on Control Panel
)
are off.
2. Set a load of 20 g on the Counterweight.
3. Lower the Platform onto the Raise/Lower Cam stop.
Be sure the Cam stop is in the “rear” position.
4. Lower the micrometer end face by rotating the Micrometer Drive
(clockwise) until it bottoms against the base.
5. Use the Raise/Lower Cam and carefully lower the Platform.
When lowered, the Cam stop is in the “front.”
6. Raise the micrometer end face by rotating the Micrometer Drive
counter-clockwise.
Rotate (several revolutions) until the Dial Indicator needle registers and
rotates one complete turn coming to rest at or near the 12 o’clock position.
Note:
It is
not
necessary for the needle to be
exactly
at the 12 o’clock position.
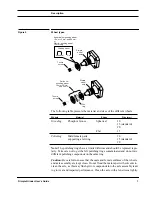
However, if it does stop more than ± 10µm away from 12 o’clock position, per-
form the Zero Adjust procedure (see Section 5.7). For small zero adjusts, use
the 3/32 hex wrench on the zero stop screw (see Figure 1) and rotate to center
needle.
7. Verify with Digital Display reading.
Rotate the Micrometer Drive (clockwise) to position the needle on “100”
and see that the Digital Display reads 0.100. Return the needle to zero. The
Dial Indicator is properly zeroed.
Summary of Contents for 656
Page 2: ...Part Number 656 82002...
Page 6: ...iv Dimple Grinder User s Guide...
Page 10: ...viii Dimple Grinder User s Guide...
Page 42: ...Spares and Consumables 32 Dimple Grinder User s Guide...
Page 44: ...I 2 Dimple Grinder User s Guide...
Page 48: ......