Owner's Manual
-67-
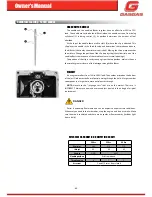
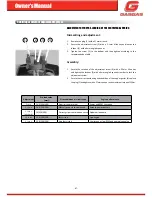
Centrifugal external adjustment system
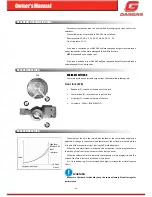
aDjuStMent Of tHe Pre-lOaDinG Of tHe CentrifuGal SPrinG
Dismantling and adjustment:
1. Remove the plug (1) with a 27mm wrench.
2. secure the adjustment screw (2) with a 2.5mm allen key and loosen the
locknut (3) with a 6mm angled spanner.
3. Tighten the screw (2) to the bottom and then tighten according to the
recommendation table.
assembly:
1. secure the rotation of the adjustment screw (2) with a 2.5mm allen key
and tighten the locknut (3) with a 6mm angled spanner in order to lock the
adjustment system.
2. Ensure the correct positioning and condition of the copper gasket (4) replace
the plug (1) and tighten with a 27mm spanner and a maximum torque of 25nm.
adjustment
pre-load value
(mm)
Site conditions or circuit type
engine performance.
1 turn
14.2 (250/300)
no grip (snow or mud)
power and Rpm limitation.
1.5 turn
14.6 (250/300)
difficult grip or technical circuit
smooth power delivery
2 turns
(standard)
15 (250/300)
correct grip or combination circuit optimum/standard
2.5 turns
15.4 (250/300)
fast circuit
Live engine
3 turns
15.8 (250/300)
Very fast circuit
Low torque at low Rpm and aggressive engine
1
2
3
4
Summary of Contents for Enduro 2T 250 2018
Page 1: ......
Page 5: ...Owner s Manual 5...
Page 6: ...Owner s Manual 6 This page has been left blank intentionally...
Page 7: ...Owner s Manual 7 General information...
Page 16: ...Owner s Manual 16...
Page 17: ...Owner s Manual 17 Electric diagram for 250 300cc models...
Page 18: ...Owner s Manual 18...
Page 21: ...Owner s Manual 21 Table of tightening torques 1 2 3 4 5 6 7 8 9...
Page 25: ...Owner s Manual 25...
Page 26: ...Owner s Manual 26 This page has been left blank intentionally Operating instructions...
Page 35: ...Owner s Manual 35 Maintenance...
Page 58: ...Owner s Manual 58 This page has been left blank intentionally Settings...
Page 68: ...Owner s Manual 68 This page has been left blank intentionally Troubleshooting...
Page 73: ...Owner s Manual 73...
Page 74: ...Owner s Manual 74 This page has been left blank intentionally Warranty manual...
Page 77: ......

