background image

Owner's Manual

-5-

Summary of Contents for Enduro 2T 250 2018

Page 1: ......

Page 2: ...in part is prohibited without the written permission of the copyright holder The company has the right without prior notice to change the technical content of the products The models in the images may...

Page 3: ...ly inspection before riding 28 Cleaning 32 Storage 33 OBD Operation 33 Maintenance 35 Maintenance table 36 Maintenance 37 1 Clutch 37 2 Clutch discs 37 3 Throttle cable 37 4 Spark plug 37 5 Air filter...

Page 4: ...age 53 40 Rear suspension 53 41 Chain 56 42 Tires 56 43 Battery charge 57 Settings 58 Introduction 59 Carburator setting For XC model 59 Opening of the throttle valve and influences 59 Idle jet and mi...

Page 5: ...Owner s Manual 5...

Page 6: ...Owner s Manual 6 This page has been left blank intentionally...

Page 7: ...Owner s Manual 7 General information...

Page 8: ...he corresponding reviews vital for your GAS GAS to be highly reliable you can enjoy the most comfortable and fulfilling motorcycling Thank you for your trust and welcome to GAS GAS Notices and warning...

Page 9: ...r GAS GAS has been designed for off road use it has not been designed for long journeys on the road or motorway Such use may result in damage to the engine due the high revolutions and the tires are n...

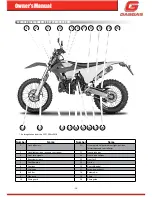
Page 10: ...ht position long and short beam 12 Front brake disc 3 Front turn signals 13 Front brake calliper 4 Rear view mirrors 14 Front fork 5 Overflow pipe 15 Starter 6 Fuel tank 16 Gear shift pedal 7 Fuel val...

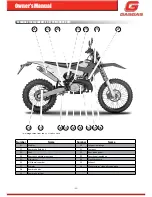
Page 11: ...nsion linkage 22 Rear brake fluid tank 31 Footpegs 23 Seat 32 Rear brake pedal 24 Rear shock absorber gas tank 33 Centrifugal regulation 25 Kick starter 34 Crankcase guard 26 VIN chassis number 35 Exh...

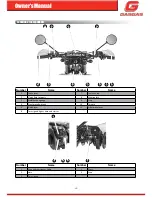
Page 12: ...teering lock 3 Multifunction gauge 9 Stop 4 Front brake fluid tank 10 Throttle 5 Clutch lever 11 Front brake lever 6 Turn signals lights horn and starter Location of components Number Name Number Name...

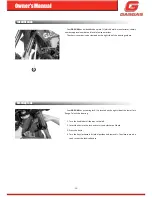
Page 13: ...tamped on the right side of the steering column Your GAS GAS has a steering lock It is located on the right side of the lower fork flange To lock the steering 1 Turn the handlebar all the way to the l...

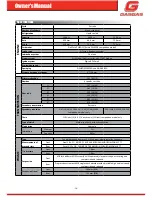
Page 14: ...4 19 Secondary transmission Per chain Secondary reduction 3 67 13 49 EC 200 250 3 69 13 48 EC300 Competition models only 3 30 13 42 EC 200 250 300 Chain 110 Links 5 8 x 1 4 with seals 112 links compet...

Page 15: ...minimum RON 98 Oil mixture JASO FC NILS DUO SYNT S 27 100 synthetic oil at 2 50 1 Semi synthetic oil at 2 50 1 Mineral oil at 3 32 1 Coolant 2 NILS POLAR PLUS Antifreeze mixture at 30 Brake fluid NIL...

Page 16: ...Owner s Manual 16...

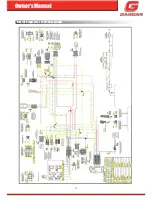
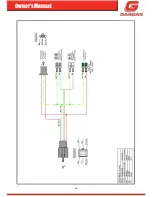
Page 17: ...Owner s Manual 17 Electric diagram for 250 300cc models...

Page 18: ...Owner s Manual 18...

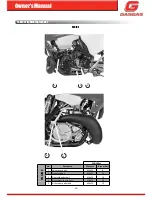
Page 19: ...60 SCREW Lower shock absorber M12 50 LINK Measure Torque Nm NUT Tie rod Chassis M12 80 NUT Tie rod Rocker arm M12 80 NUT Rocker arm Swinging arm M12 80 SWINGING ARM Measure Torque Nm NUT Swinging arm...

Page 20: ...ng torques 250 300cc ENGINE No Part name Measure Torque Nm 1 Valve cover bolts M5x15 8 2 Crankcase bolt M6x25 12 3 Gear shift pedal bolt M6x12 14 4 Kick starter to axle bolt M6x20 12 5 Kick starter pe...

Page 21: ...Owner s Manual 21 Table of tightening torques 1 2 3 4 5 6 7 8 9...

Page 22: ...5 Cylinder head bolt M8 27 6 Reed block bolt M6 12 7 Ignition cover bolt M6 8 8 Engine drain plug M12 15 9 Oil fill bolt M12 15 Ratchet plate bolt M6 8 Stator bolts M5 8 Ignition motor coil bolt M10 6...

Page 23: ...nds To enter the wheel length mode press MODE 10 seconds Adjustment push button Mode push button CLOCK Format If the units are in Km 24h If the units are in mi 12h To increase the hour digits press MO...

Page 24: ...Quantity bike Manufacturer s identification plate 1 Catalysed exhaust 1 Homologated front and rear sprockets 1 Carburettor Dell Orto PHBG21 1 Fuel overflow assembly 1 Front and rear turn signals 4 Hom...

Page 25: ...Owner s Manual 25...

Page 26: ...Owner s Manual 26 This page has been left blank intentionally Operating instructions...

Page 27: ...reaching its full performance DANGER Reckless acceleration can cause problems in the engine Take care that you use the skills and techniques necessary in riding the motorcycle Starting procedure To st...

Page 28: ...el to the carburettor the motorcycle will not run this position is used only when the engine is stopped If you can see that there is little fuel in the tank it should be started with the tap in the RE...

Page 29: ...n its stand and handlebar turned to the right in this position unlatch the tank lid together with its rubber bellows beware of DIRT it is necessary to have a clean space in which to leave the disassem...

Page 30: ...hanges go immediately to your official GAS GAS service centre The official GAS GAS service centre will be happy to assist you and to ensure your safety Does the side stand feel OK The stand is a part...

Page 31: ...on the front sprocket rear sprocket chain guides or chain protector you should go to your official GAS GAS service centre this affects your safety Is the seat correctly set This is a vital point for...

Page 32: ...r motorcycle Daily inspection before riding Cleaning To clean your GAS GAS follow these steps 1 Cover the exhaust system to prevent water from entering 2 Cover the steering lock with a piece of duct t...

Page 33: ...if this is not possible put cardboard under the wheels Cover the motorcycle to protect it from dust and dirt To put it into operation after storage Remove the plastic bag from the exhaust pipe Tighte...

Page 34: ...system has If the system detects an historical error the MIL stays on permanently Also if you use the Creader VI scan tool you can see in Monitor Status the information MIL status ON With the key lig...

Page 35: ...Owner s Manual 35 Maintenance...

Page 36: ...rs 18 Brakes adjustment 20 hours When needed 19 Brakes wear 30 hours When needed 20 Brake fluid Every 2 years 21 Brake fluid level 10 hours 20 hours When needed 22 Brake pump piston and dust cover Eve...

Page 37: ...t with a tensioner at the end of the cable tighten the locking nut and reinstall the guard 4 Spark plug The standard spark plug Denso W24ESR U or NGK BR8EG on 250 300cc must be tightened to 25 Nm The...

Page 38: ...l 38 5 Air filter Removing the filter To access the air filter remove the left side cover 1 Remove the left side cover by pulling it by its three ends 2 Remove the filter handle 3 Remove the air filte...

Page 39: ...grease to ensure the closure and prevent dirt from getting in DANGER A clogged air filter allows dirt to enter the engine causing excessive wear and damage Inspect it without fail before and after ea...

Page 40: ...he bike 7 Transmission oil For the transmission and clutch to work properly keep the transmission oil at the optimum level and replace it periodically A motorcycle with insufficient deteriorated or co...

Page 41: ...rew the oil filler cap Maintenance 8 Piston and ring For this check adjustment or change please contact your official GAS GAS service centre 9 Cylinder head cylinder and exhaust valve For this check a...

Page 42: ...noise the muffler fibre must be replaced Replacing the muffler fibre Once the muffler is removed see Replacing the muffler Remove the 4 screws 1 1 Remove the inside of the muffler 2 Replace the muffl...

Page 43: ...rust and corrosion use chemical inhibitors in the essence of coolant If an anti corrosive liquid were not used after a while the radiator would rust This would obstruct the cooling tubes NOTE Initiall...

Page 44: ...ER To avoid burns do not remove the radiator cap or try to change the liquid when the engine is still hot Wait until it cools down DANGER If liquid falls on the tires it makes them more slippery and c...

Page 45: ...he engine 18 Brakes adjustment Front brake lever Adjust the brake lever 1 until you feel comfortable To adjust it loosen the nut 2 After adjusting it tighten securely Check that the brake responds cor...

Page 46: ...ging the front brake pads To change the front brake pads follow these steps 1 Loosen the pin 1 and remove it 2 Remove the pads 2 3 Put a paper or cloth around the brake fluid tank to prevent it from f...

Page 47: ...re plate 5 in case the new pads do not have them 5 Loosen the screws 6 and remove the cap of the brake fluid tank 6 Put a paper or cloth around the brake fluid tank to prevent it from falling 7 Retrac...

Page 48: ...liquid used to fill or renew the circuit must meet the standard specified on the liquid tank of each circuit Therefore the rear brake must use DOT 4 It should never change its specification always adh...

Page 49: ...de centring Ignore it when measuring the centring WARNING Interventions on tires and spokes require the assistance of a specialist so we recommend that you go to your official GAS GAS service centre...

Page 50: ...d to change the front fork spring follow these steps 1 Remove the bar from the suspension flanges 2 Loosen the upper nut of the fork 3 Remove the inner oil from the fork 4 Loosen the lower nut of the...

Page 51: ...he level of oil in the inside of the fork and its correct operation Recommended oil KYB 48 KYB 01M Oil for closed cartridge suspension Oil volume 350 ml 32 Bolts nuts and fasteners Every day before us...

Page 52: ...at the steering is not too tight Squat down in front of the motorcycle grip the lower part of the front fork in the shaft push and pull the fork 1 If there is play the steering is too loose If the ste...

Page 53: ...This is necessary after riding on wet ground when the chain looks dry Its chain is made of seals therefore you must use a specific lubricant for this type of chain Your official GAS GAS service centre...

Page 54: ...1 Stabilize the motorcycle with a central stand or with a special bench 2 Keep the rear wheel from touching the ground with the help of a chock 3 Loosen the exhaust clamping screws 1 4 Disengage the e...

Page 55: ...rame 5 8 Remove the upper shock screw from the shock absorber to the frame 6 9 Carefully remove the shock absorber from the right side of the motorcycle as illustrated in the photograph 7 To reassembl...

Page 56: ...chain is overused or stretched more than 2 it should be replaced Usually this is the right time to change the guide the front and rear sprockets This is for practical economic and SAFETY reasons A cha...

Page 57: ...ger data Minimum voltage before starting the charging process 9v When charging is complete unplug the charger from the battery Once charged leave the battery between 1 to 2 hours before checking the v...

Page 58: ...Owner s Manual 58 This page has been left blank intentionally Settings...

Page 59: ...fully closed position Change with half turn increments If turning the screw from 1 to 2 5 turns does not yield the desired result change one step in the minimum idle jet 1 and tune with the air screw...

Page 60: ...have an effect from 25 to 75 load The needle moves inside the diffuser when the needle narrows from being cylindrical 1 to being conical 2 its position determines the amount of fuel admitted At the to...

Page 61: ...up the needle clip and turn the air screw one turn Correction factors 250 300cc For changes in height or temperature Needle position Air screw opening Correction factor 1 06 or higher 1 06 1 02 1 02 0...

Page 62: ...e fork Compression 2 located at the top of the fork Air purge 1 located at the top of the fork Oil volume 350 ml KYB 010M Oil 3 2 1 The volume of the oil in the fork affects the level of the same insi...

Page 63: ...from closed Standard 14 clicks from closed Sport 10 clicks from closed SUSPENSION settings KYB 250 300 Spring From 65 to 75 kg 50 N mm From 75 to 85kg 52 N mm STD From 85 to 95kg 54 N mm Rebound Comf...

Page 64: ...2 located at the top of the shock absorber screw High speed of compression 17mm located at the top of the shock absorber 4 Standard spring preload 3 248 mm adjustable between 243 and 255 mm between i...

Page 65: ...with both wheels on the floor not resting on the side stand 4 Measure the vertical distance between the rear axle nut and the upper fixed point If the difference between the measurements is different...

Page 66: ...atigue will lead to an incorrect judgement of the settings When the change for a particular terrain is well adjusted the references should be noted for when you encounter similar terrain the next time...

Page 67: ...locknut 3 with a 6mm angled spanner in order to lock the adjustment system 2 Ensure the correct positioning and condition of the copper gasket 4 replace the plug 1 and tighten with a 27mm spanner and...

Page 68: ...Owner s Manual 68 This page has been left blank intentionally Troubleshooting...

Page 69: ...ge a gear and push the motorcycle several meters with the throttle fully open Visually you will know when the pre compression crankcase has been emptied Mount the spark plug and start the bike It is p...

Page 70: ...combustion chamber Contact the official GAS GAS official service Poor quality petrol or bad octane Drain the petrol and introduce new and proper octane Spark plug in poor condition or has inadequate s...

Page 71: ...nt fork with too much oil viscosity Drain the oil from the fork and refill with an oil of suitable viscosity Twisted front fork Contact the official GAS GAS official service Too much pressure in the t...

Page 72: ...adjustment Bent steering axle Contact the official GAS GAS official service Bent front fork Contact the official GAS GAS official service Wheels out of alignment Check the tension of the spokes of the...

Page 73: ...Owner s Manual 73...

Page 74: ...Owner s Manual 74 This page has been left blank intentionally Warranty manual...

Page 75: ...way that the last day of the warranty period is the first business day after the Sunday or an official holiday Warranty claims for defects not brought to the attention of a dealer authorized by GG be...

Page 76: ...o make binding declarations on behalf of GG 2 In cases of doubt as to the existence of a defect or if a visual or material inspection is required GG reserves the right to require the shipment of the p...

Page 77: ......
Reviews: