Video Mode Specifications
Video
Mode
Lens
Mode
Resolution
Framerate
Video
360
4K (3840 × 2160 px)
30 fps
Front Only
Rear Only
1080p (1920 × 1080 px)
60 fps
RAW
5K (2 files at 2496 × 2496 px)
5.7K (2 files at 2880 x 2880)
NOTE:
5.7K resolution mode
requires the Garmin VIRB
mobile app. (
30 fps
Slow-Mo
360
Not available
Not available
Front Only
Rear Only
1080p (1920 × 1080 px)
120 fps
RAW
5K (2 files at 2496 × 2496 px) 60 fps
Time-
lapse
360
4K (3840 × 2160 px)
User-defined
interval
Front Only
Rear Only
1080p (1920 × 1080 px)
User-defined
interval
RAW
5K (2 files at 2496 × 2496 px) User-defined
interval
Microphone Modes
You can change the microphone mode based on the recording
environment.
From the main menu, select
Setup
>
Microphone
.
Spatial
: Records spatial audio using all four
microphones. Spatial audio records 360-degree, location-
specific sound. While playing the video using a compatible
player, the audio perspective follows the video perspective
when you view different parts of the video sphere. Spatial
audio is especially effective when viewing a video using a
virtual reality headset. Spatial audio recording is not available
when you are using the Front Only or Rear Only lens modes.
Rear Only
: Records mono audio using only the rear
microphone. This can help to reduce wind noise.
Off
: Turns off all internal and external microphones, and records
video without audio.
Outputting Live Video to an External Device
You can use a micro HDMI
®
cable to output live video from the
camera to an external device, such as a broadcasting or live-
streaming device.
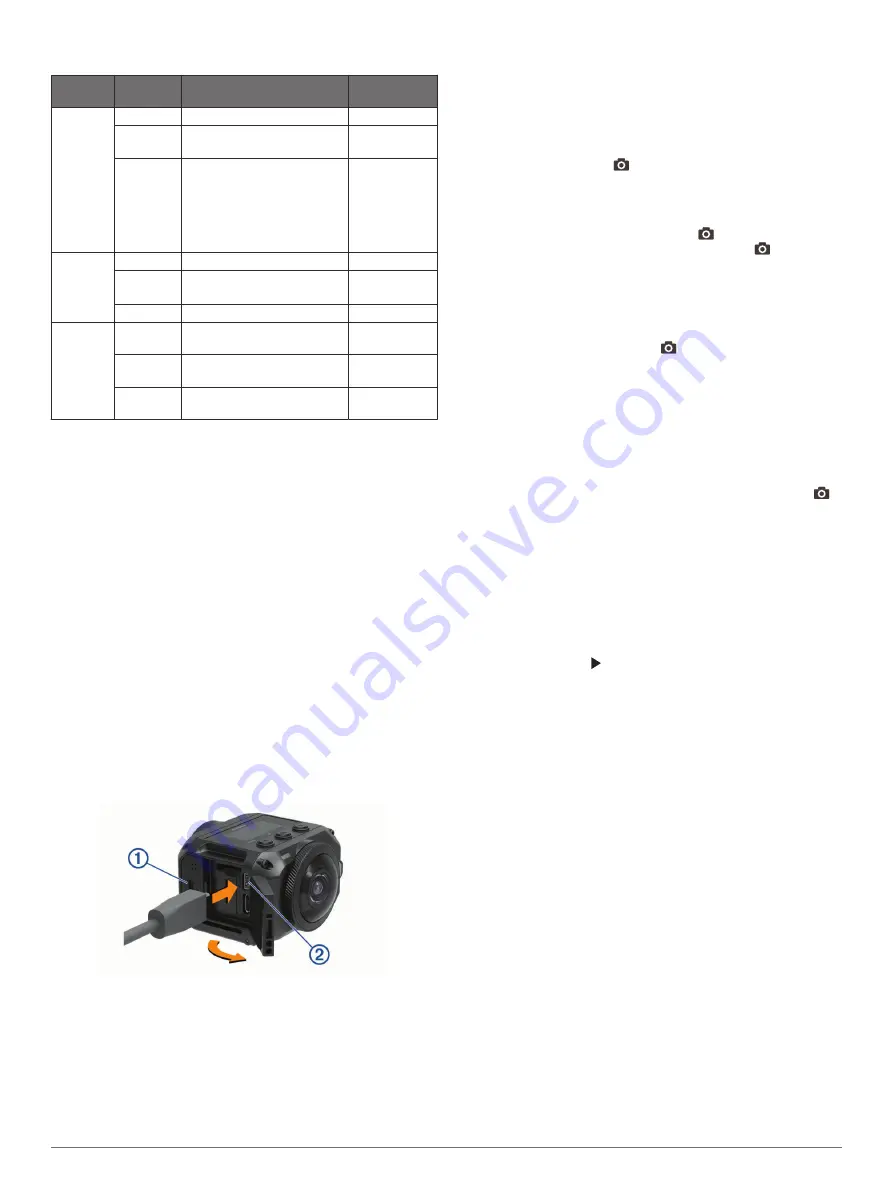
1
Slide the latch
À
to open the side door.
2
Plug the cable into the
VIDEO
port
Á
on the camera.
NOTE:
You cannot connect a power cable and a video cable
at the same time. To provide external power while outputting
video, you can use an optional powered mount
to purchase accessories.
3
Plug the other end of the cable into your external device.
Photos
Taking Photos
Your camera can capture spherical 360-degree photos. You can
change the photo mode to capture a single photo, a photo burst,
or a series of time-lapse photos (
).
• To take a photo, select
.
The camera takes a photo or photos in the active photo mode
after the default self timer expires (
).
• To increase the self-timer delay, hold
until the correct
delay time appears on the screen, and release
.
The self-timer counts down, and the status LEDs flash
yellow. The camera beeps to alert you when the self timer is
close to expiring, and it beeps rapidly immediately before the
camera takes a photo. After the self-timer expires, the
camera takes a photo or photos in the active photo mode.
• While recording a video, select
.
The camera marks the current video frame as a photo. You
can use the VIRB Edit application to save the marked frame
as a separate photo file (
). The camera
cannot take a photo burst or time-lapse photos while
recording video.
Setting the Default Photo Self Timer
You can change the default photo self timer from 0 to 60
seconds. The default self timer is used each time you press
.
1
From the main menu, select
Setup
>
Self Timer
.
2
Select a time.
Photo Modes
You can change the photo mode to capture a single photo, a
photo burst, or time-lapse photos. You can use either the
camera or the Garmin VIRB app to change the photo mode
(
Taking a Photo Using the Garmin VIRB App
). Some
options are available only when using the Garmin VIRB app.
On the camera, select >
Photo Mode
.
Single
: Enables you to take a single photo using automatic
exposure.
• Type sets the exposure type (
). This option is available only in the Garmin
VIRB app.
Burst
: Enables you to rapidly take multiple images over a set
number of seconds. This mode is ideal for capturing photos
of people or objects in motion.
• Burst Rate sets the speed at which the camera takes the
sequence of photos.
Time-lapse
: Enables you to capture a series of photos at set
time or distance intervals.
• Type sets the time-lapse video type. This option is
available only in the Garmin VIRB app.
• Interval sets the time interval between photos.
Voice Control
The voice control feature allows you to control your camera
using spoken commands.
Voice control is not available for all device languages. By
default, the voice control language is the same as the software
interface language, when available. You can set your preferred
voice control language separately from the interface.
Setting Up Voice Control
1
From the main menu, select
Setup
>
Voice Control
.
Photos
5