background image

Introduction

 WARNING

See the 

Important Safety and Product Information

 guide in the 

product box for product warnings and other important 

information.
It is your responsibility to use the device in a safe manner. 

Garmin

®

 will not be responsible for any property damage, injuries 

or deaths resulting from any use of this device in any activities.

Camera Controls

À

POWER

Select to scroll through menus and menu items.
Hold to turn the device on or off.

Á

OK

From the home screen, select to take a photo.
From the home screen, hold to set the photo delay 
timer.
From a menu, select to choose a menu item.

Â

WI-FI

Select to scroll through menus and menu items.
Hold to turn the Wi

Fi

®

 radio on or off.

Ã

Recording 
switch

Move the switch to start or stop recording video 
(

Recording a Video

, page 4

).

Device Overview

À

Status LEDs (2)

Indicate status information about the camera 
and features (

Status LEDs

, page 13

).

Á

Front camera lens Captures the front half of the video sphere. By 

default, the starting view for 360-degree videos 
is centered on this lens.

Â

Rear camera lens Captures the rear half of the video sphere.

Ã

Microphones (4)

Capture 360-degree spatial audio.

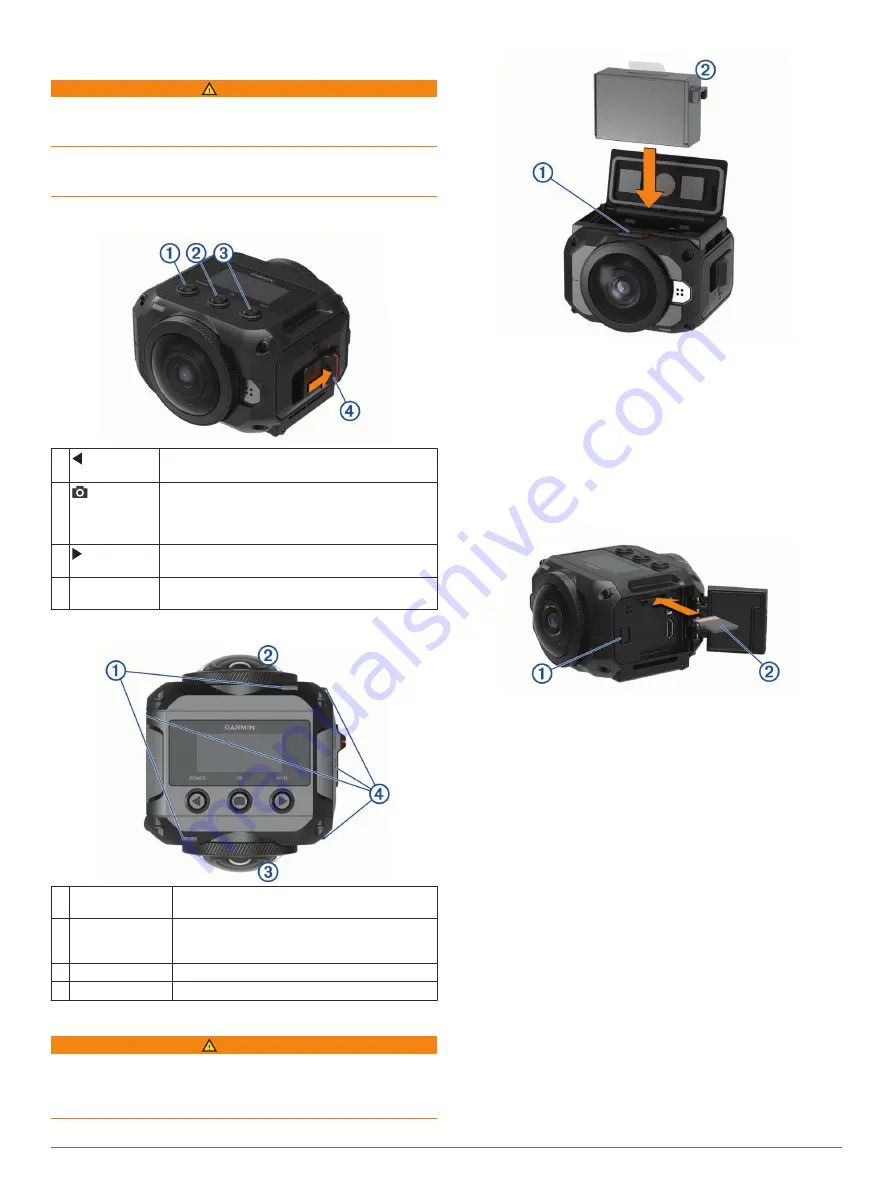
Installing the Battery

 WARNING

This product contains a lithium-ion battery. To prevent the 

possibility of personal injury or product damage caused by 

battery exposure to extreme heat, store the device out of direct 

sunlight.

1

Slide the latch 

À

 to open the battery compartment door.

2

Insert the battery 

Á

 into the compartment.

3

Close the battery compartment door, and press it until it 

clicks.

Installing a Memory Card

You must install a compatible microSD

®

 memory card to use 

your device. You should use a UHS-I microSD card from a 

quality manufacturer with a speed class rating of U3 or better 

and a storage capacity of up to 128 GB. For more information 

about compatible memory cards, go to 

garmin.com/VIRBcards

.

1

Slide the latch 

À

 to open the side door.

2

Insert the memory card 

Á

 into the slot, and press it in until it 

clicks.

TIP: 

The memory card label must face down.

3

Close the door, and press it until it clicks.

Charging the Battery

The status LEDs flash rapidly when the battery charge level is 

low. You can charge the battery using a standard wall outlet or a 

USB port on your computer. The camera is powered by a 

removable lithium-ion battery.

TIP: 

The optional external battery charger accessory allows you 

to charge up to two batteries outside the camera. Go to 

garmin.com/virb

 to purchase the battery charger accessory and 

spare batteries.

NOTE: 

The battery will not charge when outside the approved 

charging temperature range (

Specifications

, page 14

).

1

Turn off the camera.
The camera 

does not

 charge the battery while it is turned on. 

It is possible to operate the camera using external power, but 

the battery charge level does not increase until you turn off 

the camera.

2

Slide the latch 

À

 to open the side door.

Introduction

1

Summary of Contents for VIRB 360

Page 1: ...VIRB 360 Owner sManual...

Page 2: ...emarks may not be used without the express permission of Garmin Android Google Google Cardboard and YouTube are trademarks of Google Inc Apple and Mac are trademarks of Apple Inc registered in the U S...

Page 3: ...p Using Wi Fi Settings 7 Remote Viewfinder 7 App and Camera Settings 8 Garmin VIRB App Gallery 9 Connecting to a Wi Fi Network 10 Multiple Camera Network 11 Remote Control 11 Controlling Your VIRB Cam...

Page 4: ......

Page 5: ...ice out of direct sunlight 1 Slide the latch to open the battery compartment door 2 Insert the battery into the compartment 3 Close the battery compartment door and press it until it clicks Installing...

Page 6: ...lows you to start and stop recording quickly while automatically turning off the camera to conserve battery power when you are not recording NOTE The camera does not turn off using the recording switc...

Page 7: ...e camera into the cradle fitting the grooves in the side of the camera onto the teeth 2 Press the other side of the camera down until it clicks 3 Place the flanges on the bottom of the action cradle i...

Page 8: ...recording video The video is saved on the memory card as an mp4 file The G Metrix sensor data is saved on the memory card as a fit file Lens Modes The lens mode determines which lens or lenses the ca...

Page 9: ...photo or photos in the active photo mode after the default self timer expires Setting the Default Photo Self Timer page 5 To increase the self timer delay hold until the correct delay time appears on...

Page 10: ...data onto your video using gauges graphs and more You can play and share your edited videos to show your speed acceleration heart rate and other sensor data in real time G Metrix Data Your camera can...

Page 11: ...Garmin VIRB app Remote Viewfinder The remote viewfinder appears in the Garmin VIRB app while the app is connected to your camera Select to enable or change the pro settings Pro Settings page 7 Displa...

Page 12: ...he Facebook social network select Facebook select Sign in to Facebook and follow the on screen instructions to sign in to your Facebook account 4 Select one or more options to edit the broadcast detai...

Page 13: ...ly the highlights of an event 1 Connect your camera to the Garmin VIRB app 2 From the app viewfinder select Loop 3 Select the number of minutes of video to save 4 Start recording video The most recent...

Page 14: ...essing the video select an option To save the video to your mobile device select To share the video to a social network using an Apple device select To share the video to a social network using a devi...

Page 15: ...ld turn on the access point camera first followed by the other cameras The cameras connect automatically If you have additional VIRB cameras you can add them to the camera network Adding a Camera to t...

Page 16: ...B Type to switch between the Main VIRB and Extended VIRB modes 6 Repeat step 5 for each extended camera 7 After all of the cameras are connected select an option To start and stop recording on all of...

Page 17: ...card or format the memory card About Displays important software information your unit ID and regulatory and compliance information Formatting Your Memory Card NOTICE Erased data cannot be restored Y...

Page 18: ...keep it at room temperature until you are ready to use the camera again Viewing Regulatory and Compliance Information From the About menu select Regulatory Info Device Care NOTICE Avoid contact with c...

Page 19: ...al use especially while it is recording high resolution video or transmitting a Wi Fi signal Some G Metrix data is missing Some G Metrix data requires you to enable or pair sensors or use specific acc...

Page 20: ...rd mobile app 6 7 10 11 mounts 3 removing 3 tripod 2 multiple cameras 11 P photos 9 self timer 5 settings 5 8 taking 5 time lapse 9 Travelapse 9 viewing 9 playing video 9 power force 6 power key 2 R r...

Page 21: ......

Page 22: ...support garmin com May 2017 190 02191 00_0A...

Reviews: