background image

15

With the unit held level, the Pointer will point toward your destination.  The 

outer ring of the compass will show the direction that you are headed.  Begin 
walking, as you move the Pointer and Compass ring will update, always showing 
you direction of travel and the shortest path to your destination. As soon as you 
are able, turn toward the Pointer until it is aligned with the vertical line in the 
Compass Ring and stop walking.  

At a walking pace, the GPSMAP 76S by default uses the compass feature 

for navigation.  If you would prefer, the GPSMAP 76S can use the GPS receiver 
instead.  To turn the compass feature off, press and hold the 

PAGE

 key.  A 

message “Compass Turned Off” will be displayed, press 

ENTER

 to acknowledge 

the message. The unit is now using the GPS receiver for navigation.  There are 
some key differences when using the GPS receiver.  

When using the GPS receiver for navigation the unit has to be moving to 

provide accurate data.  While you are standing still the pointer and compass ring 
may not be accurate.  Hold the unit upright and begin walking.  After a few steps, 
the Pointer will once again point toward your destination and the Compass Ring 
will show your direction of travel.  As you continue walking, and approach your 
“HOME” waypoint, a message will be displayed alerting you that you have arrived.  
To reactivate the compass, press and hold the 

PAGE

 key. 

Congratulations, you should have enough basic knowledge of your GPSMAP 

76S to begin navigating on your own. Be safe; remember that while the GPS is very 
reliable, you should always have a backup means of navigation.  
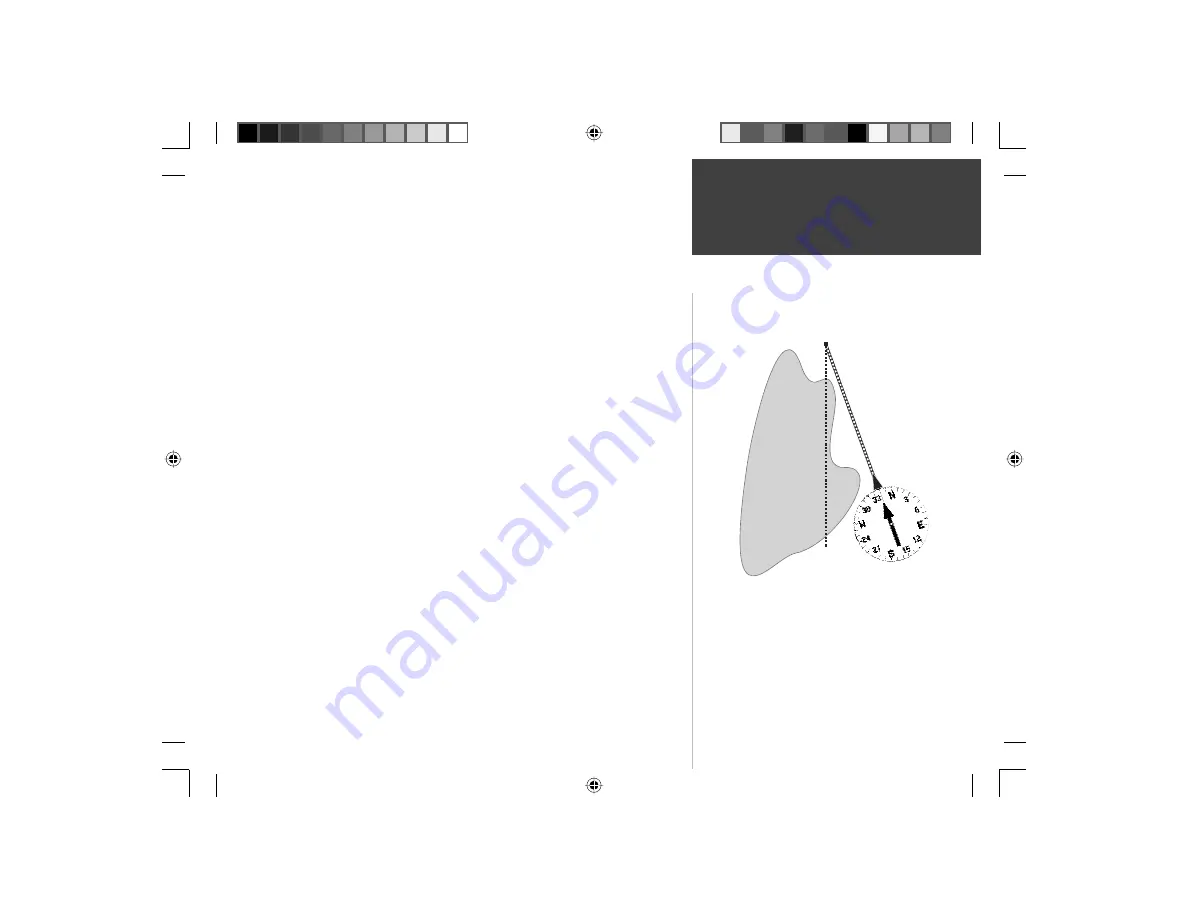
Basic Navigation

DESTINATION

START

When you are able to turn toward the destination, follow 
the Pointer until it points toward the top of the display 
and aligns with the line in the Compass Ring.  When the 
Pointer and Line are aligned, your Track and Bearing will 
be equal and you will be headed toward your destination.  
When you are near your destination, a message ‘Arriving 
at Destination’ will be displayed.

Quick Start

190-00249-01_0A.indd   15

9/1/2004, 10:58:41 AM

Summary of Contents for GPSMAP 76S

Page 1: ...GPSMAP 76S Read This First quick start guide chartplotting receiver Covers indd 1 3 25 2002 3 31 52 PM...

Page 2: ...Unit Overview Internal Antenna 180 x 240 Four Level Gray Backlit Display Interface keys External Antenna Connection Battery Compartment External Data Auxilary Power Port 190 00249 01_0A indd 1 9 1 200...

Page 3: ...install the Battery Cover by reversing step 1 Turn D ring 1 4 turn counter clockwise and remove cover Quick Start Unit Overview Remove the batteries from your GPSMAP 76S if you don t expect to use it...

Page 4: ...ard 1 Place the loop of the Lanyard through the slot opening at the bottom of the GPSMAP 76S 2 Route the strap through the loop and pull tight Quick Start Installing the Lanyard 190 00249 01_0A indd 3...

Page 5: ...key is used to turn the unit on and off To turn the unit off press the POWER key and hold it The POWER key is also used to display the adjustment window for the backlight and contrast adjustment To a...

Page 6: ...highlighted a dark strip will encompass the field Let s start by taking a look at the six main display pages They are the GPS Information Page Map Page Compass Page Highway Page Active Route Page and...

Page 7: ...ength Indicators displayed are only simulations and do not indicate the strength of actual satellite signals Activating the Simulator Mode Press the POWER key to turn the unit on The Welcome Page will...

Page 8: ...that apply to that page To display the Map Page Options Menu 1 Press the MENU key Selecting an item on the Options Menu 1 Using the ROCKER key highlight Setup Map 2 Press ENTER Many of the Option and...

Page 9: ...ving at least three satellites or simulating navigation to mark a waypoint Marking a waypoint 1 Press and hold the ENTER MARK key When the ENTER MARK key is held down the MARK function of the key is a...

Page 10: ...exceed ten charac ters and does not duplicate a previously saved waypoint When you have finished renaming the waypoint you will need to store it in the units memory To store the waypoint 1 Using the...

Page 11: ...ction and distance from the Map Pointer to the current GPS location is displayed along the top of the map To mark a waypoint using the Map Pointer 1 With the Map Pointer at a location on the map about...

Page 12: ...ll always point toward your destination Bearing while the Compass Ring reflects the direction that you are facing or traveling Track In short when you are headed directly toward your destination the P...

Page 13: ...where it will have an unobstructed view of the sky and turn it on The unit will search for satellite signals and begin to gather and store the information that it needs to become operational This proc...

Page 14: ...ils you will be prompted to start again Calibrating the Compass 1 Press the MENU key to display the options 2 Highlight Calibrate Compass and press ENTER 3 With Start highlighted press ENTER to begin...

Page 15: ...ute don t worry the GPSMAP 76S will continuously update your Track and Bearing always pointing out the shortest route to your destination To begin navigation 1 Press the NAV key 2 Select Go To Point t...

Page 16: ...ide accurate data While you are standing still the pointer and compass ring may not be accurate Hold the unit upright and begin walking After a few steps the Pointer will once again point toward your...

Page 17: ...Reference 190 00249 01_0A indd 16 3 26 2002 11 13 46 AM...

Page 18: ...t 151st Street Olathe Kansas 66062 U S A GARMIN Europe Ltd Unit 5 The Quadrangle Abbey Park Industrial Estate Romsey SO51 9AQ U K GARMIN Corporation No 68 Jangshu 2nd Road Shijr Taipei County Taiwan w...

Reviews: