de
en
cs
da
es
fi
fr
hr
hu
it
lt
nl
pl
pt
ro
ru
sl
sv
6. Check that the workpiece is securely seated.
»
The workpiece is now clamped.
7.2.
REMOVING THE WORKPIECE
1. Before removal of the workpiece, clean the vacuum plate under vacuum using an
industrial vacuum cleaner.
2. After cleaning away all debris and chips, switch off the operating vacuum.
3. Remove the workpiece.
8.
Maintenance
The vacuum plate is maintenance-free.
9.
Faults and troubleshooting
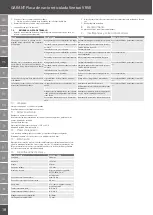
Fault
Possible cause
Action
Performed by
Operating vacuum not achieved or is too
low, and the compressed air unit is running
Leaky compressed air hoses
Exchange the compressed air hoses
Trained specialist for mechanical work
Dirt between the workpiece and vacuum
plate
Clean the faces of the workpiece and va-
cuum plate
Seal defective or not fitted
Change the seal
Kink in the compressed air hoses
Align the compressed air hoses correctly
Trained person
Shut-off valve not fully turned on.
Turn the shut-off valve fully on
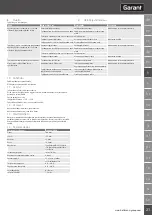
Vacuum plate changed over to vacuum
connection: Operating vacuum not
achieved or is too low, and the vacuum
pump is running
Leaky vacuum hoses
Change the vacuum hoses
Trained specialist for mechanical work
Dirt between the workpiece and vacuum
plate
Clean the faces of the workpiece and va-
cuum plate
Seal defective or not fitted
Change the seal
Kink in the vacuum hoses
Align the vacuum hoses correctly
Trained person
The clamping face of the vacuum plate is
damaged
Defective machining of the workpiece
Check the machining program
Trained specialist for mechanical work
The restraining force is insufficient to ma-
chine the workpiece
Clamping area is too small
Increase the clamping area
Trained specialist for mechanical work
Use additional restraints for workpiece
Diameter of the vacuum hoses too small, or
vacuum hoses too long
Increase the diameter of the vacuum hoses,
or reduce the length of the vacuum hoses
Power of the vacuum pump insufficient
Increase the power of the vacuum pump
10. Cleaning
Clean with a cloth or compressed air.
Do not use any corrosive cleaning agent.
11. Storage
Store in an enclosed dry room.
Do not store close to corrosive or aggressive chemical substances, solvents, moisture
or dirt.
Protect against direct sunlight.
Store at temperatures b15° C and +35 °C.
Relative atmospheric humidity max. 60%
12. Spare parts
Use only original spare parts and wearing parts.
Use only a Ø 4 mm sealing cord.
13. Disposal
Comply with the national and regional environmental protection and disposal regu-
lations for correct disposal or recycling. Segregate items into metals, non-metals,
composite materials and consumables and dispose of them responsibly.
14. Technical data
Article no. / type
384900 / VRV0
Length
200 mm
Width
125 mm
Height
21 mm
Grid
12.5 mm
Operating medium
Compressed air to ISO
8573-1:2010 [7:4:4]
not oiled
Permissible operating pressure
max. 7.0 bar
Operating pressure for maximum vacuum
4.0 bar
Maximum vacuum
91% (approx. 93 mbar at stand-
ard pressure)
Ambient temperature
0 °C - 60 °C
Operating medium temperature
0 °C - 60 °C
Compressed air hose
or hose coupling adaptor
Ø 10 mm
7.2 mm
9
Summary of Contents for VENTURI VRV0
Page 2: ...A 1 2 3 4 5 B 1 C 2 2...
Page 3: ...www hoffmann group com 3...
Page 58: ...58...
Page 59: ...www hoffmann group com 59...


