background image

   You can view the task list and press

  /  

   /  

to select and audit. 
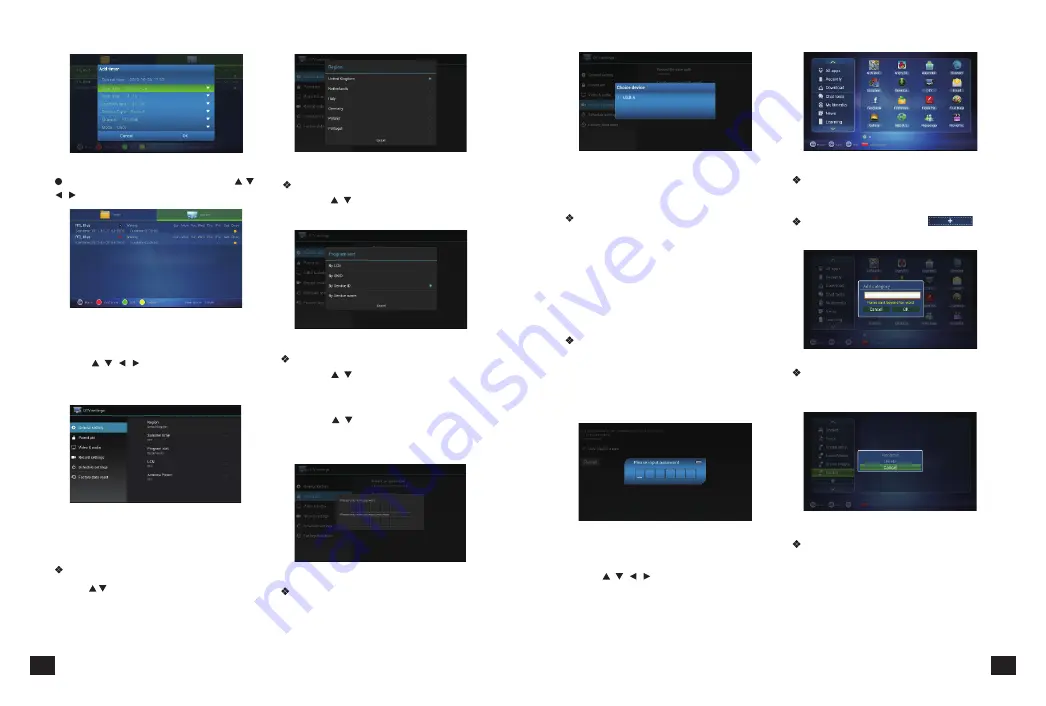
4.1.6.TV Setup

4.2.Application


Delete:

 Move the censor to the defined

clarification and press

MENU

or hold

OK

to delete the selection as P 4-2-3:


 Clarification Introduction

You can 

see all the applications here by different 
clarifications.
   

 Add

Press red button or                to 

add a new clarification as P 4-2-2


 New Name:

 Move the censor to a 

clarification, and press

MENU

or hold

OK

to show the type-in box, and input a new 
name then press OK to confirm as P 4-2-4

2

Partitions by EPG events: 

Setup if the recording files partitions by EPG 
time.


  Reserve setup

Setup the remind time and default record 
time.
3

Reminding to record

Setup how long remind user for reserving 
record in advance.
4

Default the reserve recording time.

Setup the default condition for how long last 
to reserve recording.


Restore Factory Default

This is only to make Restore Factory Default 
setting for Digital TV part, android part will 
not change, after you type in password, then 
you can make new setting for your digital TV 
functions. As P 4-1-25

Press

【   

 /   

 /   

and

OK

to enter in 

"DTV Settings". As shown in the following 
picture.

Detailed setting methods will be explained 
as follows.

Press

【  

 /  

and

OK

to select the region. 

Press

EXIT

to quit .

Press

   /   

 /   

and

OK

to enter in 

application   interface as shown in P 4-2-1

13

12

 P 4-1-18

 P 4-1-19

P 4-1-20


Programs sort:

    Press

   /   

to sort program. Press

OK

to confirm. Press

EXIT

to quit.

   Parent Lock: 

1

) Press

   /   

and

OK

to enter the 

setting, input code, then set a new password 
and parent lock grade
2

Press

【  

 /  

and

OK

 buttons to set 

a new password or parent lock grade. Press

EXIT

to quit without saving.

   Record setup: 

To record with some simple setting, such as:
1

Setting the storage place of recording file:

P 4-1-21

P 4-1-22

P 4-1-23

Region: 

P 4-1-24

P 4-2-1

P 4-2-2

P 4-2-3

P 4-1-25

Summary of Contents for Gi FLY T2

Page 1: ...GI FLY T2 HD DVB T2 DIGITAL MULTIMEDIA STB...

Page 2: ...ease keep the machine power off when not working don t use damaged power line 4 Don t touch the power line with wet hands When liquid permeated in the box by accidental please shut down power immediat...

Page 3: ...a variety of Android software application This user manual will give you specific guidance on installation use and maintenance To ensure you can fully enjoy every feature of this machine please read t...

Page 4: ...Up Down Move or change the channels EPG Show EPG INFO Show information of present program VOL Adjust volume HOME Return to main menu PAGE Switch channels FAV Show favorite channels list 0 9 input num...

Page 5: ...ist Please connect with your power TV set and other related devices according to the picture shows below if you need to connect with more devices please contact with your local operator 9 8 P 4 1 1 P...

Page 6: ...l Search to make program search 2 You can set the Frequency and Symbol rate when making Manual Scan 3 Press OK to make multi frequency program search and click the program on right corner to play 1 Pr...

Page 7: ...how long last to reserve recording Restore Factory Default This is only to make Restore Factory Default setting for Digital TV part android part will not change after you type in password then you can...

Page 8: ...representation rate to adjust screen size 4 Font Size Set system font size Ethernet Click this option press OK button to turn on or off Ethernet Ethernet configuration Set Internet IP and other param...

Page 9: ...after the whole upgrading completes Note Do not power off when in process of upgrading DLNA menu has two parts 1 Device List System will show available DMS devices so that the end users can choose 2 S...

Page 10: ...4 5 4 Fault Phenomenon Possible reason Solution After start without any display The power cord didn t connect or socket without electricity Connected power plug ensure normal voltage electrical outlet...

Page 11: ...GI FLY T2 HDTV...

Page 12: ...1 9 4 1 2 9 4 1 3 9 4 1 4 9 4 1 5 9 4 1 6 12 4 2 13 4 3 14 4 3 1 Wi Fi 14 4 3 2 Ethernet 15 4 3 3 15 4 3 4 15 4 3 5 15 4 3 6 16 4 3 7 16 4 4 DLNA 17 4 4 1 DNLA 17 4 4 2 DLNA 17 4 4 3 DLNA 17 4 5 18 4...

Page 13: ...2 A9 1GHz Mail 400 Android 2D 3D HD H 264 HDMI Android Android Android 4 2 OS Android DVB T2 HDMI1 3 MPEG 4 H 264 NTSC PAL PAL_M PAL_NC 4 3 16 9 1920 1080 2 4 USB SD 2D 3D Wi Fi Skype Facebook YouTub...

Page 14: ...2 4 USB TIMER PVR EPG INFO VOL HOME P 2 4 PAGE FAV 0 9 TV RADIO OK 7 6 PVR TIMER AUDIO SUB T EPG INFO OK MENU HOME FAV VOL EXIT TEXT _ PAGE _ 1 2 3 4 5 6 7 8 0 9 ABC DEF JKL TUV TV RADIO GHI PQRS MNO...

Page 15: ...3 4 4 1 4 1 1 4 1 2 1 MENU 1 OK FAV 9 8 P 4 1 1 P 4 1 2 P 4 1 3 P 2 5 4 1 3 4 1 4 4 1 5 INFO MENU P 4 1 4 P 4 1 5 P 4 1 6...

Page 16: ...FF FB 2 MENU PVR PVR OK 1 EPG 4 1 13 1 2 3 OK 1 MENU 11 10 P 4 1 7 P 4 1 8 P 4 1 9 2 4 1 11 5 3 EXIT P 4 1 10 P 4 1 11 P 4 1 12 PVR 2 3 EXIT PVR PVR 1 Time shift PAUSE PAUSE P 4 1 13 P 4 1 15 P 4 1 16...

Page 17: ...4 2 MENU OK 4 2 3 MENU OK OK 4 2 4 2 3 4 Android P 4 1 25 OK DTV OK EXIT OK P 4 2 1 13 12 P 4 1 18 P 4 1 19 P 4 1 20 OK EXIT 1 OK 2 OK EXIT 1 P 4 1 21 P 4 1 22 P 4 1 23 P 4 1 24 P 4 2 1 P 4 2 2 P 4 2...

Page 18: ...il SD USB AVI WMV MPEG OK IP IP DNS Ethernet Ethernet OK Ethernet Ethernet Ethernet IP Ethernet OK OK 4 3 7 1 720p 1080p 2 3 4 Ethernet OK Ethernet Ethernet Ethernet IP Wi Fi OK WI FI ON Wi Fi Wi Fi O...

Page 19: ...4 4 1 DNLA 4 4 2 DLNA 4 4 3 DLNA 1 USB 2 4 3 9 3 4 3 10 4 OK 4 3 11 5 FLASH 6 DLNA 1 2 DLNA DLNA DLNA suffix DB Player DLNA BubbleUPNP iMediaShare 17 16 P 4 3 7 P 4 3 8 P 4 3 9 P 4 3 10 P 4 3 11 P 4...

Page 20: ...4 5 4 5 1 4 5 2 5 2 P4 5 3 Android 1 http www sdmctech com PhoneClient1 4 3 1 apk 3 Network Environment 1 Wi Fi 4 5 4 IP 2 19 18 P 4 5 1 P 4 5 2 P 4 5 3 P 4 5 4 P 4 5 5 mute...

Reviews: