en
Before using for the first time
10
Other accessories
Order number
GN adapter, for use with
GN cooking inserts and
roasters
GN010330
Stainless steel cooking
container, GN 1/3, unper-
forated, 40 mm deep,
1.5 l
GN114130
Stainless steel cooking
container, GN 2/3, unper-
forated, 40 mm deep, 3 l
GN114230
Stainless steel cooking
container, GN 1/3, perfor-
ated, 40 mm deep, 1.5 l
GN124130
Stainless steel cooking
container, GN 2/3, perfor-
ated, 40 mm deep, 3 l
GN124230
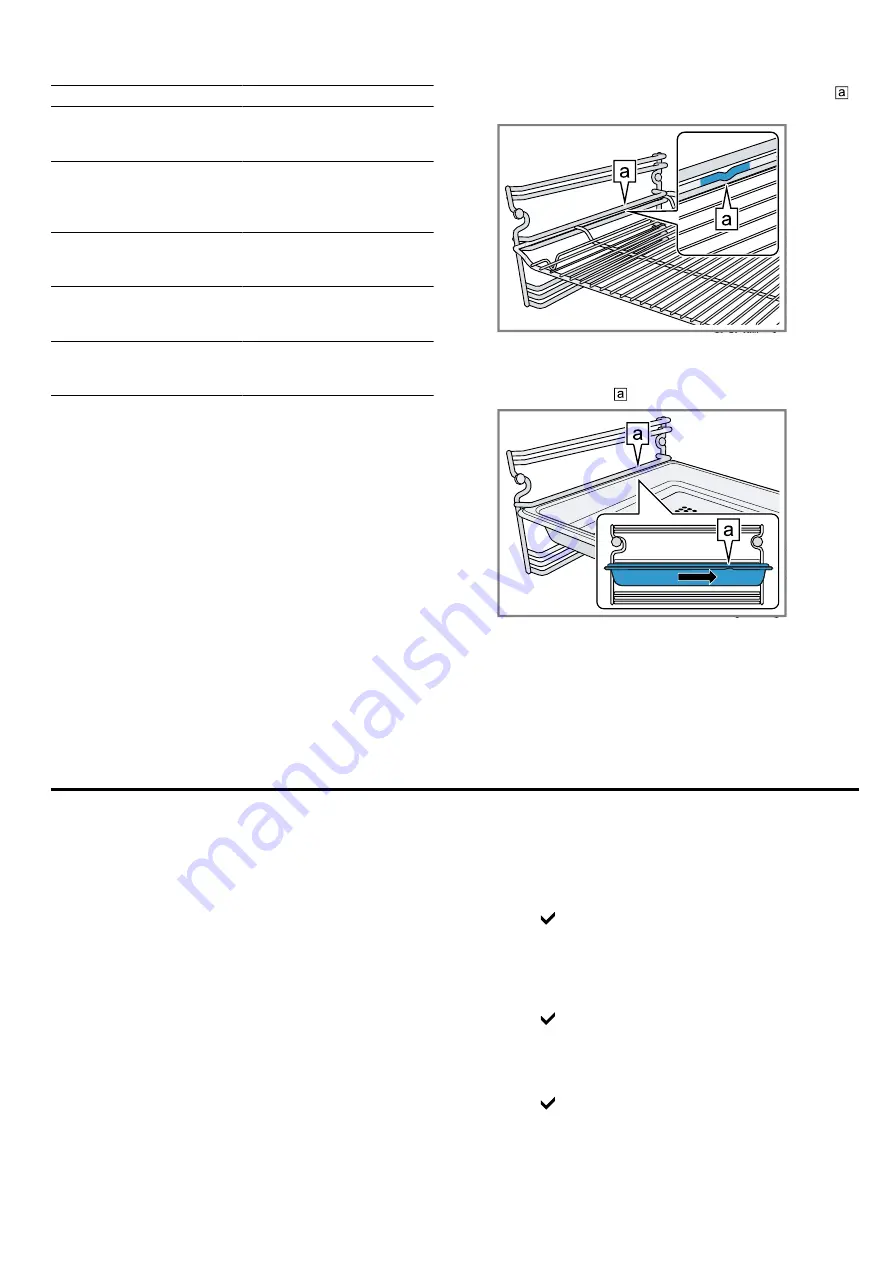
5.2 Locking function
The locking function prevents the accessories from tilt-
ing when they are pulled out.
You can pull out the accessories approximately halfway
without them tipping. The accessories must be inserted
into the cooking compartment correctly for the tilt pro-
tection to work correctly.
5.3 Sliding accessories into the cooking
compartment
The wire rack and the perforated cooking container are
fitted with a locking function. For the tilt protection to
work correctly, always insert the wire rack and the per-
forated cooking container into the cooking compart-
ment the right way round.
ATTENTION!
The accessories may tip.
▶
Do not push the accessories between the shelf posi-
tions.
1.
When inserting the wire rack, ensure that the lug
is at the rear and is facing downwards.
2.
Ensure that the safety bracket on the wire rack is
located at the rear and is facing upwards.
3.
When inserting the perforated cooking container, en-
sure that the lug is at the rear.
a
The tilt protection is working.
Note:
To pull out the accessories, lift them slightly.
Remove any accessories that you do not require from
the cooking compartment.
6 Before using for the first time
Configure the settings for initial start-up. Clean the ap-
pliance and accessories.
6.1 Initial use
Implement the settings for initial use before using your
appliance.
First read the information under safety →
.
The appliance must be installed and connected.
After connecting the appliance to the power supply, the
GAGGENAU logo appears for approx. 30 seconds and
then the appliance displays the "Initial settings" menu.
You can configure your new appliance for initial use.
The "Initial settings" menu appears only after the appli-
ance has been connected to a power supply and
switched on for the first time, or if the appliance has
not been connected to a power supply for a number of
days.
You can change all of the settings in the basic settings
→
.
Setting the language
Requirement:
The display shows the preset language.
1.
Use the rotary selector to select the required display
language.
2.
Press to confirm.
Setting the time format
Requirement:
The display shows the possible formats
24h and AM/PM. 24h is preset.
1.
Use the rotary selector to set the required format.
2.
Press to confirm.
Set the time
Requirement:
The display shows the time.
1.
Use the rotary selector to set the required time.
2.
Press to confirm.
Setting the date format
Requirement:
The display shows the possible formats
D.M.Y, D/M/Y and M/D/Y. D.M.Y is preset.
Summary of Contents for BSP2201.1
Page 1: ...en User manual and installation instructions BSP2201 1 BSP2211 1 Steamer Gaggenau ...
Page 45: ......
Page 46: ......
Page 47: ......


