background image

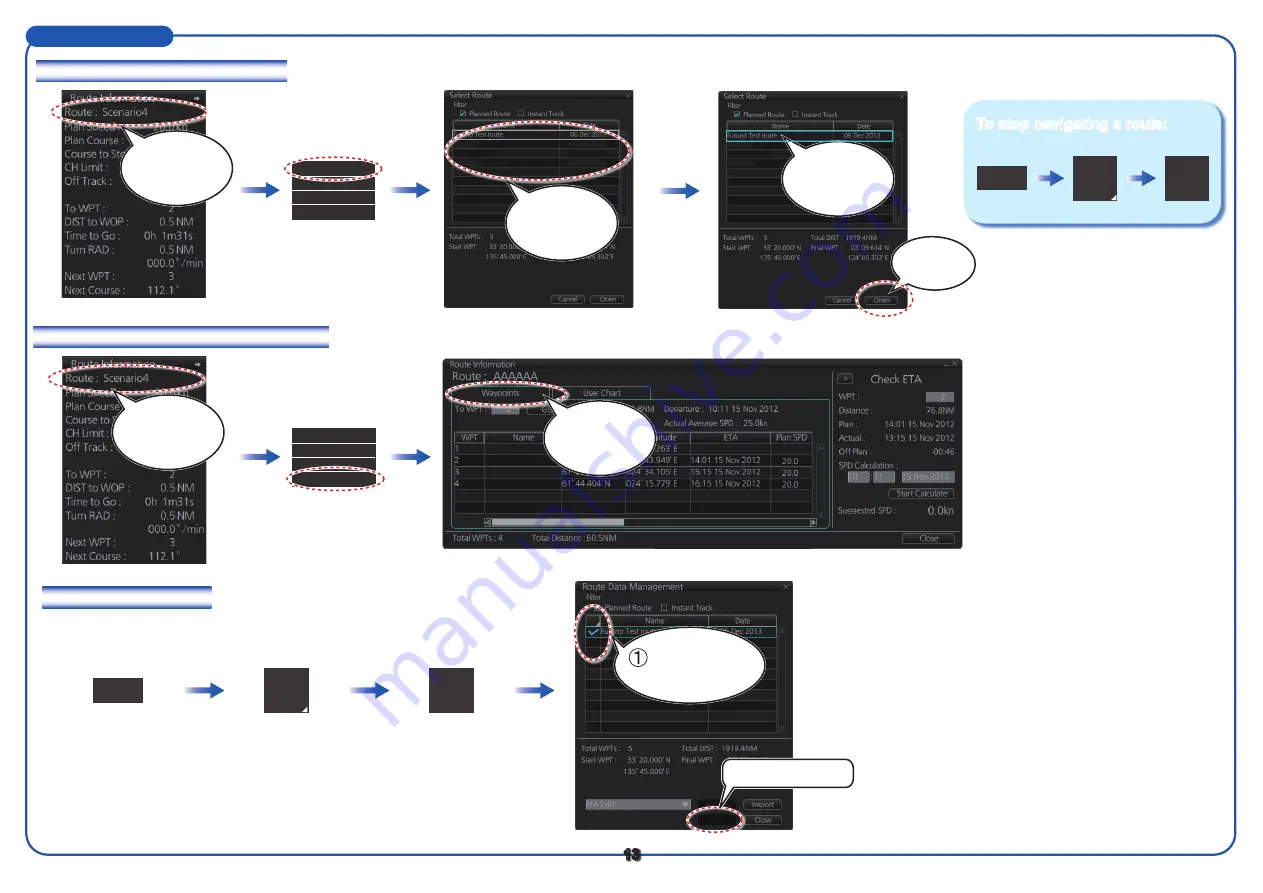
How to select a route to navigate

Routes (con’t.)

Route

Route

PLAN

How to view route waypoint information

How to delete a route

Manage 

Data

13

NAVI

Click [Select Route].

Select Route

Unselect

Move to Plan

Route INFO

Route

Un

select

Click 

[Waypoints]

tab.

Click [Route Info].

Select Route 

Unselect

Move to Plan

Route Info

Right-click 

[Route].

Right-click 

[Route].

To stop navigating a route:

Route 

selected.

Route32
AAAAAA
Route67

15 Nov 2013
15 Nov 2013
13 Nov 2013

Route 

selected.

Click 

[Open].

Route32
AAAAAA
Route67

15 Nov 2013
15 Nov 2013
13 Nov 2013

Select a route.

Check route(s) 

to delete.

Click [Delete].

Delete

ROT:

ROT:

Summary of Contents for FCR-21x9 (with 19" LCD)

Page 1: ...rol monitor on off depending on monitor setting InstantAccess knob Selects the buttons on the InstantAccess bar ESC Goes back one step in current InstantAccess bar operation VIEW HIDE Radar mode chart...

Page 2: ...line 4 OFF CENTER 5 CU TM RESET 6 INDEX LINE STBY TX Toggles the radar between standby and TX MENU Opens closes the menu CANCEL Cancels the changes made on the currently selected menu ENTER Confirms...

Page 3: ...PI line box Adjusts the direction and width of the parallel index lines Activates or deactivates the parallel index lines Watch box Counts down the time remaining until the buzzer sounds to alert the...

Page 4: ...ale provides an estimate of the bearing to a target EBL1 Measures the bearing to a target EBL2 Measures the bearing to a target Own ship marker Blue horizontal line Marks your ship s position Stern ma...

Page 5: ...lockwise if the system is working properly Time Displays the time Operating mode Selects the operating mode radar or chart for radar STBY TX Toggles the radar between stand by and transmit Antenna Sel...

Page 6: ...F Shows hides the radar map Chart ON OFF Shows hides the electronic chart Chart Disp Shows hides various chart objects MAP ON Chart OFF Chart Disp MAP OFF Chart ON Chart Disp Radar mode Chart radar mo...

Page 7: ...get symbol Symbol Name Target under automatic acquisition red Acquired target green Dangerous target red Lost target green 7 Target under acquisition green TT symbols AIS symbols How to manually acqui...

Page 8: ...IS lost target filter conditions Sets the conditions for automatic activation of AIS targets when their CPA is within the CPA set Sets plot interval for TT and AIS past position displays Sets referenc...

Page 9: ...de box Cursor position box Electronic chart area Status bar See page 10 Overlay NAV Tools box Lower section InstantAccess bar Upper section See page 11 9 Chart Display Layout Alert box Sensor informat...

Page 10: ...d held down STD DISP Restores IMO standard display No use Chart database Selects the pre defined presentations of ENC content IMO BASE IMO STD or IMO ALL Displays the operator s manual ECDIS program n...

Page 11: ...r RADAR AUTO Load Starts automatic installation of the chart data CD or DVD ROM Manage Charts Manages chart cells grouping deleting etc Cell Status Shows the chart catalog to get info about charts ins...

Page 12: ...ame for route Click New Continue entering waypoints WPT1 Click a position to mark a waypoint WPT3 25 8 1470 2NM WPT2 106 9 1748 5NM WPT6 WPT5 161 4 353 3NM WPT4 309 0 971 4NM WPT1 201 5 2137 2NM At la...

Page 13: ...Route INFO Route Un select Click Waypoints tab Click Route Info Select Route Unselect Move to Plan Route Info Right click Route Right click Route To stop navigating a route Route selected Route32 AAAA...

Page 14: ...to draw a circle How to draw an area 1 Click 2 Click 3 Click 4 Right click select Finish Click Save Click Save Click New Enter name for user chart Example objects Plan ning 1 Click 2 Move cursor doub...

Page 15: ...or area Point on a line Edit DeletePoint Select Delete Select DeletePoint Manage Data User Chart Click Mariner tab Check item s Right click Right click the point to delete 15 Click Select Click Save...

Page 16: ...How to control visibility of chart objects Chart Operations Control chart objects Control navigational features Control basic chart settings SET Basic Setting DISP Chart DISP Symbol DISP 16 Tick...

Page 17: ...17 SET DISP Chart Alert Click Approve All Put cursor on location where to enter object then click Click Planning tab Click Commit Select object from Drawing type Click Add Right click Select Object IN...

Page 18: ...on Scroll buttons Heading Navigation status Rate of turn Click to switch level of detail Title bar TT No Bearing Range Course over ground Speed over ground CPA TCPA Bow crossing range Bow crossing tim...

Page 19: ...setting Sets the conditions for the AIS lost target filter Sets the conditions for the TT lost target filter 19 AIS filter auto activation of AIS targets by CPA AIS filter how to sleep all AIS targets...

Page 20: ...lamation point in center of triangle Red triangle with black check mark in center of triangle Lights 3 s off 1 s repeat Not acknowledged Not rectified Not acknowledged Not rectified Buzzer temporarily...

Reviews: