background image

APPENDIX 


AP-31

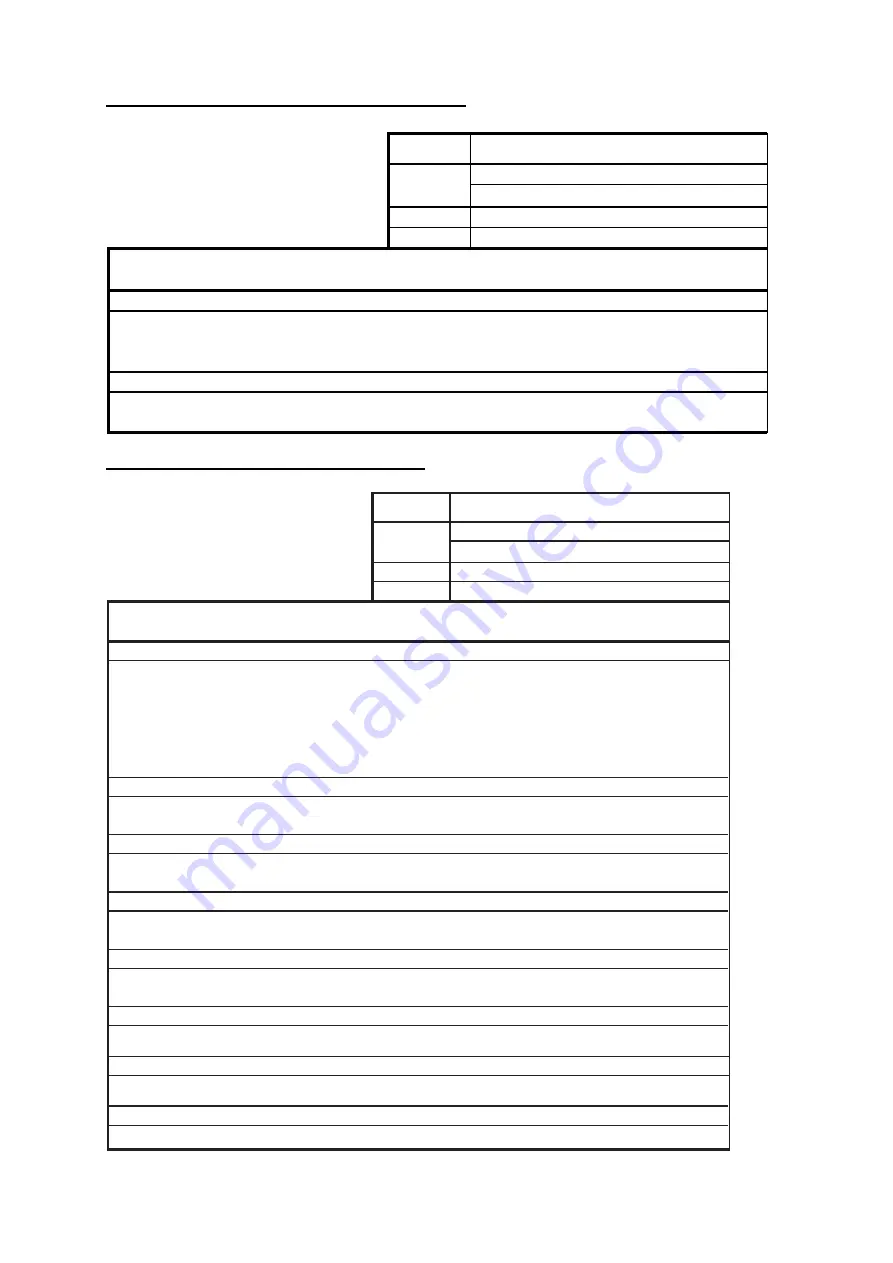
Antenna unit RSB-103/104/105 (FAR-2827W) 

FURUNO

Model

FAR-2827W

Unit

Antenna Unit RSB-104/105

ELECTRICAL PARTS LIST

SYMBOL NAME

REMARKS

PRINTED CIRCUIT BOARD

TB

03P9349

BP GEN

03P9347

MOTOR

D8G-516

2003/10


Transceiver unit RTR-081 (FAR-2827W) 

FURUNO

Model

FAR-2827W

Unit

Transceiver Unit RTR-081

ELECTRICAL PARTS LIST

SYMBOL NAME

REMARKS

PRINTED CIRCUIT BOARD

TB

03P9349

IF AMP

03P9335

PWR

    03P9348

MD

03P9244

RFC

03P9346

MIC ASSEMBLY

RU-9601

MOTOR

24 rpm

DIODE LIMITER

RU-9099

CIRCULATOR

RC-3686

PULSE TRANSFORMER

RT-9023

MAGNETRON

MG5436

2007/11

109P0824H602

ISOLATOR

FX0157


Summary of Contents for FAR-21 7-BB Series

Page 1: ...www furuno co jp MARINE RADAR ARPA FAR 28x7 Series FAR 21x7 BB Series Back...

Page 2: ...butor Dealer 9 52 Ashihara cho Nishinomiya 662 8580 JAPAN Telephone 81 0 798 65 2111 Fax 81 0 798 65 4200 A JAN 2004 Printed in Japan All rights reserved G2 OCT 31 2007 Pub No OME 35190 G2 00014745216...

Page 3: ...manual may not match the screens you see on your display The screen you see depends on your system configuration and equipment settings Store this manual in a convenient place for future reference FU...

Page 4: ...2827 2127 RTR 079 MG5436 XN20AF 0 40 m 8 60 m FAR 2827 2127 RTR 079 MG5436 XN24AF 0 20 m 5 80 m FAR 2817 2117 RTR 078 MG40102 XN12AF 0 30 m 4 20 m FAR 2817 2117 RTR 078 MG40102 XN20AF 0 10 m 3 00 m FA...

Page 5: ...electrical shock or serious injury can result Immediately turn off the power at the ship s mains switchboard if water leaks into the equipment or the equip ment is emitting smoke or fire Continued us...

Page 6: ...ar screen CAUTION The plotting accuracy and response of this ARP meets IMO standards Tracking accuracy is affected by the following Tracking accuracy is affected by course change One to two minutes is...

Page 7: ...escription of presentation modes 1 18 1 13 Entering Own Ship s Speed 1 21 1 13 1 Automatic speed input by log or GPS navigator 1 21 1 13 2 Manual speed input 1 22 1 14 Choosing the Range Scale 1 22 1...

Page 8: ...8 7 Longer trails B C and W types 1 49 1 28 8 Removing trails from the display temporarily 1 49 1 28 9 Erasing trails 1 49 1 29 Parallel Index Lines 1 50 1 29 1 Displaying erasing parallel index lines...

Page 9: ...g color and brilliance set 1 90 1 49 2 Presetting color and brilliance set 1 90 1 50 Reference Point for CPA TCPA 1 91 1 51 Switching Hub HUB 100 option 1 92 1 52 Dual Radar Display 1 93 1 52 1 Enabli...

Page 10: ...alarm ranges 3 22 3 12 2 Acknowledging CPA TCPA alarm 3 23 3 13 Setting a Guard Zone 3 24 3 13 1 Activating the guard zone 3 24 3 13 2 Sleeping deactivating a guard zone 3 25 3 13 3 Acknowledging the...

Page 11: ...ribing radar map marks and lines 5 4 5 5 Erasing Radar Map Marks and Lines 5 6 5 5 1 Erasing individual radar map marks and lines 5 6 5 5 2 Erasing all radar map marks and lines 5 7 5 6 Radar Map Corr...

Page 12: ...AM cards 5 35 5 14 2 Recording data 5 36 5 15 Replaying Data 5 38 5 16 Deleting Files 5 39 6 MAINTENANCE TROUBLESHOOTING 6 1 6 1 Periodic Maintenance Schedule 6 2 6 2 Life Expectancy of Major Parts 6...

Page 13: ...procedures for operation and maintenance We would appreciate hearing from you the end user about whether we are achieving our purposes Thank you for considering and purchasing FURUNO equipment Note T...

Page 14: ...ft IEC 60936 2 1998 Radar for high speed craft Performance requirements IMO A 694 17 General requirements for electronic navigational aids including ATA IEC 60945 2002 08 Maritime Navigational Equipme...

Page 15: ...anese fishing vessels C Japanese fishing vessels W Washington state USA ferry Specification type and function availability Type Function IMO A B C W ARP symbol selection No No Yes Yes Yes ARP w o gyro...

Page 16: ...xiv PROGRAM NUMBER PC Board Program No Version No MAIN 035 9204 02 Merchant 50 Fishing RFC 035 9202 01 KEY REMOTE 035 9203 01 ARPA 035 9212 01 Minor modification...

Page 17: ...put Speed Log Gyrocompass AIS AD 100 TRANSCEIVER UNIT RTR 081 For FAR 2827W Waveguide For FAR 2827W Option Dockyard supply Standard Category of Units Antenna unit Exposed to weather All other units Pr...

Page 18: ...7DS BB RSB 111 21 26 rpm 200 VAC 3 50 Hz 220 VAC 3 60 Hz RSB 112 21 26 rpm 380 VAC 3 50 Hz 440 VAC 3 60 Hz FAR 2827W RSB 103 24 rpm powered by processor unit FAR 2837S Same as FAR 2137S FAR 2837SW RSB...

Page 19: ...27 BB 24 VDC or 100 115 VAC 220 230 VAC 1 50 60 Hz Rectifier RU 3424 RU 1746B 2 Transformer Unit RU 1803 440 VAC 1 50 60 Hz DC spec AC spec 100 110 115 220 230 VAC 1 50 60 Hz VDR External Monitor Alar...

Page 20: ...aveguide For FAR 2827W Option Dockyard supply Standard Category of Units Antenna unit Exposed to weather All other units Protected from weather ANTENNA UNIT Performance Monitor PM 31 built in 100 115...

Page 21: ...Antenna unit Exposed to weather All other units Protected from weather ANTENNA UNIT Performance Monitor PM 31 built in 100 115 VAC 220 230 VAC 1 50 60 Hz Transformer Unit RU 1803 440 VAC 1 50 60 Hz AC...

Page 22: ...SYSTEM CONFIGURATION xx This page intentionally left blank...

Page 23: ...on On When temperature goes down to 5 C Off When temperature goes up to 12 C 2 RF TRANSCEIVER 1 Frequency X band 9410 MHz 30 MHz S band 3050 MHz 30 MHz 2 Output power FAR 2117 2117 BB 2817 12 kW FAR 2...

Page 24: ...1 5 Bearing discrimination 0 95 XN4A 0 75 XN5A 2 1 XN12AF 1 5 XN20AF 1 2 XN24AF 2 5 SN30AF 2 0 SN36AF 6 Bearing accuracy 1 7 Presentation mode Head up Head up TB North up Course up True Motion sea or...

Page 25: ...A 220 230 VAC FAR 2157 2157 BB 2167DS 2167DS BB 2137S 2137S BB 2837S 2837SW 3 0A 100 115 VAC 1 5A 220 230 VAC 3 Antenna unit X band 24 VDC 4A 200 220 VAC 2A 3 50 60 Hz S band 200 220 380 440 VAC 115 2...

Page 26: ...47 H x270 W x1458 D mm includes fixing screws Mass Less than 1 6 kg 10 Environmental Conditions Ambient Temperature 15 to 55 C Relative Humidity 95 at 40 C EMC IEC 60945 Waterproofing IPX0 IEC 60529 1...

Page 27: ...Further ARP is cancelled and the AIS display is erased In warm up and stand by condition ON TIME and TX TIME counts in hours and tenths of hour appear at the screen center Note Avoid turning the powe...

Page 28: ...hly recommended that the radar be set to stand by when not used for an extended period of time Quick start Provided that the radar was once in use with the transmitter tube magnetron still warm you ca...

Page 29: ...R OFF 4 5 RESET CU TM OFFSET EBL GAIN TARGET CANCEL TARGET DATA RANGE LIST TARGET 9 ENTER MARK TIME VECTOR 7 8 CANCEL TRAILS 0 MODE VECTOR BRILL BRILL EBL F1 OFF F2 ON ACK ALARM F3 F4 STBY TX Trackbal...

Page 30: ...es own ship position in 75 radius in stern direction Resets the heading line to 0 in course up and true motion modes INDEX LINE Turns index lines on and off VECTOR TIME Chooses vector time length VECT...

Page 31: ...open For example press the 2 key to open MARK menu MARK 1 BACK 2 OWN SHIP MARK OFF ON 3 STERN MARK OFF ON 4 INDEX LINE BEARING 1 REL TRUE 5 INDEX LINE 2 1 2 3 6 6 INDEX LINE MODE 3 VERTICAL HORIZONTA...

Page 32: ...hoose the menu you wish to open and then push the wheel or the left button For example choose the 2 MARK menu and then push the wheel or the left button MARK 1 BACK 2 OWN SHIP MARK OFF ON 3 STERN MARK...

Page 33: ...tside the effective display and a cursor when inside the effective display See the illustration on the next page for further details For example choose the MARK box which is at the bottom left corner...

Page 34: ...t button to display the MAIN menu To choose boxes successively push the wheel when the guidance box reads as above Then the nearest box is selected and marked with the double ended arrow and the guida...

Page 35: ...r the trackball or a combination of the two in case of Control Unit RCU 014 Note that in later sections only the procedure for menu operation by the trackball is given 4 Roll the wheel to choose item...

Page 36: ...push the wheel or the left button 5 Roll the wheel to choose function desired and then push the wheel or the left button Note For operation from the keyboard you may press the 2 key to choose a functi...

Page 37: ...t to adjust brilliance Turn it clockwise to increase brilliance counterclockwise to decrease brilliance Watch the BRILL box see illustration below to know current brilliance level By trackball 1 Roll...

Page 38: ...below Note that a display mode cannot be chosen when the menu is open 1 Roll the trackball to place the arrow in the DISPLAY MODE box at the top of the screen DISPLAY XX XX display mode RADAR PLOTTER...

Page 39: ...g A C RAIN Setting TUNING Setting Position MENU Box AIS Message Arrival Guidance Box WATCH Box Alarm watch time EBL2 Box EBL1 Box TX STBY Box HL OFF Box BRILL Box MARK Box Bearing and range to mark IL...

Page 40: ...variation corrected gyro or magnetic heading Speed data is LOG MAN etc showing sensor and types CSE when water tracking mode is selected STW when water tracking mode is selected ARP Target Data See Ch...

Page 41: ...ized during the installation However if you feel that automatic tuning is not working properly try re initializing it as follows 1 Roll the trackball to choose the MENU box at the right side of the sc...

Page 42: ...Gyrocompass With connection of a gyrocompass ship s heading is displayed at the right side of the screen Upon turning on the radar align the on screen GYRO readout with the gyrocompass reading by fol...

Page 43: ...elative motion 1 12 1 Choosing presentation mode By keyboard Press the MODE key consecutively to choose presentation mode desired The PRESENTATION MODE box shows the current presentation mode See the...

Page 44: ...n red at the lower right corner of the screen Heading Line North Marker Note When display is off centered the heading mark appears at 000 degrees Head up mode Course up mode The course up mode is an a...

Page 45: ...ir true heading sensor directions from own ship north bearing maintained at the top of the screen The heading line changes its direction according to the ship s heading Requires heading signal If the...

Page 46: ...the CU TM RESET key or roll the trackball to choose the CU TM RESET box at the bottom right corner of the display and then push the left button If the heading sensor fails the mode is changed to the h...

Page 47: ...r ground SOG Note that a log cannot produce BT Bottom Tracking speed in deep waters without set and drift entry LOG WT Log speed thru water STW GPS Speed input by GPS navigator 5 Push the right button...

Page 48: ...he left button 6 Roll the wheel to set speed For entry through the keyboard use the numeric keys 7 Push the wheel to finish 8 Push the right button to close the menu 1 14 Choosing the Range Scale The...

Page 49: ...0 3 M2 Medium pulse 2 0 5 M3 Medium pulse 3 0 7 L Long pulse 1 2 S M1 M2 and L on FAR 2157 BB and S band radars Appropriate pulselengths are preset to individual range scales and function keys If you...

Page 50: ...ange and then push the wheel or the left button 5 Roll the wheel to choose pulselength desired and then push the wheel or the left button 6 Push the right button twice to close the menu 1 15 2 Changin...

Page 51: ...st between desired echoes and the background noise on the display To adjust receiver sensitivity adjust the gain control so background noise is just visible on the screen By keyboard While monitoring...

Page 52: ...te 1 17 2 Automatic adjustment by the A C SEA control Auto A C SEA allows for fine tuning of the A C SEA circuit within 20 dB Accordingly with the bar reading set to 100 gain is not lowered to minimum...

Page 53: ...and small targets become distinguishable If the setting is set too low targets will be hidden in the clutter while if the setting is too high both sea clutter and targets will disappear from the disp...

Page 54: ...uppresses rain clutter in the picture and A C RAIN suppresses clutter picked up by the antenna 1 18 1 Turning AUTO RAIN on or off 1 Roll the trackball to choose the PICTURE box at the left side of the...

Page 55: ...adjust the A C RAIN control to split up these unwanted echoes into a speckled pattern making recognition of solid targets easier a True target trails No smearing of stationary targets b Relative targ...

Page 56: ...icture Activating the interference rejector circuit can reduce this type of interference The interference rejector is a kind of signal correlation circuit It compares the received signals over success...

Page 57: ...box at the bottom right corner see the illustration at the bottom of the next page for location now reads DISP MAIN MENU 2 Push the left button to display the MAIN menu 3 Roll the wheel to choose 2 M...

Page 58: ...the RANGE box This means that the apparent radius of the VRM ring changes in proportion to the selected range scale 3 Press the VRM OFF key to erase each VRM By trackball 1 Roll the trackball to plac...

Page 59: ...6 Push the right button four times to close the menu 1 21 Measuring the Bearing Use the Electronic Bearing Lines EBLs to take bearings of targets There are two EBLs No 1 and No 2 Each EBL is a straig...

Page 60: ...EBL at right angles and its distance from the EBL origin is indicated at the VRM readout whether or not the corresponding VRM is displayed The range marker changes its position along the EBL with the...

Page 61: ...ush the wheel or the left button to open the MARK menu 3 Roll the wheel to choose 9 EBL VRM CURSOR SET B C and W types or 9 EBL CURSOR BEARING IMO and A types and push the wheel or the left button For...

Page 62: ...which may be true or relative depending on the EBL bearing reference setting Note If relative motion is selected it is also possible to read CPA by using a VRM as shown in left hand figure at the top...

Page 63: ...en push the left button 2 Roll the wheel to choose 2 MARK and then push the wheel or the left button to display the MARK menu MARK 1 BACK 2 OWN SHIP MARK OFF ON 3 STERN MARK OFF ON 4 INDEX LINE BEARIN...

Page 64: ...n EBL following steps 1 3 in By trackball in paragraph 1 21 1 2 With the cursor inside the effective display area push the left button roll the wheel to show EBL OFFSET EXIT in the guidance box and th...

Page 65: ...e the ALARM1 or ALARM2 box whichever alarm you wish to set ALARM 1 ALARM 2 ALARM boxes 2 Push the left button The cursor jumps into the effective display area and SET appears inside the ALARM box chos...

Page 66: ...m press the ALARM ACK key on the full keyboard or choose the appropriate ALARM box and then push the left button The ALARM box shows ALARMx ACK This will deactivate the audible alarm but will not stop...

Page 67: ...l the wheel to choose 2 TARGET ALARM MODE and then push the wheel or the left button 4 Roll the wheel to choose IN guard zone or OUT anchor watch as appropriate and then push the wheel or the left but...

Page 68: ...the trackball to place the cursor at a position where you wish to move the sweep origin 2 Press the OFF CENTER key Then the sweep origin is off centered to the cursor position 3 To cancel off centerin...

Page 69: ...eater the amount of stretching Note The echo stretch magnifies not only small target pips but also returns clutter from sea surface rain and radar interference For this reason make sure these types of...

Page 70: ...e echo averaging function under heavy pitching and rolling loss of targets can result Note 2 Echo averaging can be used without a heading sensor For further details contact your dealer Note 3 Echo ave...

Page 71: ...t trails Targets moving relative to own ship Target trails Note When true trail is selected on the RM mode the TRAIL MODE box is shown in red No true relative selection on TM it is only True trails on...

Page 72: ...the length of the target trail The maximum time for continuous plotting is 99 59 When the timer counts to 99 59 the timer is reset to zero all target trails are erased and then trails are restarted 1...

Page 73: ...range Within 1 3 of previous range ex 3 nm 1 5 nm Trails continue on targets which were in the previous range scale Within 1 4 of previous range ex 3 nm 0 75 nm Trails are restarted a Previous range b...

Page 74: ...y be chosen as below 1 Roll the trackball to place the arrow on the TRAIL MODE box at the bottom right corner of the screen 2 Push the right button to display the TRAIL menu 3 Roll the wheel to choose...

Page 75: ...12 hour 24 hour or 48 hour 9 TRAIL HIDE appears together with start and end times This item allows you to designate a time period in which no trails will be extended Enter time frame at START and END...

Page 76: ...EX LINE 2 While watching the IL Index Line box at the left side of the screen press and hold down the INDEX LINE key to activate or deactivate applicable index line Press down the key again to display...

Page 77: ...eading Relative or referenced to North True as below 1 Roll the trackball to choose the MENU box at the right side of the screen and then push the left button 2 Roll the wheel to choose 2 MARK and the...

Page 78: ...NDEX LINE and then push the wheel or the left button 4 Roll the wheel to choose 1 2 3 or 6 as appropriate and then push the wheel or the left button 5 Push the right button twice to close the menu 1 2...

Page 79: ...ge from own ship to mark 1 MARK box 2 Push the right button to open the MARK menu MARK MENU 1 ORIGIN MARK STAB GND SEA 2 MARK KIND ORIGIN MARK No ORIGIN MARK SYM MAP MARK WP 1 50 WP 51 100 WP 101 150...

Page 80: ...he location desired 10 Push the left button to inscribe the origin mark at the cursor location The bearing and range from the origin mark to the cursor location are shown just below the MARK box MARK...

Page 81: ...Roll the wheel to choose 1 ORIGIN MARK STAB and then push the wheel 4 Roll the wheel to choose GND or SEA as appropriate and then push the wheel or the left button 5 Push the right button to close the...

Page 82: ...turned on 1 With the cursor inside the effective display area roll the wheel to display ZOOM EXIT in the guidance box 2 Roll the trackball to choose the location to zoom 3 Push the left button or the...

Page 83: ...release the key or the left button 1 32 2 Stern marker The stern marker which is a dot and dash line appears opposite to the heading line To display or erase this marker do the following 1 Roll the t...

Page 84: ...ws 1 Roll the trackball to choose the MENU box at the right side of the display and then push the left button to display the MAIN menu 2 Roll the wheel to choose MARK and then push the wheel or the le...

Page 85: ...scale of 6 nm or larger NEAR BUOY Optimum setting for detecting navigation buoys small vessels and other small surface objects at close range FAR BUOY Optimum setting for detecting navigation buoys s...

Page 86: ...1 M1 M3 L L 2 0 ROUGH SEA S1 S1 S2 M1 M2 M3 4 0 SHIP S1 S2 M1 M2 M3 L 2 0 HARBOR S1 S1 S2 M1 M3 L 2 0 COAST S1 S2 M1 M2 M3 L 2 0 Picture setup options and default settings for X band 50 kW and S band...

Page 87: ...URE 4 2 Push the left button to choose picture setup option desired 1 33 2 Restoring default picture setup options Any of the radar functions programmed with the picture setup options may be adjusted...

Page 88: ...the trackball to choose the PICTURE box at the left side of the screen 2 Push the left button to choose PICTURE 1 PICTURE 2 PICTURE 3 or PICTURE 4 whichever you wish to set 3 Push the right button to...

Page 89: ...Roll the wheel to choose appropriate sea condition and then push the wheel or the left button The larger the number the rougher the sea state 10 Roll the wheel to choose 3 ANT HEIGHT and then push th...

Page 90: ...he key to instantly set the radar for the preset purpose Further press the key to choose option Function key Default setting F1 Interference Rejector F2 Echo Stretch F3 Auto Rain F4 Heading Line Off 1...

Page 91: ...T TRAIL BRILL MARK MENU RANGE UP RANGE DOWN ACQ TARGET DATA TARGET CANCEL OPERATION 1 BACK 2 ECHO COLOR BACK COLOR RING ALARM1 ALARM2 WATCH ALARM RESET ZOOM MARK DELETE OWN TRACK DELETE TGT TRACK DELE...

Page 92: ...ets antenna height SEA CONDITION Sets sea condition 2ND ECHO REJ Turns 2nd trace echo rejector on off PM Turns performance monitor on off SART Turns SART setup conditions on off STD KEY ALARM ACK Ackn...

Page 93: ...r RING Turns range rings on off ALARM1 Sets no 1 guard alarm ALARM2 Sets no 2 guard alarm WATCH ALARM RESET Resets watch alarm ZOOM Enables zoom MARK DELETE Deletes mark origin mark waypoint mark plot...

Page 94: ...er NEAR BUOY Optimum setting for detecting navigation buoys small vessels and other small surface objects at close range FAR BUOY Optimum setting for detecting navigation buoys small vessels and other...

Page 95: ...he following to enter position manually For GPS1 or GPS2 go to step 7 a Roll the wheel to choose 2 MANUAL L L and then push the wheel Enter latitude and longitude position as follows b Roll the wheel...

Page 96: ...show itself on the screen as random speckles spread over the entire radar image You can remove this noise as follows 1 Roll the trackball to choose the PICTURE box at the left side of the screen 2 Pus...

Page 97: ...rackball to choose the MENU box at the right side of the screen and then push the left button 2 Roll the wheel to choose 1 ECHO and then push the wheel or the left button to open the ECHO menu ECHO 1...

Page 98: ...d For further details see paragraph 1 49 BRILL menu 2 Roll the wheel to choose item you wish to adjust and then push the wheel or the left button To go to the second page of the BRILL menu choose 0 NE...

Page 99: ...ce the alarm press the ALARM ACK key on the full keyboard or roll the trackball to choose the ALARM ACK box and then push the left button The label WATCH turns to normal color and the watch alarm time...

Page 100: ...F REL TRUE 1 40 Setting Up Nav Data Wind depth ocean current water temperature date and time and waypoint data may be set up as follows 1 Roll the trackball to choose the MENU box at the right side of...

Page 101: ...value may be chosen by spinning the wheel past zero 0 WPT DATA Turn waypoint data off or display range and bearing to waypoint 4 Push the right button twice to close the menu Note Wind and current dat...

Page 102: ...the wheel to choose 9 CUSTOMIZE TEST and then push the wheel or the left button CUSTOMIZE TEST menu 3 Roll the wheel to choose 2 DATA BOX and then push the wheel or the left button DATA BOX menu 4 Rol...

Page 103: ...o show among 1BOX 2BOX 3BOX and LARGE and then push the wheel or the left button Note Nav data or zoom is automatically removed when 3BOX is selected LARGE Nav Data or Zoom ARP AIS Functions Box Warni...

Page 104: ...items may be customized to suit your needs 1 Roll the trackball to choose the MENU box at the right side of the screen and then push the left button 2 Roll the wheel to choose 9 CUSTOMIZE TEST and th...

Page 105: ...ontrol unit operates radar it is connected to 5 POP UP GUIDANCE Available on B C and W types Pop up guidance You may turn the guidance off or on 6 OWN SHIP VECTOR Choose what the own ship vector displ...

Page 106: ...ALARM ACK key or click the ALARM ACK box with the left button WATCH alarm Beeps WATCH 0 00 WATCH appears and time count freezes at 0 00 Press the ALARM ACK key or click the WATCH box with the left bu...

Page 107: ...ring Equipment Speed log fails to detect a bottom tracking speed resulting in the Speed through the water STW mode automatically COLLISION Continuous beep COLLISION comes on when ARP tracked target is...

Page 108: ...EAD LINE TRIGGER VIDEO GYRO LOG EPFS XTE ARRIVAL WPT DEPTH ALARM ACK OUT OPERATOR FITNESS 9 ALARM OUT POLARITY NORMAL INVERT 1 43 2 Outputting alarm signal Four ports are provided from which to output...

Page 109: ...1 44 1 Choosing the antenna For the ship which carries multiple antennas you may choose the antenna to use as follows 1 Roll the trackball to place the arrow in the ANTENNA box at the left side of th...

Page 110: ...ich does not exist or one which is not powered 3 Push the right button to show the antenna information display Not available on IMO or A type ANTENNA INFORMATION display 4 Push the right button to clo...

Page 111: ...wn ship to cursor position Latitude and longitude position of cursor Cursor X Y position Cursor data options Note 1 For the X Y coordinates display the Y axis is the heading line right top is plus and...

Page 112: ...IALIZE 4 PM 1 OFF ON 5 SART OFF ON 6 WIPER OFF 1 2 7 ECHO AREA 2 CIRCLE WIDE ALL 1 Not available on FAR 2157 2167DS 2 Not available on IMO or A type ECHO menu 3 Roll the wheel to choose 4 PM and then...

Page 113: ...st arcs should appear between 13 5 to 18 5 nm The performance monitor can observe a total of 10 dB loss in transmitter and receiver Transmitter normal Receiver normal Transmitter and receiver 10 db lo...

Page 114: ...tting 1 and 2 is that brilliance is lowered more slowly 2 Condition B Echo averaging is automatically activated when the wiper feature is turned on allowing you to instantly see how the picture is aff...

Page 115: ...SHIP SHAPE 8 MARK POSN CURSOR OS L L 00 000 00 N 000 000 00 E 9 MAP DISPLAY OFF ON 0 MAP MARK COLOR RED GRN BLU YEL CYA MAG WHT Not available on IMO or A type MARK menu 3 Roll the wheel to choose 2 an...

Page 116: ...creen 2 Roll the wheel to choose color and brilliance set from among BRILL1 BRILL4 3 Push the wheel to finish 1 49 2 Presetting color and brilliance set 1 Roll the trackball to choose the BRILL box at...

Page 117: ...rence Point for CPA TCPA The common reference point for CPA TCPA can be chosen from antenna position or conning position as shown below Echo sweep center and sector blanking symbol are always referenc...

Page 118: ...he HUB 100 s AC power source to power it LED display The LEDs on the top of the unit light flash or go off according to equipment status When the equipment is powered all LEDs light and then go off LE...

Page 119: ...s COMBINE setting The following should be done in order to enable the dual radar display Set antenna position correctly on both the main radar and the external radar Select external radar to use from...

Page 120: ...radar display is active Set a zone before activating the dual radar display 1 Right click the MENU box MENU 2 Select 9 CUSTOMIZE TEST and push the left button 3 Select 7 OPERATION and push the left bu...

Page 121: ...OWN at the top left side of the screen to switch control to the external radar The indication then shows CTRL EXT Each click of the indication switches control between the main and external radar alt...

Page 122: ...played EXT Set external radar s antenna as reference point and set display area of external radar The area outside that set here is where the image from own radar will be displayed Picture from extern...

Page 123: ...ct 5 COMBINE RANGE and push the left button 10 Use the scrollwheel to set START and LENGTH referring to the example below Spin the scrollwheel to set and push it to confirm START Set range start point...

Page 124: ...he left button 1 BACK 2 DUAL RADAR OFF MIX COMBINE 3 COMBINE MODE OWN EXT 4 COMBINE SECTOR START 000 ANGLE 000 5 COMBINE RANGE START 00 00NM LENGTH 00 00NM 6 EXT RADAR 1 2 3 4 DUAL RADAR Shown when 2...

Page 125: ...Maximum range The maximum detecting range of the radar Rmax varies considerably depending on several factors such as the height of the antenna above the waterline the height of the target above the s...

Page 126: ...ed by pulselength only Practically a 0 08 microsecond pulse offers the discrimination better than 35 m as do so with all FURUNO radars Test targets for determining the range and bearing resolution are...

Page 127: ...target as shown below Multiple reflection echoes can be reduced and often removed by decreasing the gain sensitivity or properly adjusting the A C SEA control Own ship Target True echo Multiple echo...

Page 128: ...he figure below If your ship comes close to a large metal bridge for example such a false echo may temporarily be seen on the screen True echo False echo Own ship Target ship Mirror image of target sh...

Page 129: ...ange the frequency match during each of the 12 slow sweeps will produce a response on the radar display thus a line of 12 dots equally spaced by about 0 64 nautical miles will be shown When the radar...

Page 130: ...he left button 2 Roll the wheel to choose 1 ECHO and then push the wheel or the left button ECHO 1 BACK 2 2ND ECHO REJ OFF ON 3 TUNE INITIALIZE 4 PM 1 OFF ON 5 SART OFF ON 6 WIPER OFF 1 2 7 ECHO AREA...

Page 131: ...h Narrow bandwidths of 3 5 MHz are used with long pulses on long range scales and wide bandwidths of 10 25 MHz with short pulses on short ranges A radar bandwidth of less than 5 MHz will attenuate the...

Page 132: ...frequency spectrum X or S band There are several signal formats in general the RACON signal appears on the radar screen as a rectangular echo originating at a point just beyond the position of the rad...

Page 133: ...needed to restore vectors to full accuracy after an abrupt course change The actual amount depends on gyrocompass specifications The amount of tracking delay is inversely proportional to the relative...

Page 134: ...T DATA Displays data on ARP target chosen with the trackball TARGET CANCEL Terminates tracking of ARP target chosen with the trackball Control unit RCU 014 Trackball With the cursor inside the effecti...

Page 135: ...enced speed input The use of echo referenced speed is recommended when The speed log is not operating properly or not connected to the radar The vessel has no device which can measure ship s leeward m...

Page 136: ...target 5 Repeat steps 2 4 to continue entering reference marks Three may be entered Notes on speed input by reference target When the reference target is lost or goes out of the acquisition range the...

Page 137: ...the initial tracking stage is finished and the target becomes ready for stable tracking At this point the broken square mark changes to a solid circle Targets automatically acquired are distinguished...

Page 138: ...ce the cursor on the ARP target reference target or lost target you wish to cancel tracking 2 Press the TARGET CANCEL key By trackball 1 With the cursor inside the effective display area roll the whee...

Page 139: ...ET menu 2 Roll the wheel to choose 1 ARP SELECT and then push the wheel 3 Roll the wheel to choose MANUAL 100 AUTO 25 AUTO 50 or AUTO 75 as appropriate and then push the wheel or the left button For d...

Page 140: ...otting symbol changes to a small circle indicating steady state tracking condition Note 1 For successful acquisition the target to be acquired should be within 0 2 to 32 nm from own ship and not obscu...

Page 141: ...lotting symbol selected for a target acquired manually is shown in bold broken lines Bold broken square for 20 60 scans 3 scans for HSC of the antenna after acquisition Steady tracking Manual plotting...

Page 142: ...ARGET DATA ACQ in the guidance box and push the wheel 3 Press the TARGET DATA key on the keyboard or the wheel consecutively until desired symbol is displayed 3 7 3 ARP symbol brilliance 1 Roll the tr...

Page 143: ...ize of the ARP symbol as follows 1 Roll the trackball to choose the MENU box at the right side of the screen and then push the left button 2 Roll the wheel to choose 4 ARP AIS and then push the wheel...

Page 144: ...ll the trackball to choose the MENU box at the right side of the screen and then push the left button 2 Roll the wheel to choose 5 PLOTTER and then push the wheel or the left button 3 Roll the wheel t...

Page 145: ...ctive display area roll the wheel to show TARGET DATA ACQ CURSOR MENU in the guidance box 2 Roll the trackball to place the cursor on a desired ARP target and then push the left button 3 To erase a ta...

Page 146: ...BCT 20MIN BRG Bearing from own ship to target in R Relative or T True RNG Range from own ship to target COG Course of target over ground True or Relative SOG Speed of target over ground CPA Closest Po...

Page 147: ...oll the trackball to choose the TARGET LIST box at the right side of the screen TARGET LIST TARGET LIST box 2 Push the left button to display the TARGET LIST in the TCPA means that the time is greater...

Page 148: ...96 nm range scale 1 Roll the trackball to choose the TARGET LIST box at the right side of the screen 2 Push the right button to open the TARGET LIST menu TARGET LIST menu 3 Roll the wheel to choose 1...

Page 149: ...radar is displaying AIS targets True vector In the true motion mode all fixed targets such as land navigational marks and ships at anchor remain stationary on the radar screen with vector length zero...

Page 150: ...time Your selection appears in the vector length box see illustration below By trackball 1 Roll the trackball to choose VECTOR TRUE or VECTOR REL whichever is displayed at the right side of the scree...

Page 151: ...its plotted course will not be a straight line a Ship turning b Ship running straight c Ship reduced speed d Ship increased speed Past position display 3 10 1 Displaying and erasing past position poin...

Page 152: ...ts to display per plotting interval and the color of past position points 1 Roll the trackball to choose the MENU box at the right side of the screen and then push the left button 2 Roll the wheel to...

Page 153: ...and then push the right button SPEED menu 2 Roll the wheel to choose 3 SET DRIFT and then push the wheel or the left button 3 Roll the wheel to choose ON and then push the wheel or the left button 4...

Page 154: ...or CPA TCPA calculation may be chosen from antenna position or conning position For further details see paragraph 1 50 3 12 1 Setting CPA TCPA alarm ranges To set the CPA TCPA alarm ranges do the foll...

Page 155: ...ALARM ACK box with the trackball and then push the left button The warning label COLLISION and the flashing of the triangle plotting symbol and vector remain on the screen until the dangerous situati...

Page 156: ...dashed so as to distinguish them from the radar guard alarm The procedure below shows how to set a guard zone using the example at the bottom of the page 1 Roll the trackball to choose one of the GZ...

Page 157: ...ints For details see paragraph 3 13 5 Note 4 Two more alarm zones No 1 and No 2 Guard Alarm Zones may be added in addition This means a maximum 4 alarm zones are available at a time ARP symbols are no...

Page 158: ...eft button ARP AIS menu 3 Roll the wheel to choose 2 GUARD ZONE STAB and then push the wheel or the left button 4 Roll the wheel to choose STAB HDG or STAB NORTH as appropriate and then the push the w...

Page 159: ...sition Target full alarm for automatic acquisition System failure Collision CPA TCPA alarm Visual COLLISION and audible alarms are generated a target falls with a preset limits To acknowledge the audi...

Page 160: ...the screen bottom and a short beep sounds when the capacity for automatically acquired targets as set on the menu is reached System failure alarm When the SPU Board receives no signal input from the...

Page 161: ...ated below The delay time represents the time lag from the present time to the time when own ship will actually start to change her speed and or course You should therefore take into consideration own...

Page 162: ...ly show position OS7 for own ship position A7 for target A and position B7 for target B omitting the intermediate positions Thus the static trial maneuver will be convenient when you wish to know the...

Page 163: ...data by sets as shown in the figure below This is done to provide accurate trial maneuver results for various ship s speed 3 TRIAL SPEED RATE 4 TRIAL TURN RATE Set 1 0kt 0 00kt s 0kt 0 00kt s Set 2 Se...

Page 164: ...h own ship that is the target ship comes within preset CPA TCPA limits the target plotting symbol changes to a triangle and flashes If this happens change own ship s trial speed course or delay time t...

Page 165: ...ssessing overall performance of the ARP Normal operation is suspended and the indication XX appears at the bottom of the effective display area during the test The test may be terminated at any time 1...

Page 166: ...simulated automatically together with current targets 7 The test continues for five minutes and repeats To terminate the test press the STBY TX key or choose the TX STBY box at the bottom left corner...

Page 167: ...ing is achieved when the target is clearly distinguishable on the display for 5 out of 10 consecutive scans whether acquired automatically or manually Required tracking facilities are available within...

Page 168: ...d of own ship are computed from own ship s gyro and speed inputs and the resulting course and speed of each tracked target is easily computed by vector summing of the relative motion with own ship s c...

Page 169: ...sible if the radar sensitivity control GAIN control were increased The setting of the correct radar receiver gain is not critical but the target should be on the radar PPI and be clearly visible and w...

Page 170: ...ertain cases false echoes in the shadow sector cause the ARP system to acquire track and vector them Shadow sectors should be avoided Indirect echoes A target at close range is usually picked up direc...

Page 171: ...hown below ACQ ON MENU OFF VRM A C SEA A C RAIN MODE 3 LINE INDEX 6 OFF 2 1 HL CENTER OFF 4 5 RESET CU TM OFFSET EBL GAIN TARGET CANCEL TARGET DATA RANGE LIST TARGET 9 MARK ENTER TIME VECTOR 7 8 CANCE...

Page 172: ...all to choose the MENU box at the right side of the screen and then push the left button 2 Roll the wheel to choose 4 ARP AIS and then push the wheel or the left button ARP AIS menu 3 Roll the wheel t...

Page 173: ...targets are marked with appropriate AIS symbol as below Activated target ROT higher than preset ROT Dangerous target Lost target Target selected for data display AIS symbols Note 1 The equipment cont...

Page 174: ...4 Setting Up for a Voyage There are five items on the VOYAGE DATA menu you will need to enter at the start of a voyage navigational status ETA destination draught and crew 1 Roll the trackball to choo...

Page 175: ...heel or left button 7 Use the wheel to enter estimated date and time of arrival in order of day two digits month year four digits and time Push the wheel after entering the data 8 Roll the wheel to ch...

Page 176: ...urse over Ground vector 1 Turning direction ROT 1 Vector shows STW speed thru water and CSE course when water tracking mode is selected at the radar If there is no heading data the line points in dire...

Page 177: ...y cannot be slept 1 With the cursor inside the effective display area roll the wheel to display TARGET CANCEL EXIT in the guidance box 2 Roll the trackball to place the cursor on an activated AIS targ...

Page 178: ...marked with a broken square and AIS data is shown in the AIS data box when the target is correctly selected Ship name is shown near the target If this data is not available MMSI no appears Activated...

Page 179: ...SNS GPS POS ACC HIGH NAV STATE ANCHOR MMSI No 107374182 IMO No 12354876 SHIP LENGTH 187m SHIP WIDTH 28m SHIP DRAFT 12 2m DESTINATION Osaka ETA 01 FEB 12 59 AIS VERSION 0 FUSION OFF TYPE OF SHIP CARGO...

Page 180: ...then push the right button 2 Roll the wheel to choose 0 NEXT and then push the wheel or the left button BRILL1 MENU 2 2 1 BACK 2 BRG CURSOR 3 EBL 4 VRM 5 INDEX LINE 6 ARPA SYMBOL 7 AIS SYMBOL 8 L L G...

Page 181: ...wheel to choose 4 ARP AIS and then push the wheel or the left button 3 Roll the wheel to choose 6 AIS SYMBOL and then push the wheel or the left button AIS SYMBOL menu 4 Roll the wheel to choose 2 AIS...

Page 182: ...ub menu of the PLOTTER menu is ON regardless of whether AUTO TARGET TRACK on the PLOTTER menu is turned ON or OFF Below are sample past position displays a Ship turning b Ship running straight c Ship...

Page 183: ...d then push the left button 2 Roll the wheel to choose 4 ARP AIS and then push the wheel or the left button 3 Roll the wheel to choose 7 AIS SYMBOL and then push the wheel or the left button AIS SYMBO...

Page 184: ...erval depends on target s speed For example the data is transmitted every 10 seconds on ship speed of 0 to 14 kt and every two seconds on the ship speed of more than 23 knots For details see the owner...

Page 185: ...direction of turning of the vessel 1 Roll the trackball to choose the MENU box and then push the left button 2 Roll the wheel to choose 4 ARP AIS and then push the wheel or the left button 3 Roll the...

Page 186: ...choose the MENU box and then push the left button 3 Roll the wheel to choose 4 ARP AIS and then push the left button 4 Roll the wheel to choose 7 FUSION and then push the left button FUSION menu 5 Rol...

Page 187: ...AIS symbol is displayed Further ARPA FUSION appears at the bottom right corner of the display at the time of conversion and the ARP target no appears next to the AIS symbol An ARP target whose speed...

Page 188: ...pe of ship call sign name and position of internal and external GPS antennas can be viewed as follows 1 Roll the trackball to choose the AIS DISP box at the right side of the screen 2 Push the right b...

Page 189: ...IS DISP box at the right side of the screen 2 Push the right button to open the AIS TARGET menu 3 Roll the wheel to choose 5 TRANSMIT MESSAGE and then push the wheel TRANSMIT MESSAGE menu 4 Roll the w...

Page 190: ...FILE and then push the wheel or the left button 15 Roll the wheel to choose appropriate number and then push the wheel or the left button 16 Push the right button to close the menu 4 14 2 Transmittin...

Page 191: ...es up to 20 AIS messages When the storage capacity is reached the oldest AIS message is automatically erased to make room for the latest Note that received messages and alarm messages are not backed u...

Page 192: ...wheel to choose ON as appropriate and then push the wheel or the left button 5 Push the right button to close the menu When a message arrives the message arrival icon appears at the right hand side of...

Page 193: ...get fails to produce data for six minutes or five reporting intervals whichever is the shorter RECEIVE Not receiving AIS data from own AIS VDO message GUARD Displayed when an AIS target enters the gua...

Page 194: ...4 AIS OPERATION 4 24 This page intentionally left blank...

Page 195: ...y be simultaneously shown on the display 200 waypoints are available Own ship and other ship tracks may be stored at a selected interval Charts B C and W types are superimposed on the radar picture wi...

Page 196: ...ine AIS activated target Video plotter display 5 3 Presentation Modes Five presentation modes are available North up Course up Head up Head up TB True Bearing and North up TM True Motion To choose a m...

Page 197: ...dar display To choose the radar display use the trackball to choose the DISPLAY MODE box and push the left button to display RADAR Then follow the procedures in this section to create a radar map 5 4...

Page 198: ...dars you may specify mark color by choosing 0 MAP MARK COLOR pushing the wheel and the choosing color desired 5 Push the right button to close the menu The guidance box now reads MARK SELECT MARK MENU...

Page 199: ...ange MARK Orange MARK Orange MARK Orange MARK Orange MARK Orange MARK Orange MARK Orange MARK Orange MARK Orange MARK Orange MARK Green BUOY Orange MARK Red BUOY Orange MARK Green BUOY Orange MARK Red...

Page 200: ...ox 2 Roll the trackball to place the cursor on the radar map mark or line you wish to erase 3 Push the left button to erase selected mark or line Note When erasing a line the cursor location determine...

Page 201: ...choose 5 PLOTTER and then push the wheel or the left button 3 Roll the wheel to choose 8 DATA ERASE and then push the wheel or the left button DATA ERASE 1 BACK 2 OWN TRACK RED GRN BLU YEL CYA MAG WH...

Page 202: ...h the left button until MAN ALIGNED disappears from the screen 5 6 2 Cursor data correction You can correct cursor data as below 1 Roll the trackball to choose the MENU box at the right side of the sc...

Page 203: ...ight heat sources and active gases Keep cards away from water and chemicals Keep the connector free foreign material Do not drop the cards Chart cards are intended as an aid to navigation The navigato...

Page 204: ...the right side of the screen To release the chart position correction display CHART ALIGN L OFF EXIT in the guidance box and then push the left button until CHART ALIGN disappears from the screen 5 7...

Page 205: ...and then push the left button 2 Roll the wheel to choose 5 PLOTTER and then push the left button PLOTTER 1 BACK 2 CHART COLOR GRN YEL CYA ORANGE GRAY 3 OWN TRACK INTERVAL OFF DRAW 10S 30S 1M 2M 3M 6M...

Page 206: ...el or the left button DISPLAY 1 2 1 BACK 2 GRID OFF ON 3 OWN TRACK OFF ON 4 TARGET TRACK OFF ON 5 MARK OFF ON 6 LAND DENSITY OFF ON 7 PLACE NAME OFF ON 8 COAST LINE OFF ON 9 CONTOUR LINE OFF ON 0 NEXT...

Page 207: ...1 Roll the trackball to choose the MENU box at the right side of the screen and then push the left button 2 Roll the wheel to choose 5 PLOTTER and then push the wheel PLOTTER 1 BACK 2 CHART COLOR GRN...

Page 208: ...e the MENU box at the right side of the screen and then push the left button 2 Roll the wheel to choose 5 PLOTTER and then push the wheel or the left button 3 Roll the wheel to choose 5 TGT TRACK INTE...

Page 209: ...ALL 3 TARGET TRACK RED GRN BLU YEL CYA MAG WHT 30 50 80 ALL 4 MARK ALL ERASE NO YES 5 WPT ALL ERASE NO YES 6 NAV LINE ALL ERASE Not available on IMO type DATA ERASE menu 4 Roll the wheel to choose 2 O...

Page 210: ...u MARK MENU 1 ORIGIN MARK STAB GND SEA 2 MARK KIND ORIGIN MARK No ORIGIN MARK SYM MAP MARK WP 1 50 WP 51 100 WP 101 150 WP 151 200 OWN SHIP SHAPE 8 MARK POSN CURSOR OS L L 00 000 00 N 000 000 00 E 9 M...

Page 211: ...cursor where you want to inscribe a mark and then push the left button to inscribe the mark You can see the range and bearing to the cursor location by monitoring the mark range and bearing indicatio...

Page 212: ...trackball to place the cursor on the mark or line you wish to erase A flashing X appears on the mark when it is correctly selected 3 Push the left button to erase Note When erasing a line the cursor...

Page 213: ...Roll the wheel to choose 8 DATA ERASE and then push the wheel or the left button DATA ERASE 1 BACK 2 OWN TRACK RED GRN BLU YEL CYA MAG WHT 30 50 80 ALL 3 TARGET TRACK RED GRN BLU YEL CYA MAG WHT 30 50...

Page 214: ...to waypoint 1 MARK box 2 Push the right button to open the MARK menu MARK MENU 1 ORIGIN MARK STAB GND SEA 2 MARK KIND ORIGIN MARK No ORIGIN MARK SYM MAP MARK WP 1 50 WP 51 100 WP 101 150 WP 151 200 O...

Page 215: ...scribe the mark The waypoint mark waypoint number appears at the location selected You can see the range and bearing to the cursor location by monitoring the mark range and bearing indication just bel...

Page 216: ...push the wheel or the left button b b Roll the wheel to choose alphanumeric character desired and then push the wheel c c Repeat step 2 to complete the waypoint name You may use up to 15 alphanumeric...

Page 217: ...he wheel to choose 2 WPT NO SELECT and then push the wheel or the left button 5 Use the wheel to enter waypoint number you wish to edit and then push the wheel or the left button Then do one of the fo...

Page 218: ...the right button when the guidance reads MARK DELETE EXIT Erasing all waypoints 1 Roll the trackball to choose the MENU box at the right side of the screen and then push the left button 2 Roll the whe...

Page 219: ...ds eight waypoints To display the waypoint list 1 Roll the trackball to choose the MENU box at the right side of the screen 2 Roll the wheel to choose 8 NAV LINE WPT and then push the wheel or the lef...

Page 220: ...eel to choose 8 NAV LINE WPT and then push the wheel or the left button 3 Roll the wheel to choose 0 NEXT and then push the wheel or the left button NAV LINE WPT menu 2 2 4 Roll the wheel to choose 4...

Page 221: ...SET and then push the wheel or the left button NAV LINE SET menu 4 Roll the wheel to choose 2 NAV LINE NO SELECT and then push the wheel or the left button 5 Use the wheel to enter nav line no in two...

Page 222: ...h the wheel or the left button 5 Use the wheel to enter nav line number to edit and then push the wheel or the left button 6 To edit nav line name roll the wheel to choose 3 NAV LINE NAME and then pus...

Page 223: ...and then push the left button 2 Roll the wheel to choose 8 NAV LINE WPT and then push the wheel or the left button 3 Roll the wheel to choose 9 NAV LINE LIST and then push the wheel or the left button...

Page 224: ...box at the right side of the screen and then push the left button 2 Roll the wheel to choose 8 NAV LINE WPT and then push the wheel or the left button 3 Roll the wheel to choose 8 NAV LINE SET and the...

Page 225: ...t available on IMO type DATA ERASE menu 4 Roll the wheel to choose 6 NAV LINE ALL ERASE 5 Roll the wheel to choose YES and then push the wheel or the left button to erase all nav lines and their data...

Page 226: ...ate option and then push the wheel or the left button OFF Turns turning lines off ON Use this setting when the vessel is not to correct cross track error to return to course set after arriving at turn...

Page 227: ...order Choose appropriate option and then push the wheel 8 To skip the next waypoint roll the wheel to choose 2 SKIP NEXT WPT and then push the wheel or the left button 9 Push the right button twice to...

Page 228: ...0 130 140 150 160 170 180 190 200 210 220 230 240 250 260 270 280 290 300 310 320 330 340 350 Waypoint Mark Waypoint mark 1 Roll the trackball to choose the MENU box and then push the left button 2 Ro...

Page 229: ...however in which case all prior information on them is erased 1 Insert a blank memory card into the appropriate card slot in the Card I F Unit Card Slot 1 2 Card I F unit front view 2 Roll the trackb...

Page 230: ...menu disappears and the message FORMAT CARD appears 5 14 2 Recording data When the memory becomes full the oldest track is erased to make room for the latest Further when the memory is full you cannot...

Page 231: ...display then looks something like the one below CARD WRITE menu Note The file name is composed of a single alphabet the file type and seven alphanumeric characters the file number The file type is den...

Page 232: ...or the left button CARD menu 4 Roll the wheel to choose 2 DRIVE SELECT and then push the wheel or the left button 5 Roll the wheel to choose the drive where you inserted the memory card 6 Push the whe...

Page 233: ...CARD and then push the wheel or the left button 3 Roll the wheel to choose 2 DRIVE SELECT and then push the wheel or the left button 4 Roll the wheel to choose the appropriate drive and then push the...

Page 234: ...5 VIDEO PLOTTER OPERATION 5 40 This page intentionally left blank...

Page 235: ...ly qualified personnel should work inside the equipment Turn off the radar power switch before servicing the antenna unit Post a warn ing sign near the switch indicating it should not be turned on whi...

Page 236: ...essary clean and repaint them thickly Replace them if heavily corroded Sealing compound may be used instead of paint Apply a small amount of grease between nuts and bolts for easy removal in future An...

Page 237: ...000 h Backlight Unit for Display Unit MU 201CR 201LHS2F 45 000 h 25 C 30 000 h 50 C Cold Cathode Fluorescent Lamp for Display Unit MU 231CR FLCL 23 50 000 h 25 C 35 000 h 50 C 6 3 Replacing the Fuse...

Page 238: ...8 L 000 103 769 6 5 Trackball Maintenance If the cursor skips or moves abnormally clean the trackball as below 1 Turn the retaining ring counterclockwise 45 to unlock it Retaining Ring 2 Remove the r...

Page 239: ...ad may be required in case of the keyboard type control unit If that does not work try to turn the power off and on again to see if the problem might be video freeze up Only 2 parallel index lines whe...

Page 240: ...ly board Brilliance adjusted but no picture SPU board Replace SPU board Antenna not rotating 1 Antenna drive mechanism 2 Defective antenna drive motor relay thermal relay K2 200 220 380 440 100 VAC 1...

Page 241: ...ding pulse is not received during standby 2 Replace the gyro interface Cannot operate radar from on screen boxes SPU Board Replace SPU Board Radar is properly tuned but poor sensitivity 1 Deteriorated...

Page 242: ...functioning properly Improper setting of A C SEA If A C SEA is seen only at very close range suspect inaccurate frequency of reference oscillator True motion presentation not working correctly 1 Poor...

Page 243: ...MIZE TEST menu 3 Roll the wheel to choose 8 TEST and then push the wheel or the left button TEST menu 4 Roll the wheel to choose 2 SELF TEST and push the wheel or the left button SELF TEST menu 5 Roll...

Page 244: ...1 6 MAG CURRENT 1 5 HEATER 1 8 12V 11 9 12V 11 8 5V 4 8 32V 31 8 TUNE OUT 19 2 TRIGGER FREQ 2273 ANT SPEED 21 6 Program Version No Installed card units are shown 0 0 0 0 0 0 0 0 0 0 0 0 Self test res...

Page 245: ...e categories of GPS1 and GPS2 position speed heading and nav data Below is an example The sentences shown depend on your system settings GPS1 GGA GLL RMC RMB VTG ZDA DTM BWR BWC GPS2 GGA GLL RMC RMB V...

Page 246: ...ed target becomes a lost target ARPA SYSTEM ERROR Continuous No status data from ARPA TARGET FULL AUTO MAN Continuous Capacity for automatic and manually acquired targets has been reached TARGET FULL...

Page 247: ...a waypoint KEY Continuous No status data from keyboard RF Continuous No status data from antenna EXT ERROR Continuous An alarm among GYRO TRIGGER VIDEO AZIMUTH and HEADLINE has been generated at a rad...

Page 248: ...6 MAINTENANCE TROUBLESHOOTING 6 14 This page intentionally left blank...

Page 249: ...DEX LINE 1 2 3 6 4 6 INDEX LINE MODE VERTICAL HORIZONTAL 5 7 INS MARK 6 8 EBL OFFSET BASE POINT STAB GND STAB HDG STAB NORTH 9 EBL VRM CURSOR SET 7 0 RING OFF ON 1 BACK 2 GUARD ALARM MODE IN OUT 3 GUA...

Page 250: ...L CYA MAG WHT 3 AIS SYMBOL SIZE SMALL STD LARGE 4 ROT TAG LIMIT 0 359 MIN 5 PAST POSN COLOR RED GRN BLU YEL CYA MAG WHT 6 PAST POSN POINTS 5 10 1 BACK 2 FUSION TARGET OFF ON 3 GAP 0 000 9 999 NM 4 RAN...

Page 251: ...EAD CARD 4 WR MARK 5 WR NAV LINEQWPT 6 WR OWN TRACK 7 WR TARGET TRACK 8 WR SETTING DATA 9 WR INSTALLATION DATA 0 NEXT 1 BACK 2 FILE DELETE 3 CARD INITIALIZE 1 BACK 2 DEPTH OFF m ft 3 DEPTH GRAPH SCALE...

Page 252: ...ISE REJ ANT SELECT PULSE LENGTH A C SEA SELECT AUTO RAIN SELECT TUNE SELECT ANT HEIGHT SEA CONDITION 2ND ECHO REJ PM SART WIPER 1 BACK 2 ALARM ACK STBY TX HL OFF EBL OFFSET MODE OFF CENTER CU TM RESET...

Page 253: ...ADAR 0 NEXT 1 BACK 2 SELF TEST 3 ARP TEST 6 PICTURE 1 BACK 2 PICTURE1 PICTURE 2 PICTURE 3 PICTURE 4 NEAR FAR NEAR BUOY FAR BUOY ROUGH SEA SHIP HARBOR 1 COAST 1 NEAR BIRD 2 FAR BIRD 2 1 Other than FAR...

Page 254: ...u VOYAGE DATA menu STATIC DATA menu TRAIL MENU 1 TRAIL MODE REL TRUE 2 TRAIL GRAD SINGLE MULTI 4 TRAIL LEVEL 1 2 3 4 5 TRAIL RESTART OFF ON 6 TRAIL COPY OFF ON 7 TARGET LIST MENU CPA TCPA BCR BCT RANG...

Page 255: ...NOISE REJ OFF ON 5 AUTO STC OFF ON 6 AUTO RAIN 7 VIDEO CONTRAST 1 2 3 4 A B C D 8 PULSE 9 CONDITION PULSE MENU 1 BACK 2 0 5NM S1 S2 3 0 75NM S1 S2 M1 4 1 5NM S1 S2 S3 5 3NM S2 M1 M2 M3 6 6NM M1 M2 M3...

Page 256: ...Data bits 8 D7 0 Parity none Stop bits 1 D0 D1 D2 D3 D4 D5 D6 D7 Start bit Stop bit Data bits Data sentences Data used is shown in bold italics Input sentences BWC Bearing and distance to waypoint Not...

Page 257: ...C of observation 2 Waypoint latitude N S 3 Waypoint longitude E W 4 Bearing degrees true 5 Bearing degrees magnetic 6 Distance nautical miles 7 Waypoint ID 8 Mode indicator see note 9 Checksum NOTE Po...

Page 258: ...P90 PE90 999 User defined IHO datum code 2 Local datum subdivision code 3 Lat offset min N S 4 Lon offset min E W 5 Altitude offset m 6 Reference datum W84 WGS84 W72 WGS72 S85 SGS85 P90 PE90 7 Checksu...

Page 259: ...x x x x x hh CR LF 4 3 2 1 1 Water depth relative to trancsducer in meters 2 Offset from transeducer in meters see notes 1 and 2 3 Maximum range scale in use 4 Checksum NOTE1 positive distance from t...

Page 260: ...eoidal separation m 9 Age of differential GPS data 10 Differential reference station ID 0000 1023 11 Checksum NOTE 0 fix not available or invalid 1 GPS SPS mode fix valid 2 differential GPS SPS mode f...

Page 261: ...e indicator A Autonomous D Differential E Estimated dead reckoning M Manual input S Simulator N Data not valid The Mode indicator field supplements the Status field The Status field shall be set to V...

Page 262: ...2 1 1 Temperature degrees C 2 Checksum MWV Wind speed and angle MWV x x a x x a A hh CR LF 6 5 4 3 2 1 1 Wind angle 0 to 359 degrees 2 Reference R relative T true 3 Wind speed 4 Wind speed units K M...

Page 263: ...status A arrival circle entered or perpendicular passed 12 Mode indicator see note 3 13 Checksum NOTES 1 If range to destination exceeds 999 9 nautical miles display 999 9 2 If cross track error exce...

Page 264: ...iation degrees E W 9 Mode indicator see note 10 Checksum NOTE Positioning system Mode indicator A Autonomous D Differential E Estimated dead reckoning M Manual input S Simulator N Data not valid The M...

Page 265: ...ground water speed VBW x x x x A x x x x A x x A x x A hh CR LF 11 10 9 8 7 6 5 4 3 2 1 1 Longitudinal water speed knots 2 Transverse water speed knots 3 Status water speed A data valid V data invali...

Page 266: ...x N x x K hh CR LF 5 4 3 2 1 1 Heading degrees true 2 Heading degrees magnetic 3 Speed knots 4 Speed km h 5 Checksum VDR Set and drift VDR x x T x x M x x N hh CR LF 4 3 2 1 1 Direction degrees true 2...

Page 267: ...tor A Autonomous D Differential E Estimated dead reckoning M Manual input S Simulator N Data not valid The positioning system Mode indicator field shall not be a null field Data shown in green in case...

Page 268: ...speed meters second 4 Wind speed Km Hr 5 Checksum WPL Waypoint location WPL llll lll a yyyyy yyy a c c hh CR LF 4 3 2 1 1 Waypoint latitude N S 2 Waypoint longitude E W 3 Waypoint identifier 4 Checks...

Page 269: ...state A acknowledged V unacknowledged 5 Alarm s description text 6 Checksum AIVDM VHF data link message AIVDM x x x a s s x hh CR LF 7 6 5 4 3 2 1 1 Total number of sentences needed to transfer the me...

Page 270: ...eeded to transfer the message 1 to 9 2 Message sentence number 1 to 9 3 Sequential message identifier 0 to 9 4 AIS channel Number 5 Encapsulated ITU R M 1371 radio message 6 Number of fill bits 0 to 5...

Page 271: ...true 4 Course reference B M W R P see note 5 Vessel soeed 6 Speed refereence B M W R P see note 7 Vessel set degrees true Manually entered 8 Vessel drift speed Manually entered 9 Speed units K km h N...

Page 272: ...7 VRM2 range 8 EBL2 degrees 9 Cursor range from own ship 10 Cursor bearing degrees clockwise from 0 11 Range scale in use 12 Range units K N S 13 Display rotation see note 1 14 Checksum NOTES 1 Displa...

Page 273: ...llll lll a yyyyy yyy a c c hhmmss ss a a hh CR LF 8 7 6 5 4 3 2 1 1 Target number 00 99 2 Latitude N S 3 Longitude E W 4 Target name 5 UTC of data 6 Target status see note 7 Reference target R null o...

Page 274: ...R 4 Target speed 5 Target course degrees true relative T R 6 Distance of closet point of approach 7 Time to CPA min increasing 8 Speed distance units K N S 9 User data e g target name 10 Target statu...

Page 275: ...85 Transceiver Logical High A B 0 2V Logical Low A B 0 2V RD B Log navigator PC 400 RD A RD B Photo Coupler 470 ohm This port is an opticoupler used to isolate I F terminal on RD terminal Absolute max...

Page 276: ...2V Logical Low A B 0 2V Serial interface input output ports Transmission rate is selectable from 4800 bps and 38 4 kbps Input port RD A B LTC1535 RD A GND Isolated RS485 Transceiver Logical High A B 0...

Page 277: ...ssy TA4726N CONTROL UNIT RCU 015 PNL Board 03P9344 Trackball Assy TA4726N DISPLAY UNIT MU 201CR PWR Pack RKW 12 13RE AC spec DC DC Board 03P9359 DC spec Noise Filter CF 205A AC spec MXB 1206 33 DC spe...

Page 278: ...03P9244 B FAR 2127 2827 SCANNER CHASSIS RSB 096 24 rpm RSB 097 42 rpm RF MODULE RTR 078 FAR 2117 2817 RTR 079 FAR 2127 2827 MIC ASSEMBLY RU 9601 FAR 2117 2817 RU 9603 FAR 2127 2827 MOTOR D8G 516 24 r...

Page 279: ...347 MOTOR D8G 516 2003 10 Transceiver unit RTR 081 FAR 2827W FURUNO Model FAR 2827W Unit Transceiver Unit RTR 081 ELECTRICAL PARTS LIST SYMBOL NAME REMARKS PRINTED CIRCUIT BOARD TB 03P9349 IF AMP 03P9...

Page 280: ...CHASSIS RSB 098 21 26 rpm RSB 099 21 26 rpm RSB 100 45 rpm RSB 101 45 rpm RSB 102 45 rpm RF MODULE RTR 080 MIC ASSEMBLY RU 9760A MOTOR RM 7398 RSB 098 099 21 26 rpm 200 220V 3 RM 7435 RSB 098 099 21...

Page 281: ...LAY 2003 10 Antenna unit RSB 104 105 for FAR 2837SW FURUNO Model FAR 2837SW Unit Antenna Unit RSB 104 105 ELECTRICAL PARTS LIST SYMBOL NAME REMARKS PRINTED CIRCUIT BOARD TB 03P9349 BP GEN 03P9347 MSS...

Page 282: ...sceiver Unit RTR 082 ELECTRICAL PARTS LIST SYMBOL NAME REMARKS PRINTED CIRCUIT BOARD TB 03P9349 IF AMP 03P9335 PWR 03P9348 MD 03P9244 RFC 03P9346 MIC ASSEMBLY RU 9760A MOTOR TR LIMITER TL378A CIRCULAT...

Page 283: ...205A DC spec MXB 1206 33 DC DC Board 03P9359 AC spec For DC spec PWR Pack RKW 12 13RE is used FIL Board 03P9360 DVI I F Board BSM 501A Display unit MU 231CR rear cover removed LCD Board NA21808 Invert...

Page 284: ...WR Module RKW 12 13RE DC spec For AC spec DC DC Board 03P9359 is used Noise Filte AC spec LF 205A DC spec MXB 1206 33 Display unit MU 201CR rear cover removed Inverter Board 210PW021 C LCD Board 201PW...

Page 285: ...trol unit RCU 014 PNL Board 03P9343 BUZ Board 03P9362 Trackball Assy TA4726N Control unit RCU 014 rear cover removed Control unit RCU 015 PNL Board 03P9344 Trackball Assy TA4726N Control unit RCU 015...

Page 286: ...RC 3686 Diode Limiter RU 9099 IF Board 03P9355 MIC Assy RU 9601 FAR 2117 2817 RU 9603 FAR 2127 2127 5A 2827 Transceiver unit RTR 078 079 for FAR 2117 BB 2127 BB 2817 2827 upper half MD Board 03P9244...

Page 287: ...B Magnetron MG5436 Pulse Transformer RT 9203 Transceiver unit RTR 079 for FAR 2117 BB 2127 BB 2817 2827 lower half Antenna unit RSB 103 for FAR 2827W RF Board 03P9349 BP Board 03P9347 Motor DG8 516 An...

Page 288: ...03P9348 IF Amplifier 03P9335 MIC Assy RU 9601 Diode Limiter RU 9099 Circulator RC 3686 RFC Board 03P9346 Underneath MD Board 03P9244 Pulse Converter RT 9023 Magnetron MG5436 Circulator RC 3686 Motor...

Page 289: ...B 099 21 26 rpm 380 440V 3 RM 9519 RSB 100 45 rpm 220V 3 50 Hz RM 9520 RSB 101 45 rpm 220V 3 60 Hz RM 9521 RSB 102 45 rpm 440V 3 60 Hz MIC Assy RU 9760A Behind plate Diode Limiter RU 9426 Circulator R...

Page 290: ...APPENDIX AP 42 MD Board 03P9244 Pulse Transformer RT 9773 Magnetron MG5223F RFC Board 03P9346 Antenna unit RSB 098 099 100 101 102 for FAR 2137S BB 2837S cover opened...

Page 291: ...pm 200 V 3 50 Hz For RSB 104 26 rpm 220 V 3 60 Hz RM 7345 For RSB 105 21 rpm 380 V 3 50 Hz For RSB 105 26 rpm 440 V 3 60 Hz Antenna unit RSB 104 105 for FAR 2837SW cover opened MSS Board MSS 7497 200...

Page 292: ...9335 TB Board 03P9349 RFC Board 03P9346 RF PWR Board 03P9348 MD Board 03P9244 Magnetron MG5223F Beneath plate MIC Assy RU 9760A Circulator RC4910S TR Limiter TL378A Fan Motor MSS 09B24DH R Pulse Trans...

Page 293: ...ccurs on the radar display For example when own ship is at 60 N and 135 E even if the cursor indication is 62 N and 139 E the real cursor position is deviated to the left west side The table below sho...

Page 294: ...0 00323737 0 0063035 0 00903844 0 01130406 0 01299309 0 01403609 0 0144058 0 0141187 0 01323356 1 2780 1 2192 1 1233 0 9933 0 8332 0 6479 0 4431 0 2249 0 1 24442563 1 18701379 1 09356117 0 96694117 0...

Page 295: ...y 1 40 ALARM box 1 39 Alarms description 1 80 output 1 82 ANTENNA box 1 83 Antenna selection 1 83 ARP activating deactivating 3 3 ARP VECTOR box 3 18 automatic acquisition 3 5 controls 3 2 CPA and TCP...

Page 296: ...1 38 reference for origin point 1 37 EBL OFFSET key 1 36 1 38 EBL ON EBL OFF keys 1 33 Echo averaging 1 44 Echo stretch 1 43 F False echoes 2 3 Function keys activating 1 64 programming 1 64 Fuse rep...

Page 297: ...e ring on off 1 31 S SART 2 5 Second trace echo rejector 1 71 Sensitivity 1 25 Set and drift 3 21 SET box 3 21 Shuttle ferry 1 79 SPD box 1 21 Speed automatic input 1 21 echo referenced input 3 3 manu...

Page 298: ...nav line setup 5 31 other track plotting 5 14 own track plotting 5 13 radar map activation 5 3 radar map mark and line erasure 5 6 radar map marks and lines 5 4 radar map position correction 5 8 recor...

Page 299: ...y Federal Maritime and Hydrographic Agency BSH The Federal Republic of Germany EC Quality System Module D Certificate No BSH 4613 02202 0339 06 of 04 July 2006 and Annex of 2006 09 20 to BSH 4613 0220...

Page 300: ...it RSB 100 x x S band 45 rpm RSB 101 x x S band 45 rpm RSB 102 x x S band 45 rpm RSB 103 x x X band 24 rpm RSB 104 x x S band 21 rpm Display unit MU 201CR x x x x x x x x 250 mm color JH20T06 FUR E1 x...

Page 301: ......

Page 302: ......

Page 303: ......

Page 304: ......

Page 305: ......

Reviews: