background image

14

English

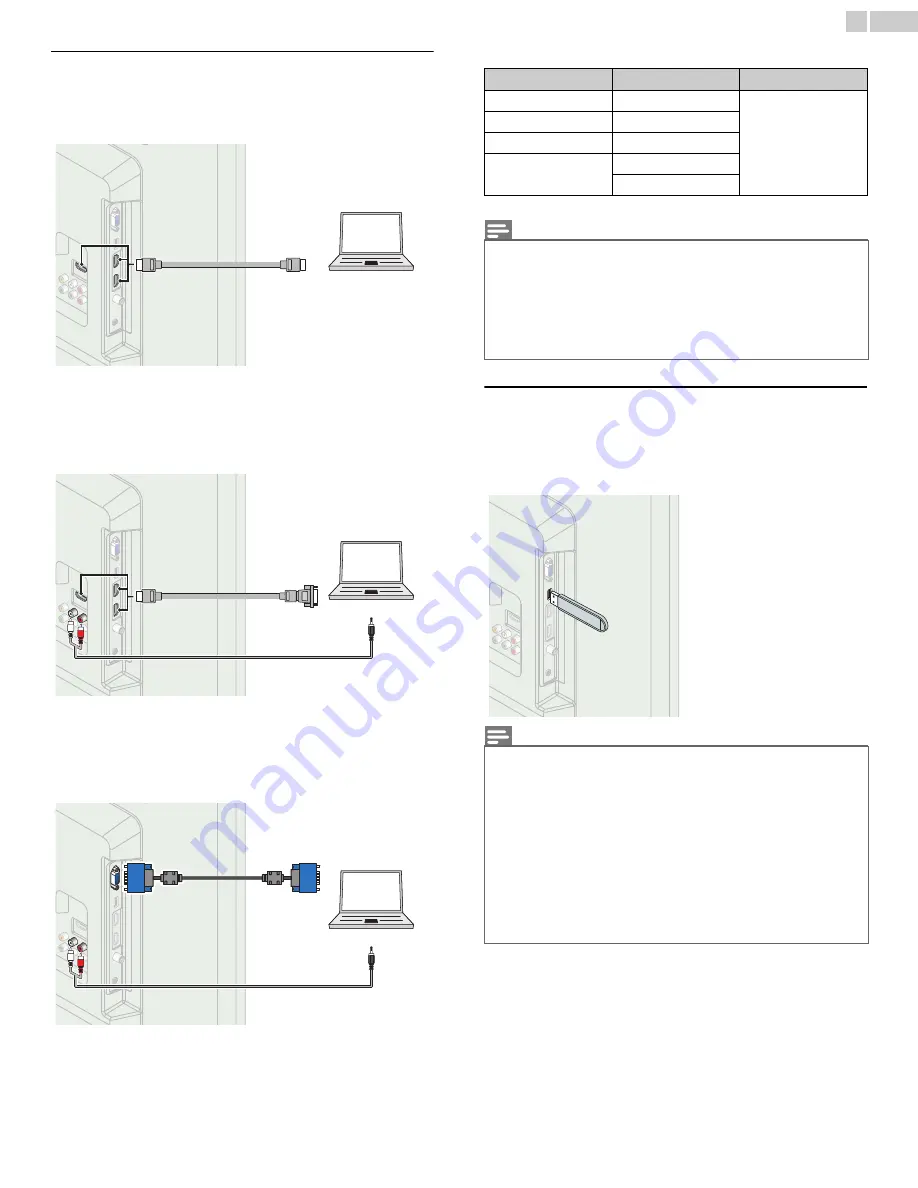
PC connection

HDMI connection

This unit can be connected to your PC that has a HDMI terminal. Use an 
HDMI cable for this Digital connection.

HDMI-DVI connection

This unit can be connected to your PC that has a DVI terminal. Use an 
HDMI-DVI conversion cable for this Video Digital connection and it 
requires Stereo mini 3.5mm plug Audio cable for Analog Audio signal as 
well.

VGA connection

This unit is equipped with a PC Input jack. If you connect this unit to 
your PC, you can use this unit as a PC monitor.
Use a VGA cable for this Video connection and it requires a Stereo mini 
3.5mm plug Audio cable for Analog Audio signal as well.

The following video signals can be displayed:

Other formats or non-standard signals will not be displayed correctly.

USB Memory Stick

This unit offers easy playback of picture (JPEG) and video (Motion JPEG) 
files.
Insert the USB Memory Stick into the USB terminal shown below.

USB 

 p.30

IN

IN

IN

OUT

PC

HDMI cable

OUT

IN

IN

IN

OUT

IN

IN

IN

HDMI-DVI 

conversion cable

PC

Stereo mini 3.5 mm plug Audio cable

OUT

IN

IN

IN

IN

IN

IN

OUT

PC

VGA cable

Stereo mini 3.5 mm plug Audio cable

Format

Resolution

Refresh rate

VGA

640 x 480

60Hz

SVGA

800 x 600

XGA

1,024 x 768

WXGA

1,280 x 768

1,360 x 768

Note(s)

• Please purchase the VGA cable or HDMI-DVI conversion cable that has a ferrite core.

• The following operations may reduce noise.

– Attach a ferrite core to the AC power cord of your PC.

– Unplug the AC power cord and use the built-in battery of your PC.

• Use an HDMI cable with the HDMI logo (a certified HDMI cable). High Speed HDMI 

cable is recommended for the better compatibility.

• The unit accepts 480i, 480p, 720p, 1080i and 1080p video signals.

• HDMI-DVI connection requires separate audio connections as well and the audio 

signals are output as Analog (L/R) Audio.

• DVI does not display 480i image which is not in compliance with EIA/CEA-861/861B.

Note(s)

• The unit recognizes only a USB Memory Stick.

• Do not use a USB hub or an extension cable to connect an external hard disk drive to 

the unit. (Not supported.)

• A USB Memory Stick is always inserted to this unit directly.

• A USB Memory Stick is not supplied with this unit.

• We do not guarantee that all USB Memory Sticks can be supported by this unit.

• Be sure to keep a backup copy of the original files on your device before you play 

them back on this unit. We have no responsibilities for damage or loss of your stored 

data.

• To protect your USB Memory Stick files from being erased place the write protect 

sliding tab in the protect position.

• When you are ready to remove a USB Memory Stick, set the unit to go into Standby 

mode to avoid any damage to your data and the unit.

• A USB Memory Stick that requires its own driver or the device with a special system 

such as fingerprint recognition are not supported.

• This unit is not allowed to use the USB Memory Stick which requires an external 

power supply (500mA or more).

Summary of Contents for LF320FX4

Page 1: ...sto visite nuestro sitio web en 1 877 393 8624 www funaiamerica com LF320FX4F EN Owner s Manual ES Manual del Propietario EN ES To obtain a more detailed electronic copy of this manual go to www funai...

Page 2: ...ection 13 Composite Analog Video Connection 13 Digital Audio Output Connection 13 PC connection 14 USB Memory Stick 14 Initial setup 15 4 Use your TV 16 Switching on your TV or putting it in Standby m...

Page 3: ...onics industry are committed to making home entertainment safe and enjoyable As you enjoy your television please note that all televisions new and old must be supported on proper stands or installed a...

Page 4: ...tion to Article 820 40 of the NEC that provides guidelines for proper grounding and in particular specifies that the cable ground shall be connected to the grounding system of the building as close to...

Page 5: ...se harmful interference to radio or television reception which can be determined by turning the equipment off and on the user is encouraged to try to correct the interference by one or more of the fol...

Page 6: ...inches 10cm or more around this apparatus Press to turn the unit on and go into standby mode To completely turn Off the unit you must unplug the AC power cord Disconnect the AC plug to shut the unit...

Page 7: ...controlled by the HDMI cable connected to your TV HDMI Input HDMI DVI Input If your video device has DVI Output jack use an HDMI DVI conversion cable to connect the unit Component Video Input PC Inpu...

Page 8: ...s line up with the markings inside the case 3 Slide the cover back into position Note s Make sure to use a table which can support the weight of this unit and is larger than this unit Make sure the ta...

Page 9: ...s to the previously viewed Channel CH Selects a Channel e SAP Selects Audio mode MONO STEREO SAP Audio language f VOL Adjusts the Volume g MUTE Turns the Sound On and Off h BACK Returns to the previou...

Page 10: ...nent Video Input Y jack j Analog Audio L R Input jacks Connect Analog Audio signals from HDMI DVI Analog Audio L R jacks signal Component Video Analog Audio L R jacks signal Composite Video Analog Aud...

Page 11: ...le IN OUT OUT OUT IN IN IN IN IN IN OUT OUT OUT Component Y Pb Pr video cables Audio L R cables set top box RF cable Note s If you have any question about the DTV s antenna visit www antennaweb org fo...

Page 12: ...an HDMI DVI conversion cable for this connection and it requires Audio Cables for Analog Audio signal as well No supplied cables are used with these connections Please purchase the necessary cables a...

Page 13: ...like 5 1ch Digital broadcasting sound Use a Digital Audio coaxial cable to connect the unit to external Digital Audio devices Note s The unit accepts 480i 480p 720p and 1080i of video signals for this...

Page 14: ...ons may reduce noise Attach a ferrite core to the AC power cord of your PC Unplug the AC power cord and use the built in battery of your PC Use an HDMI cable with the HDMI logo a certified HDMI cable...

Page 15: ...nd settings you adjusted will not be memorized after the unit goes into Standby mode After an initial setup is completed If you want to scan the channels automatically again Autoprogram p 22 You can a...

Page 16: ...buttons For Digital channels press a number followed by a dot and the corresponding sub channel number When selecting Digital channel 11 1 Be sure to press before entering the subchannel number When s...

Page 17: ...repeatedly to change the amount of time increases the time by 30 minutes up to 120 minutes Press SLEEP once to call up the display for checking the remaining time To cancel sleep timer press SLEEP rep...

Page 18: ...Outputs Mono Audio Digital TV operation 11 1 English 1 3 Analog Cable TV operation 11 SAP STEREO SAP STEREO SAP MONO SAP STEREO Normal Original size 4 3 Shortened horizontally Sidebars appear on both...

Page 19: ...ption is set to Off Caption settings p 24 g Child lock rating Child and Ratings Lock p 25 2 Press INFO to hide the information Note s While the TV screen information is displayed the Closed Caption is...

Page 20: ...age USB Auto picture Backlight Contrast Brightness Color Tint Advanced settings Sharpness 18 Personal 50 30 30 0 2 p 21 Adjusting the Picture Mode or customize the Picture quality as your preference p...

Page 21: ...ure Picture Sound Setup Features Language USB Auto picture Backlight Contrast Brightness Color Tint Advanced settings Sharpness 18 Personal 50 30 30 0 2 Color alignment Color temperature mode to set t...

Page 22: ...the TV detects any off the air antenna signals It searches for ATSC Digital and NTSC Analog channels available in your area When Cable is selected the TV detects signals supplied by Cable It searches...

Page 23: ...your cable service contact the Cable provider If you press or MENU during autoprogram the setup of TV channels will be cancelled Even if Autoprogram is completed the channel setting will be lost if th...

Page 24: ...Home Picture Sound Setup Features Language USB Closed Caption Caption service Digital caption service Caption style CC 1 CS 1 Off Digital TV operation Caption service CC 1 and T 1 The primary caption...

Page 25: ...ions symbols and other grammatical shortcuts may be used in order to keep pace with the On screen action This is not a malfunction The caption or text characters will not be displayed while the main m...

Page 26: ...ratings US TV ratings Description All All ratings locked including no rating NR None No rating TV Y Appropriate for all children TV Y7 Appropriate for all children 7 and older G TV G General audience...

Page 27: ...can block non rated programs as per CEA 608 E sec L 3 If the option to block NR None or E programs is used in US movie ratings lock US TV ratings lock Canadian English rating or Canadian French ratin...

Page 28: ...ected devices Use to select the desired fun Link devices listed on the TV screen then press OK Your connected fun Link device will be Turned On if the device is in Stand by mode Continued on next page...

Page 29: ...RGY STAR qualified The unit is set to maximize the energy efficiency for Home setting and it can be adjusted through a choice of Picture and Sound quality selections according to your preference Note...

Page 30: ...255 English characters can be recognized This unit does not support MTP Media Transfer Protocol This unit supports FAT16 and FAT32 file systems If the file is not supported an error message appears Wh...

Page 31: ...ow Press 4 or OK to start the Slide show While the Slide show is on the following 2 settings will be displayed Stop show Press 4 or OK to stop the Slide show While the Slide show is Off the following...

Page 32: ...field 3 Click the desired software to be downloaded Decompress the ZIP file 4 Copy the upgrade file to the root directory of the USB Memory Stick Starting the software upgrade 1 Connect your USB Memor...

Page 33: ...d Ratings Lock setting p 25 The unit requires some kind of antenna Input An indoor antenna Digital or VHF UHF an external antenna Digital or VHF UHF or an RF coaxial cable from your wall Cable Satelli...

Page 34: ...ress so that the volume bar and current volume level will appear on the TV screen Make sure that the volume is NOT set to 0 or If so use VOL to adjust to the desired volume Adjusted Picture or Sound s...

Page 35: ...ll uncompressed Digital Audio Video formats including Set top Box Blu ray DVD Recorder or Digital television over a single cable HDTV High Definition TV Ultimate Digital format that produces high reso...

Page 36: ...20 x 240 30fps and file extension avi only Channel Channel coverage Terrestrial DTV ATSC VHF 2 13 UHF 14 69 each channel has e g 2 1 2 9 3 1 3 9 etc Terrestrial Analog NTSC VHF 2 13 UHF 14 69 CATV Ana...

Page 37: ...y a to damage caused by accident abuse misuse neglect misapplication or non supplied product b to damage caused by service performed by anyone other than company approved Authorized Service Location c...

Page 38: ...FUNAI CORPORATION Inc 19900 Van Ness Avenue Torrance CA 90501 A3AFMUT A3AFTUH A3AFNUH...

Reviews: