background image

2-30

 Using Point 510/Point 1600 Connectivity Peripherals

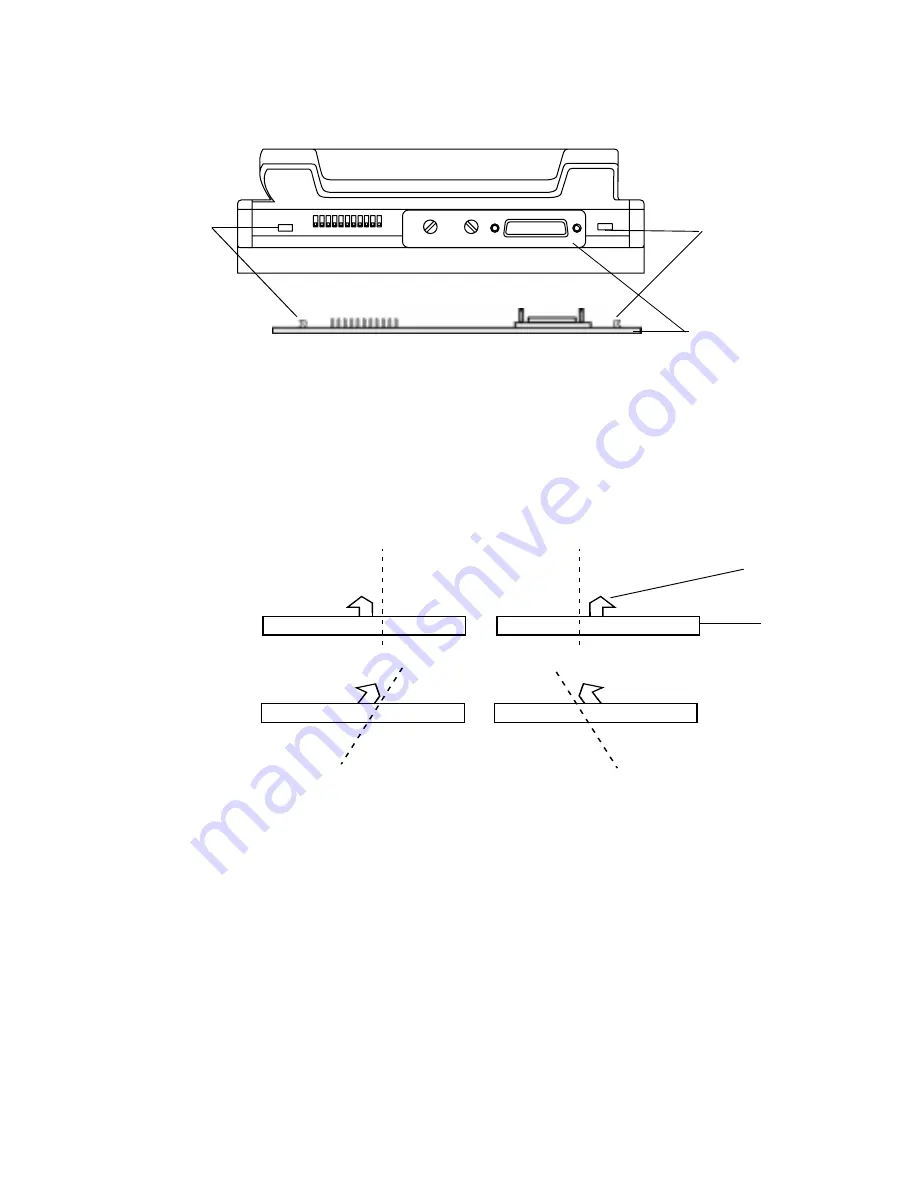
Figure 2-12.  Cradle Latches

Before inserting the pen tablet into the cradle, look inside the cradle and note the 
position of the cradle latches. Both latches must be slanting inward, in the unlocked 
position (See Figure 2-13). If one or both latches are in the upright (locked) position, 
they must be set to the unlocked position before you can insert the pen tablet. 

Figure 2-13.  Checking Cradle Latch Position

To synchronize the cradle latches, press the plate (shown in Figure 2-12) downward 
with your hand on the side with the locked cradle latch until it clicks into the 
unlocked position. (If both latches are in the locked position, press down on both 
sides of the plate until they click into the unlocked position. Apply even pressure to 
both sides.) 

In the event the pen tablet is in the cradle, and only one side locks or unlocks, press 
down on one side of the pen tablet to synchronize the cradle latches. 

Side View

Top View

Cradle Latch

Cradle Latch

Plate

Locked position

Unlocked position

Plate

Latch

Locked Position

Unlocked Position

Summary of Contents for Point 1600

Page 1: ...Connectivity Peripherals User s Guide Point 510 Point 1600 ...

Page 2: ......

Page 3: ...Connectivity Peripherals User s Guide Point 510 Point 1600 ...

Page 4: ...contents of this document We disclaim liability for errors omissions or future changes herein Point 510 and Point 1600 are trademarks of Fujitsu Personal Systems Inc All other products are trademarks or registered trademarks of their respective companies Copyright 1999 Fujitsu Personal Systems Inc No part of this publication may be copied reproduced translated stored or transmitted without the exp...

Page 5: ...elocate the receiving antenna Increase the separation between the equipment and receiver Connect the equipment into an outlet on a circuit different from that to which the receiver is connected Consult the dealer or an experienced radio TV technician for help Shielded interconnect cables must be employed with this equipment to insure compliance with the pertinent RF emission limits governing this ...

Page 6: ...iv ...

Page 7: ...9 Removing the Pen Tablet From the Port Replicator 2 10 Attaching the Port Replicator to the Desk Stand 2 10 Setting Up the Desk Stand 2 11 Attaching the Port Replicator to the Desk Stand 2 12 Detaching the Port Replicator from the Desk Stand 2 13 Folding the Desk Stand 2 13 High Connectivity Cradle 2 14 Inserting the Pen Tablet 2 14 Locking and Unlocking the High Connectivity Cradle 2 16 Adjustin...

Page 8: ... 27 Charge Only Cradle 2 28 Inserting the Pen Tablet 2 28 Removing the Pen Tablet 2 28 Synchronizing Cradle Latches 2 29 Chapter 3 Care and Maintenance of Connectivity Peripherals Cautions 3 1 Cleaning Connectivity Peripherals 3 2 ...

Page 9: ...r details on installing these cradles and connecting peripheral devices refer to the Connectivity Peripherals Installation Guide Point 510 Point 1600 or contact your reseller Part Name Locking Non Locking FPSI Order Number Portable port expander N A FMW26CR5 Port replicator Locking FMW26CR3 Non Locking FMW26CR23 High connectivity cradle Locking FMW26CR2 Non Locking FMW26CR22 High usage cradle Lock...

Page 10: ...roduct Reference Point 510 Point 1600 This 1 page sheet is shipped with Point 510 and Point 1600 connectivity peripheral components to illustrate the individual components required to assemble different connectivity peripherals Organization 0 This guide is organized as follows Chapter 1 Getting Started This chapter provides an introduction to the Point 510 and Point 1600 connectivity peripherals a...

Page 11: ...vides a quick look at the interfaces provided by each of the connectivity peripherals The specific sections comprising the rest of the chapter outline the interfaces and functionality of each of the peripherals The PS 2 style port on the PPE can be used for either a mouse or keyboard on the Point 1600 on the Point 510 it can only be used for a mouse Although the wall mount cradle includes a mouse ...

Page 12: ...e the necessary connectivity Figure 1 1 Portable Port Expander Bottom View Figure 1 2 Portable Port Expander Top View The portable port expander provides the following interfaces for connection to peripheral computer equipment Serial port A Serial port B PS 2 style mouse keyboard port This port can only be used with a mouse on the Point 510 on the Point 1600 it can be used either with a mouse or a...

Page 13: ...eral equipment is needed Note The port replicator for the Point 510 and the Point 1600 is available in two versions locking and non locking The locking version includes a lock also called a tubular lock elsewhere in this manual to secure the pen tablet to the port replicator The illustrations and procedures provided in this document address the locking version Figure 1 3 Point 510 Point 1600 Port ...

Page 14: ...l operations This cradle is best suited for desk or counter top installations where the cradle remains stationary Note The high usage cradle for the Point 510 and the Point 1600 is available in two versions locking and non locking The locking version includes a tubular lock to secure the pen tablet into the cradle The illustrations and procedures provided in this document address the locking versi...

Page 15: ...is equipped only with high usage connector pins and does not have a connector that contacts the system interface port on the pen tablet the high connectivity cradle has both The following figure shows the location of the high usage connector pins on the high usage cradle Figure 1 5 Identifying the High Usage Cradle High usage connector pins No connector in this area ...

Page 16: ...s stationary Note The high connectivity cradle for the Point 510 and the Point 1600 is available in two versions locking and non locking The locking version includes a tubular lock to secure the pen tablet into the cradle The illustrations and procedures provided in this document address the locking version Figure 1 6 High Connectivity Cradle The high connectivity cradle provides the following per...

Page 17: ... Note that the high connectivity cradle is similar in appearance to the high usage cradle To distinguish the two observe that the high connectivity cradle is equipped with a system interface connector the high usage cradle does not have the connector Figure 1 7 shows the location of the system interface connector on the high connectivity cradle Figure 1 7 Identifying the High Connectivity Cradle H...

Page 18: ...edures provided in this document address the locking version The wall mount cradle provides the following interface connectors DC power input PS 2 style keyboard port PS 2 style mouse port Due to the modular design of the Point 510 and Point 1600 connectivity peripherals the mouse port is not used in most wall mounted installations because the wall mount cradle is designed specifically to be used ...

Page 19: ...onnection to a DC power source only is needed The pen tablet can be placed in the charge only cradle and used while external DC power is supplied by the cradle The connector pins on the cradle are high usage type connectors and are designed to withstand a large number of insertion and removal operations Figure 1 9 Charge Only Cradle ...

Page 20: ...in five positions one folded position and four open positions The four open positions allow you to set up the desk stand in four different viewing angles A storage pouch is provided with the desk stand Figure 1 10 Folding Desk Stand Top of desk stand snaps over rubber feet when stand is folded Rubber feet One folded locking position Four open locking positions ...

Page 21: ...or connector sockets on your equipment Electrostatic discharge ESD can damage interface circuitry in your equipment Do not connect or disconnect any peripheral device when the system is running or when the peripheral device is turned on Always turn off peripheral devices and either shut down and turn off the pen tablet or suspend system operation before connecting to or disconnecting from peripher...

Page 22: ...rface Note the following This port provides only the Rx and Tx receive and transmit signals of the RS232 C interface When this port is enabled the IrDA port on the pen tablet is disabled Parallel Port This 25 pin D sub female connector can be used to connect a device with a parallel interface such as a parallel printer Floppy Disk Drive Port This connector can be used to connect the Fujitsu FMWFD2...

Page 23: ...the peripheral device you intend to use with the pen tablet system may need to be initialized upon starting the system If this is the case you may need to shut down the system rather than suspend system operation Contact your local help desk or reseller for details on using specific peripheral devices with your system 2 Turn off any peripheral devices you intend to connect to the portable port exp...

Page 24: ...into the system interface port The shutters on the system interface port on the pen tablet open automatically Insert the posts into the post holes in the system interface port Push the pen tablet and portable port expander together in a straight line Do not rock either component as you push them together When the portable port expander is firmly seated against the pen tablet push the latch handle ...

Page 25: ...ort expander from working properly Point 510 only Due to the size and location of the portable port expander when attached to the pen tablet the portable port expander blocks the IrDA port on the bottom of the Point 510 pen tablet Therefore the IrDA port is inoperable when the portable port expander is attached Also note that serial port B and the IrDA port share the same system resources so the I...

Page 26: ...with a serial interface Note the following 1 This port provides only the Rx and Tx receive and transmit signals of the RS232 C interface 2 When this port is enabled the IrDA port on the pen tablet is disabled Parallel Port This connector can be used to connect a device with a parallel interface such as a parallel printer Floppy Disk Drive Port This connector can be used to connect the Fujitsu FMWF...

Page 27: ...ort replicator 4 If you are attaching peripheral devices to the port replicator do so now Insert the connectors of the devices into the appropriate ports on the bottom of the port replicator Tighten the connector screws if used to maintain consistent and reliable connections between the devices and the port replicator The following illustration shows the locations of peripheral connectors on the p...

Page 28: ...ubular lock is in the unlocked position See Locking and Unlocking the Port Replicator later in this chapter If you do not intend to lock the pen tablet into the port replicator you can set the tubular lock in the locked position if desired This ensures that the cradle latches stay in the unlocked position when you insert the pen tablet into the port replicator 7 Align the pen tablet with the port ...

Page 29: ... 11 Start the pen tablet or if you suspended the pen tablet resume system operation Note If the required driver software for an attached peripheral device is not installed the device may not work or may work incorrectly Refer to the documentation provided with your peripheral device and install the driver software at this time or contact your local help desk for further assistance if necessary Loc...

Page 30: ...at if the tubular lock is in the locked position you also need to unlock the tubular lock before you can release the cradle latches Ensure that both cradle latches click into the unlocked position If the pen tablet remains locked inside the port replicator or only one latch releases see Synchronizing Cradle Latches at the end of this chapter for a description of the latch mechanism and techniques ...

Page 31: ...esk stand as indicated in Figure 2 4 and squeeze to unlock the locking pins as you raise the top of the desk stand Figure 2 4 Folding Desk Stand 3 Adjust the desk stand to the desired angle To do so grasp the desk stand as indicated in Figure 2 4 and squeeze to position the locking pins in the desired locking position 4 Release to lock the locking pins into place You can now place the pen tablet o...

Page 32: ...ting Up the Desk Stand 2 Place the port replicator on the desk stand as shown in Figure 2 5 Figure 2 5 Port Replicator on Desk Stand 3 Lean the port replicator forward with one hand 4 With your free hand pull the wire frame catch on the back of the port replicator upward 5 Push the back of the port replicator against the desk stand 6 Push the wire frame catch onto the top rung of the desk stand ...

Page 33: ...cribed in Folding the Desk Stand Folding the Desk Stand 2 To fold the desk stand 1 Unlock the locking pins by grasping the desk stand as indicated in Figure 2 4 and squeeze to release the locking pins 2 Fold the desk stand to the folded position 3 Lock the locking pins in the folded locking position 4 Push the top of the desk stand over the rubber feet on the base of the desk stand The desk stand ...

Page 34: ...e initialized upon starting the system If this is the case you may need to shut down the system rather than suspend system operation Contact your local help desk or reseller for details on using specific peripheral devices with your system 2 Turn off any devices connected to the high connectivity cradle 3 If using a locking style high connectivity cradle ensure that the cradle latches inside the c...

Page 35: ... alone is sufficient to seat the connectors It is not necessary to force or push the pen tablet into the cradle or engage the cradle latches to make the connection If you have a locking high connectivity cradle and intend to lock the pen tablet into it you must push the pen tablet downward into the cradle until the cradle latches click into place Do not rock the components as you push them togethe...

Page 36: ...radle are available a locking version and a non locking version This section is applicable only to the locking version The high connectivity cradle is equipped with a tubular lock that allows you to lock the pen tablet into the cradle You can also use the lock to lock the cradle latches in the unlocked position This allows the pen tablet to be inserted into and removed from the cradle more easily ...

Page 37: ...iewing angle of the pen tablet in the cradle 1 Hold the top of the pen tablet or cradle with one hand 2 With the other hand turn the knob on the side of the cradle counter clockwise to release the upper part of the high connectivity cradle so it swivels freely 3 Move the pen tablet or cradle to the desired viewing angle 4 Tighten the knob to set the viewing angle Knob Adjustable Viewing Angle ...

Page 38: ...ed position If the pen tablet remains locked inside the cradle or only one latch releases see Synchronizing Cradle Latches at the end of this chapter for a description of the latch mechanism and techniques for removing the pen tablet 3 Once removed from the cradle you can start the pen tablet or if you suspended the pen tablet resume system operation High Usage Cradle 2 Peripheral connectors on th...

Page 39: ...unlocked position See Synchronizing Cradle Latches at the end of this chapter for a description of how the cradle latches in the high usage cradle work 3 Choose one of the following only if you have a locking version of the high usage cradle If you have a non locking version skip this step If you intend to lock the pen tablet into the high usage cradle ensure that the tubular lock is in the unlock...

Page 40: ...en tablet into the cradle or engage the cradle latches to make the connection If you have a locking high usage cradle and intend to lock the pen tablet you must push the pen tablet downward into the cradle until the cradle latches click into place Do not rock the components as you push them together See Synchronizing Cradle Latches at the end of this chapter for a description of how the cradle lat...

Page 41: ...he pen tablet is inserted in the cradle and the cradle latches are engaged in the locked position 2 Insert the key into the tubular lock situated on the front of the cradle and turn the key clockwise until it stops To unlock the pen tablet insert the key into the tubular lock situated on the front of the cradle and turn the key counter clockwise until it stops Adjusting the Viewing Angle 2 The hig...

Page 42: ...he locked position push the pen tablet into the cradle to release the cradle latches Note that if the tubular lock is in the locked position you also need to unlock the tubular lock before you can release the cradle latches Ensure that both cradle latches click into the unlocked position If the pen tablet remains locked inside the cradle or only one latch releases see Synchronizing Cradle Latches ...

Page 43: ...en open the keyboard tray is ready for use The angle of the keyboard tray is not adjustable When not in use the keyboard tray can be closed to save space in your work area To open the wall mount cradle pull the keyboard tray towards you and downward until the keyboard tray stops in the open position Table 2 4 Wall Mount Cradle Connectors Port Description DC Input This connector is used to connect ...

Page 44: ...he vertical position The keyboard tray is held in the closed position with magnetic latches Inserting the Pen Tablet 2 To insert the pen tablet into the wall mount cradle 1 Suspend or shut down and turn off the pen tablet Note that driver software for the peripheral device you intend to use with the pen tablet system may need to be initialized upon starting the system If this is the case you may n...

Page 45: ...version of the wall mount cradle If you have a non locking version skip this step If you intend to lock the pen tablet into the wall mount cradle ensure that the tubular lock is in the unlocked position See Locking and Unlocking the Wall Mount Cradle later in this chapter If you do not intend to lock the pen tablet into the cradle you can set the tubular lock in the locked position if desired This...

Page 46: ...me See Locking and Unlocking the Wall Mount Cradle later in this chapter for details 6 Start the pen tablet or if you suspended the pen tablet resume system operation Locking and Unlocking the Wall Mount Cradle 2 Note Two versions of the wall mount cradle are available a locking version and a non locking version This section is applicable only to the locking version The wall mount cradle is equipp...

Page 47: ...le push the pen tablet into the cradle to release the cradle latches Note that if the tubular lock is in the locked position you also need to unlock the tubular lock before you can release the cradle latches Ensure that both cradle latches click into the unlocked position If the pen tablet remains locked inside the cradle or only one latch releases see Synchronizing Cradle Latches at the end of th...

Page 48: ...radle refer to the Connectivity Peripherals Installation Guide Point 510 Point 1600 Inserting the Pen Tablet 2 The pen tablet does not have to be suspended or powered down when it is inserted into or removed from the charge only cradle To insert the pen tablet into the charge only cradle 1 Align the pen tablet with the cradle 2 Slide the pen tablet into the cradle Note that the pen tablet just res...

Page 49: ...dle without engaging the cradle latches To do so ensure that the cradle latches are in the unlocked position and insert or remove the pen tablet into the cradle without pushing the pen tablet down The weight of the pen tablet is sufficient to make the connection between the cradle and the pen tablet The tubular lock can be used to lock the cradle latches in either the locked or unlocked position I...

Page 50: ...le Latch Position To synchronize the cradle latches press the plate shown in Figure 2 12 downward with your hand on the side with the locked cradle latch until it clicks into the unlocked position If both latches are in the locked position press down on both sides of the plate until they click into the unlocked position Apply even pressure to both sides In the event the pen tablet is in the cradle...

Page 51: ...ter are not followed regarding the care and maintenance of connectivity peripherals To avoid damage to your hardware observe the following guidelines Disconnect the AC adapter power source to the peripheral prior to cleaning Turn off all connected devices Do not touch connector pins or connector sockets on your equipment Electrostatic discharge can damage interface circuitry in your equipment Do n...

Page 52: ...nnectivity peripheral case 3 Do not apply cleaner to the inside of a cradle module It is recommended that you not clean the inside of a cradle module because it can damage the connectors In the event it is necessary to clean the inside of cradle module 1 Remove the pen tablet from the cradle module 2 With a dry cotton cloth gently rub the inside of the cradle module Avoid rubbing against connector...

Page 53: ...1 10 H handling precautions 2 1 3 1 high connectivity cradle 1 6 connectors 2 14 inserting the pen tablet 2 14 locking 2 16 removing pen tablet 2 18 using 2 14 viewing angle adjusting 2 17 high usage cradle description 1 4 inserting the pen tablet 2 19 locking 2 21 removing the pen tablet 2 22 viewing angle adjusting 2 21 K keyboard port 2 6 2 18 M maintenance 3 1 mouse port 2 2 2 6 2 18 P paralle...

Page 54: ...atches 2 29 system interface port 2 4 2 5 T tubular lock 2 9 2 26 2 29 V video display external 2 2 2 6 video port 2 2 2 6 W wall mount cradle closed view 2 24 connectors 2 23 description 1 8 inserting the pen tablet 2 24 keyboard tray 2 23 locking 2 26 opening and closing 2 23 removing the pen tablet 2 27 ...

Page 55: ......

Page 56: ...1 99 FMW26TRG5 58 0628 00A ...

Reviews: