45
U s e r I n s t a l l a b l e F e a t u r e s
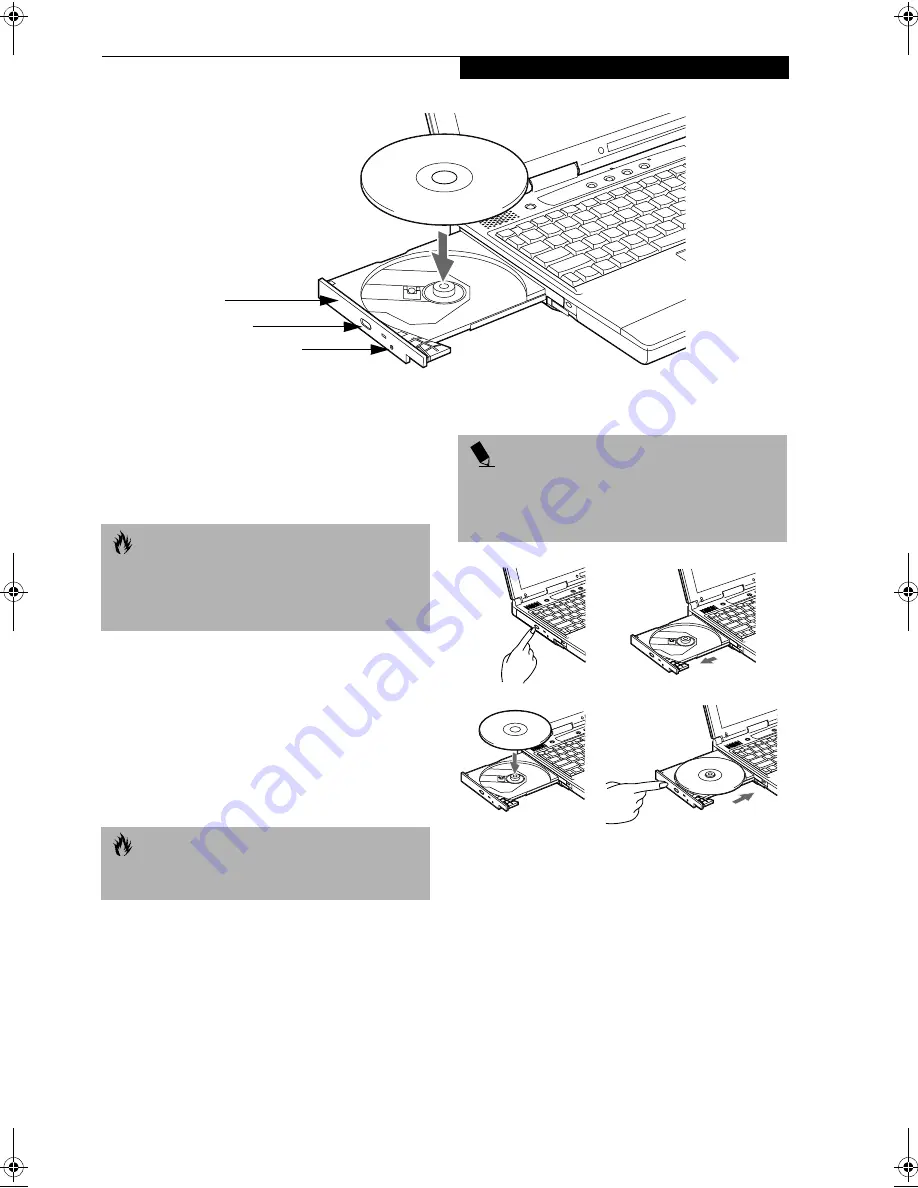
Figure 4-6 CD-ROM Drive
CD-ROM Drive
Your Fujitsu LifeBook contains a 24x max CD-ROM
player. This gives you access to both software and
audio CDs. (Figure 4-6)
LOADING A CD
To load a CD into your CD-ROM drive, follow these
easy steps:
1. Push and release the eject button on the front of the
CD-ROM drive to open the holder tray. The tray will
come out of the LifeBook a short distance.
2. Gently pull the tray out until a CD can easily be
placed in the tray.
3. Place the CD into the tray, label side up, with the
hole in the center of the CD. Snap the CD onto
the raised circle in the center of the tray.
4. Gently push the holder tray back in until you
hear a click. (Figure 4-7)
Figure 4-7 Loading/Ejecting a CD
REMOVING A CD
1. Push and release the eject button on the front of
the CD-ROM drive. This will stop the CD and
the holder tray will come out of the LifeBook a
short distance.
2. Gently pull the tray out until the CD can easily
be removed from the tray.
3. Carefully remove the CD from the holder tray.
4. Gently push the holder tray back in until you
hear a click.
CD Holder Tray
CD Eject Button
Tray Eject Button
C A U T I O N
Do not operate your CD-ROM drive unless your
LifeBook is sitting on a flat surface. Using a CD
when the drive is not level may damage the drive
or prevent proper operation.
C A U T I O N
There may be a protective sheet in the tray when it was
shipped, please make sure it is removed before operating.
P O I N T
If you have disabled the Auto Insert Notification Func-
tion, you will have to start the CD from your desktop,
as your LifeBook will not automatically recognize that
a CD has been loaded.
a.
b.
c.
d.
Summary of Contents for Lifebook S4542
Page 8: ...L i f e B o o k S S e r i e s ...
Page 9: ...1 1 Preface ...
Page 10: ...2 L i f e B o o k S S e r i e s ...
Page 12: ...2 L i f e B o o k S S e r i e s S e c t i o n O n e ...
Page 13: ...3 2 Getting to Know Your LifeBook ...
Page 14: ...4 L i f e B o o k S S e r i e s S e c t i o n T w o ...
Page 39: ...29 3 Getting Started ...
Page 40: ...30 L i f e B o o k S S e r i e s S e c t i o n T h r e e ...
Page 49: ...39 4 User Installable Features ...
Page 50: ...40 L i f e B o o k S S e r i e s S e c t i o n F o u r ...
Page 70: ...60 L i f e B o o k S S e r i e s S e c t i o n F o u r ...
Page 71: ...61 5 Troubleshooting ...
Page 72: ...62 L i f e B o o k S S e r i e s S e c t i o n F i v e ...
Page 87: ...77 6 Care and Maintenance ...
Page 88: ...78 L i f e B o o k S S e r i e s S e c t i o n S i x ...
Page 92: ...82 L i f e B o o k S S e r i e s S e c t i o n S i x ...
Page 93: ...83 7 Specifications ...
Page 94: ...84 L i f e B o o k S S e r i e s S e c t i o n S e v e n ...
Page 98: ...88 L i f e B o o k S S e r i e s S e c t i o n S e v e n ...
Page 99: ...89 8 Glossary ...
Page 100: ...90 L i f e B o o k S S e r i e s S e c t i o n E i g h t ...


