background image

Systemerweiterungen

Deutsch - 27

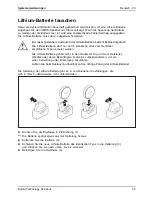
Power-over-Ethernet-Modul ein- und
ausbauen (optional)

Sie können in Ihr Gerät ein zusätzliches Power-over-Ethernet-Modul einbauen.

Alternativ können Sie ein WLAN-Modul in denselben Steckplatz einbauen.
Sie können nur jeweils eines der Module einbauen.

Wenn Sie das System über das PoE-Modul mit Strom versorgen, stellen Sie sicher,
dass keine zusätzliche Stromversorgung (Netzadapter) angeschlossen ist.

Power-over-Ethernet-Modul einbauen

Power-over-Ethernet-

Öffnen Sie das Gehäuse (siehe

"Gehäuse öffnen", Seite 20 - Deutsch

).

1

2

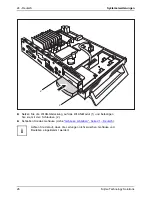
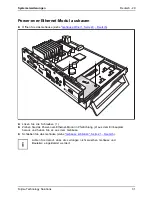
Brechen Sie die Blende (1) aus dem Gehäuse.

Setzen Sie das Power-over-Ethernet-Modul mit der Bauteilseite nach oben in das
Gehäuse (2). Achten Sie darauf, dass es am Steckplatz einrastet.

Fujitsu Technology Solutions

29

Summary of Contents for FUTRO S700

Page 1: ...Thin Client Operating Manual FUTRO S700 ...

Page 2: ...ite http ts fujitsu com For automatic driver updates go to http support ts fujitsu com com support index html Should you have any technical questions please contact our Hotline Service Desk see the Service Desk list or visit http ts fujitsu com support servicedesk html Your sales partner Your sales office We hope you really enjoy using your new Fujitsu system ...

Page 3: ......

Page 4: ...odifications and delivery subject to availability Any liability that the data and illustrations are complete actual or correct is excluded Designations may be trademarks and or copyrights of the respective manufacturer the use of which by third parties for their own purposes may infringe the rights of such owner You will find more information at http ts fujitsu com terms_of_use html Order No Fujit...

Page 5: ...FUTRO S700 Operating Manual Deutsch 3 English 37 简体中文 71 ...

Page 6: ... registered trademarks of their respective owners whose protected rights are acknowledged Copyright Fujitsu Technology Solutions GmbH 2011 All rights including rights of translation reproduction by printing copying or similar methods of the whole document or parts thereof are reserved Offenders will be liable to prosecution and payment of damages All rights reserved including rights created by pat...

Page 7: ...xterne Geräte an die serielle Schnittstelle anschließen 14 Externe Geräte an die USB Anschlüsse anschließen 14 Mikrofon Kopfhörer Line Out und Line In Geräte anschließen 15 Netzadapter anschließen 15 Gerät an das Netzwerk LAN anschließen 15 Bedienung 16 Gerät einschalten 16 Gerät ausschalten 16 BIOS Setup aufrufen 16 PXE Systemstart 16 Konfigurationsmenü des PXE Systemstarts aufrufen 16 Systemerwe...

Page 8: ...2 Deutsch Inhalt Lautsprecher ein und ausbauen optional 30 Lautsprecher einbauen 30 Lautsprecher ausbauen 32 Lithium Batterie tauschen 33 Technische Daten 34 4 Fujitsu Technology Solutions ...

Page 9: ...t ein Resultat Diese Schrift kennzeichnet Eingaben die Sie mit der Tastatur in einem Programm Dialog oder in einer Kommandozeile vornehmen z B Ihr Passwort Name123 oder einen Befehl um ein Programm zu starten start exe Diese Schrift kennzeichnet Informationen die von einem Programm am Bildschirm ausgegeben werden z B Die Installation ist abgeschlossen Diese Schrift kennzeichnet Begriffe und Texte ...

Page 10: ...aturen am Gerät dürfen nur von autorisiertem Fachpersonal durchgeführt werden Durch unsachgemäße Reparaturen können Gefahren für den Benutzer elektrischer Schlag Energiegefahr Brandgefahr bzw Sachschäden am Gerät entstehen Netzleitung und Netzadapter Die mitgelieferte Netzleitung entspricht den Anforderungen des Landes in dem Sie das Gerät gekauft haben Achten Sie darauf dass die Netzleitung für d...

Page 11: ...es Geräts darf nur von autorisiertem Fachpersonal gereinigt werden Verwenden Sie für die Reinigung kein Scheuerpulver und keine Kunststoff lösenden Reinigungsmittel Alkohol Verdünnung oder Acethon Auf keinen Fall das Gerät nass reinigen Durch eindringendes Wasser können erhebliche Gefahren für den Anwender entstehen z B Stromschlag Achten Sie darauf dass keine Flüssigkeit in das Innere der Geräte ...

Page 12: ...radio or television reception which can be determined by turning the equipment off and on the user is encouraged to try to correct the interference by one or more of the following measures Reorient or relocate the receiving antenna Increase the separation between equipment and the receiver Connect the equipment into an outlet on a circuit different from that to which the receiver is connected Cons...

Page 13: ... Anschlüsse und Bedienelemente des Geräts Machen Sie sich mit diesen Elementen vertraut bevor Sie mit dem Gerät arbeiten Vorderansicht Einschalter Ausschalter Betriebsanzeige SmartCard Leser Flashspeicherzugriff Kopfhöreranschluss Audioausgang Mikrofonanschluss USB 5 4 3 2 6 7 1 1 SmartCard Leser 2 Anzeige für SmartCard Leser 3 Flashspeicherzugriff 4 Mikrofonanschluss 5 USB Anschlüsse Universal Se...

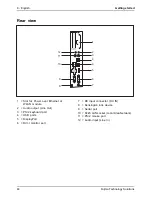
Page 14: ...teckplatz KensingtonLock 1 2 3 4 6 4 5 7 9 10 8 11 12 1 Steckplatz für Power over Ethernet bzw WLAN Modul 2 Audioausgang Line Out 3 PS 2 Tastaturanschluss 4 USB Anschlüsse 5 DisplayPort 6 DVI I Bildschirmanschluss 7 Gleichspannungsbuchse DC IN 8 Kensington Lock Vorrichtung 9 Serielle Schnittstelle 10 RJ45 LAN Anschluss Local Area Network 11 PS 2 Mausanschluss 12 Audioeingang Line In 10 Fujitsu Tec...

Page 15: ...tsch und Waagerechte Betriebslage optional Seite 10 Deutsch Standfüße für waagerechten Betrieb sind optional erhältlich Senkrechte Betriebslage SenkrechteBetriebslage Betriebslagesenkrecht Aufstellfüße Seitenteil Benutzen Sie den mitgelieferten Standfuß wenn Sie das Gerät in senkrechter Betriebslage betreiben wollen Gehen Sie wie folgt vor um das Gerät in senkrechter Betriebslage zu betreiben Löse...

Page 16: ...slagewaagrecht Aufstellfüße Lösen Sie gegebenfalls die Leitungen Legen Sie das Gerät auf einer stabilen ebenen und sauberen Unterlage auf die Oberseite Positionieren Sie die Standfüße auf der Unterseite des Geräts 1 1 1 1 Schrauben Sie die Standfüße mit den Schrauben 1 fest Stecken Sie gegebenenfalls die zuvor gelösten Leitungen wieder 12 Fujitsu Technology Solutions ...

Page 17: ... Beachten Sie auf jeden Fall die Sicherheitshinweise im Kapitel Wichtige Hinweise Seite 4 Deutsch Alle Datenübertragungsleitungen in die vorgesehenen Steckvorrichtungen der Daten Fernmeldenetze stecken Alle Netzstecker in die geerdeten Schutzkontakt Steckdosen stecken USB Geräte sind hot plug fähig Daher können die Leitungen von USB Geräten bei eingeschaltetem Gerät angeschlossen und gelöst werden...

Page 18: ...Bildschirmanschluss weiß Bildschirmanschluss USB Universal Serial Bus schwarz UnversalSerialBus RJ45 LAN Anschluss LAN Anschluss PS 2 Mausanschluss grün Mausanschluss PS 2 Mausanschluss PS 2 Tastaturanschluss violett Tastaturanschluss Serielle Schnittstelle türkis SerielleSchnittstelle Für einige der angeschlossenen Geräte müssen Sie spezielle Software z B Treiber installieren und einrichten siehe...

Page 19: ...astatur an Ihr Gerät anschließen Tastatur Anschließen USB Tastatur anschließen Verwenden Sie nur die mitgelieferte Tastaturleitung USB Anschluss Anschließen Stecken Sie den rechteckigen Stecker der Tastaturleitung in die rechteckige Buchse an der Unterseite oder an der Rückseite der Tastatur Stecken Sie den flachen rechteckigen USB Stecker der Tastaturleitung in einen USB Anschluss des Geräts USB ...

Page 20: ...ernet erhältlich oder werden auf einem Datenträger mitgeliefert Externe Geräte an die USB Anschlüsse anschließen USB Geräte USB Anschluss ExterneGeräte Geräte An die USB Anschlüsse können Sie eine Vielzahl externer Geräte anschließen z B Drucker Scanner Modem oder Tastatur USB Geräte sind hot plug fähig Daher können die Leitungen von USB Geräten bei eingeschaltetem Gerät angeschlossen und gelöst w...

Page 21: ...Out Geräte an den Audioausgang an Schließen Sie Line In Geräte an den Audioeingang an Netzadapter anschließen Netzadapter Schließen Sie die Netzadapterleitung an das Gerät an Schließen Sie die Netzleitung an den Netzadapter an Schließen Sie die Netzleitung an eine geerdete Schutzkontakt Steckdose an Gerät an das Netzwerk LAN anschließen LAN Schließen Sie die 10 100 1000 Base T Netzleitung an den R...

Page 22: ...m an Energie Der Ein Ausschalter trennt das Gerät nicht von der Netzspannung Zur vollständigen Trennung von der Netzspannung müssen Sie den Netzstecker aus der Steckdose ziehen Schalten Sie gegebenenfalls den Bildschirm aus siehe Betriebsanleitung des Bildschirms BIOS Setup aufrufen BIOS Setup Wenn das System startet drücken Sie eventuell mehrmals die Taste F2 Das BIOS Setup wird gestartet Sie err...

Page 23: ...pecification vorhanden ist wird das System durch das BBS BIOS gestartet ROM Disabled Der komplette Mechanismus zum Systemstart ist ausgeschaltet Das System kann nur noch über die lokalen Geräte aktiviert werden Int 18h Es werden die Geräte aktiviert die im BIOS Setup eingestellt wurden Show Config Message Die folgende Meldung kann während des Systemstarts ein oder ausgeschaltet werden Realtek RTL8...

Page 24: ...räts geringfügig von Ihrem Gerät unterscheiden Werden mit Ihrem Gerät weitere Dokumentationen mitgeliefert lesen Sie sich diese ebenfalls sorgfältig durch Beachten Sie vor dem Aus und Einbau von Systemkomponenten außerdem Folgendes Das Gerät muss beim Ein Ausbau von Systemerweiterungen ausgeschaltet sein und darf sich nicht im Energiesparmodus befinden Ziehen Sie den Netzstecker bevor Sie das Gerä...

Page 25: ...ruppen gerade einzusetzen Verwenden Sie niemals scharfe Gegenstände Schraubendreher als Hebelwerkzeuge Baugruppen mit elektrostatisch gefährdeten Bauelementen EGB können durch den abgebildeten Aufkleber gekennzeichnet sein Wenn Sie Baugruppen mit EGB handhaben müssen Sie folgende Hinweise unbedingt beachten Sie müssen sich statisch entladen z B durch Berühren eines geerdeten Gegenstandes bevor Sie...

Page 26: ...m Kapitel Wichtige Hinweise Seite 4 Deutsch Ziehen Sie den Netzstecker aus der Steckdose Stecken Sie den Netzstecker erst wieder an wenn Sie das Gehäuse geschlossen haben Entfernen Sie störende gesteckte Leitungen 3 2 2 1 1 Lösen Sie die Schrauben auf der Rückseite 1 Schieben Sie den Gehäusedeckel in Pfeilrichtung 2 Heben Sie den Gehäusedeckel ab 3 22 Fujitsu Technology Solutions ...

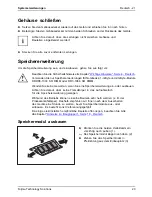
Page 27: ...yte und 2 GByte Module DDDR3 1333 SO DIMM oder DR3 1066 SO DIMM Wenden Sie keine Gewalt an wenn Sie eine Speichererweiterung ein oder ausbauen Achten Sie darauf dass keine Fremdkörper in das Aufnahmefach für die Speichererweiterung gelangen Während des Betriebs können einzelne Bauteile sehr heiß werden z B der Prozessorkühlkörper Deshalb empfehlen wir Ihnen nach dem Ausschalten des Geräts eine Stu...

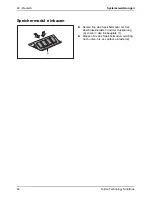
Page 28: ... 2 a 1 Setzen Sie das Speichermodul mit den Anschlusskontakten und der Aussparung a voran in den Einbauplatz 1 Speichererweiterung Speichermodul Klappen Sie das Speichermodul vorsichtig nach unten bis es spürbar einrastet 2 24 Fujitsu Technology Solutions ...

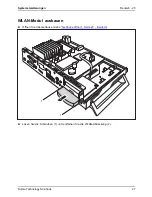
Page 29: ...auen WLAN Modul einbauen WLAN Modul Öffnen Sie das Gehäuse siehe Gehäuse öffnen Seite 20 Deutsch 3 3 1 2 4 Brechen Sie die Blende 1 aus dem Gehäuse Setzen Sie das WLAN Modul mit der Bauteilseite nach unten in das Gehäuse und schieben Sie es in Pfeilrichtung 2 durch die Öffnung in der Gehäuserückseite Befestigen Sie das WLAN Modul mit den Schrauben 3 Schließen Sie die Leitung des WLAN Moduls am Ste...

Page 30: ...eckung auf das WLAN Modul 1 und befestigen Sie sie mit den Schrauben 2 Schließen Sie das Gehäuse siehe Gehäuse schließen Seite 21 Deutsch Achten Sie darauf dass die Leitungen nicht zwischen Gehäuse und Bauteilen eingeklemmt werden 26 Fujitsu Technology Solutions ...

Page 31: ...erungen Deutsch 25 WLAN Modul ausbauen WLAN Modul Öffnen Sie das Gehäuse siehe Gehäuse öffnen Seite 20 Deutsch 1 1 2 Lösen Sie die Schrauben 1 und entfernen Sie die WLAN Abdeckung 2 Fujitsu Technology Solutions 27 ...

Page 32: ... Schrauben 2 Ziehen Sie das WLAN Modul in Pfeilrichtung 3 aus dem Einbauplatz heraus und heben Sie es aus dem Gehäuse Schließen Sie das Gehäuse siehe Gehäuse schließen Seite 21 Deutsch Achten Sie darauf dass die Leitungen nicht zwischen Gehäuse und Bauteilen eingeklemmt werden 28 Fujitsu Technology Solutions ...

Page 33: ... Wenn Sie das System über das PoE Modul mit Strom versorgen stellen Sie sicher dass keine zusätzliche Stromversorgung Netzadapter angeschlossen ist Power over Ethernet Modul einbauen Power over Ethernet Öffnen Sie das Gehäuse siehe Gehäuse öffnen Seite 20 Deutsch 1 2 Brechen Sie die Blende 1 aus dem Gehäuse Setzen Sie das Power over Ethernet Modul mit der Bauteilseite nach oben in das Gehäuse 2 Ac...

Page 34: ... Sie das Power over Ethernet Modul mit den Schrauben 1 Schließen Sie das Gehäuse siehe Gehäuse schließen Seite 21 Deutsch Achten Sie darauf dass die Leitungen nicht zwischen Gehäuse und Bauteilen eingeklemmt werden 30 Fujitsu Technology Solutions ...

Page 35: ...utsch 1 1 2 Lösen Sie die Schrauben 1 Ziehen Sie das Power over Ethernet Modul in Pfeilrichtung 2 aus dem Einbauplatz heraus und heben Sie es aus dem Gehäuse Schließen Sie das Gehäuse siehe Gehäuse schließen Seite 21 Deutsch Achten Sie darauf dass die Leitungen nicht zwischen Gehäuse und Bauteilen eingeklemmt werden Fujitsu Technology Solutions 31 ...

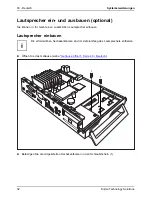
Page 36: ...n Lautsprecher einbauen Lautsprecher einbauen Lautsprecher Die erforderlichen Sechskantbolzen sind im Lieferumfang des Lautsprechers enthalten Öffnen Sie das Gehäuse siehe Gehäuse öffnen Seite 20 Deutsch 1 1 Befestigen Sie die mitgelieferten Sechskantbolzen in den Schraublöchern 1 32 Fujitsu Technology Solutions ...

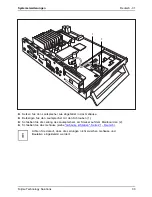
Page 37: ...ie den Lautsprecher mit den Schrauben 1 Schließen Sie die Leitung des Lautsprechers am Stecker auf dem Mainboard an 2 Schließen Sie das Gehäuse siehe Gehäuse schließen Seite 21 Deutsch Achten Sie darauf dass die Leitungen nicht zwischen Gehäuse und Bauteilen eingeklemmt werden Fujitsu Technology Solutions 33 ...

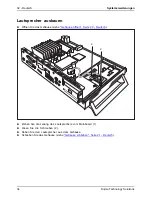
Page 38: ...as Gehäuse siehe Gehäuse öffnen Seite 20 Deutsch 2 2 1 Ziehen Sie die Leitung des Lautsprechers vom Mainboard 1 Lösen Sie die Schrauben 2 Heben Sie den Lautsprecher aus dem Gehäuse Schließen Sie das Gehäuse siehe Gehäuse schließen Seite 21 Deutsch 34 Fujitsu Technology Solutions ...

Page 39: ...ehört nicht in den Hausmüll Sie wird vom Hersteller Händler oder deren Beauftragten kostenlos zurückgenommen um sie einer Verwertung oder Entsorgung zuzuführen Achten Sie beim Austausch unbedingt auf die richtige Polung der Lithium Batterie Lithium Batterie Tauschen Wechseln Austauschen Lithium Batterie Batterie Die Halterung der Lithium Batterie gibt es in verschiedenen Ausführungen die sich in i...

Page 40: ... mm 191 mm Gewicht im Grundausbau ca 1 6 kg mit Standfuß Umgebungsbedingungen Temperatur Betrieb Transport 15 C 35 C 25 C 60 C Zu und Ablufträume um eine ausreichende Belüftung zu gewährleisten links rechts hinten oben min 200 mm min 200 mm min 200 mm min 200 mm Betauung ist im Betrieb nicht zulässig Netzadapter Elektrische Daten Nennspannung 100 240 V Max Nennstrom 1 2 A Nennfrequenz 50 60 Hz Es ...

Page 41: ...al devices to the serial interface 14 Connecting external devices to the USB ports 14 Connecting microphone headphones line out and line in devices 15 Connecting the mains adapter 15 Connecting the device to the network LAN 15 Operation 16 Switch the device on 16 Switching off the device 16 Open BIOS Setup 16 PXE system boot 16 Calling the PXE system boot configuration menu 16 System expansions 18...

Page 42: ...lish Contents Installing and removing the loudspeaker optional 30 Installing the loudspeaker 30 Removing the loudspeaker 32 Replacing the lithium battery 33 Technical data 34 38 Fujitsu Technology Solutions ...

Page 43: ...es an activity that must be performed Indicates a result This font indicates data entered using the keyboard in a program dialogue or at the command line e g your password Name123 or a command used to start a program start exe This font indicates information that is displayed on the screen by a program e g Installation is complete This font indicates terms and texts used in a software interface e ...

Page 44: ...e device must only be carried out by qualified technicians Incorrect repairs could put the user at great risk electric shock hazardous energy emissions risk of fire or cause serious damage to the equipment Power cable and mains adapter The supplied power cable conforms to the requirements of the country in which you purchased your device Make sure that the power cable is approved for use in the co...

Page 45: ...d equipment switches and disconnect the power plug from the mains outlet Do not clean any interior parts yourself leave this job to a service technician Do not use any cleaning agents that contain abrasives or may corrode plastic alcohol thinner or acetone Never clean the device with water Water entering into the device could present a serious risk to users e g electric shock Ensure that no liquid...

Page 46: ...erence to radio or television reception which can be determined by turning the equipment off and on the user is encouraged to try to correct the interference by one or more of the following measures Reorient or relocate the receiving antenna Increase the separation between equipment and the receiver Connect the equipment into an outlet on a circuit different from that to which the receiver is conn...

Page 47: ...f the ports and operating elements on the device Please familiarise yourself with these components before starting to work with your device Front view Onswitch Offswitch Powerindicator SmartCardreader Flashmemoryaccess Headphoneport Audiooutput Microphonejack USB 5 4 3 2 6 7 1 1 SmartCard reader 2 Indicator for SmartCard reader 3 Flash memory access 4 Microphone jack 5 USB ports Universal Serial B...

Page 48: ...t PCIslot KensingtonLock 1 2 3 4 6 4 5 7 9 10 8 11 12 1 Slot for Power over Ethernet or WLAN module 2 Audio output Line Out 3 PS 2 keyboard port 4 USB ports 5 DisplayPort 6 DVI I monitor port 7 DC input connector DC IN 8 Kensington lock device 9 Serial port 10 RJ45 LAN socket Local Area Network 11 PS 2 mouse port 12 Audio input Line In 44 Fujitsu Technology Solutions ...

Page 49: ...e 9 English and Horizontal operating position optional Page 10 English Base feet for horizontal operation are available as an option Vertical operating position Verticaloperatingposition Operatingposition vertical Basefeet Sidecover Use the supplied foot when the device is to be used in a vertical position Proceed as follows to operate the device in the vertical operating position Disconnect the c...

Page 50: ...ratingposition Operatingposition horizontal Basefeet Disconnect the cables if required Place the device on its upper side on a sturdy flat and clean surface Position the base feet on the underside of the device 1 1 1 1 Screw on the base feet with the screws 1 If necessary reconnect any cables that were previously disconnected 46 Fujitsu Technology Solutions ...

Page 51: ...and the external devices Please make sure that you always observe the safety notes provided in Important notes Page 4 English Plug all data communication cables into the appropriate sockets Plug all power cables into the grounded mains outlets USB devices are hot pluggable This means you can connect and disconnect USB cables while your device is switched on Additional information can be found in C...

Page 52: ...nput Line In light blue Audioinput Linein DisplayPort DVI I monitor port white Monitorport USB Universal Serial Bus black UniversalSerialBus RJ45 LAN port LANport PS 2 mouse port green Mouseport PS 2mouseport PS 2 keyboard port purple Keyboardport Serial port turquoise Serialport Some of the connected devices require special software e g drivers refer to the documentation for the connected device ...

Page 53: ...ct a USB keyboard or a PS 2 keyboard to your device Keyboard Connecting Connecting a USB keyboard Use the supplied keyboard cable only USBport Connecting Plug the rectangular connector of the keyboard cable into the rectangular socket on the underside or on the rear of the keyboard Insert the flat rectangular USB plug of the keyboard cable into one of the device s USB ports USBport Connecting a PS...

Page 54: ...l be supplied on a data carrier Connecting external devices to the USB ports USBdevices USBport Externaldevices Devices You can connect a wide range of external devices to the USB ports e g printer scanner modem or keyboard USB devices are hot pluggable This means you can connect and disconnect USB cables while your device is switched on Additional information can be found in the documentation for...

Page 55: ...nect line out devices to the audio output Connect the external line in devices to the audio input Connecting the mains adapter Mainsadapter Connect the mains adapter cable to the device Connect the power cable to the mains adapter Plug the power cable into a grounded mains outlet Connecting the device to the network LAN LAN Connect the 10 100 1000 Base T network cable to the RJ45 LAN port Fujitsu ...

Page 56: ...ice is switched off it consumes a minimum of energy The ON OFF switch does not disconnect the device from the mains voltage To completely disconnect the mains voltage remove the power plug from the power socket If necessary switch the monitor off see the operating manual for the monitor Open BIOS Setup BIOS Setup When the system starts press the F2 key several times if necessary BIOS Setup will be...

Page 57: ... BBS BIOS BIOS Boot Specification exists the system is started by the BBS BIOS ROM Disabled The entire mechanism for the system boot is deactivated The system can only be activated via the local devices Int 18h The devices set in BIOS Setup are enabled Show Config Message The following message can be activated or deactivated during the system boot Realtek RTL8139 X 8130 810X Boot Agent Press Shift...

Page 58: ... on its configuration level If further documentation was delivered with your device please also read this through carefully In addition before removing or installing system components please pay attention to the following The device must be switched off when installing removing the system expansions and may not be in energy saving mode Remove the power plug before opening the device Be careful tha...

Page 59: ...ards Make sure expansion boards are inserted straightly Never use sharp objects screwdrivers for leverage Boards with electrostatic sensitive devices ESD are identifiable by the label shown When handling boards fitted with ESDs you must always observe the following points You must always discharge static build up e g by touching a grounded object before working The equipment and tools you use must...

Page 60: ...nformation in Important notes Page 4 English Disconnect the mains plug from the mains outlet Only insert the power plug after you have closed the casing Remove any connected wires which are in the way 3 2 2 1 1 Loosen the screws at the rear 1 Slide the casing cover in the direction of the arrow 2 Lift off the casing cover 3 56 Fujitsu Technology Solutions ...

Page 61: ...SO DIMM or DR3 1066 SO DIMM Never use force when installing or removing a memory extension Make sure that foreign objects do not fall into the memory extension compartment Individual components e g the processor heat sink can become very hot during operation We therefore recommend that you wait one hour after switching off the device before removing or installing the memory modules Otherwise there...

Page 62: ... a memory module 2 a 1 Insert the memory module with the contacts and the recess a facing the slot 1 Memoryexpansion Memorymodule Carefully push the memory module downwards until you feel it click into place 2 58 Fujitsu Technology Solutions ...

Page 63: ...talling the WLAN module WLANmodule Open the casing see Opening the casing Page 20 English 3 3 1 2 4 Break the cover 1 out of the casing Place the WLAN module in the casing with the component side facing downwards and push it in the direction shown by the arrow 2 through the opening in the back of the casing Secure the WLAN module with the screws 3 Connect the cable of the WLAN module to the connec...

Page 64: ...ace the WLAN cover on the WLAN module 1 and fasten it with the screws 2 Close the casing see Closing the casing Page 21 English Make sure that the cables are not trapped between the casing and the components 60 Fujitsu Technology Solutions ...

Page 65: ...ystem expansions English 25 Removing the WLAN module WLANmodule Open the casing see Opening the casing Page 20 English 1 1 2 Undo the screws 1 and remove the WLAN cover 2 Fujitsu Technology Solutions 61 ...

Page 66: ...ainboard 1 Undo the screws 2 Pull the WLAN module in the direction of the arrow 3 out of the slot and lift it out of the casing Close the casing see Closing the casing Page 21 English Ensure that cables are not trapped between the casing and the components 62 Fujitsu Technology Solutions ...

Page 67: ... modules If you are supplying the system with power via the PoE module ensure that no additional power supply mains adapter is connected Installing the Power over Ethernet module PoweroverEthernetmodule Open the casing see Opening the casing Page 20 English 1 2 Break the cover 1 out of the casing Place the Power over Ethernet module in the casing with the component side facing upwards 2 Ensure tha...

Page 68: ...ions 1 1 Secure the Power over Ethernet module with the screws 1 Close the casing see Closing the casing Page 21 English Ensure that cables are not trapped between the casing and the components 64 Fujitsu Technology Solutions ...

Page 69: ...he casing Page 20 English 1 1 2 Undo the screws 1 Pull the Power over Ethernet module in the direction of the arrow 2 out of the slot and lift it out of the casing Close the casing see Closing the casing Page 21 English Ensure that cables are not trapped between the casing and the components Fujitsu Technology Solutions 65 ...

Page 70: ...al loudspeaker in your device Installing the loudspeaker Loudspeaker The required hexagon head bolts are included in the delivery scope of the loudspeaker Open the casing see Opening the casing Page 20 English 1 1 Secure the hexagon head bolts provided into the screw holes 1 66 Fujitsu Technology Solutions ...

Page 71: ...ustrated Secure the loudspeaker with the screws 1 Connect the loudspeaker cable to the connector on the mainboard 2 Close the casing see Closing the casing Page 21 English Make sure that the cables are not trapped between the casing and the components Fujitsu Technology Solutions 67 ...

Page 72: ...ker Open the casing see Opening the casing Page 20 English 2 2 1 Disconnect the loudspeaker cable from the mainboard 1 Undo the screws 2 Lift the loudspeaker out of the housing Close the casing see Closing the casing Page 21 English 68 Fujitsu Technology Solutions ...

Page 73: ...recommended by the manufacturer Do not dispose of lithium batteries with household waste They must be disposed of in accordance with local regulations concerning special waste Ensure that you observe the correct polarity when replacing the lithium battery Lithiumbattery Replacing Replacing Replacing lithiumbattery Battery The lithium battery holder exists in different designs that function in the ...

Page 74: ...in basic configuration approx 1 6 kg including foot Ambient conditions Temperature Operation Transportation 15 35 25 60 Clearance required to ensure adequate ventilation left hand side right hand side rear above min 200 mm min 200 mm min 200 mm min 200 mm Condensation must be avoided during operation Mains adapter Electrical data Rated voltage 100 240 V Max rated current 1 2 A Rated frequency 50 6...

Page 75: ... 连接显示器 12 連接滑鼠 13 連接鍵盤 13 外部设备连接到串行接口上 14 將外接式設備連接到 USB 連接埠 14 麦克风 耳机 Line Out 和 Line In 设备连接 15 电源适配器连接 15 设备的网络 LAN 连接 15 操作 16 開啟設備 16 關閉設備 16 BIOS Setup 调出 16 PXE 系统启动 16 调出 PXE 系统启动的配置菜单 17 系統擴充 18 組件指示 18 打开机箱 19 关闭机箱 20 内存扩展插槽 20 存储模块拆除 20 存储模块安装 21 WLAN 模块安装与拆卸 可选 22 WLAN 模块安装 22 WLAN 模块拆卸 24 Power over Ethernet 模块安装与拆卸 可选 26 Power over Ethernet 模块安装 26 Power over Ethernet 模块拆卸 28 Fujitsu ...

Page 76: ...2 简体中文 目录 扬声器安装与拆卸 可选 29 扬声器安装 29 扬声器拆卸 31 更换锂电池 32 技术参数 33 72 Fujitsu Technology Solutions ...

Page 77: ...的标记提示可能危害人员健康或造成财产损失 表示您必须执行的运行步骤 表示一个结果 文字 表示您用键盘在程序对话框中或在命令行中所要输入的内容 比如您的密 码 Name123 或一个启动程序的指令 start exe 文字 表示从显示器的程序中输出的信息 比如 安装已完成 文字 表示 软件表面的定义和正文 比如 点击保存 程序或数据的命名 比如 Windows 或setup exe 文字 表示 相互参照另一段 比如 安全说明 相互参照外部源程序 比如 一个网址 请您继续查阅 http ts fujitsu com CD DVD 的名称以及其他资料的标记和标题 例如 CD DVD 驱动 程序和实用程序 或 安全 规定 手册 按键 表示键盘上的键 比如 F10 文字 表示强调或突出的定义和正文 比如 设备未关闭 Fujitsu Technology Solutions 73 ...

Page 78: ... 执行本说明书中所述作业时必须小心谨慎 只能由授权的专业人员进行设备维修 维修不当会对使用者带来危险 电 击 能量危险 火灾危险 或对设备造成财产损失 电源线和网卡 提供的电源线符合您购买设备的国家的要求 注意您使用的这个电 源线也要获得这个国家的批准 连接设备时 必须将网卡的电源线插到插座上 不能使用其他设备的网卡 只能使用为设备指定的网卡 见章节 技术参数 第 33 简体中文 页 确保网卡的电流消耗不高于网卡连接的电网 打开 关闭开关不能使设备断电 必须将电源插头从插座上拔出才能完全断电 运输设备 运 输 运 输 再 运 输 逐一运送所有设备 并且只能用它们的原包装或者用另一种可防止碰撞和敲击的合适包装 在安装地点方可拆开设备包装 如果设备从寒冷的环境中带入工作室 可能会形成冷凝水 所以在您启动此 设备之前 请等待 直至设备适应室温并且完全变干 74 Fujitsu Technolog...

Page 79: ...只可由授權的專業人員清理 不能使用去污粉和会腐蚀塑料的清洁剂 酒精 稀释剂或丙酮 进行清洁 在任何情況下都不得將設備弄濕 水分滲入可能會對使用者造成巨大危險 比如電擊 注意勿讓液體流入設備內部 主機殼表面可用乾布清潔 如果有特別髒的地方 您可使用沾有溫和洗滌劑的濕抹布小心清潔 您可用消毒抹布清理鍵盤和滑鼠 節能 處理與回收利用 處 理 節 能 回 收 利 用 DVD驅 動 程 式 和 公用 程 式 DVD使 用 者 說 明 文 件 您可在 驅動程式和公用程式 DVD 上找到此主題的資訊 Fujitsu Technology Solutions 75 ...

Page 80: ...this equipment does cause harmful interference to radio or television reception which can be determined by turning the equipment off and on the user is encouraged to try to correct the interference by one or more of the following measures Reorient or relocate the receiving antenna Increase the separation between equipment and the receiver Connect the equipment into an outlet on a circuit different...

Page 81: ...章将介绍设备的所有硬件元件 您将得到一份设备接口和控制元件的概 述 使用设备作业前请先熟悉这些元件 正视图 打 开 关 闭 电 源 指 示 灯 智 能 卡 读 写器 闪 存 存 取 耳 机 插 孔 音 频 输 出 麦 克 风 接 口 USB 5 4 3 2 6 7 1 1 智能卡读写器 2 智能卡读写器指示灯 3 闪存存取 4 麦克风接口 5 USB 接口 Universal Serial Bus 6 打开 关闭开关 7 耳机插孔 音频输出 Line Out Fujitsu Technology Solutions 77 ...

Page 82: ... 流 电 压 插槽 音 频 输 入 PCI插 槽 肯 辛 通 锁 1 2 3 4 6 4 5 7 9 10 8 11 12 1 Power over Ethernet 或 WLAN 模块插槽 2 音频输出 Line Out 3 PS 2 键盘接口 4 USB 接口 5 DisplayPort 6 DVI I 显示器接口 7 直流电压插槽 DC IN 8 肯辛通锁装置 9 串行接口 10 RJ45 LAN 接口 Local Area Network 11 PS 2 鼠标接口 12 音频输入 Line In 78 Fujitsu Technology Solutions ...

Page 83: ...备时必须保证足够的通风 安装适用于水平或垂直运行的固定底座 见 垂直的操作位置 第 9 简体中 文 页 和 水平操作位置 可选 第 10 简体中文 页 可选适用于水平运行的固定底座 垂直的操作位置 垂 直 的 操作 位 置 操 作 位 置垂 直 的 固 定 底 座 侧 面 如准备在垂直的操作位置操作设备 可使用随附的固定底座 按照下列步骤在垂直的操作位置操作设备 必要时拆除导线 按箭头方向将设备推入固定底座 必要时 再插上以前拆除的导线 Fujitsu Technology Solutions 79 ...

Page 84: ...10 简体中文 試運行 水平操作位置 可选 按照下列步骤在水平操作位置操作设备 水 平 操 作 位置 操 作 位 置 水平 固 定 底 座 必要时拆除导线 将稳定的 平整的且防滑的底座上的设备放在上面 放置设备下面的固定底座 1 1 1 1 用螺丝 1 拧紧固定底座 必要时 再插上以前拆除的导线 80 Fujitsu Technology Solutions ...

Page 85: ...設備 電 纜 導 線 從具有保護觸點的插座中拔出所有相關設備的電源插頭 插入設備和外接式設備的所有導線 請隨時留意 重要说明 第 4 简体中文 页中所述的安全指示 將所有數據傳輸線插入相應的數據 通信網路插槽中 將所有電源插頭插入接地的保護觸點插座中 USB 設備具有熱插拔能力 因此 您可以在開啟設備的情況下連 接和拔除 USB 設備的導線 如需詳細資訊 請參閱 將外接式設備連接到 USB 連接埠 第 14 简 体中文 页 及 USB 設備的說明文件 拔除導線 关闭涉及到的所有设备 導 線 從具有保護觸點的插座中拔出所有相關設備的電源插頭 從相應數據 通信網路插槽中拔出所有的數據傳輸線 拔除設備和外接式設備上的所有導線 Fujitsu Technology Solutions 81 ...

Page 86: ...音频输出 Lineout 音频输入 Line In 浅蓝色 音频输入 Linein DisplayPort DVI I 显示器接口 白色 显示器接口 USB Universal Serial Bus 黑色 UnversalSerialBus RJ45 LAN 接口 LAN接口 PS 2 鼠标接口 绿色 鼠标接口 PS 2鼠标接口 PS 2 键盘接口 紫色 键盘接口 串行接口 绿松石 串行接口 一些连接的设备必须安装并设置专用软件 例如驱动程序 见 连接设备和操作系统文件 连接显示器 准备显示器 如显示器操作说明书所述 例如插导线 显 示 器 将数据线连接到所需的设备显示器接口上 将显示器的电源线连接到安全插座上 82 Fujitsu Technology Solutions ...

Page 87: ...S 設定中關閉 滑鼠控制器 如此即可空出 IRQ12 另作他用 將 PS 2 滑鼠連接到設備的 PS 2 滑鼠連接埠 PS 2滑 鼠 連 接 PS 2滑 鼠 再打开设备 連接鍵盤 您可将 USB 键盘或 PS 2 键盘连接到设备上 鍵 盤 連 接 連接 USB 鍵盤 只使用隨附的鍵盤線 USB連 接 埠 連 接 將鍵盤線的矩形插頭插入鍵盤底面或背面的矩形插座中 將鍵盤線的矩形 USB 平插頭插入設備的 USB 連接埠中 USB連 接 埠 連接 PS 2 鍵盤 只使用隨附的鍵盤線 連 接PS 2鍵 盤 連 接 只有设备关闭时连接键盘 然后再打开设备 设备才能识别 PS 2 键盘 关闭设备 將鍵盤線的矩形插頭插入鍵盤底面或背面的矩形插座中 將鍵盤線的圓形插頭插入設備的鍵盤連接埠中 鍵 盤 再打开设备 Fujitsu Technology Solutions 83 ...

Page 88: ...中已包括许多驱动程序 如没有 所需驱动程序 请安装 通常可从网上或从随附的数据载体上获得最新驱动程序 將外接式設備連接到 USB 連接埠 USB設 備 USB連 接 埠 外 接 式 設 備 設 備 您可將多個外接式設備連接到 USB 連接埠 上 比如印表機 掃描器 數據機或鍵盤 USB 設備具有熱插拔能力 因此 您可以在開啟設備的情況下連 接和拔除 USB 設備的導線 如需詳細資訊 請參閱 USB 設備的說明文件 將數據線連接到外接式設備 將數據線連接到設備的 USB 連接埠 設備驅動程式 與 USB 連接埠相連的外接 USB 設備通常不需要單獨的驅動程式 因為 作業系統中已包含必要的軟體 但是 若外接 USB 設備需要自己的軟體 時 請從 USB 設備提供的數據媒體中安裝 为保证 USB 2 0 的传输功率 外部 USB 设备连接到设备 USB 接口的导线最长为 3 m 84 Fujit...

Page 89: ...n 设备连接 麦 克 风 耳 机 LineOut设 备 将麦克风连接到麦克风接口上 将耳机连接到耳机插孔上 将 Line Out 设备连接到音频输出上 将 Line In 设备连接到音频输入上 电源适配器连接 网 卡 将网卡导线连接到设备上 将电源线连接到网卡上 将电源线连接到接地的安全插座上 设备的网络 LAN 连接 LAN 将 10 100 1000 Base T 电源线连接到 RJ45 LAN 接口上 Fujitsu Technology Solutions 85 ...

Page 90: ...表中的結束功能 設 備 顯 示 器 设备的操作系统不能自动切换至节能模式或关闭时按下打开 关闭开 关 注意 可能导致数据丢失 如设备已关闭 则设备耗能最小 打开 关闭开关不能使设备断电 必须将电源插头从插座上拔出才能完全断电 必要時 關閉顯示器 請參閱顯示器的操作說明書 BIOS Setup 调出 BIOS Setup 启动系统时 可能是多次 按 F2 键 BIOS Setup 启动 选择某个标签时 可在 BIOS Setup 中进行更多可能的设置 PXE 系统启动 PXE系 统 启 动 用启动开关 关闭开关打开设备 系统启动时多次按 F12 键 Boot 菜单将被显示 选择所需的 Boot 选项 86 Fujitsu Technology Solutions ...

Page 91: ...Quit 配置菜单显示器 可进行以下设置 Network Boot Protocol PXE 标准 或 RPL 使用的系统启动日志的说明 Boot Order Int 19h 激活本地设备前总是先启动网络 PnP BEV BBS 如 BBS BIOS BIOS Boot Specification 已存在 则系统通过 BBS BIOS 启动 ROM Disabled 系统启动的全部机械装置已关闭 系统只能通 过本地设备激活 Int 18h 在 BIOS Setup 中设置的设备将被激活 Show Config Message 系统启动过程中会关闭下列信息 Realtek RTL8139 X 8130 810X Boot Agent Press Shift F10 to configure Show Message Time 给出系统启动过程中看到的下列提示信息的时间 以秒为单位 Realte...

Page 92: ...擴充拆裝時 必須關閉設備 且設備不得處於節能模式中 打開設備之前請先拔出電源插頭 元件拆卸和安装时注意不要夹住导线 安装热度变化大的元件时注意元件不能超过运行时允许的最高温度 系统扩展或硬件升级可能需要更新 BIOS 借助 BIOS 或必要时查 阅主板技术手册获取更多信息 組件指示 更换组件或组件上的元件时小心处理锁紧装置 定位横档和定心销 注意 刚使用设备后 主板上的元件可能非常热 為防止組件損壞或其配件以及印製導線損壞 請小心拆裝組件 注意正確安裝擴充組件 切勿使用尖銳的物體 螺絲起子 作為槓桿工具 具備靜電危險模組 EGB 的組件可用如圖所示的標籤加以標識 操縱具備 EGB 的組件時 務必注意以下指示 您必須在操作組件前放電 比如通過碰觸接地的物體 所用的設備和工具必須無靜電荷 只要触摸边缘位置或 如存在 触摸绿色标记点 接触点 的组件 切勿碰觸組件上的連接埠針腳或印製導線 88 F...

Page 93: ...系統擴充 简体中文 19 打开机箱 机 箱 设 备 关闭设备 设备不能处于节能模式下 遵守章节 重要说明 第 4 简体中文 页 的安全提示 从插座上拔出电源插头 机箱关闭时才能再插上电源插头 移除碍事的插入的导线 3 2 2 1 1 拆除背面的螺丝 1 按箭头方向推锁紧装置 2 提起机箱盖 3 Fujitsu Technology Solutions 89 ...

Page 94: ...插槽的步骤如下 遵守章节 重要说明 第 4 简体中文 页 的安全提示 只能使用笔记本内存扩展插槽 1 GByte 和 2 GByte 模块 DDDR3 1333 SO DIMM 或 DR3 1066 SO DIMM 安装或拆卸内存扩展插槽时请不要太用力 注意 内存扩展插槽内没有异物 操作过程中 某些部件会非常热 例如处理器散热器 因此 建议您在关闭 设备一个小时后再拆卸或安装存储模块 否则会有烧伤危险 打开一些静电敏感组件时请注意章节 組件指示 第 18 简体中文 页 存储模块拆除 3 2 1 1 向外小心按下两个固定夹 1 内 存 扩 展 插 槽 存 储 模 块 向上打开存储模块 2 按照箭头方向从安装位置拉出存 储模块 3 90 Fujitsu Technology Solutions ...

Page 95: ...系統擴充 简体中文 21 存储模块安装 2 a 1 使用终端接口和凹口 a 将存储模块 向前推入安装位置 1 内 存 扩 展 插 槽 存 储 模 块 小心向下拍存储模块 直到感觉 卡到位 2 Fujitsu Technology Solutions 91 ...

Page 96: ...内安装附加的 WLAN 模块 或者也可以将 Power over Ethernet 模块安装在同一个插槽内 每次只能安装一个模块 WLAN 模块安装 WLAN模 块 打开机箱 见 打开机箱 第 19 简体中文 页 3 3 1 2 4 从机箱挖出孔口 1 将 WLAN 模块组件面朝下插入机箱并按箭头方向 2 将其穿过机箱背面的开孔 用螺丝 3 固定 WLAN 模块 将 WLAN 模块导线连接到主板的插头上 4 92 Fujitsu Technology Solutions ...

Page 97: ...系統擴充 简体中文 23 2 2 1 将 WLAN 盖板插到 WLAN 模块上 1 并用螺丝 2 固定 关闭机箱 见 关闭机箱 第 20 简体中文 页 注意不要夹住机箱和各部件间的导线 Fujitsu Technology Solutions 93 ...

Page 98: ...24 简体中文 系統擴充 WLAN 模块拆卸 WLAN模 块 打开机箱 见 打开机箱 第 19 简体中文 页 1 1 2 拆除螺丝 1 并拆下 WLAN 盖板 2 94 Fujitsu Technology Solutions ...

Page 99: ...系統擴充 简体中文 25 2 2 3 1 从主板 1 上拉出 WLAN 模块的导线 拆除螺丝 2 按箭头方向 3 从安装位置拉出 WLAN 模块并从机箱内取出 关闭机箱 见 关闭机箱 第 20 简体中文 页 注意不要夹住机箱和各部件间的导线 Fujitsu Technology Solutions 95 ...

Page 100: ...装附加的 Power over Ethernet 模块 或也可以在同一插槽安装 WLAN 模块 每次只能安装一个模块 如系统通过 PoE 模块供电 则要确定没有连接额外的电源 网卡 Power over Ethernet 模块安装 Power over Ethernet 打开机箱 见 打开机箱 第 19 简体中文 页 1 2 从机箱挖出孔口 1 将 Power over Ethernet 模块部件面朝上插入机箱 2 注意在安装位置锁定 96 Fujitsu Technology Solutions ...

Page 101: ...系統擴充 简体中文 27 1 1 用螺丝 1 固定 Power over Ethernet 模块 关闭机箱 见 关闭机箱 第 20 简体中文 页 注意不要夹住机箱和各部件间的导线 Fujitsu Technology Solutions 97 ...

Page 102: ... 系統擴充 Power over Ethernet 模块拆卸 Power over Ethernet模 块 打开机箱 见 打开机箱 第 19 简体中文 页 1 1 2 拆除螺丝 1 按箭头方向 2 从安装位置拉出 Power over Ethernet 模块并从机箱内取出 关闭机箱 见 关闭机箱 第 20 简体中文 页 注意不要夹住机箱和各部件间的导线 98 Fujitsu Technology Solutions ...

Page 103: ...系統擴充 简体中文 29 扬声器安装与拆卸 可选 还可以在设备内安装附加的扬声器 扬声器安装 扬 声 器 扬声器交付范围内包括必要的六角螺栓 打开机箱 见 打开机箱 第 19 简体中文 页 1 1 将附带的六角螺栓固定到螺丝孔内 1 Fujitsu Technology Solutions 99 ...

Page 104: ...30 简体中文 系統擴充 1 1 2 将扬声器放入机箱内 如图所示 用螺丝 1 固定扬声器 将扬声器导线连接到主板的插头上 2 关闭机箱 见 关闭机箱 第 20 简体中文 页 注意不要夹住机箱和各部件间的导线 100 Fujitsu Technology Solutions ...

Page 105: ...系統擴充 简体中文 31 扬声器拆卸 扬 声 器 打开机箱 见 打开机箱 第 19 简体中文 页 2 2 1 从主板 1 上拉出扬声器的导线 拆除螺丝 2 从机箱内取出扬声器 关闭机箱 见 关闭机箱 第 20 简体中文 页 Fujitsu Technology Solutions 101 ...

Page 106: ...会给出相关错误信息 然后必须更换锂电池 更换锂电池不正确会发生爆炸危险 只能使用同一型号或厂商推荐的型号的锂电池 锂电池不属于家庭垃圾范围 由厂商 经销商或代理商免费回收利用或清除 更换时务必注意锂电池正确极性 锂 电 池 更 换 更 换 更 换 锂 电 池 电 池 锂电池支架有不同规格 从功能性上无法区分 1 2 3 4 按箭头方向 1 按下定位横档 电池从支架上跳出 拆除电池 2 将同一型号新的锂电池推入支架 3 并向下按直至锁定 固定定位横档 4 102 Fujitsu Technology Solutions ...

Page 107: ... mm 191 mm 宽 长 高 不含底座 250 mm 52 mm 191 mm 重量 基本结构 约 1 6 kg 含底座 环境条件 温度 运行 运输 15 C 35 C 25 C 60 C 送风排风间 保证足够通风 左 右 后 上 最小 200 mm 最小 200 mm 最小 200 mm 最小 200 mm 运行中不允许出现水汽 网 卡 电气数据 额定电压 100 240 V 最大额定电流 1 2 A 额定频率 50 60 Hz 只能使用下列带 Limited Power Source 的适配器 S26113 E578 V55 1 模块 ADP 40PH AD S26113 E557 V55 模块 ADP 65JH AD Fujitsu Technology Solutions 103 ...

Reviews: