background image

34

MEMO

Summary of Contents for Finepix XP140 Series

Page 1: ...Owner s Manual BL00005004 201 EN Series ...

Page 2: ... read by all who use the product For the Latest Information The latest versions of the manuals are available from http fujifilm dsc com en manual The site can be accessed not only from your computer but also from smartphones and tablets It also contains information on the software license For information on firmware updates visit http www fujifilm com support digital_cameras software ...

Page 3: ...otography and Playback 29 4 Movie Recording and Playback 35 5 Taking Photographs 41 6 The Shooting Menus 65 7 Playback and the Playback Menu 79 8 The Setup Menus 99 9 Shortcuts 113 10 Optional Accessories 117 11 Connections 119 12 Technical Notes 131 P Chapter Index ...

Page 4: ...NU P A A ASHOOTING MODE 66 FAF MF SETTING 66 RRELEASETYPE 68 NISO 68 OIMAGE SIZE 69 TIMAGE QUALITY 70 PFINEPIX COLOR 70 SHOOTING MENU P B B BSELF TIMER 70 oINTERVALTIMER SHOOTING 71 PTIME LAPSE MOVIE MODE 72 DWHITE BALANCE 73 pFLASH SET UP 73 WMOVIE SET UP 74 LIS MODE 76 C C WDIGITAL IMAGE STABILIZER 76 rWIRELESS COMMUNICATION 77 RINTELLIGENT DIGITAL ZOOM 78 ...

Page 5: ...OTATE 92 BRED EYE REMOVAL 93 ISLIDE SHOW 93 mPHOTOBOOK ASSIST 94 sPC AUTO SAVE 95 ECOPY 96 M M KPRINT ORDER DPOF 97 Vinstax PRINTER PRINT 98 JDISP ASPECT 98 Setup Menus Adjust basic camera settings N See page 99 for details SET UP P G G FDATE TIME 100 NTIME DIFFERENCE 100 Qa 101 RRESET 101 oSOUND FLASH 101 bSOUND SET UP 102 ASCREEN SET UP 103 SET UP P H H FFUNCTION Fn SETTING 105 ZPOWER MANAGEMENT...

Page 6: ...fore You Begin 1 Parts of the Camera 2 The Selector 4 The Burst Mode Button 5 Camera Displays 6 The LCD Monitor 6 Adjusting Display Brightness 8 The DISP BACK Button 8 Customizing the Standard Display 9 Using the Menus 11 2First Steps 13 First Steps 13 Attaching the Strap 14 Inserting the Battery and a Memory Card 15 Compatible Memory Cards 18 Charging the Battery 20 Turning the Camera On and Off ...

Page 7: ...iewing Movies 38 5Taking Photographs 41 Taking Photographs 41 Choosing a Shooting Mode 42 Shooting Mode Options 43 SADVANCED SR AUTO 44 jMULTIPLE EXPOSURE 45 YADVANCED FILTER 46 rPANORAMA 48 pFIREWORKS 51 tCALS 51 Exposure Compensation 52 Continuous Shooting Burst Mode 53 ICONTINUOUS HIGH MIDDLE LOW 54 f4K BURST 54 HDR 56 Focus Mode 57 Focus Exposure Lock 58 Using the Flash 59 White Balance 60 Usi...

Page 8: ...IMER SHOOTING 71 PTIME LAPSE MOVIE MODE 72 DWHITE BALANCE 73 pFLASH SET UP 73 FLASH MODE 73 FLASH COMPENSATION 73 RED EYE REMOVAL 73 WMOVIE SET UP 74 MOVIE MODE 74 HD HIGH SPEED VIDEO 75 FOCUS MODE 75 WIND FILTER 75 LIS MODE 76 WDIGITAL IMAGE STABILIZER 76 rWIRELESS COMMUNICATION 77 RINTELLIGENT DIGITAL ZOOM 78 7Playback and the Playback Menu 79 Playback and the Playback Menu 79 The Playback Displ...

Page 9: ...E SHOW 93 mPHOTOBOOK ASSIST 94 sPC AUTO SAVE 95 ECOPY 96 KPRINT ORDER DPOF 97 Vinstax PRINTER PRINT 98 JDISP ASPECT 98 8The Setup Menus 99 The Setup Menus 99 The Setup Menu G H 100 FDATE TIME 100 NTIME DIFFERENCE 100 Qa 101 RRESET 101 oSOUND FLASH 101 bSOUND SET UP 102 OPERATION VOL 102 SHUTTER VOLUME 102 SHUTTER SOUND 102 PLAYBACK VOLUME 102 ASCREEN SET UP 103 IMAGE DISP 103 LCD BRIGHTNESS 103 LC...

Page 10: ...SETTING 110 KFORMAT 111 9Shortcuts 113 Shortcuts 113 The Fn Function Buttons 114 Assigning a Role to the Function Buttons 115 10Optional Accessories 117 Optional Accessories 117 Accessories from Fujifilm 118 11Connections 119 Connections 119 HDMI Output 120 Connecting to HDMI Devices 120 Wireless Connections Bluetooth Wireless LAN Wi Fi 122 Smart Phones and Tablets FUJIFILM Camera Remote 122 Copyi...

Page 11: ...cal Notes 131 Technical Notes 131 Software from Fujifilm 132 FUJIFILM Camera Remote 132 FUJIFILM PC AutoSave 132 MyFinePix Studio 132 For Your Safety 133 Product Care 142 Firmware Updates 143 Checking the Firmware Version 143 Troubleshooting 144 Warning Messages and Displays 152 Memory Card Capacity 155 Specifications 156 ...

Page 12: ...ion Supplied Accessories The following are included with the camera NP 45S rechargeable battery AC 5VG AC power adapter Plug adapter Shape of adapter varies with region of sale USB cable Strap User Guide Basic Manual ...

Page 13: ...d with the camera are not water resistant Before Use Before Use 1 Inspect the water resistant seal and adjacent sur faces and remove any dust sand or other foreign matter using a soft dry cloth QHave the water resistant seal replaced if it is deformed or otherwise damaged note that a fee is charged for this service contact your retailer or a Fujifilm au thorized repair technician for more informati...

Page 14: ...utes Clean and dry the camera within one hour of using it un derwater QThe interior of the camera is not waterproof Do not open or close the bat tery chamber cover while under water After cleaning the camera be sure it is completely dry before opening or closing the battery chamber cover QDo not use in hot springs or heated pools QThe camera may lose water resistance if subjected to excessive forc...

Page 15: ...rming that the camera has dried and is free of water droplets open the battery chamber cover and use a soft dry cloth to remove any water dust or other foreign matter from the battery chamber QRemove any foreign matter from the water resistant seal and adjacent surfaces Foreign matter could damage the seal lowering water resistance QLiquid soaps detergents alcohol and other cleansers may affect wat...

Page 16: ...ide of lens This does not indicate a mal function Condensation can be removed by leaving the battery chamber cover open in a location with a steady temperature that is free of heat humidity sand and dust Condensation Condensation is particularly likely to occur if the camera is placed in cold water after being exposed to high temperatures or taken from a cold to a warm environment or if the batter...

Page 17: ... the product N Additional information that may be helpful when using the product P Pages on which related information may be found Menusandothertextinthedisplaysareshowninbold Illustrations are for explanatory purposes only drawings may be simplified while photographs are not necessarily taken with the model of camera described in this manual Terminology The optional SD SDHC and SDXC memory cards ...

Page 18: ...xviii MEMO ...

Page 19: ...1 Before You Begin ...

Page 20: ...re You Begin Parts of the Camera A Microphone 36 B Shutter button 31 C ON OFF button 24 D t movie recording button 36 E Flash 59 73 F Self timer lamp 61 70 AF assist illuminator 30 67 G Lens protective glass 30 ...

Page 21: ...54 56 r wireless transfer button playback mode 110 Q Speaker 38 102 R Tripod mount S Product name plate see below T LCD monitor 6 U Water resistant seal xiii 16 V Micro USB connector Micro B 126 W Memory card slot 15 X Micro HDMI connector Type D 120 Y Battery chamber 15 Z Battery latch 17 The Product name plate Do not remove the product name plate which provides the FCC ID KC mark CMIIT ID serial...

Page 22: ...sor down f h self timer button 61 114 E MENU OK button 11 66 84 100 The Fn Function Buttons The N flash and h self timer buttons can also serve as Fn function buttons Pressing and holding the f g or h button during shooting activates the assigned function displaying a menu of options The roles assigned to the function buttons can be selected using the FFUNCTION Fn SETTING item in the setup menu P1...

Page 23: ... Camera The Burst Mode Button Press the burst mode button I to switch between single frame and burst modes Mode Mode P P B B STILL IMAGE STILL IMAGE 30 I I CONTINUOUS CONTINUOUS 54 Mode Mode P P f f 4K BURST 4K BURST 54 h h HDR HDR 56 ...

Page 24: ...Displays This section lists the indicators that may be displayed during shooting O For illustrative purposes displays are shown with all indicators lit The LCD Monitor A B D E F S T U V W X Y G H I J K M N c a Z d e O b R P Q C L ...

Page 25: ...indicator 101 R Focus warning 31 S Battery level 25 T Sensitivity 68 U Exposure compensation 52 V Aperture W Shutter speed X Face eye detection setting 66 Y Shooting mode 42 Z Continuous mode 53 a Self timer indicator Interval shooting Time lapse movie 70 b Flash compensation 73 c Flash mode 59 d IS mode 76 e Intelligent digital zoom 78 1 a indicates that no memory card is inserted and that pictur...

Page 26: ... adjust the brightness and hue of the LCD monitor when changes in am bient brightness make the display difficult to read Choose LCD BRIGHTNESS to adjust brightness or LCD COLOR to adjust hue The DISP BACK Button Press DISP BACK to cycle through display modes as follows Standard Information off ...

Page 27: ... select or deselect Item Item Default Default FRAMING GUIDELINE R ELECTRONIC LEVEL R FOCUS FRAME R SHOOTING MODE R APERTURE S SPEED ISO R INFORMATION BACKGROUND R Expo Comp Digit R FLASH R CONTINUOUS MODE R Item Item Default Default DUAL IS MODE R WHITE BALANCE R FINEPIX COLOR R FRAMES REMAINING R IMAGE SIZE QUALITY R MOVIE MODE REC TIME R INTELLIGENT DIGITAL ZOOM R AUTO IMAGETRANSFER R BATTERY LE...

Page 28: ...Camera Displays Virtual Horizon Selecting ELECTRONIC LEVEL displays a virtual horizon The camera is level when the two lines overlap Note that the virtual horizon may not be displayed if the camera lens is pointed up or down ...

Page 29: ...AYBACK MENU To navigate the menus 1 Press MENU OK to display the menus AF MF SETTING SHOOTING MODE RELEASE TYPE ISO IMAGE SIZE IMAGE QUALITY FINEPIX COLOR EXIT SHOOTING MENU 2 Press the selector left to highlight the tab for the current menu EXIT FINEPIX COLOR IMAGE QUALITY IMAGE SIZE ISO RELEASE TYPE AF MF SETTING SHOOTING MODE SHOOTING MENU Tab 3 Press the selector up or down to highlight the ta...

Page 30: ...12 MEMO ...

Page 31: ...13 First Steps ...

Page 32: ...14 2 First Steps Attaching the Strap Attach the strap to the eyelet as shown O To avoid dropping the camera be sure the strap is correctly secured ...

Page 33: ...th be fore opening the battery chamber cover O Do not open the battery chamber cover when the camera is on Fail ure to observe this precaution could result in damage to image files or memory cards Do not use excessive force when handling the battery chamber cover 2 Insert the battery as shown Using the battery to keep the battery latch pressed to one side insert the battery contacts first in the d...

Page 34: ...t the cover is secure O If the cover does not close check that the battery is in the correct orientation Before closing the cover confirm that there is no dust sand or other foreign matter on the water resistant seal or adjacent surfaces When closing the battery chamber cover do not subject it to excessive horizontal forces Failure to observe this precaution could cause the water re sistant seal t...

Page 35: ...e removing the battery or memory card turn the camera off and open the battery chamber cover To remove the battery press the battery latch to the side and slide the battery out of the camera as shown O The battery may become hot when used in high temperature envi ronments Observe caution when removing the battery To remove the memory card press it in and re lease it slowly The card can then be rem...

Page 36: ...ards The UHS I bus interface is supported Use a memory card with a UHS speed class of 3 or better for 4K burst photography or when recording movies A list of supported memory cards is available on the Fujifilm website For details visit http www fujifilm com support digital_cameras compatibility ...

Page 37: ...ke the cam era to an authorized service representative Do not forcibly remove the card Do not affix labels or other objects to memory cards Peeling labels can cause camera malfunction Movie recording may be interrupted with some types of memory card The data in internal memory may be erased or corrupted when the camera is repaired Please note that the repairer will be able to view pictures in inte...

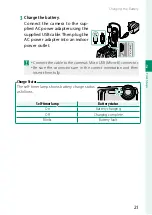
Page 38: ...ter as shown making sure that it is fully inserted and clicks into place on the AC power adapter terminals O The supplied plug adapter is for use exclusively with the AC 5VG AC pow er adapter Do not use it with other devices The shape of the plug adapter varies with the country of sale 2 Open the battery chamber cover Keeping the safety lock pressed A rotate the latch B and open the bat tery chamb...

Page 39: ...r into an indoor power outlet O Connect the cable to the camera s Micro USB Micro B connector Be sure the connectors are in the correct orientation and then insert them fully Charge Status The self timer lamp shows battery charge status as follows Self timer lamp Self timer lamp Battery status Battery status On Battery charging Off Charging complete Blinks Battery fault ...

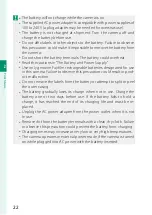
Page 40: ...es designated for use in this camera Failure to observe this precaution could result in prod uct malfunction Do not remove the labels from the battery or attempt to split or peel the outer casing The battery gradually loses its charge when not in use Charge the battery one or two days before use If the battery fails to hold a charge it has reached the end of its charging life and must be re placed...

Page 41: ...will not charge while the camera is on Connect the cable to the camera s Micro USB Micro B connector Connect the camera directly to the computer do not use a USB hub or keyboard Charging stops if the computer enters sleep mode to resume charging activate the computer and disconnect and reconnect the USB cable Charging may not be supported depending on the model of computer computer settings and th...

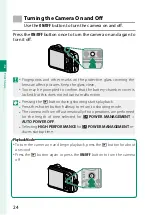
Page 42: ...ver is locked but this does not indicate a malfunction N Pressing the a button during shooting starts playback Press the shutter button halfway to return to shooting mode The camera will turn off automatically if no operations are performed for the length of time selected for ZPOWER MANAGEMENT AUTO POWER OFF Selecting HIGH PERFORMANCE for ZPOWER MANAGEMENT re duces startup time Playback Mode To tu...

Page 43: ...attery level in the display Battery level is shown as follows Indicator Indicator Description Description O white Battery partially discharged M white Battery more than half discharged J red Low battery Charge battery A blinks red Battery exhausted Turn camera off and recharge battery ...

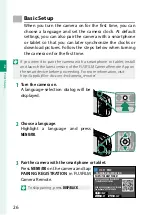
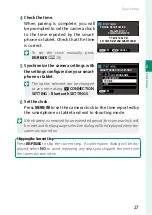
Page 44: ...t version of the FUJIFILM Camera Remote App on the smart device before proceeding For more information visit http app fujifilm dsc com en camera_remote 1 Turn the camera on A language selection dialog will be displayed 2 Choose a language Highlight a language and press MENU OK 3 Pair the camera with the smartphone or tablet Press MENU OK on the camera and tap PAIRING REGISTRATION in FUJIFILM Camer...

Page 45: ...blet N The option selected can be changed at any time using rCONNECTION SETTING Bluetooth SETTINGS SMARTPHONE SYNC SETTING SET TIME OFF LOCATION LOCATION TIME 6 Set the clock Press MENU OK to set the camera clock to the time reported by the smartphone or tablet and exit to shooting mode N If the battery is removed for an extended period the camera clock will be reset and the language selection dia...

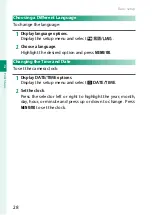
Page 46: ...2 Choose a language Highlight the desired option and press MENU OK Changing the Time and Date To set the camera clock 1 Display DATE TIME options Display the setup menu and select FDATE TIME 2 Set the clock Press the selector left or right to highlight the year month day hour or minute and press up or down to change Press MENU OK to set the clock ...

Page 47: ...29 Basic Photography and Playback ...

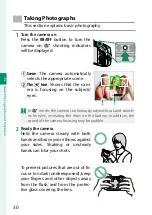
Page 48: ...n the subjects eyes PORTRAIT O In S mode the camera continuously adjusts focus and search es for eyes increasing the drain on the battery in addition the sound of the camera focusing may be audible 2 Ready the camera Hold the camera steady with both hands and brace your elbows against your sides Shaking or unsteady hands can blur your shots To prevent pictures that are out of fo cus or too dark un...

Page 49: ...d s will be displayed Change the composition or use focus lock P58 N The lens may make a noise when the camera focuses this is normal If the subject is poorly lit the AF assist illuminator may light to assist the focus operation Focus and exposure will lock when the shutter button is pressed halfway Focus and exposure remain locked while the button is kept in this position AF AE lock The camera wi...

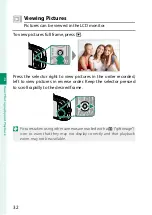
Page 50: ... a Press the selector right to view pictures in the order recorded left to view pictures in reverse order Keep the selector pressed to scroll rapidly to the desired frame N Pictures taken using other cameras are marked with a m gift image icon to warn that they may not display correctly and that playback zoom may not be available ...

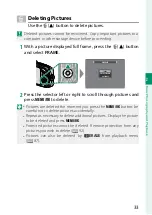
Page 51: ...E FRAME SELECTED FRAMES ALL FRAMES 2 Press the selector left or right to scroll through pictures and press MENU OK to delete N Pictures are deleted the moment you press the MENU OK button be careful not to delete pictures accidentally Repeat as necessary to delete additional pictures Display the picture to be deleted and press MENU OK Protected pictures cannot be deleted Remove protection from any...

Page 52: ...34 MEMO ...

Page 53: ...35 Movie Recording and Playback ...

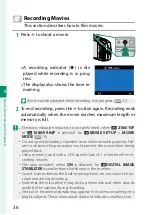
Page 54: ...s selected for WMOVIE SET UP MOVIE MODE P74 Do not open the battery chamber cover while recording movies Fail ure to observe this precaution could prevent the movie from being played back Use a memory card with a UHS speed class of 3 or better when re cording movies The area recorded when ON is selected for WDIGITAL IMAGE STABILIZER is smaller than that shown in the monitor Sound is recorded via t...

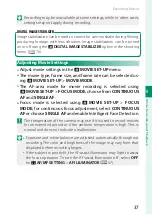
Page 55: ...ovie recording is selected using WMOVIE SET UP FOCUS MODE choose from CONTINUOUS AF and SINGLE AF Focus mode is selected using WMOVIE SET UP FOCUS MODE for continuous focus adjustment select CONTINUOUS AF or choose SINGLE AF and enable Intelligent Face Detection O The temperature of the camera may rise if it is used to record movies for an extended period or if the ambient temperature is high This...

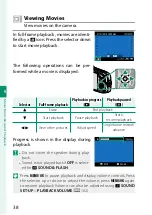
Page 56: ... progress x x Playback paused Playback paused y y e Erase End playback f Start playback Pause playback Start resume playback gh View other pictures Adjust speed Single frame rewind advance Progress is shown in the display during playback O Do not cover the speaker during play back Sound is not played back if OFF is select ed for oSOUND FLASH STOP PAUSE N Press MENU OK to pause playback and display...

Page 57: ...39 4 Movie Recording and Playback Viewing Movies Playback Speed Press the selector left or right to adjust playback speed during playback Speed is shown by the number of arrows M or N STOP PAUSE Arrows ...

Page 58: ...40 MEMO ...

Page 59: ...41 Taking Photographs ...

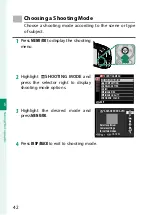
Page 60: ... 2 Highlight ASHOOTING MODE and press the selector right to display shooting mode options AF MF SETTING SHOOTING MODE RELEASE TYPE ISO IMAGE SIZE IMAGE QUALITY FINEPIX COLOR EXIT SHOOTING MENU 3 Highlight the desired mode and press MENU OK CANCEL SET for certain modes camera settings Selects optimum ADVANCED SR AUTO 4 Press DISP BACK to exit to shooting mode ...

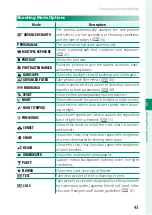
Page 61: ... N NSPORT SPORT Choose when photographing moving subjects O ONIGHT NIGHT Choose this mode for poorly lit twilight or night scenes H HNIGHT TRIPOD NIGHT TRIPOD Choose this mode for slow shutter speeds when shoot ing at night p pFIREWORKS FIREWORKS Slow shutter speeds are used to capture the expanding burst of light from a firework P51 Q QSUNSET SUNSET Choose this mode to record the vivid colors in s...

Page 62: ...s If there is more than one face in the frame the camera will select the face closest to the center Other faces are indi cated by white borders To select a different face press the selector left If the camera detects a non portrait subject it will be indicated by a green border press the shutter button halfway to focus Press the selector left g to switch focus from the selected subject to the sub ...

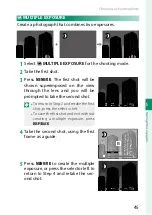
Page 63: ... on the view through the lens and you will be prompted to take the second shot N To return to Step 2 and retake the first shot press the selector left To save the first shot and exit without creating a multiple exposure press DISP BACK EXIT RETRY NEXT 4 Take the second shot using the first frame as a guide EXIT 5 Press MENU OK to create the multiple exposure or press the selector left to return to...

Page 64: ...lso be displayed by pressing a func tion button Advanced filter selection is assigned to the g but ton by default Advanced filter selection can also be assigned to other function buttons P115 The g button can also be assigned other functions using the FFUNCTION Fn SETTING item in the setup menu 2 A menu of advanced filter options will be displayed ADVANCED FILTER TOY CAMERA Create shaded borders a...

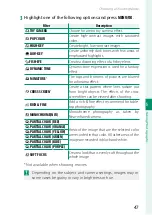
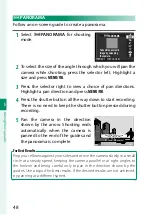
Page 65: ... where lines radiate out from bright objects The effects of the cross screen filter can be viewed after shooting n nRICH FINE RICH FINE Add a rich fine effect recommend for table top photography m mMONOCHROME NIR MONOCHROME NIR Monochrome photography as taken by Near infrared camera u uPARTIAL COLOR RED PARTIAL COLOR RED Areas of the image that are the selected color are recorded in that color All oth...

Page 66: ...he way down to start recording There is no need to keep the shutter button pressed during recording 5 Pan the camera in the direction shown by the arrow Shooting ends automatically when the camera is panned to the end of the guides and the panorama is complete Sweep camera along yellow line in direction of y ANGLE DIRECTION For Best Results Prop your elbows against your sides and move the camera s...

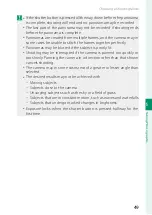
Page 67: ...amas may be blurred if the subject is poorly lit Shooting may be interrupted if the camera is panned too quickly or too slowly Panning the camera in a direction other than that shown cancels shooting The camera may in some cases record a greater or lesser angle than selected The desired results may not be achieved with Moving subjects Subjects close to the camera Unvarying subjects such as the sky...

Page 68: ...in or out pause playback and use the W zoom out and T zoom in buttons Panorama playback is controlled using the multi selector Selector Selector Full frame Full frame playback playback Panorama Panorama playback playback Panorama Panorama playback paused playback paused e Press up Erase End playback f Press down Start playback Pause playback Resume playback gh Press left or right View other pictur...

Page 69: ...ector up and then press it up or down to choose a shutter speed 3 Press MENU OK to select tCALS Take pictures at size and image quality settings suitable for sub mission under Japanese Ministry of Land Infrastructure Trans port and Tourism guidelines 1 Select tCALS for shooting mode 2 Press MENU OK O The OIMAGE SIZE and TIMAGE QUALITY items in the shooting menu are disabled in tCALS mode To adjust...

Page 70: ...ensation Adjust exposure 1 Press the selector up d to display exposure compensation options 2 Press the selector up or down to choose an exposure com pensation value and then press MENU OK O Exposure compensation is unavailable in some modes ...

Page 71: ...f4K BURST P54 3 WhenICONTINUOUSisselected youcanpresstheselector left or right to choose the frame rate JHIGH KMIDDLE or OLOW 4 Press MENU OK to select 5 Take pictures Viewing PicturesTaken Using Continuous Shooting Only the first frame of each series will be displayed Press the selector down to view the other pictures in the series N Pictures taken in continuous shooting mode have file names that...

Page 72: ...ra will record all photos shot to that point Burst shooting may not begin if the space available on the memory card or in internal memory is insufficient Frame rates may slow as more shots are taken Frame rate varies with the scene shutter speed sensitivity and focus mode Depending on shooting conditions frame rates may slow The flash cannot be used Recording times may increase during burst shooti...

Page 73: ...ft or right to highlight frames and press the burst mode button I to save the high lighted frame as a separate image SWITCH DISPLAY SAVE EXIT 4 After saving the desired frames press DISP BACK to exit the thumbnail list O If the subject moves during shooting the image may be distorted while banding may occur in images taken under flickering or transient light sources such as fluorescent lights N If...

Page 74: ... right to choose the amount expo sure is varied over the course of each shot AUTO 1 0EV 1 5EV 2 0EV 2 5EV or 3 0EV 4 Press MENU OK to select The exposure range will be set to the selected value 5 Take pictures O The camera may fail to record an image if the subject moves during shooting If the camera is moved or the subject changes during shooting the shots may be recorded separately instead of be...

Page 75: ...n Description s MULTI When the shutter button is pressed halfway the camera detects high contrast subjects and selects the focus area automatically t AREA The focus area can be changed Press the selector up down left or right to move the focus area and then press MENU OK to apply the focus area setting SELECT AF AREA Focus area point x TRACKING Position the subject in the center focus area and pre...

Page 76: ...on all the way down Autofocus Although the camera boasts a high precision autofocus system it may be unable to focus on the subjects listed below Very shiny subjects such as mirrors or car bodies Subjects photographed through a window or other reflective object Dark subjects and subjects that absorb rather than reflect light such as hair or fur Insubstantial subjects such as smoke or flame Subject...

Page 77: ...REDUCTION RED EYE REDUCTION N N L L FORCED FLASH FORCED FLASH FORCED FLASH FORCED FLASH The flash fires whenever a picture is taken O O M M SLOW SYNCHRO SLOW SYNCHRO RED EYE SLOW RED EYE SLOW Capture both the main subject and the back ground under low light note that brightly lit scenes may be overexposed P P SUPPRESSED FLASH SUPPRESSED FLASH The flash does not fire even when the subject is poorly lit...

Page 78: ...ations i For subjects in direct sunlight j For subjects in the shade k Use under daylight fluorescent lights l Use under warm white fluorescent lights m Use under cool white fluorescent lights n Use under incandescent lighting g Reduces the blue cast typically associated with underwater lighting N In conditions in which AUTO fails to produce the desired results for example under certain types of ligh...

Page 79: ...SELF TIMER item in the shooting menu 2 Highlight one of the following options and press MENU OK Option Option P P R R2 SEC 2 SEC 62 S S10 SEC 10 SEC 62 m mFACE AUTO SHUTTER FACE AUTO SHUTTER 62 o oSMILE SMILE 63 Option Option P P a aBUDDY BUDDY 63 g gGROUP GROUP 64 OFF OFF O Stand behind the camera when using the shutter button Standing in front of the lens can interfere with focus and exposure Th...

Page 80: ...ter button is pressed Use for photographs in which you wish to appear yourself The self timer lamp blinks immediately before the pic ture is taken 2 Press the shutter button all the way down to start the timer A count down timer will appear in the display the picture will be taken when the timer expires FACE AUTO SHUTTER The picture will be taken when the camera detects a portrait sub ject facing ...

Page 81: ...ts close together 1 Highlight a BUDDY in the self timer menu and press MENU OK 2 When prompted to choose how close the subjects must be together before the timer starts highlight the desired option and press MENU OK the required degree of closeness is shown by heart icons in the shooting display the more hearts the closer together the subjects must be LV 1 NEAR The timer starts when the subjects a...

Page 82: ...t subjects 1 Highlightg GROUP intheself timermenuandpressMENU OK 2 Highlight the desired number of sub jects 1 to 4 and press MENU OK the number of subjects is indicated by h icons in the shooting display The timer starts only when the selected number of subjects is in the frame the shutter is released two seconds later EXIT ...

Page 83: ...65 The Shooting Menus ...

Page 84: ...nd exposure for human faces anywhere in the frame preventing the camera from focus ing on the background in group portraits Choose for shots that emphasize portrait subjects You can also choose whether the camera detects and focuses on eyes when Intelligent Face Detection is on Choose from the following options Option Option Description Description FACE ON EYE OFF Intelligent Face Detection only F...

Page 85: ... select a different face by pressing the selector left Faces can be detected with the camera in vertical or horizontal ori entation If the camera is unable to detect the subject s eyes because they are hidden by hair glasses or other objects the camera will instead focus on faces AF ILLUMINATOR AF ILLUMINATOR If ON is selected the AF assist illuminator will light to assist autofocus Options Option...

Page 86: ...Description AUTO AUTO 1600 AUTO 800 AUTO 400 Sensitivity is adjusted automatically in response to shooting con ditions but will not be raised above the value in parentheses AUTO is only displayed if AUTO 1600 AUTO 800 and AUTO 400 are unavailable 12800 100 Adjust sensitivity manually Selected value is shown in display N Sensitivity is not reset when the camera is turned off Adjusting Sensitivity H...

Page 87: ...ns of the frame Choose an op tion suited to your goals Option Option Description Description 4 3 Pictures have the same proportions as the camera display 3 2 Pictures have the same proportions as a frame of 35 mm film 16 9 Suited for display on High Definition HD devices 1 1 Pictures are square Selecting 1 1 To switch to an aspect ratio of 1 1 before taking pictures simply press the control to which...

Page 88: ...on Description cSTANDARD Standard contrast and saturation Recommended in most situations aCHROME Vivid contrast and color Choose for vivid shots of flowers or enhanced greens and blues in landscapes bB W Take pictures in black and white fSEPIA Take pictures in sepia N Settings other than cSTANDARD are shown by an icon in the LCD monitor Depending on the subject the effects of aCHROME may not be vis...

Page 89: ...L NUMBEROFTIMES END CANCEL 001 2 1 24 23 0 01 00 h m s 3 Highlight one of the following re cording types and press MENU OK STILL Each photo is recorded sep arately STILL TIME LAPSE MOVIE Each photo is recorded separately in addition the entire sequence is re corded as a time lapse movie BACK SET STILL TIME LAPSE MOVIE STILL RECORDING MODE SETTING N The frame size and rate for the time lapse movie ...

Page 90: ...ing Only the first frame of each series will be displayed Press the selector down to view the other pictures in the series N Pictures taken during interval timer shooting have file names that start with S e g S0010001 JPG PTIME LAPSE MOVIE MODE Choose the frame size and rate for time lapse movies Option Option Frame size Frame size Rate Rate V2160 15P 3840 2160 4K 15 fps i1080 59 94P i1080 24P 192...

Page 91: ...N FLASH COMPENSATION Adjust flash brightness Choose from values between 2 EV and 2 EV Note that the desired results may not be achieved depend ing on shooting conditions and the distance to the subject Options Options 2 12 3 11 3 1 2 3 1 3 0 1 3 2 3 1 11 3 12 3 2 RED EYE REMOVAL RED EYE REMOVAL Choose ON to remove red eye effects caused by the flash Options Options ON OFF N Red eye reduction is pe...

Page 92: ...0 Full HD 59 94 fps n1080 SQUARE 50P 50 fps n1080 SQUARE 24P 24 fps n1080 SQUARE 23 98P 23 98 fps h720 59 94P 1280 720 HD 59 94 fps h720 50P 50 fps h720 24P 24 fps h720 23 98P 23 98 fps m720 SQUARE 59 94P 720 720 HD 59 94 fps m720 SQUARE 50P 50 fps m720 SQUARE 24P 24 fps m720 SQUARE 23 98P 23 98 fps 1 Electronic vibration reduction is not performed 2 Use a memory card with a UHS speed class of 3 o...

Page 93: ...d recording off O High speed movies are recorded at a reduced frame size with no sound Focus exposure and white balance are fixed at the values in effect at the start of recording Movies shot under low light may be un derexposed due to the high recording speeds we recommend shoot ing outdoors in daylight or in other brightly lit locations If desired high speed movies can also be viewed in slow moti...

Page 94: ...y when the shutter is released If MOTION is selected the camera will adjust shutter speed to reduce motion blur when moving objects are detected mSHOOTING ONLY OFF Image stabilization off Choose this option when using a tripod N MOTION has no effect when sensitivity is set to a fixed value and may also be unavailable at some other combinations of settings The effect may vary with lighting condition...

Page 95: ...ictures uploaded from the camera Browse the pictures on the camera and download selected pic tures Upload location data to the camera N For downloads and other information visit http app fujifilm dsc com en camera_remote If WIRELESS COMMUNICATION is selected for rCONNECTION SETTING GENERAL SETTINGS rBUTTON SETTING you can connect to the smartphone during shooting using a function button to which W...

Page 96: ...om INTELLIGENT DIGITAL ZOOM on INTELLIGENT DIGITAL ZOOM off Options Options ON OFF N Intelligent digital zoom may sometimes produce lower quality imag es than optical zoom Selecting another mode may end intelligent digital zoom When combined with optical zoom intelligent digital zoom offers zoom factors as high as 10 The time needed to record images increases The effects are not visible in the dis...

Page 97: ...79 Playback and the Playback Menu ...

Page 98: ...Number of frames selected for upload 84 F Internal memory indicator G Frame number 106 H Sound and flash indicator 101 I Temperature warning 154 J Protected image 92 K Location data 108 110 L Red eye removal indicator 93 M Movie edit 89 N Battery level 25 O Image quality 70 P Image size 69 Q FINEPIX color 70 R White balance 73 S Sensitivity 68 T Exposure compensation 52 U Aperture V Shutter speed W...

Page 99: ...utton The DISP BACK button controls the display of indicators during playback Standard Information off 4 01 01 2019 10 00 AM Favorites Favorites Rating Pictures To rate the current picture press DISP BACK and press the selector up and down to select from zero to five stars ...

Page 100: ...zoom and multi frame playback Use the W or T button to go from full frame playback to playback zoom or multi frame playback Full frame playback Multi frame playback Playback zoom Nine frame view Hundred frame view Medium zoom Maximum zoom N Press the DISP BACK button to return to full frame playback ...

Page 101: ... When the picture is zoomed in the selector can be used to view areas of the image not currently visible in the display Navigation window Multi Frame Playback Press W to increase the number of images displayed from 1 to 9 or 9 to 100 multi frame playback The number of pictures dis played decreases each time the T button is pressed N When two or more images are displayed use the selector to highlig...

Page 102: ...exit to playback N If ON is selected for rCONNECTION SETTING Bluetooth SETTINGS Bluetooth ON OFF upload will begin shortly after you exit to playback or turn the camera off N Image transfer orders can contain a maximum of 999 pictures The following cannot be selected for upload Protected pictures Movies Gift pictures pictures taken with other cameras If PAIRING TRANSFER ORDER is selected for rCONN...

Page 103: ...res remotely Receive pictures uploaded from the camera Browse the pictures on the camera and download selected pic tures Upload location data to the camera N For downloads and other information visit http app fujifilm dsc com en camera_remote If WIRELESS COMMUNICATION is selected for rCONNECTION SETTING GENERAL SETTINGS rBUTTON SETTING you can connect to the smartphone by pressing the r wireless t...

Page 104: ...Find all pictures containing faces BY I FAVORITES Search by rating BY SCENE Find all pictures that match a selected scene BYTYPE OF DATA Find all still pictures all movies or all pictures taken in burst mode 2 Select a search condition Only pictures that match the search condition will be displayed NTo delete or protect selected pictures or to view the search results in a slide show press MENU OK ...

Page 105: ...ion Description Description FRAME Delete pictures one at a time SELECTED FRAMES Delete multiple selected pictures ALL FRAMES Delete all unprotected pictures FRAME 1 Select FRAME for ERASE in the playback menu 2 Display the desired picture and press MENU OK to delete N Pictures are deleted the moment you press the MENU OK button be careful not to delete pictures accidentally Repeat as necessary to ...

Page 106: ...te the selected pic tures ALL FRAMES 1 Select ALL FRAMES for ERASE in the playback menu 2 A confirmation dialog will be displayed highlight OK and press MENU OK to delete all unprotected pictures N Pressing DISP BACK cancels deletion note that any pictures deleted before the button was pressed cannot be recovered If a message appears stating that the selected images are part of a DPOF print order ...

Page 107: ...ge from the start of the copy proceed to Step 3 otherwise proceed to Step 4 3 Press the selector down to begin playback and press it down again when the new opening frame is reached 4 Press MENU OK To remove footage from the end of the copy proceed to Step 5 otherwise proceed to Step 6 5 Press the selector down to begin playback and press it down again when the new closing frame is reached 6 Press...

Page 108: ...ress the selector left or right to highlight a movie 4 Press MENU OK to add the highlighted footage to the end of the current movie and save the resulting copy or press DISP BACK to exit without creating a copy O Both movies must have been recorded at the same frame size and frame rate Footage cannot be joined if the size of the resulting file would exceed 4 GB Do not turn the camera off while edi...

Page 109: ...alog 5 Press MENU OK again to save the cropped copy to a separate file N The higher the zoom ratio the smaller the number of pixels in the cropped copy If the size of the final copy will be a YES will be displayed in yellow ORESIZE Create a small copy of the current picture 1 Display the desired picture 2 Select ORESIZE in the playback menu 3 Highlight a size and press MENU OK to display a confirm...

Page 110: ...matted CIMAGE ROTATE Rotate pictures 1 Display the desired picture 2 Select CIMAGE ROTATE in the playback menu 3 Press the selector down to rotate the picture 90 clockwise up to rotate it 90 counterclockwise 4 Press MENU OK The picture will automatically be displayed in the selected orientation whenever it is played back on the camera N Protected pictures cannot be rotated Remove protection before...

Page 111: ...n de tecting faces The amount of time needed to process the image varies with the number of faces detected Red eye cannot be removed from pictures that have already been processed using red eye removal which are indicated by a e icon during playback ISLIDE SHOW View pictures in an automated slide show Press MENU OK to start and press the selector right or left to skip ahead or back Press DISP BACK...

Page 112: ... or smaller nor movies can be selected for photobooks The first picture selected becomes the cover image Press the selector down to select the current image for the cover instead 3 Highlight COMPLETE PHOTOBOOK and press MENU OK to se lect all photos for the book choose SELECT ALL The new book will be added to the list in the photobook assist menu N Books can contain up to 300 pictures Books that c...

Page 113: ... following options will be displayed select the desired option and follow the on screen instructions EDIT Edit the book as described in Creating a Photobook ERASE Delete the book sPC AUTO SAVE Upload pictures from the camera to a computer running the latest version of FUJIFILM PC AutoSave note that you must first install the software and configure the computer as a destination for images copied fr...

Page 114: ...RD Copy pictures from in ternal memory to a memory card bCARD y aINTERNAL MEMORY Copy pictures from a memory card to internal memory 3 Highlight one of the following options and press MENU OK FRAME Copy selected pictures NPress the selector left or right to view pictures and press MENU OK to copy the current picture ALL FRAMES Copy all pictures N Copying ends when the destination is full DPOF prin...

Page 115: ...N To remove a picture from the order press the selector down until the number of copies is 0 01 PRINT ORDER DPOF SHEETS SET FRAME DPOF 00001 Total number of prints Number of copies 5 Repeat steps 3 4 to complete the print order 6 The total number of prints is displayed in the monitor Press MENU OK to exit N Remove the memory card to create or modify a print order for the pictures in internal memor...

Page 116: ...hoose how High Definition HD devices display pictures with an aspect ratio of 4 3 this option is available only when an HDMI cable is connected 4 3 16 9 Option Option 16 16 9 9 4 4 3 3 Display NSelect 16 9 to display the image so that it fills the screen with its top and bottom cropped out 4 3 to display the entire image with black bands at either side ...

Page 117: ...99 The Setup Menus ...

Page 118: ...time at your destination when traveling To specify the difference between your local and home time zone 1 Highlight gLOCAL and press MENU OK 2 Use the selector to choose the time difference between local time and your home time zone Press MENU OK when settings are complete To set the camera clock to local time highlight gLOCAL and press MENU OK To set the clock to the time in your home time zone s...

Page 119: ...shooting menu settings to default values SET UP RESET Reset all setup menu settings other than FDATE TIME NTIME DIFFERENCE and rCONNECTION SETTING to default values 2 A confirmation dialog will be displayed highlight OK and press MENU OK oSOUND FLASH Select OFF to disable the speaker flash and illuminator in situa tions in which camera sounds or lights may be unwelcome Options Options ON OFF N o a...

Page 120: ...just the volume of the sounds produced by the electronic shutter Choose eOFF to disable the shutter sound Options Options b high c medium d low eOFF mute SHUTTER SOUND SHUTTER SOUND Choose the sound made by the electronic shutter Options Options i SOUND 1 j SOUND 2 k SOUND 3 PLAYBACKVOLUME PLAYBACKVOLUME Adjust the volume for movie playback Choose from 10 options between 10 high and 1 low or selec...

Page 121: ...isplayed for the selected time or until the shutter button is pressed halfway 0 5 SEC OFF Pictures are not displayed after shooting N Colors may differ slightly from those in the final image Noise mottling may be visible at high sensitivities Note that at some settings the camera will display pictures after shooting regardless of the option selected LCD BRIGHTNESS LCD BRIGHTNESS Adjust monitor bri...

Page 122: ... four grid Frame HD pictures in the crop shown by the lines at the top and bottom of the display N Framing guides are not shown at default settings but can be displayed using ASCREEN SET UP DISP CUSTOM SETTING P9 AUTOROTATE PB AUTOROTATE PB Choose ON to automatically rotate tall portrait orientation pictures during playback Options Options ON OFF DISP CUSTOM SETTING DISP CUSTOM SETTING Choose item...

Page 123: ...anagement settings AUTO POWER OFF AUTO POWER OFF Choose the length of time before the camera turns off automati cally when no operations are performed Shorter times increase battery life if OFF is selected the camera must be turned off manually Options Options 5 MIN 2 MIN OFF HIGH PERFORMANCE HIGH PERFORMANCE Select ON for faster focus and to reduce the time needed to re start the camera Options O...

Page 124: ... number File number Frame number Option Option Description Description CONTINUOUS Numbering continues from the last file number used or the first available file number whichever is higher Choose this option to reduce the number of pictures with duplicate file names RENEW Numbering is reset to 0001 after formatting or when a new mem ory card is inserted N If the frame number reaches 999 9999 the shutte...

Page 125: ...g OFF Do not stamp the time and date on new photographs O Time and date stamps cannot be deleted Turn DATE STAMP off to prevent time and date stamps appearing on new photographs If the camera clock is not set you will be prompted to set the clock to the current date and time P26 28 We recommend that you turn the DPOF print date option off when printing images with a time and date stamp P97 Time an...

Page 126: ...mation for selected devices Choose the device in the device list The selected device will also be removed from the devices listed in SELECT PAIRING DESTINATION Bluetooth ON OFF ON The camera automatically establishes a Bluetooth connection with paired devices when turned on OFF The camera does not connect via Bluetooth AUTO IMAGETAGGING ON Mark JPEG images for upload as they are taken OFF Photos a...

Page 127: ... wireless LAN Option Option Description Description PC AUTO SAVE SETTING Choose the method used for connection to computers via a wireless LAN SIMPLE SETUP Connect using WPS MANUAL SETUP Choose the network from a list SELECT FROM NETWORK LIST or enter the name manually ENTER SSID DELETE REGISTERED DESTINATION PC Remove selected destinations DETAILS OF PREVIOUS CONNECTION View computers to which th...

Page 128: ...ING Choose whether location data downloaded from a smart phone are embedded in pictures as they are taken LOCATION INFO Display the location data last downloaded from a smart phone rBUTTON SETTING Choose the role played by the r wireless transfer button during playback or during shooting by the Fn button when it is assigned the WIRELESS COMMUNICATION function PAIRING TRANSFER ORDER If the camera i...

Page 129: ... dialog will be dis played HighlightOKandpressMENU OK to format the memory card or internal memory SET FORMAT FORMAT OK ERASE ALL DATA OK CANCEL NTo exit without formatting the memory card or internal memory select CANCEL or press DISP BACK O All data including protected pictures will be deleted from the memory card or internal memory Be sure important files have been copied to a computer or other...

Page 130: ...112 MEMO ...

Page 131: ...113 Shortcuts ...

Page 132: ...n a role to the function buttons for quick access to the selected feature The default assignments are Fn function button Fn function button Advanced filter h h self timer button self timer button Self timer N N flash button flash button Flash mode ...

Page 133: ...R LV FLASH MODE FLASH COMPENSATION MOVIE MODE FACE EYE DETECTION SETTING WIRELESS COMMUNICATION AUTO IMAGE TAGGING SELECT PAIRING DESTINATION Bluetooth ON OFF NONE N To disable the function button choose NONE Role selection can also be accessed by pressing and holding the function or DISP BACK button Pressing the button to which advanced filters are assigned displays filter selection options Highl...

Page 134: ...116 MEMO ...

Page 135: ...117 Optional Accessories ...

Page 136: ...in your region check with your local Fujifilm representative or visit http www fujifilm com products digital_cameras index html Rechargeable Li ion batteries Rechargeable Li ion batteries NP 45S AdditionalNP 45Srechargeablebatteriescanbepurchased as required instax SHARE printers instax SHARE printers SP 1 SP 2 SP 3 Connect via wireless LAN to print pictures on instax film ...

Page 137: ...119 Connections ...

Page 138: ...n below Insert into HDMI Micro connector Type D Insert into HDMI connector 3 Configure the device for HDMI input as described in the doc umentation supplied with the device 4 Press the a button for about a second to turn the camera on The camera monitor turns off and pictures and movies are played back on the TV O Making sure the connectors are fully inserted The USB cable cannot be used while an ...

Page 139: ...ted pictures and sound are played back on the TV Some televisions may briefly display a black screen when movie play back begins Note that the camera volume controls have no effect on sounds played on the TV use the television volume controls to adjust the volume ...

Page 140: ...he camera you will need to in stall the latest version of the FUJIFILM Camera Remote app on your smartphone or tablet FUJIFILM Camera Remote Once a connection has been established you can use FUJFILM Camera Remote to Control the camera and take pictures remotely Receive pictures uploaded from the camera Browse the pictures on the camera and download selected pictures Upload location data to the ca...

Page 141: ...lsobeperformedbypressingther wirelesstransfer but ton during playback or by pressing the button to which PAIRING TRANSFER ORDER has been assigned using rCONNECTION SETTING GENERAL SETTINGS rBUTTON SETTING P114 Once pairing is complete these buttons display transfer options Smartphones and Tablets Wi Fi Use the rWIRELESS COMMUNICATION options in the shoot ing menu or the playback menu to connect to...

Page 142: ...load pictures from the camera over wireless networks Wi Fi FUJIFILM PC AutoSave For downloads and other information visit http app fujifilm dsc com en pc_autosave Computers Wireless Connections You can upload pictures from the camera using the sPC AUTO SAVE option in the playback menu N You can also upload pictures by pressing and holding the r wireless transfer button in playback mode ...

Page 143: ...nized and printed MyFinePix Studio is available for download from the following website http fujifilm dsc com mfs Once download is complete double click the downloaded file MFPS_Setup EXE and follow the on screen instructions to complete installation Mac OS X macOS Pictures can be copied to your computer using Image Capture supplied with your computer or other software OUse a card reader to copy f...

Page 144: ...able as shown making sure the connectors are fully inserted O The camera is equipped with a Micro USB Micro B USB 2 0 con nector 3 Press the a button for about a second to turn the camera on 4 Copy pictures to the computer using MyFinePix Studio or ap plications provided with your operating system 5 When transfer is complete turn the camera off and discon nect the USB cable ...

Page 145: ...eader to transfer pictures Do not disconnect the USB cable while transfer is in progress Failure to observe this precaution could result in loss of data or damage to internal memory or the memory card Disconnect the camera before inserting or removing memory cards In some cases it may not be possible to access pictures saved to a network server using the software in the same way as on a stand alon...

Page 146: ...ETTING instaxPRINTERCONNECTION SETTING in the camera setup menu and enter the instax SHARE printer name SSID and password The Printer Name SSID and Password The printer name SSID can be found on the bottom of the printer the default password is 1111 If you have already chosen a different password to print from a smartphone enter that password instead ...

Page 147: ...NNECTING CANCEL PRINTER PRINT instax 12345678 3 Display the picture you want to print then press MENU OK 100 0020 TRANSMIT CANCEL instax 12345678 PRINTER PRINT N Pictures taken with other cameras cannot be printed The area printed is smaller than the area visible in the LCD monitor The displays may vary depending on the printer connected 4 The picture will be sent to the printer and printing will ...

Page 148: ...130 MEMO ...

Page 149: ...131 Technical Notes ...

Page 150: ...nnection between your camera and a smartphone or tablet P122 http app fujifilm dsc com en camera_remote FUJIFILM PC AutoSave Download pictures from your camera over wireless networks P124 http app fujifilm dsc com en pc_autosave MyFinePix Studio Manage view print and edit the many images downloaded from your digital camera P125 http fujifilm dsc com mfs ...

Page 151: ...s video product should not be placed in a built in instal lation such as a bookcase or rack unless proper ventilation is provided or the manufacturer s instructions have been ad hered to This video product should never be placed near or over a radiator or heat register Attachments Do not use attachments not recommended by the video product manufacturer as they may cause hazards Water and Moisture ...

Page 152: ...e the same characteristics as the original part Unauthorized substitutions may result in fire electric shock or other hazards Safety Check Upon completion of any service or repairs to this video product ask the service technician to perform safety checks to determine that the video product is in prop er operating condition Be sure to read these notes before use Safety Notes Make sure that you use y...

Page 153: ...d fluid gets in contact with your eyes skin or clothing flush the affected area with clean eyes skin or clothing flush the affected area with clean water and seek medical attention or call an emergency water and seek medical attention or call an emergency numberrightaway numberrightaway WARNING WARNING Do not use the charger to charge batteries other than Do not use the charger to charge batteries...

Page 154: ...t plan to use the camera for an extended period remove the bat use the camera for an extended period remove the bat tery and disconnect and unplug the AC power adapter tery and disconnect and unplug the AC power adapter Failure to do so can cause a fire or electric shock Whenchargingends unplugthechargerfromthepower Whenchargingends unplugthechargerfromthepower socket socket Leaving the charger plu...

Page 155: ...ife At normal temperatures the battery can be recharged about 300 times A noticeable decrease in the length of time the battery will hold a charge indicates that it has reached the end of its service life and should be replaced Storage Storage Performance may be impaired if the battery is left unused for extended periods when fully charged Run the battery flat before storing it If the camera will n...

Page 156: ... medical assistance If liquid crystal is swallowed rinse your mouth thoroughly with water Drink large quantities of water and induce vom iting then seek medical assistance Although the display is manufactured using extremely high precision technology it may contain pixels that are always lit or that do not light This is not a malfunction and images recorded with the product are unaffected Trademark...

Page 157: ...ing the equipment off and on the user is encouraged to try to correct the interference by one or more of the fol lowing measures Reorient or relocate the receiving antenna Increase the separation between the equipment and re ceiver Connect the equipment into an outlet on a circuit different from that to which the receiver is connected Consult the dealer or an experienced radio TV technician for help...

Page 158: ...ested and found to comply with IC radiation ex posure limits set forth for an uncontrolled environment and meets RSS 102 of the IC radio frequency RF Exposure rules DisposalofElectricalandElectronicEquipmentinPrivateHouseholds DisposalofElectricalandElectronicEquipmentinPrivateHouseholds In the European Union Norway Iceland and Liechtenstein This symbol on the product or in the manual and in the w...

Page 159: ...nterference Do not use the trans mitter in the vicinity of microwave ovens or in other loca tions subject to magnetic fields static electricity or radio interference that may prevent reception of wireless signals Mutual interference may occur when the transmitter is used in the vicinity of other wireless devices operating in the 2 4 GHz band The wireless transmitter operates in the 2 4 GHz band usi...

Page 160: ...e chemicals which could discolor or deform the leather on the camera body Any liquid on the camera should be removed immediately with a soft dry cloth Use a blower to remove dust from the monitor taking care to avoid scratches and then gently wipe with a soft dry cloth Any remaining stains can be removed by wiping gen tly with a piece of Fujifilm lens cleaning paper to which a small amount of lens...

Page 161: ... com support digital_cameras software Checking the Firmware Version O The camera will only display the firmware version if a memory card is inserted 1 Turn the camera off and check that a memory card is insert ed 2 Turn the camera on while holding the DISP BACK button The current firmware version will be displayed check the firm ware version 3 Turn the camera off ...

Page 162: ...ing and holding the a button The battery is exhausted Charge the battery or insert a ful ly charged spare battery P20 The battery is inserted incorrectly Reinsert in the correct ori entation P15 The battery chamber cover is not latched Latch the bat tery chamber cover P15 The battery runs down quickly Thebatteryiscold Warm the battery by placing it in a pock et or other warm place and reinsert it ...

Page 163: ... battery at room temperature The self timer lamp blinks and the battery does not charge There is dirt on the battery terminals Clean the terminals with a soft dry cloth P15 The battery has been charged many times The battery has reached the end of its charging life Purchase a new bat tery If the battery still fails to charge contact your Fujifilm dealer P118 The battery is too hot or too cold Wait ...

Page 164: ...is poorly lit which may result in noticeable mottling when images are previewed in the displays Images taken with the camera are unaffected The camera does not focus The subject is not suited to autofocus Use focus lock P58 No face is detected The subject s face is obscured by sunglasses a hat long hair or other objects Remove the obstructions P66 The subject s face occupies only a small area of th...

Page 165: ...not in range of the flash Position the subject in range of the flash The flash window is obstructed Hold the camera correctly Pictures are blurred The protective glass covering the lens is dirty Clean the glass The protective glass covering the lens is blocked Keep objects away from the lens P30 s is displayed during shooting and the focus frame is dis played in red Check focus before shooting P31 ...

Page 166: ...k volume P102 The microphone was obstructed Hold the camera correctly during recording The speaker is obstructed Hold the camera correctly during playback OFF is selected for SOUND FLASH Select ON P101 Selectedpicturesarenot deleted Some of the pictures selected for deletion are protected Remove protection using the device with which it was originally applied P92 File numbering is unexpectedly res...

Page 167: ...sound onTV The camera is not properly connected Connect the camera properly P120 Input on the television is set to TV Set input to HDMI P120 ThevolumeontheTVistoolow Use the controls on the tele vision to adjust the volume P120 The computer does not recognize the camera Be sure the camera and computer are correctly connected P125 Cannot transfer pictures to computer Use MyFinePix Studio to transfe...

Page 168: ...y devices are causing radio interference Move the cam era and smartphone away from microwave ovens or cord less phones P122 The smartphone is connected to another device The smart phone and camera can connect to only one device at a time End the connection and try again Cannot upload images There are several smartphones in the vicinity Try connecting again The presence of multiple smartphones can ...

Page 169: ... a wireless LAN End the con nection The camera does not func tion as expected Remove and reinsert the battery P15 If the problem persists contact your Fujifilm dealer No sound Adjust the volume P102 Select ON for SOUND FLASH P101 Time and date stamps Time and date stamps are not correct Set the camera clock P28 100 Time and date stamps appear on photographs Time and date stamps cannot be deleted To...

Page 170: ...ture will be over or under exposed Use the flash for additional light ing when taking photographs of poorly lit subject FOCUS ERROR Camera malfunction Turn the camera off and then on again If the message persists contact a Fujifilm dealer LENS CONTROL ERROR TURN OFFTHE CAMERA ANDTURN ON AGAIN NO CARD No memory card inserted when COPY is selected in the playback menu Insert a memory card CARD NOT INIT...

Page 171: ...ded or copied Delete pictures or insert a memory card with more free space aMEMORYFULL INTERNALMEMORY ISFULLINSERTANEW CARD WRITE ERROR Memory card error or connection error Reinsert the card or turn the camera off and then on again If the message persists contact a Fujifilm dealer Not enough memory remaining to record additional pictures Delete pictures or insert a memory card with more free space ...

Page 172: ...econd print order PCANNOT EXECUTE An attempt was made to create a resized copy at a size equal to or larger than the original Choose a smaller size QCANNOT EXECUTE aCANNOT EXECUTE CAN NOT SET DPOF The picture cannot be printed using DPOF FCAN NOT SET DPOF Movies cannot be printed using DPOF CAN NOT ROTATE The selected picture cannot be rotated FCAN NOT ROTATE Movies cannot be rotated FCANNOT EXECU...

Page 173: ...3 3 1000 1590 2000 3190 Movies Movies V V2160 15P 2160 15P 6 minutes i i1080 59 94P 50P 24P 23 98P 1080 59 94P 50P 24P 23 98P 13 minutes n n1080 SQUARE 59 94P 50P 24P 23 98P 1080 SQUARE 59 94P 50P 24P 23 98P 23 minutes h h720 59 94P 50P 24P 23 98P 720 59 94P 50P 24P 23 98P 26 minutes m m720 SQUARE 59 94P 50P 24P 23 98P 720 SQUARE 59 94P 50P 24P 23 98P 29 minutes Use a UHS speed class 3 card or bet...

Page 174: ...4 1840 Q16 9 1920 1080 O1 1 3456 3456 P1 1 2432 2432 Q1 1 1728 1728 tCALS 1280 960 Opanorama vertical 5760 1632 horizontal 5760 1088 Ppanorama vertical 3840 1632 horizontal 3840 1088 Lens Type Fujinon 5 optical zoom lens Focal length f 5 0mm 25 0mm 35 mm format approximately equivalent to 28 mm 140 mm Maximum aperture F3 9 wide angle F4 9 telephoto Digital zoom Up to about 2 with intelligent digit...

Page 175: ...and number of frames per burst vary with shooting conditions and type of memory card used Focus Mode MULTI AREA TRACKING Focus area selection Contrast detect TTL AF Movie focus mode CONTINUOUS AF SINGLE AF White balance Auto direct sunlight shade daylight fluorescent warm white fluorescent cool white fluorescent incandescent underwater Self timer Off 2 sec 10 sec Face auto shutter Smile Buddy Group Fl...

Page 176: ...80 23 98P n1080 SQUARE 23 98P h720 59 94P m720 SQUARE 59 94P h720 50P m720 SQUARE 50P h720 24P m720 SQUARE 24P h720 23 98P m720 SQUARE 23 98P Silent HD high speed movies 1 6 a59 94P F100P 2 a50P F100P 3 3 a29 97P F100P 4 a25P F100P Input output terminals Digital input output USB 2 0 High Speed Micro USB connector Micro B MTP PTP HDMI output HDMI Micro connector Type D ...

Page 177: ...Humidity 10 to 80 no condensation Battery life Battery type NP 45S Shooting mode mode P Approximate number of frames Approximate number of frames 240 Mode Mode Actual battery life of Actual battery life of movie capture movie capture Continuance battery life Continuance battery life of movie capture of movie capture V Approx 42 minutes Approx 73 minutes i Approx 40 minutes Approx 54 minutes At a f...

Page 178: ...reless protocol Operating frequency center frequency Japan China 2 412 MHz 2 472 MHz 13 channels Other countries 2 412 MHz 2 462 MHz 11 channels Access protocols Infrastructure Bluetooth Standards Bluetooth version 4 1 Bluetooth Low Energy Operating frequency center frequency 2 402 MHz 2 480 MHz ...

Page 179: ...put 100 V 240 V AC 50 60 Hz Input capacity 10 5 VA 100 V 11 9 VA 240 V Rated output 5 0 V DC 1000 mA Operating temperature 0 C to 40 C 32 F to 104 F Weight Approx 26 g 15 0 9 oz 15 AC power adapter only N Weight and dimensions vary with the country or region of sale O Specifications and performance are subject to change without notice Fujifilm will not be held liable for any errors this manual may...

Page 180: ...7 3 AKASAKA 9 CHOME MINATO KU TOKYO 107 0052 JAPAN http www fujifilm com products digital_cameras index html ...

Reviews: