background image

20

Basic Photography and Playback

Taking Pictures in 

Q

 (Scene Recognition) Mode

   2

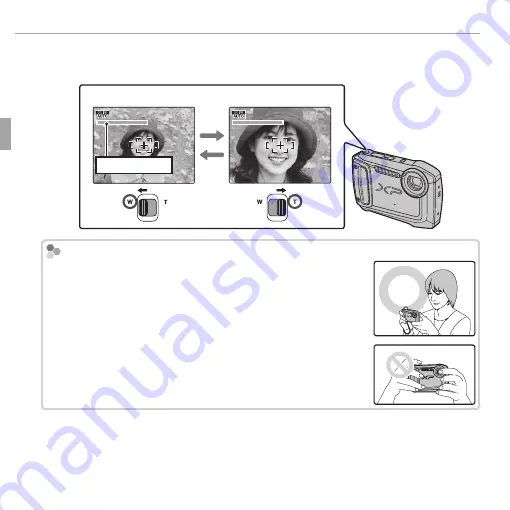
 Frame the picture.

Use the zoom control to frame the picture in the display.

Zoom out

Zoom in

Zoom indicator

     Holding the Camera

  Holding the Camera

Hold the camera steady with both hands and brace your 
elbows against your sides.  Shaking or unsteady hands can 
blur your shots.

To prevent pictures that are out of focus or too dark (under-
exposed), keep your fi ngers and other objects away from 
the fl ash and from the protective glass covering the lens.

Summary of Contents for Finepix XP100

Page 1: ...ulations when using the device FUJIFILM does not accept liability for problems arising from use in other jurisdictions Wirelessdata images maybeinterceptedbythirdparties The security of data transmitted over wireless networks is not guaranteed Donotusethedeviceinlocationssubjecttomagneticfields staticelectricity orradiointerference Do not use the transmitter in the vicinity of microwave ovens or i...

Page 2: ...d Observe all location regulations when using the device FUJIFILM does not accept liability for problems arising from use in other jurisdictions Wirelessdata images maybeinterceptedbythirdparties The security of data transmitted over wireless networks is not guaranteed Donotusethedeviceinlocationssubjecttomagneticfields staticelectricity orradiointerference Do not use the transmitter in the vicini...

Page 3: ...FINEPIX XP150 XP160 FINEPIX XP100 XP110 DIGITAL CAMERA Basic Manual BL01641 101 ENGLISH FRANÇAIS ESPAÑOL Worldwide Network ...

Page 4: ... is left on the sand its temperature may exceed operating temperature may exceed operating limits and sand may get into the limits and sand may get into the speaker or microphone speaker or microphone Q Q Sunscreen suntan lotion or other Sunscreen suntan lotion or other oily substances may discolor the oily substances may discolor the camera body and should be re camera body and should be re moved...

Page 5: ...ffic accident Do not touch any metal parts of the camera during a thunderstorm This can cause an electric shock due to induced current from the lightning discharge Donotusethebatteryexceptasspecified Load the battery as shown by the indicator Do not heat change or take apart the battery Do not drop or subject the battery to impacts Do not store the battery with metallic products Any of these actions...

Page 6: ...mera body may become warm to the touch after extended use This is normal An AC power adapter is recom mended for periods of extended use Do not transport or store batteries with metal objects such as necklaces or hairpins Do not expose to flame or heat Disposal Disposal Dispose of used batteries in accordance with lo cal regulations Before disposing of the camera including the batteries or accumula...

Page 7: ...or help You are cautioned that any changes or modifications not expressly approved in this manual could void the user s authority to operate the equipment Notes on the Grant To comply with Part 15 of the FCC Rules this product must be used with a Fujifilm specified ferrite core A V cable USB cable and DC supply cord ForCustomersinCanada ForCustomersinCanada CAUTION This Class B digital apparatus com ...

Page 8: ...lds In the European Union Norway Iceland and Liechtenstein This symbol on the product or in the manual and in the warranty and or on its packaging indicates that this product shall not be treated as household waste Instead it should be taken to an applicable collection point for the recycling of electrical and electronic equip ment By ensuring this product is disposed of cor rectly you will help p...

Page 9: ...g Started Getting Started Supplied Accessories 1 Charging the Battery 1 Inserting the Battery and a Memory Card 2 Turning the Camera On 2 Taking Pictures 3 Viewing Pictures 4 Deleting Pictures 4 Troubleshooting 4 Movies Movies Recording Movies 5 Viewing Movies 7 Reference Reference Parts of the Camera 8 Shooting Playback and Setup Options 9 ...

Page 10: ...rds referred to in this manual as memory cards Charging the Battery Charging the Battery The battery is not charged at shipment Charge the battery before use 1 Attach the plug adapter as shown below mak ing sure that it is fully inserted and clicks into place on the charger terminals Q The plug adapter is exclusively for use with the supplied battery charger Do not use it with other devices Plug a...

Page 11: ...rce 4 Close the battery chamber cover Close the cover q and then close the latch w and safety lock e Q Do not use excessive force when handling the battery chamber cover Turning the Camera On Turning the Camera On Press the ON OFF button to turn the camera on The camera can be turned off by pressing the ON OFF button again Language Selection Setting the Camera Clock Language Selection Setting the C...

Page 12: ...d in the monitor to indicate that the camera is continuously adjusting focus and searching for faces increasing the drain on the battery Taking Pictures Taking Pictures This section describes how to take pictures in Q scene recognition mode 1 Turn the camera on 2 Use the zoom control to frame the picture in the display Zoom indicator Zoom out WIDE Zoom in TELE 3 Press the shutter button halfway to...

Page 13: ... press the shutter but ton Troubleshooting Troubleshooting Problem Problem Solution Solution The camera does not The camera does not turn on turn on The battery is exhausted The battery is exhausted Charge the battery or insert a fully charged spare battery Charge the battery or insert a fully charged spare battery The battery is inserted incorrectly The battery is inserted incorrectly Reinsert in...

Page 14: ...s the t button again Recording ends automatically when the movie reaches maximum length or memory is full R Zoom can be adjusted while recording is in progress The type of zoom can be se lected using the p MOVIE ZOOM TYPE option in the setup menu R Focus exposure and white balance are adjusted automatically throughout record ing the focus mode can be selected using the F MOVIE AF MODE option in th...

Page 15: ...n Q The temperature of the camera may rise if it is used to record movies for an ex tended period or if the ambient temperature is high This is normal and does not indicate a malfunction MovieFrameSize MovieFrameSize Before recording select a frame size using the W MOVIE MODE option in the shooting menu Option Option Description Description i1920 1920 1080 Full HD High Definition h1280 1280 720 Hi...

Page 16: ...playback is not in progress pressing the selector up will delete the movie Adjust speed Adjust speed Press the selector left or right to adjust playback speed dur ing playback Adjust volume Adjust volume Press MENU OK to pause playback and display volume con trols Press the selector up or down to adjust the volume and press MENU OK to exit Volume can also be adjusted from the setup menu PLAY 100 0...

Page 17: ...lash button Move cursor left F macro button Move cursor down h self timer button DISP display BACK button a playback button Microphone P 5 Speaker P 7 a button View pictures P4 DISP BACK button View or hide indicators or cancel the current operation Press and hold to disable the speaker and flash in situations in which lights and sounds produced by the camera may be unwelcome ...

Page 18: ...Macro Macro Take close ups of small objects Press the selector left F F OFF h h Self timer Self timer Reduce blur or shoot self portraits Reduce blur or shoot self portraits Press the selector down h T a a g g S R N N Flash Flash Use the flash for additional lighting Press the selector right N AUTO K N L O M P d d Exposure Exposure compensation compensation Photograph very bright very dark or high...

Page 19: ...e and white D D WHITE BALANCE WHITE BALANCE Adjust colors to compensate for different colored light sources Adjust colors to compensate for different colored light sources R R CONTINUOUS CONTINUOUS Capture motion in a series of pictures b b FACE DETECTION FACE DETECTION Choosewhetherthecameradetectsandsetsfocusandexposure for portrait subjects F F AF MODE AF MODE This option controls how the camer...

Page 20: ... Facebook using Select pictures for upload toYouTube or Facebook using MyFinePix Studio Windows only MyFinePix Studio Windows only I I SLIDE SHOW SLIDE SHOW View pictures in an automated slide show B B RED EYE REMOVAL RED EYE REMOVAL Remove red eye from pictures taken with Intelligent Face De tection D D PROTECT PROTECT Protect pictures from accidental deletion G G CROP CROP Create a cropped copy ...

Page 21: ...ormat the memory card or internal memory A A IMAGE DISP IMAGE DISP Choose how long pictures are displayed in the LCD monitor after Choose how long pictures are displayed in the LCD monitor after shooting shooting B B FRAME NO FRAME NO Choose how files are named G G OPERATIONVOL OPERATIONVOL Adjust the volume of the sounds produced when camera con Adjust the volume of the sounds produced when camer...

Page 22: ...p MOVIE ZOOMTYPE MOVIE ZOOMTYPE Choose the zoom type when recording movies Choose the zoom type when recording movies t t SAVE ORIGINAL SAVE ORIGINAL IMAGE IMAGE Choose ON to save unprocessed copies of pictures taken using B RED EYE REMOVAL j PRO LOW LIGHT or k D RANGE PRIORITY m m AUTOROTATE PB AUTOROTATE PB XP150 XP160 Only XP150 XP160 Only Choose ON to automatically rotate tall portrait orienta...

Page 23: ... sur Si vous laissez l appareil photo sur le sable sa température risque de le sable sa température risque de dépasser les limites de fonctionnement dépasser les limites de fonctionnement Le sable peut également s infiltrer dans Le sable peut également s infiltrer dans le haut parleur ou le microphone le haut parleur ou le microphone Q Q Les crèmes et laits solaires ou toute Les crèmes et laits so...

Page 24: ...ontact avec votre revendeur FUJIFILM Neposezpasl appareilphotosurunplaninstable L ap pareil photo pourrait tomber ou se renverser et provoquer des blessures N essayezjamaisdeprendredesphotosquandvous bougez N utilisez pas l appareil photo pendant que vous marchez ou que vous conduisez Vous pourriez tomber ou être impliqué dans un accident de la circulation Pendantlesorages netouchezaucunepièceméta...

Page 25: ... pas dans un endroit exposé à des températures extrêmes Précautions Manipulation de la batterie Utilisez uniquement les chargeurs préconisés N exposez pas la batterie à l eau Gardez les bornes toujours propres Il se peut que la batterie et le boîtier de l appareil photo soient chauds au toucher après une utilisation prolongée Ceci est normal Il est recom mandé de recourir à un adaptateur secteur e...

Page 26: ... CC avec tores de ferrite tels que préconisés par Fujifilm Àl attentiondesclientsrésidantauCanada Àl attentiondesclientsrésidantauCanada ATTENTION Cet appareil numérique de classe B est conforme à la norme canadienne ICES 003 INSTRUCTIONS IMPORTANTES RELATIVES À LA SÉCURITÉ Veuillez lire ces instructions Veuillez conserver ces instructions Veuillez tenir compte de tous les avertissements Veuillez s...

Page 27: ...u sur son emballage indique que l appareil ne doit pas être traité comme un déchet ménager Il doit être acheminé vers un point de collecte qui recycle le matériel électrique et électronique En vous assurant de la bonne élimination de ce produit vous contribuerez à éviter des conséquences préjudiciables pour l environnement et la santé de l homme qui peuvent être provoquées par l élimina tion inapp...

Page 28: ...ssoires fournis 1 Recharge de la batterie 1 Insertion des batteries piles et d une carte mémoire 2 Mise sous tension de l appareil photo 2 Prise de vue 3 Visualisation des photos 4 Suppression de photos 4 Détection des pannes 4 Vidéos Vidéos Enregistrement de vidéos 5 Visualisation des vidéos 7 Référence Référence Parties de l appareil photo 8 Options de prise de vue de lecture et de configuration...

Page 29: ...mées cartes mémoire dans ce manuel Recharge de la batterie Recharge de la batterie La batterie n est pas chargée lors de l expédition Chargez la avant toute utilisation 1 Fixez la fiche intermédiaire comme illustré ci dessous en veillant à ce qu elle soit insérée entièrement et à ce qu elle s emboîte dans les bornes du chargeur Q La fiche intermédiaire est conçue exclusive ment pour le chargeur de b...

Page 30: ...age de sécurité e Q Ne forcez pas trop lorsque vous manipulez le couvercle du compartiment de la batterie Mise sous tension de l appareil photo Mise sous tension de l appareil photo Appuyez sur la touche ON OFF pour allumer l appareil photo Pour éteindre l appareil photo appuyez à nouveau sur la touche ON OFF Sélection de la langue Réglage de l horloge de l appareil photo Sélection de la langue Ré...

Page 31: ...ppareil photo ajuste la mise au point en continu et tente de détecter des visages ce qui augmente la consommation d énergie Prise de vue Prise de vue Cette section décrit comment prendre des photos en mode Q reconnaissance scène 1 Allumez l appareil photo 2 Utilisez la commande de zoom pour cadrer la photo sur l écran Indicateur de zoom Zoom arrière GRAND ANGLE Zoom avant TÉLÉOBJECTIF 3 Appuyez su...

Page 32: ...encheur Détection des pannes Détection des pannes Problème Problème Solution Solution L appareil photo ne L appareil photo ne s allume pas s allume pas La batterie est déchargée La batterie est déchargée Rechargez la batterie ou insérez une batterie de rechange entièrement chargée Rechargez la batterie ou insérez une batterie de rechange entièrement chargée La batterie n est pas insérée correcteme...

Page 33: ...rête automatiquement lorsque la vidéo a atteint sa durée maximale ou lorsque la mémoire est pleine R Vous pouvez ajuster le zoom pendant l enregistrement Il est possible de choisir le type de zoom avec l option p TYPE ZOOM FILM du menu configuration R La mise au point l exposition et la balance des blancs sont ajustées automatiquement pendant l enregistrement il est possible de choisir le mode de ...

Page 34: ... appareil photo augmente si ce dernier est utilisé pour enregistrer des vidéos pendant une période prolongée ou si la température ambiante est élevée Ceci est normal et ne traduit pas un dysfonctionnement Tailled imagepourlesvidéos Tailled imagepourlesvidéos Avant de commencer l enregistrement sélectionnez une taille d image à l aide de l option W MODE VIDEO du menu prise de vue Option Option Desc...

Page 35: ... vidéo sera effacée si vous appuyez sur la touche de sélection supérieure Régler la Régler la vitesse vitesse Appuyez sur la touche de sélection gauche ou droite pour régler la vitesse de lecture pendant la lecture Régler le Régler le volume volume Appuyez sur MENU OK pour faire une pause pendant la lecture et afficher les commandes du volume Appuyez sur la touche de sélection supérieure ou inféri...

Page 36: ...n droite Touche N flash Touche de sélection gauche Touche F macro Touche de sélection inférieure Touche h retardateur Touche DISP affichage BACK Touche a lecture Microphone P 5 Haut parleur P 7 Touche a Visualisez les photos P4 Touche DISP BACK Affichez ou masquez les indicateurs ou annulez l opération en cours Maintenez enfoncé pour désactiver le haut parleur et le flash dans les situations où ce...

Page 37: ...o Macro Réalisez des gros plans de petits objets Appuyez sur la touche de sélection gauche F F OFF h h Retardateur Retardateur Réduit l effet bougé et permet les autoportraits Appuyez sur la touche de sélection inférieure h T a a g g S R N N Flash Flash Utilisez le flash pour un éclairage supplémentaire Appuyez sur la touche de sélection droite N AUTO K N L O M P d d Correction de l exposition Cor...

Page 38: ... photos en noir et blanc D D BALANCE DES BLANCS BALANCE DES BLANCS Ajustez les couleurs pour contrebalancer l eff et de diff érentes Ajustez les couleurs pour contrebalancer l eff et de diff érentes sources lumineuses colorées sources lumineuses colorées R R CONTINU CONTINU Restituez le mouvement en prenant une série de photos b b DETECTION SUJET DETECTION SUJET Choisissez si l appareil photo déte...

Page 39: ... surYouTube ou Facebook avec MyFinePix Studio Windows uniquement I I DIAPORAMA DIAPORAMA Visionnez les photos sous forme de diaporama automatisé B B REDUC YEUX ROUGE REDUC YEUX ROUGE Supprimez l effet yeux rouges des photos prises avec la fonction de détection des visages D D PROTEGER PROTEGER Cette option permet de protéger les photos contre toute suppression accidentelle G G RECADRER RECADRER Cr...

Page 40: ...o o MODE SILENCE MODE SILENCE Choisissez OUI pour désactiver le haut parleur et le flash dans les situations où ceux ci ne sont pas désirables R R INITIALISER INITIALISER Réinitialisez les réglages sur leurs valeurs par défaut K K FORMATAGE FORMATAGE Formatez la carte mémoire ou la mémoire interne A A IMAGE IMAGE Choisissez la durée d affichage des photos sur l écran LCD après la prise de vue B B ...

Page 41: ...UC YEUX ROUGE Réduisez l effet yeux rouges D D ZOOM NUM ZOOM NUM Activez ou désactivez le zoom numérique p p TYPE ZOOM FILM TYPE ZOOM FILM Choisissez le type de zoom utilisé lors de l enregistrement vidéo t t SAUVEGARDER PHOTO SAUVEGARDER PHOTO D ORG D ORG Choisissez OUI pour sauvegarder des copies non traitées des photos prises avec B REDUC YEUX ROUGE j BASSE LUM PRO ou k PRIORITE PLAGE D m m REG...

Page 42: ...r le sa Si vous laissez l appareil photo sur le sa ble sa température risque de dépasser ble sa température risque de dépasser les limites de fonctionnement Le sable les limites de fonctionnement Le sable peut également s infiltrer dans le haut peut également s infiltrer dans le haut parleur ou le microphone parleur ou le microphone Q Q Les crèmes et laits solaires ou toute au Les crèmes et laits ...

Page 43: ...lo hiciera podría producirse una descarga eléctrica debido a la corriente inducida por los relámpagos Uselapilaúnicamentedelaformaespecificada Coloque la pila tal y como muestra el indicador Nosometalapilaafuentesdecalor modificacionesnila desmantele Nosometalapilaafuertesimpactos nilatire contraelsuelo Noalmacenelapilajuntoaobjetosmetálicos Cualquiera de estas acciones pueden hacer que la pila se...

Page 44: ...jetos metálicos como por ejemplo collares u horquillas del pelo No la exponga a llamas o fuentes de calor Desecho Desecho Deshágase de las pilas usadas en conformidad con las normativas locales Antes de desechar la cámara incluyendo las pilas o acumuladores póngase en contacto con las autoridades responsables de la gestión de desechos para obtener información sobre la forma de desecho correcta Cri...

Page 45: ...uier cambio o modificación que no haya sido expresamente autorizado en este manual podría anular la autoridad del usuario para manejar el equipo Notas sobre la concesión Para cumplir con la Parte 15 de las normas FCC este producto debe utilizarse con un cable de A V de núcleo de ferrita especificado por Fujifilm un cable USB y un cable de suministro de CC ParalosclientesenCanadá ParalosclientesenCana...

Page 46: ...oseléctricosyelectrónicosen elhogar elhogar En la Unión Europea Noruega Islandia y Liechtenstein Este símbolo en el pro ducto o en el manual y en la garantía y o en su envoltura indica que este producto no deberá ser tratado como residuo doméstico Por el contrario deberá llevarlo al punto de recolección aplicable para el reciclado del equipo electrónico y eléctrico Al asegurarse de que este produc...

Page 47: ...rimeros pasos Accesorios suministrados 1 Carga de la pila 1 Inserción de las pilas y de una tarjeta de memoria 2 Encender la cámara 2 Toma de imágenes 3 Visualización de imágenes 4 Borrar imágenes 4 Resolución de problemas 4 Vídeos Vídeos Grabación de vídeos 5 Visualización de los vídeos 7 Referencia Referencia Partes de la cámara 8 Opciones de disparo reproducción y configuración 9 ...

Page 48: ...ridas en este manual como tarjetas de memoria Carga de la pila Carga de la pila La pila no sale de fábrica cargada Cargue la pila antes de utilizarla 1 Coloque el adaptador de clavija tal y como se muestra debajo asegurándose de que esté completamente insertado y encaje en su lugar sobre los terminales del cargador Q El adaptador de clavija es para uso exclusivo con el cargador de pila suministrad...

Page 49: ...utilice fuerza 4 Cierre y bloquee la tapa del compar timento de la pila Cierre la cubierta q y luego cierre la pestaña de bloqueo w y el cierre de seguridad e Q No utilice fuerza excesiva al manipular la tapa del compartimiento de las pilas Encender la cámara Encender la cámara Pulse el botón ON OFF para encender la cámara Podrá apagar la cámara pulsando de nuevo el botón ON OFF Selección del idio...

Page 50: ... el monitor para indicar que la cámara está ajustando continuamente el enfoque y buscando rostros aumentando el desgaste de la pila Toma de imágenes Toma de imágenes En esta sección se explica cómo tomar fotografías en el modo Q reconocim escena 1 Encienda la cámara 2 Utilice el control de zoom para encuadrar la imagen en la pantalla Indicador de zoom Alejar zoom AMPLIO Acercar zoom TELE 3 Pulse e...

Page 51: ...se el disparador Resolución de problemas Resolución de problemas Problema Problema Solución Solución La cámara no se enciende La cámara no se enciende La pila está agotada La pila está agotada Cargue la pila o inserte una pila de repuesto completamente cargada Cargue la pila o inserte una pila de repuesto completamente cargada No ha colocado la pila correctamente No ha colocado la pila correctamen...

Page 52: ...n t La grabación termina automáticamente cuando el vídeo alcanza la duración máxima o cuando la memoria está llena R Mientras la grabación está en curso puede ajustar el zoom Podrá seleccionar el tipo de zoom utilizando la opción p ZOOM PELÍCULA del menú de configuración R El enfoque la exposición y el balance de blancos se ajustan automáticamente durante la grabación el modo de enfoque puede sele...

Page 53: ... de la cámara podría aumentar si se utiliza para grabar vídeos durante largos períodos de tiempo o si la temperatura ambiente es alta Esto es normal y no indica mal funcionamiento Tamañodelfotogramadevídeo Tamañodelfotogramadevídeo Antes de grabar seleccione el tamaño del fotograma utilizando la opción W MODO VÍDEO en el menú de disparo Opción Opción Descripción Descripción i1920 1920 1080 HD tota...

Page 54: ...a sin que esté reproduciendo un vídeo se borrará el vídeo Ajuste de Ajuste de velocidad velocidad Pulse el selector hacia la izquierda o derecha para ajustar la veloci dad de reproducción durante la reproducción Ajustar el Ajustar el volumen volumen Pulse MENU OK para hacer una pausa en la reproducción y visualizar los controles de volumen Pulse el selector hacia arriba o hacia abajo para ajustar ...

Page 55: ...or hacia la izquierda Botón F macro Cursor hacia abajo Botón h autodisparador Botón DISP mostrar BACK ATRÁS Botón a reproducción Micrófono P 5 Altavoz P 7 Botón a Visualiza imágenes P4 Botón DISP BACK Visualiza u oculta indicadores o cancela la operación actual Manténgalo pulsado para deshabilitar el altavoz y el flash en aquellas situa ciones en las que no sea oportuno que la cámara emita luces y...

Page 56: ...ia la izquierda F F OFF h h Autodisparador Autodisparador Se usa para reducir efectos borrosos y permitir al Se usa para reducir efectos borrosos y permitir al fotógrafo aparecer en la imagen fotógrafo aparecer en la imagen Pulse el selector hacia abajo h T a a g g S R N N Flash Flash Usa el flash para obtener iluminación adicional Usa el flash para obtener iluminación adicional Pulse el selector ...

Page 57: ...ntraste y la saturación del color o toma fotografías en blanco y negro en blanco y negro D D EQUILIBRIO BLANCO EQUILIBRIO BLANCO Ajuste los colores para compensar las diferentes fuentes de la Ajuste los colores para compensar las diferentes fuentes de la luz coloreada luz coloreada R R CONTINUO CONTINUO Capture el movimiento en una secuencia de imágenes b b DETECCIÓN DE DETECCIÓN DE ROSTROS ROSTRO...

Page 58: ...indows I I PROYECCIÓN PROYECCIÓN Permite ver las imágenes en una presentación automática B B SUPR OJ0S ROJOS SUPR OJ0S ROJOS Elimina los ojos rojos de imágenes realizadas con la Detección Elimina los ojos rojos de imágenes realizadas con la Detección Inteligente de rostros Inteligente de rostros D D PROTEGER PROTEGER Permite proteger imágenes contra el borrado accidental Permite proteger imágenes ...

Page 59: ...MATEAR FORMATEAR Formatear la tarjeta de memoria o la memoria interna Formatear la tarjeta de memoria o la memoria interna A A MOSTRAR FOTO MOSTRAR FOTO Permite especificar durante cuánto tiempo se deben mostrar Permite especificar durante cuánto tiempo se deben mostrar las fotografías en el monitor LCD después de tomarlas las fotografías en el monitor LCD después de tomarlas B B CONTADOR CONTADOR...

Page 60: ...tar o deshabilitar el zoom digital p p ZOOM PELÍCULA ZOOM PELÍCULA Elija el tipo de zoom al grabar vídeos Elija el tipo de zoom al grabar vídeos t t GUARDAR FOTO GUARDAR FOTO ORIGINAL ORIGINAL Seleccione SÍ para guardar copias no procesadas de imáge nes realizadas utilizando B SUPR OJOS ROJOS j LUZ BAJA PRO o k RANGO DINÁMICO m m VIS GIRO AUTO VIS GIRO AUTO únicamente XP150 XP160 únicamente XP150 ...

Page 61: ...M 1 Memo Memo ...

Page 62: ...M 2 Memo Memo ...

Page 63: ...film com my R TEL 603 55698388 camera fujifilm com my Mongol Tavan Bogd Group Mongolia S R TEL 976 99052517 or 976 91118833 batkhuyag tavanbogd com or gantsolmon tavanbogd com Myanmar Indobest Co Ltd S R TEL 95 1 577996 indobest myanmar com mm Pakistan Fujifilm Pakistan Pvt Ltd S finepix fujifilm com pk R TEL 92 42 7237704 6 finepix fujifilm com pk Philippines YKL COLOR INC S TEL 632 7436601 06 di...

Page 64: ...4 2222 kamol jelcorp com MIDDLE EAST Iran Tehran Fuka Co S R TEL 98 21 22254810 fuka neda net Israel Shimone Group Ltd S TEL 972 3 9250666 digital fujifilm co il R TEL 972 3 9250683 khaim shimone com haimy shimone com Jordan Grand Stores Al swaifieh Anman Jordan S R TEL 009626 5829157 Digital grandstoresjo com Kuwait Boushahri GroupW L L S R TEL 965 18855 photo boushahrigroup com Lebanon Fototek S...

Page 65: ...FujiFilm Italia S p a S R TEL 39 02 33490345 online fujifilm it Kazakhstan JEL Corporation S R TEL 7 727 264 2222 kamol jelcorp com Kyrgyzstan JEL Corporation S R TEL 7 727 264 2222 kamol jelcorp com Lithuania Fujifilm Lithuania S R TEL 370 5 2133017 info fujifilm lt Malta Ciancio 1913 Co Ltd S R TEL 356 21 480500 info fujifilm com mt http www fujifilm com mt Norway Fujifilm Norge AS S TEL 0047 02...

Page 66: ...00 800 3854 digitalinfo fujifilm com R TEL 800 659 3854 CENTRAL AND SOUTH AMERICA Argentina Imagen e informacion S A S R TEL54 11 4737 1030 servtec imageneinformacion com ar Bolivia Reifschneider Bolivia Ltda S R TEL 591 33 441129 info reifschneider com bo Brazil FUJIFILM do Brasil Ltda S R TEL 0800 7706627 camarasdigitais fujifilm com br Chile Reifschneider SA S R TEL 56 2 6781111 adobson reifsch...

Page 67: ...ment into an outlet on a circuit different from that to which the receiver is connected Consult the dealer or an experienced radio TV technician for help CAUTION Any changes or modifications not expressly approved by the party responsible for compliance could void the user s authority to operate the equipment This device complies with Part 15 of the FCC Rules Operation is subject to the following ...

Page 68: ...stry Canada IC Cet appareil numérique de classe B est conforme aux normes canadiennes ICES 003 et RSS 210 Son fonctionnement est soumis aux deux conditions suivantes 1 cet appareil ne doit pas causer d interférence et 2 cet appareil doit accepter toute interférence notamment les interférences qui peuvent affecter son fonctionnement Informations concernant l exposition aux fréquences radio RF La pu...

Page 69: ...are Be sure that you have read and understood its contents and the warnings in ForYour Safety Pii before us ing the camera For information on related products visit our website at http www fujifilm com products digital_cameras index html EN BeforeYou Begin First Steps Basic Photography and Playback More on Photography More on Playback Movies Connections Menus Technical Notes Troubleshooting Append...

Page 70: ...s can result in a risk of fire or electric shock Ventilation Slots and openings in the cabinet are provided for ventilation to ensure reliable operation of the video product and to pro tect it from overheating and these openings must not be blocked or covered The open ings should never be blocked by placing the video product on a bed sofa rug or other similar surface This video product should not b...

Page 71: ...waterproof products Lightning For added protection for this video product receiver during a lightning storm or when it is left unattended and unused for long periods of time unplug it from the wall outlet and disconnect the antenna or cable system This will prevent damage to the video product due to lightning and power line surges Service Service Servicing Do not attempt to service this video prod...

Page 72: ...shower excluding water proofproducts This can cause a fire or electric shock Donot disassemble Never attempt to change or take apart the camera never open the case Failure to observe this precaution can cause fire or electric shock Donottouch internalparts Should the case break open as the result of a fall or other accident do not touch the exposed parts Failure to observe this precau tion could res...

Page 73: ...ty or dust excluding waterproof products This can cause a fire or elec tric shock Donotleavethiscamerainplacessubjecttoextremelyhightemper atures Do not leave the camera in locations such as a sealed vehicle or in direct sunlight This can cause a fire CAUTION CAUTION Keep out of the reach of small children This product could cause injury in the hands of a child Do not place heavy objects on the came...

Page 74: ... touch imme diately after charging or use This is normal Battery Life At normal temperatures the battery can be recharged about 300 times A noticeable de crease in the length of time the battery will hold a charge indicates that it has reached the end of its service life and should be re placed Storage Performance may be impaired if the battery is left unused for extended periods when fully charge...

Page 75: ... battery charger Q CAUTION Do not use the discharge option with alkaline batteries The camera draws a small amount of current even when off Ni MH batteries that have been left in the camera for an extended pe riod may be drawn down to the point that they no longer hold a charge Battery perfor mance may also drop if the batteries are run down in a device such as a flashlight Use the discharge option ...

Page 76: ...nse your mouth thoroughly with water Drink large quantities of water and induce vomiting then seek medical assistance Although the display is manufactured using extremely high precision technology it may contain pixels that are always lit or that do not light This is not a malfunction and images re corded with the product are unaffected TrademarkInformation TrademarkInformation xD Picture Card and ...

Page 77: ...es representations or war ranties of any kind express or implied arising by law or otherwise including but not limited to content quality accuracy completeness effectiveness reliability fitness for a particular purpose usefulness use or results to be obtained from this Data or that the Data or server will be uninterrupted or error free Disclaimer of Warranty FUJIFILM Corporation AND ITS LICENSORS IN...

Page 78: ...ajesty the Queen in Right of Canada Queen s Printer for Ontario Canada Post Corporation GeoBase Department of Natural Resources Canada ZIP 4 United States Postal Service 2010 the USPS Australia Copyright Based on data provided under license from PSMA Australia Limited www psma com au Austria Bundesamt für Eich und Vermes sungswesen Croatia Cyprus Estonia Latvia Lithuania Moldova Poland Slovenia an...

Page 79: ...ith the Data provided to you hereunder Government End Users If the Data is being acquired by or on behalf of the United States government or any other entity seeking or apply ing rights similar to those customarily claimed by the United States government this Data is a commercial item as that term is defined at 48 C F R FAR 2 101 is licensed in accordance with these End User Terms and each copy of ...

Page 80: ...le of Contents gives an overview of the entire manual The principal camera operations are list ed here Having a specific problem with the camera Find the answer here WarningMessagesandDisplays WarningMessagesandDisplays P P110 110 Find out what s behind that flashing icon or error message in the display Memory Cards Memory Cards Pictures can be stored in the camera s internal memory or on optional...

Page 81: ...yback Taking Pictures During Playback y To return instantly to shooting mode press the shutter button halfway View Shoot Silent Mode Silent Mode y Press and hold the DISP BACK button to disable camera lights and sounds Turning the Camera on in Turning the Camera on in Playback Mode Playback Mode y When the camera is off playback can be started by pressing the a button for about a second ...

Page 82: ...the camera could cause malfunction Q Do not open or close the battery chamber with wet hands or near water for example while on or by a body of water Q Be sure the camera is completely dry before inserting or removing batteries or memory cards or connecting the USB or A V cable Q The camera does not float Be sure to attach the strap and keep it around your wrist when using the camera During Use Du...

Page 83: ...latch the battery chamber cover and soak the camera in fresh water for about ten minutes Dry the camera thoroughly after removing it from the water Storage and Maintenance Storage and Maintenance Q Do not store at temperatures below 0 C 32 F or above 40 C 104 F Q To ensure continued water resistance it is recommended that you have the water resistant seal replaced about once a year a fee is charge...

Page 84: ...y and Playback Taking Pictures in Q Scene Recognition Mode 19 Viewing Pictures 23 More on Photography More on Photography Shooting Mode 24 Choosing a Shooting Mode 24 Shooting Mode Options 25 j PRO LOW LIGHT 27 k D RANGE PRIORITY 28 r MOTION PANORAMA 360 29 Recording GPS Data with Pictures Only XP150 160 31 The GPS Menu 32 GPSTracking 34 b Intelligent Face Detection 36 Focus Lock 37 d Exposure Com...

Page 85: ...o 67 Macintosh Installing FinePixViewer 69 Connecting the Camera 71 Menus Menus Using the Menus Shooting Mode 74 Using the Shooting Menu 74 Shooting Menu Options 74 ASHOOTING MODE 74 NISO 74 OIMAGE SIZE 75 TIMAGE QUALITY 76 PFINEPIX COLOR 76 DWHITE BALANCE 77 RCONTINUOUS 78 bFACE DETECTION 78 FAF MODE 79 F MOVIE AF MODE 79 W MOVIE MODE 79 qLED ILLUMINATOR 80 Using the Menus Playback Mode 81 Using ...

Page 86: ...7 m AUTOROTATE PB XP150 XP160 Only 97 cGUIDANCE DISPLAY 97 QVIDEO SYSTEM 97 UDATE STAMP 98 R DEMONSTRATION XP150 XP160 Only 98 Technical Notes Technical Notes Optional Accessories 99 Accessories from FUJIFILM 100 Caring for the Camera 101 Storage and Use 101 Condensation 101 Cleaning 102 Traveling 102 Troubleshooting Troubleshooting Problems and Solutions 103 Warning Messages and Displays 110 Appe...

Page 87: ...which related information may be found Menus and other text in the LCD monitor are shown in bold In the illustra tions in this manual displays may be simplified for explanatory purposes Supplied Accessories Supplied Accessories The following items are included with the camera NP 50Arecharge ablebattery BC 50A battery charger Plug adapter USB cable CD ROM contains this manual Strap User Guide Attac...

Page 88: ...cursor down h self timer button P43 MENU OK button Move cursor right N flash button P41 Move cursor up d exposure compensation button P39 b delete button Pxiii Move cursor left F macro button P40 The illustrations in this manual have been simplified for explanatory purposes The illustrations in this manual have been simplified for explanatory purposes ...

Page 89: ...ount 20 Battery chamber 9 21 USB multi connector 63 71 22 Memory card slot 11 23 Micro HDMI connector 62 24 Battery latch 10 13 Press and hold the DISP BACK button until o is displayed The Indicator Lamp The Indicator Lamp The indicator lamp shows camera status as follows Indicator lamp Indicator lamp Camera status Camera status Glows green Glows green Focus locked Blinks green Blinks green Blur f...

Page 90: ...warning 111 13 FINEPIX color 76 14 White balance 77 15 Battery level 5 16 Dual IS mode 95 17 GPS signal strength XP150 XP160 only 31 18 Exposure compensation 39 19 Date and time 18 20 Blur warning 42 110 21 Focus warning 21 110 22 Self timer indicator 43 23 Macro close up mode 40 24 Flash mode 41 1 Shooting mode 24 2 Intelligent Face Detection indicator 36 3 Continuous shooting mode 78 4 Silent mo...

Page 91: ... 82 6 Gift image 44 7 Frame number 93 8 GPS data XP150 XP160 only 52 9 Silent mode indicator 3 91 10 Mark for upload to 84 11 Photobook assist 49 12 Favorites 44 13 DPOF print indicator 65 14 Protected image 86 Battery Level Battery Level Battery level is shown as follows Indicator Indicator Description Description D white Battery partially discharged C white Battery more than half discharged B re...

Page 92: ...rs hidden best framing HD framing GPS infomation XP150 XP160 only P32 Playback Indicators displayed indicators hidden Ifavorites GPS information XP150 XP160 only P52 The The m m Brightness Button XP100 XP110 Only Brightness Button XP100 XP110 Only Press the m button to temporarily increase monitor brightness when shooting outdoors or in bright ambi ent light Normal brightness is restored when a pi...

Page 93: ... is fully inserted and clicks into place on the charger terminals Q The plug adapter is exclusively for use with the supplied battery charger Do not use it with other devices Battery charger Plug adapter 2 Place the battery in the supplied battery charger Insert the battery in the orien tation indicated by the DFC labels The camera uses an NP 50A re chargeable battery DFC label Charge lamp Battery...

Page 94: ...tery not inserted Insert the battery Insert the battery On green On green Battery fully charged Battery fully charged Remove the battery Remove the battery On orange On orange Battery charging Battery charging Blinks orange Blinks orange Battery fault Battery fault Unplug the charger and remove the battery Unplug the charger and remove the battery 4 Charge the battery Remove the battery when charg...

Page 95: ...bed below 1 Open the battery chamber cover Release the latch q and safety lock w and open the battery chamber cover e R Be sure the camera is off before opening the battery chamber cover Q Do not open the battery chamber cover when the camera is on Failure to observe this pre caution could result in damage to image files or memory cards Q Do not use excessive force when handling the battery chambe...

Page 96: ...n shown by the label inside the battery chamber keeping the battery latch pressed to one side Confirm that the battery is securely latched Q Insert the battery in the correct orientation Do NOT use force or attempt to insert the bat tery upside down or backwards The battery will slide in easily in the correct orientation Label Battery latch ...

Page 97: ...do not insert at an angle or use force If the mem ory card is not correctly inserted or no mem ory card is inserted a will appear in the LCD monitor and internal memory will be used for recording and playback Click Q SD SDHC SDXC memory cards can be locked making it impossible to format the card or to record or delete images Before inserting an SD SDHC SDXC memory card slide the write protect swit...

Page 98: ...s Q When closing the battery chamber cover do not subject it to excessive horizontal forces Failure to observe this precaution could cause the water resistant seal to be come misaligned allowing water into the camera ConfirmingThat the Cover Is Latched ConfirmingThat the Cover Is Latched Make sure that the strap is not caught in the cover and that both the latch and safety lock are closed Correct ...

Page 99: ...off and open the battery chamber cover To remove the battery press the battery latch to the side and slide the battery out of the camera as shown Battery latch To remove the memory card press it in and release it slowly The card can then be removed by hand When a memory card is removed the card could come out of the slot too quickly Use your finger to hold it and gently release the card ...

Page 100: ...uld damage the card Format SD SDHC SDXC memory cards before first use and be sure to reformat all memory cards after using them in a computer or other device For more information on formatting memory cards see KFORMAT P92 Memory cards are small and can be swallowed keep out of reach of children If a child swallows a memory card seek medical assistance immediately miniSD or microSD adapters that ar...

Page 101: ...ame the copies not the originals Q Q Batteries Batteries Remove dirt from the battery terminals with a clean dry cloth Failure to observe this precaution could prevent the battery from charging Do not affix stickers or other objects to the battery Failure to observe this precaution could make it impossible to remove the battery from the camera Do not short the battery terminals The battery could o...

Page 102: ...k Mode Press the a button to start playback Press the shutter button halfway to return to shooting mode PlaybackMode PlaybackMode To turn the camera on and begin playback press the a button for about a second Press the a button again or press the ON OFF button to turn the camera off R R Switching to Shooting Mode Switching to Shooting Mode To exit to shooting mode press the shut ter button halfway...

Page 103: ...ep the glass clean Q The ON OFF button does not completely end the supply of power to the camera R R Auto Power Off Auto Power Off The camera will turn off automatically if no operations are performed for the length of time selected for MAUTO POWER OFF P95 To turn the camera on use the ON OFF button or press the a button for about a second ...

Page 104: ...mera is turned on START MENU ENGLISH NO SET DEUTSCH FRANCAIS ESPAÑOL PORTUGUÊS 2 The date and time will be displayed Press the selector left or right to highlight the year month day hour or minute and press up or down to change To change the order in which the year month and day are displayed highlight the date format and press the selector up or down Press MENU OK when settings are complete R R T...

Page 105: ...a on Press the ON OFF button to turn the camera on Q shooting indicators will be displayed The The g g Icon Icon This icon indicates that the camera continuously searches for faces to select the appropriate scene increasing the drain on the battery The Scene Icon The Scene Icon The camera selects the scene according to shooting conditions and the type of subject bPORTRAIT portraits c LANDSCAPE lan...

Page 106: ...out Zoom in Zoom indicator Holding the Camera Holding the Camera Hold the camera steady with both hands and brace your elbows against your sides Shaking or unsteady hands can blur your shots To prevent pictures that are out of focus or too dark under exposed keep your fingers and other objects away from the flash and from the protective glass covering the lens ...

Page 107: ...e lens may make a noise when the camera focuses this is normal If the camera is able to focus it will beep twice and the in dicator lamp will glow green If the camera is unable to focus the focus frame will turn red s will be dis played and the indicator lamp will blink green Change the composition or use focus lock P37 Double beep ...

Page 108: ...the subject is poorly lit the flash may fire when the pic ture is taken For information on using the flash when lighting is poor see N Using the Flash Intelligent Flash P41 The Shutter Button The Shutter Button The shutter button has two positions Pressing the shutter button halfway sets focus and exposure to shoot press the shutter button the rest of the way down Click ...

Page 109: ...king important photo graphs take a test shot and check the results 1 Press the a button The most recent picture will be displayed 2 View additional pictures Press the selector right to view pictures in the order recorded left to view pictures in reverse order Press the shutter button halfway to exit to shoot ing mode ...

Page 110: ...hoosingaShootingMode 1 Press MENU OK to display the shooting menu 2 Highlight ASHOOTING MODE and press the selector right to display shooting mode options SET SHOOTING MENU EXIT SHOOTING MODE 3 Highlight the desired mode and press MENU OK QSCENE RECOGNITION CANCEL SET Selects optimum camera settings for certain modes 4 Press DISP BACK to exit to shooting mode ...

Page 111: ...PRIORITY D RANGE PRIORITY Choose when photographing high contrast scenes The camera varies exposure over a series of shots and blends the results to preserve details in highlights and shadows P28 C C NATURAL NATURAL N N The camera takes two shots one without the flash and one with D D NATURAL LIGHT NATURAL LIGHT Capture natural lighting under low light conditions L L PORTRAIT PORTRAIT Choose for p...

Page 112: ...s domi nated by shining white snow S S BEACH BEACH Choose for crisp clear shots that capture the brightness of sunlit beaches F F UNDERWATER UNDERWATER Choose for underwater photography t t UNDERWATER UNDERWATER WIDE WIDE Choose for wide angle underwater shots that include more of the back ground behind the main subject s s UNDERWATER UNDERWATER MACRO MACRO Choose for underwater close ups of small...

Page 113: ...om ratios R A single combined photograph may not be created with some scenes or if the subject or camera moves during shooting Do not move the camera until shooting is complete PRO LOW LIGHT PRO LOW LIGHT To save unprocessed copies of pictures taken in this mode select ON for the t SAVE ORIGINAL IMAGE option in the setup menu P97 Q Keep the camera steady during shooting Q Frame coverage is reduced...

Page 114: ...s Press the selector left or right to choose the exposure range before shooting R A single combined photograph may not be created with some scenes or if the subject or camera moves during shooting Do not move the camera until shooting is complete D RANGE PRIORITY D RANGE PRIORITY To save unprocessed copies of pictures taken in this mode select ON for the t SAVE ORIGINAL IMAGE option in the setup m...

Page 115: ...K 2 Press the selector right to view a choice of pan directions Press the selec tor left or right to highlight a pan direction and press MENU OK 3 Press the shutter button all the way down to start recording There is no need to keep the shutter button pressed during recording 4 Pan the camera in the direction shown by the arrow Shooting ends automatically when the progress bar is full and the pano...

Page 116: ...her than that shown cancels shooting Q The desired results may not be achieved with moving subjects subjects close to the camera unvarying subjects such as the sky or a field of grass subjects that are in constant motion such as waves and waterfalls or subjects that undergo marked changes in brightness Panoramas may be blurred if the subject is poorly lit For Best Results For Best Results For best...

Page 117: ... UWHENSWITCHEDON The camera updates GPS data only when on The cam era may need some time to acquire GPS data when turned on This option is selected automatically at battery levels of B and below R GPS works best outdoors under clear skies During shooting GPS data are displayed in the monitor as shown at right Signal strength is indicated by the number of bars O is displayed when the camera is sear...

Page 118: ...urn the GPS receiver on or off P31 TRACKING DATA TRACKING DATA Record GPS data P34 MY LANDMARK REGISTER MY LANDMARK REGISTER Add custom landmarks to or delete them from the map database AUTOTIME CORRECTION AUTOTIME CORRECTION Use GPS data to set the camera clock P35 LOCATION INFO LOCATION INFO Display GPS data P31 km mile km mile Choose the units used to display GPS information P54 Viewing GPS Dat...

Page 119: ...are current as of the date on which the map database was created P121 and will not be updated to reflect any changes after that date Q Place name data are unavailable in some countries and regions If no name is avail able the latitude and longitude will be displayed for a few seconds GPS GPS The camera may be unable to receive GPS data if the antenna P2 is obstructed or when underground underwater...

Page 120: ...p tion P53 Q See GPS P33 for information on using GPS Q The indicator lamp glows orange during recording GPS data even when the cam era is turned off while ON is selected Select OFF before removing the battery or memory card Failure to observe this precaution could damage the card Q Tracking ends after the camera has been off for 3 hours consecutively Q Signal strength will be displayed in yellow ...

Page 121: ...ting g g LOCAL LOCAL for for N N TIME DIFFERENCE TIME DIFFERENCE turns turns AUTO TIME CORRECTION AUTO TIME CORRECTION off Note off Note that GPS may not provide the correct time in some locations if necessary select that GPS may not provide the correct time in some locations if necessary select OFF OFF for for AUTO TIME CORRECTION AUTO TIME CORRECTION and set the clock using and set the clock usi...

Page 122: ... menu and select ON for bFACEDETECTION P78 Facescanbedetected with the camera in vertical or horizontal orientation if a face is detected it will be indicated by a green border If there is more than one face in the frame the camera will select the face closest to the center other faces are indicated by white borders Q In some modes the camera may set exposure for the frame as a whole rather than t...

Page 123: ... 1 Focus Position the subject in the focus frame U and press the shutter button halfway to lock focus and exposure Focus and exposure will remain locked while the shutter button is pressed halfway AF AE lock 2 Recompose Keep the button pressed halfway 3 Shoot Press the button all the way down ...

Page 124: ...r car bodies Fast moving subjects Subjects photographed through a window or other re flective object Darksubjectsandsubjectsthatabsorbratherthanreflect light such as hair or fur Insubstantial subjects such as smoke or flame Subjects that show little contrast with the background for example subjects in clothing that is the same color as the background Subjects positioned in front of or behind a hig...

Page 125: ... tion value and then press MENU OK Choose positive values to increase exposure Choose negative values to reduce exposure R A d icon and exposure indicator are displayed at settings other than 0 Exposure compensation is not reset when the camera is turned off to restore normal expo sure control choose a value of 0 R Turn the flash off when using exposure compensation R Exposure compensation is avai...

Page 126: ...ector left F and select F When macro mode is in effect the camera fo cuses on subjects near the center of the frame Use the zoom control to compose pictures P20 To exit macro mode press the selector left F and select H R Use of a tripod is recommended to prevent blur caused by camera shake OFF OFF ...

Page 127: ...when shooting at night or indoors under low light Press the selector right N and choose from the fol lowing flash modes P AUTO FLASH According to shooting conditions Option Option Description Description AUTO AUTO K K AUTO FLASH AUTO FLASH The flash fires when required Recommended in most situations N N L L FORCED FLASH FORCED FLASH The flash fires whenever a picture is taken Use for backlit subje...

Page 128: ...may fire several times with each shot Do not move the camera until shooting is complete R The flash may cause vignetting Red Eye Removal Red Eye Removal When Intelligent Face Detection P36 and red eye removal P86 are on red eye removal is available in auto K RED EYE REDUCTION flash on L FORCED FLASH and slow sync M RED EYE SLOW modes Red eye removal minimizes red eye caused when light from the fla...

Page 129: ...fore the picture is taken press DISP BACK DISP BACK g GROUPTIMER The camera will start the timer when it detects the selected number of portrait subjects Press the selector up to choose the number of subjects R R To stop the timer before the picture is taken press To stop the timer before the picture is taken press DISP BACK DISP BACK S 10 SEC The shutter is released ten seconds after the shutter ...

Page 130: ...order recorded left to view pictures in reverse order Keep the selector pressed to scroll rapidly to the desired frame R Pictures taken using other cameras are indicated by a m gift image icon during playback I IFavorites RatingPictures Favorites RatingPictures To rate the picture currently displayed in full frame playback press DISP BACK and press the selector up and down to select from zero to f...

Page 131: ...re is zoomed in the selector can be used to view areas of the image not currently visible in the display Navigation window shows portion of image currently displayed in LCD monitor Zoom indicator Press DISP BACK to exit zoom R The maximum zoom ratio varies with image size Playback zoom is not available with cropped or resized copies saved at a size of a or smaller ...

Page 132: ...revious and following images in the background Select W to increase the number of images displayed to two nine or one hundred T to view fewer images 100 0001 100 0001 When two or more images are displayed use the selector to highlight images and press MENU OK to view the highlighted image full frame In the nine and hundred frame displays use the selector to view more pictures ...

Page 133: ... are shown by u When the operation is com plete press DISP BACK to display a confirmation dialog then highlight OK and press MENU OK to delete the selected pictures ALL FRAMES ALL FRAMES A confirmation dialog will be displayed highlight OK and press MENU OK to de lete all unprotected pictures if a memory card is inserted only the pictures on the memory card will be affected the pictures in interna...

Page 134: ... the search conditions under BY FACE Search for faces from the face recognition database BY I FAVORITES Search by rating BY SCENE Search by scene BYTYPE OF DATA Find all still pictures all movies or edited pictures BY UPLOAD MARK Find all pictures selected for upload to a specified desti nation 2 Select a search condition Only pictures that match the search condition will be displayed To delete or...

Page 135: ...ected for photobooks 2 Scroll through the images and press the selector up to select or deselect To display the current image on the cover press the selector down Press MENU OK to exit when the book is complete R The first picture selected becomes the cover image Press the selector down to select a different image for the cover 3 Select COMPLETE PHOTOBOOK to select all photos or all photos match i...

Page 136: ...rough the pictures EditingandDeletingPhotobooks EditingandDeletingPhotobooks Display the photobook and press MENU OK The following options will be dis played select the desired option and follow the on screen instructions EDIT Edit the book as described in Creating a PhotoBook P49 ERASE Delete the book Photobooks Photobooks Photobooks can be copied to a computer using the supplied MyFinePix Studio...

Page 137: ...orama is displayed full frame the camera will play back the picture from left to right or from bottom to top To pause playback press the selector down press the selector down again to resume To exit to full frame playback press the selector up while panorama playback is in progress PLAY STOP PAUSE ...

Page 138: ...a J icon GPS data are shown for a few sec onds each time the picture is displayed GPS icon 100 0001 100 0001 MINATO TOKYO JAPAN Viewing GPS Data Viewing GPS Data To view the compass heading at the time the picture was taken press DISP BACK until GPS data appear in the monitor 100 0001 N 10 00 00 E 10 00 00 NE NE 10 00 AM 10 00 AM 12 31 2050 12 31 2050 ...

Page 139: ...button LOCATION SEARCH LOCATION SEARCH Turn the GPS receiver on or off P31 TRACKING DATA TRACKING DATA Record GPS data P34 DISPTRACKING DATA DISPTRACKING DATA View the GPS track P56 ERASETRACKING DATA ERASETRACKING DATA Delete the GPS track P57 PHOTO NAVIGATION PHOTO NAVIGATION View the approximate direction and distance to the location where cur rent the picture was taken P54 LOCATION INFO COPY L...

Page 140: ...units are indicated by those under 100 units by NE 100 m NE 100 m 100 0001 100 0001 MINATO TOKYO JAPAN R Photo navigation ends when the next picture is displayed Calibration Calibration A f icon indicates that the camera s internal sensor requires calibration Move the camera slowly in a large figure eight while rotating your wrist as shown on page 35 If the icon does not clear from the display cho...

Page 141: ...ce image for the GPS data and press MENU OK 3 Press the selector left or right to display the destination and press MENU OK to copy the data to the image Q Once copied the new GPS data can not be deleted and the original GPS data can not be recovered Note however that copying data from a picture with GPS data to a picture with GPS data will delete the original GPS data recorded with the des tinati...

Page 142: ...wn by a line with dots z representing the locations where photographs were taken Press the selector left or right to highlight a location the high lighted location is shown by V 100km E W 2 15 N S 2050 10 7 10 24 11 3 2051 1 3 10 00 AM DISP TRACKING DATA Select a location 4 Press MENU OK to view the photograph taken at the highlighted location Press the selector left or right to view additional ph...

Page 143: ...G DATA in the R menu 2 Press the selector up or down to highlight the desired track log and press MENU OK 100km E W 2 15 N S 10 00 AM 2050 2051 10 7 10 24 11 3 1 3 ERASE TRACKING DATA CANCEL YES Select a track log 3 A confirmation dialog will be displayed highlight OK and press MENU OK to delete the selected log R Images are not deleted when track logs are erased ...

Page 144: ...button again Recording ends automatically when the movie reaches maximum length or memory is full R Zoom can be adjusted while recording is in progress The type of zoom can be se lected using the p MOVIE ZOOM TYPE option in the setup menu P97 R Focus exposure and white balance are adjusted automatically throughout record ing the focus mode can be selected using the F MOVIE AF MODE option in the sh...

Page 145: ...e temperature of the camera may rise if it is used to record movies for an ex tended period or if the ambient temperature is high This is normal and does not indicate a malfunction MovieFrameSize MovieFrameSize Before recording select a frame size using the W MOVIE MODE option in the shooting menu P79 Option Option Description Description i1920 1920 1080 Full HD High Definition h1280 1280 720 High...

Page 146: ...yback is not in progress pressing the selector up will delete the movie Adjust speed Adjust speed Press the selector left or right to adjust playback speed dur ing playback Adjust volume Adjust volume Press MENU OK to pause playback and display volume con trols Press the selector up or down to adjust the volume and press MENU OK to exit Volume can also be adjusted from the setup menu PLAY 100 006 ...

Page 147: ...ck Q When connecting cables be sure the connectors are fully inserted R Image quality may drop during movie playback 2 Tune the television to the video input channel See the documentation supplied with the television for details 3 Press the a button for about a second to turn the camera on The camera monitor turns off and pictures and movies are played back on theTV Note that the camera volume con...

Page 148: ...nserted R When an HDMI cable is connected pictures and sound are played back on the TV 2 Tune the television to the HDMI input channel See the documentation supplied with the television for details 3 Press the a button for about a second to turn the camera on The camera monitor turns off and pictures and movies are played back on theTV Note that the camera volume controls have no effect on sounds ...

Page 149: ...e that depending on the printer not all the functions described below may be supported 1 Connect the supplied USB cable as shown and turn the printer on 2 Turn the camera on 3 Press the selector left or right to display a picture you wish to print 4 Press the selector up or down to choose the number of copies up to 99 5 Repeat steps 3 4 to select additional pictures Press MENU OK to display a conf...

Page 150: ...d disconnect the USB csable R Pictures can be printed from internal memory or a memory card that has been formatted in the camera R If no pictures are selected the camera will print one copy of the current picture R Page size print quality and border selections are made using the printer Printing the Date of Recording Printing the Date of Recording To print the date of recording on pictures press ...

Page 151: ...n a memory card The information in the order includes the pictures to be printed and the number of copies of each picture 1 Select playback mode and press MENU OK to display the playback menu 2 Highlight KPRINT ORDER DPOF and press MENU OK 3 Highlight one of the following options and press MENU OK WITH DATE s Print the date of recording on pictures WITHOUT DATE Do not print the date of recording o...

Page 152: ...e the print order and press MENU OK when settings are complete 7 A confirmation dialog will be displayed Press MENU OK to save the print order R Remove the memory card to create or modify a print order for the pictures in internal memory R Print orders can contain a maximum of 999 pictures R If a memory card is inserted containing a print order created by another camera a message will be displayed...

Page 153: ...more 512MB or more 1 1GB or more GB or more 2 2 Free disk space Free disk space 2GB or more 2GB or more GPU GPU Supports DirectX 9 or later Supports DirectX 9 or later recommended recommended Supports DirectX 7 or later Supports DirectX 7 or later required performance not guaranteed with other GPUs required performance not guaranteed with other GPUs Video Video 1 024 768 pixels or more with 24 bit...

Reviews: