background image

18

19

Getting

Ready

1

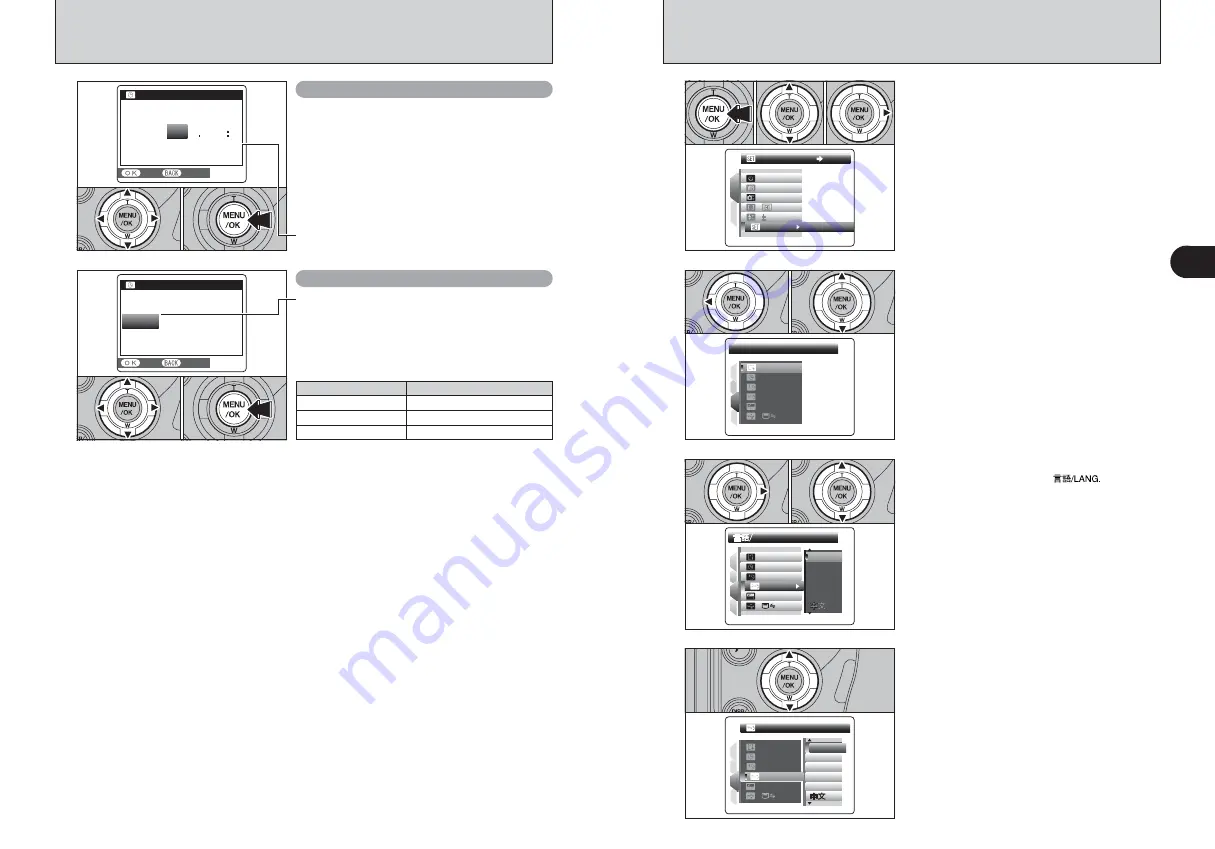
CORRECTING THE DATE AND TIME / CHANGING THE DATE FORMAT

DATE/TIME

DATE/TIME

AM

AM

SET

SET

CANCEL

CANCEL

D D. M M . Y Y

D D. M M . Y Y

Y Y. M M . D D

Y Y. M M . D D

8 / 2 4 / 2 0 0 5

MM/DD/YY

MM/DD/YY

1 0 : 0 0

Changing the date format

1

Press “

d

” or “

c

” to select the date format.

2

Press “

a

” or “

b

” to set the format. Refer to the

table below for details of the settings.

3

Always press the “MENU/OK” button after the
settings are completed.

0

1

0

2

0

3

Date format

Sample settings

YY.MM.DD

2005.8.24

MM/DD/YY

8/24/2005

DD.MM.YY

24.8.2005

2007
2006

2005

2004
2003

8 4

2

2

1 00

A M

Y Y. M M . D D

Y Y. M M . D D

SET

SET

CANCEL

CANCEL

DATE/TIME

DATE/TIME

Correcting the date and time

5

1

Press “

d

” or “

c

” to select Year, Month, Day,

Hour or Minute.

2

Press “

a

” or “

b

” to correct the setting.

3

Always press the “MENU/OK” button after the
settings are completed.

!

Holding down “

a

” or “

b

” changes the numbers continuously.

!

When the time displayed passes “12”, the AM/PM setting
changes.

0

1

0

2

0

3

SELECTING THE LANGUAGE

SET-UP

SET-UP

SET

SET

1

2

AUTO

AUTO

0

OFF

OFF

OFF

OFF

:

:

:

:
:

1

2

1

Press “

d

” to move to page number.

2

Press “

a

” or “

b

” to select “PAGE 3”.

PAGE 

PAGE 

3

1

4

3

2

SET

SET

SET

SET

OK

OK

ENGLISH

ENGLISH
SET

SET

:
:
:
:
:

0

1

0

2

1

Press the “MENU/OK” button to display the
menu on the screen.

2

Press “

a

” or “

b

” to select “

˜

” SET-UP.

3

Press “

c

”.

0

1

0

2

0

3

!

The screens in this manual are shown in English.

!

See P.100 for more information on the “

˜

” SET-UP menu.

3

1

Press “

c

” to move to menu item.

2

Press “

a

” or “

b

” to select “

”.

3

Press “

c

”.

LANG.

LANG.

LANG.

LANG.

SET

SET

1

3

2

SET

SET

ENGLISH

ENGLISH

DEUTSCH

DEUTSCH
ESPA

ESPAÑOL

OL

ITALIANO

ITALIANO

FRANCAIS

FRANCAIS

4

:

SET

SET

:

:

:

OK

OK

:

ENGLISH

ENGLISH

:

0

1

0

2

4

Press “

a

” or “

b

” to select the language.

ENGLISH

ENGLISH

ENGLISH

ENGLISH

ENGLISH

ENGLISH

DEUTSCH

DEUTSCH
ESPA

ESPA

Ñ

OL

OL

ITALIANO

ITALIANO

FRANCAIS

FRANCAIS

SET

SET

1

4

3

2

SET

SET

OK

OK
SET

SET

:
:
:

:

:

:

0

3

Summary of Contents for FinePix S9000

Page 1: ... how to use your FUJIFILM DIGITAL CAMERA FinePix S9000 FinePix S9500 correctly Please follow the instructions carefully OWNER S MANUAL 1 2 3 4 5 6 Getting Ready Settings Using the Camera Advanced Features Software Installation Viewing Images ...

Page 2: ...ent without any notice 10 Term This Agreement is effective until the date when you cease to use Software unless earlier terminated in accordance with Section 9 hereof 11 Obligation upon termination Upon termination or expiration of this Agreement you shall at your own responsibility and expense delete or destroy immediately all Software including its copies Media and Documentation 12 Governing Law...

Page 3: ...URE COMPENSATION 45 USING AE LOCK 46 ADJUSTING LIGHT METERING PHOTOMETRY 47 CONTINUOUS AF 48 MANUAL FOCUS 49 AE L M N PHOTOGRAPHY FUNCTIONS 3 Advanced Features e MACRO CLOSE UP 50 d FLASH PHOTOGRAPHY 51 x Auto flash 52 bRed eye reduction 52 d Forced flash 52 c Slow synchro 52 n Red eye reduction Slow synchro 52 f CONTINUOUS SHOOTING 54 f Top 4 frame continuous shooting 55 j Auto bracketing 55 k Fi...

Page 4: ... OS are trademarks of Apple Computer Inc registered in the U S and other countries h Microsoft Windows and the Windows logo are trademarks or registered trademarks of Microsoft Corporation in the United States and or other countries Windows is an abbreviated term referring to the Microsoft Windows Operating System The Designed for Microsoft Windows XP logo refers to the camera and the driver only ...

Page 5: ... Anti blur P 40 Movie P 93 Aperture priority Auto P 43 Natural light P 40 Shutter priority Auto P 42 Portrait P 40 Programmed Auto P 41 Landscape P 40 Auto P 40 Night P 40 Release socket P 25 Exposure compensation button P 45 Playback mode P 31 Photography mode P 23 Mode dial External AF sensor AF assist illuminator P 26 Self timer lamp P 65 Still photography Movie recording 8 Camera parts and fea...

Page 6: ... ring P 22 29 Focus ring P 22 49 INFO information check button P 22 58 74 Strap mount P 11 USB socket mini B Speaker Microphone A V OUT Audio Visual output socket P 112 Terminal cover One touch AF button P 22 49 DC IN 5V power input socket P 112 Focus mode selector switch P 22 48 49 1 1 2005 12 00 AM 2000 F2 8 1 1 2005 12 00 AM 100 0001 ISO 200 ISO 200 ISO 200 ISO 200 6 6 N N N N N N Self timer Fl...

Page 7: ...ch AA size alkaline batteries referred to hereafter simply as alkaline batteries can be used varies depending on the brand Some brands of alkaline batteries may stop providing power more quickly than those supplied with the camera Note also that due to their nature the time for which alkaline batteries can be used decreases in cold conditions 0 C to 10 C 32 F to 50 F The use of AA size Ni MH batte...

Page 8: ... CF Microdrive eject button and remove the CF Microdrive When storing CF Microdrives always use the special protective case CF Microdrive eject button Depending on the camera mode and the type of batteries used the transition from C to V may occur more quickly Due to the nature of the battery the battery level warning may appear early when the camera is used in cold locations This is normal Try wa...

Page 9: ...er purchasing the date and time are cleared Press the MENU OK button to set the date and time The message also appears when the batteries have been removed and the camera has been left for a long period To set the date and time later press the DISP BACK button If you do not set the date and time this message will appear each time you turn the camera on 3 1Press d or c to select Year Month Day Hour...

Page 10: ...ompleted Holding down a or b changes the numbers continuously When the time displayed passes 12 the AM PM setting changes 0 1 0 2 0 3 SELECTING THE LANGUAGE SET UP SET UP SET SET 1 2 AUTO AUTO 0 OFF OFF OFF OFF 1 2 1Press d to move to page number 2Press a or b to select PAGE 3 PAGE PAGE 3 1 4 3 2 SET SET SET SET OK OK ENGLISH ENGLISH SET SET 0 1 0 2 1Press the MENU OK button to display the menu on...

Page 11: ...g the Menus 1Displaying the menu Press the MENU OK button 5Confirming the setting Press the MENU OK button 2Selecting a menu option Press the up or down arrow on the 4 direction button 3Selecting an option Press the right arrow on the 4 direction button 4Selecting a setting Press the up or down arrow on the 4 direction button Up down left and right are indicated by black triangles in the Owner s M...

Page 12: ... YES YES CANCEL CANCEL Flash pop up button To use the flash press the flash pop up button to release the flash INFO information check button Press this button to view image information Photography mode Displays the current settings white balance sharpness etc and histogram Playback mode Displays the information for the image currently displayed One touch AF button Focus the image once This can onl...

Page 13: ...en selecting a slow shutter speed that will cause camera shake appears on the screen Use the flash to take pictures According to the scene or mode being shot use a tripod Press the shutter button down fully When a clicking sound is heard the camera records the image There is a slight delay between the shutter button being pressed and the picture being taken Play back the shot to check the image Wh...

Page 14: ...lephoto When using the AF assist illuminator in Macro mode the camera may have difficulty focusing to take close up shots See P 100 for information on turning the AF assist illuminator off NUMBER OF AVAILABLE FRAMES 6 6 N N N The number of available frames appears on the screen See P 59 for information on changing the quality setting The default quality set at shipment is N Standard number of fram...

Page 15: ...ING ZOOM FUNCTION Turn the zoom ring to take pictures with zoom function The zoom bar appears on the screen during zooming h Optical zoom focal length 35 mm camera equivalent Approx 28 mm to 300 mm Max zoom scale 10 7 Zoom ring Press a to change to Digital zoom mode 2 When using digital zoom appears in the bottom left corner of the screen and the zoom bar turns blue Use the zoom ring to adjust dig...

Page 16: ... FUNCTION Select the framing guideline and post shot assist window in Photography mode Pressing the DISP BACK button changes the screen display Text displayed No text displayed Framing guideline displayed Post shot assist window displayed Important Always use AF AE lock when composing a shot The image may be out of focus if AF AE lock is not used The framing guideline display consists of horizonta...

Page 17: ...c to move the cursor colored frame to the selecting frame 2005 2005 1 9 1 9 8 22 22 8 8 23 23 8 8 24 24 Press a b d or c to move the cursor colored frame to the selecting frame 2005 2005 1 4 1 4 8 22 8 22 8 23 8 23 8 24 8 24 6 Press the MENU OK button to enlarge the selected image 7 To select the date 1Press a b d or c to move the cursor colored frame to b on the upper left frame 2Press d to displ...

Page 18: ...Zoom bar PANNING PANNING CANCEL CANCEL 1Press d or c to select to PANNING 2Press a b d or c to display another part of the image The current displayed image appears on the navigation screen CANCEL CANCEL 0 1 0 2 Navigation screen 1 2 ERASE FRAME ERASE FRAME FRAME FRAME ALL FRAMES ALL FRAMES 2 1Press a or b to select Ò ERASE 2Press c 3 1Press a or b to select FRAME 2Press the MENU OK button See P 7...

Page 19: ...Main subject 2 Turning Macro mode ON OFF Macro OFF Macro ON Super macro ON Wide angle Approx 50 cm 1 6 ft infinity Telephoto Approx 2 m 6 6 ft infinity Wide angle Approx 10 cm 3 m 3 9 in 9 8 ft Telephoto Approx 90 cm 3 m 3 0 ft 9 8 ft Approx 1 cm 1 m 0 4 in 3 3 ft Wide angle only EXPOSURE SHUTTER SPEED AND APERTURE PHOTOGRAPHY FUNCTIONS Exposure refers to the light that hits the CCD or the total a...

Page 20: ...t the Mode dial to and select a narrow aperture setting Use a tripod to prevent camera shake because shutter speed decreases To prevent the image from having a red or blue cast due to the light source Change the White balance setting in the photography menu To avoid missing snapshot opportunities Take pictures in AUTO mode see Using the Camera Shoot with HIGH SPEED SHOOTING To prevent the subject ...

Page 21: ...ent camera shake always use a tripod c n N PROGRAMMED AUTO PHOTOGRAPHY FUNCTIONS Set the Mode dial to N This is an automatic mode to specify the settings except for the shutter speed and aperture setting This is a simple way to take pictures the same as the Shutter priority Auto and Aperture priority Auto modes Program shift Command dial 320 F5 6 ISO 200 6 N Program shift Turn the Command dial to ...

Page 22: ...0 6 N 250 F8 2000 F2 8 ISO 200 6 N 2000 F2 8 250 F ISO 200 6 N 250 F APERTURE PRIORITY AUTO PHOTOGRAPHY FUNCTIONS Set the Mode dial to This is an automatic mode to set the aperture Use this mode to have the area in front of and behind the subject out of focus large aperture or have both near and far subjects in focus small aperture 2000 F3 2 ISO 200 6 N Aperture Setting the aperture Turn the Comma...

Page 23: ...Turn the Command dial to set the compensation value The symbol indicating the compensation direction or turns yellow The D icon also turns yellow while exposure compensation is being set and then turns blue after setting is completed h Compensation range 2 EV to 2 EV 13 steps in 1 3 EV increments Exposure compensation cannot be used in the B À U and r modes The screen brightness will increase or d...

Page 24: ...JUSTING LIGHT METERING PHOTOMETRY PHOTOGRAPHY FUNCTIONS 500 F4 ISO 200 ISO 200 ISO 200 6 6 N N N Set the Power switch to q 1 Set the Mode dial to Photography mode 2 3 Turn the Photometry selector dial to select the light metering method Multi Pattern Light metering where the camera assesses the scene and selects the correct exposure _ Spot Light metering where the exposure is optimized for the cen...

Page 25: ...to focus on the subject in the focus frame 2A focusing indicator mark appears on the screen Check whether mark appears in yellow 3When the mark is not yellow turn the focus ring until the mark appears in yellow Focusing indicator marks The focusing mark appears when the focus is close to the focused position Use the mark to focus the shot Focus check function The shot is focused The focus is set t...

Page 26: ...e Approx 10 cm 3 m 3 9 in to 9 8 ft Telephoto Approx 90 cm 3 m 3 0 ft to 9 8 ft Wide angle Approx 30 cm 3 m 1 0 ft 9 8 ft Telephoto Approx 90 cm 3 m 3 0 ft 9 8 ft Super macro Approx 1 cm 1 m 0 4 in 3 3 ft Wide angle only Flash not available Super macro Use the lens at the wide angle zoom setting in Super macro mode If your camera select any other settings d appears on the screen Turn the zoom ring...

Page 27: ...ight up to 4 sec n Red eye reduction Slow synchro Use this mode for Slow synchro shots with Red eye reduction The image may be overexposed when shooting bright scenes To take a picture of a main subject at night with the background brightly lit use the Night setting in Photography mode P 40 Red eye effect When using the flash to take a picture of people in low light conditions their eyes sometimes...

Page 28: ... 1 5 frames sec When taking the pictures the images appear and are recorded Top 4 frame continuous shooting cannot be used in the r Movie mode The maximum file recording time using the continuous shooting is 15 seconds when recording in xD Picture Card Final 4 frame continuous shooting cannot be used in the r Movie mode Only 1 frame can be shot when using the Final 4 frame continuous shooting mode...

Page 29: ...When a Continuous shooting mode is selected the flash mode is forcibly set to v Suppressed flash However when the mode is changed back to normal photography the flash setting specified before continuous shooting was selected is restored This is useful when checking the shot composition for dimly lit scenes Slow synchro shots etc 1 Set the Power switch to q 2 Set the Mode dial to Photography mode 1...

Page 30: ...t shown during playback Play back the image to check the histogram after shooting P 74 A quick display of the brightness distribution is shown when taking a picture The exposure cannot be checked Information for the photography settings does not appear in B À U and mode 1 1Set the Power switch to q 2Set the Mode dial to Photography mode 3Press the p button to display the menu on the screen 0 1 0 3...

Page 31: ...d in the û sensitivity setting When selecting AUTO as the sensitivity setting the camera selects the best sensitivity setting for the subject s brightness 60 Quality settings in Photography mode Choose from 7 settings Using the table below as a guide select the setting that best suits your aims Area shot and quality setting Normal shooting provides an aspect ratio of 4 3 and shooting provides an a...

Page 32: ... the setting 2Press the MENU OK button to confirm the setting 0 1 0 2 4 p CHROME may have little visible effect with some subjects such as close up shots of people portraits Because the effects on the image differ depending on the scene being shot in p CHROME mode take pictures in p STANDARD mode as well as this mode Note that you may not be able to see any difference on the screen For shots taken...

Page 33: ...ful when you have the camera on a tripod and you want to prevent camera shake 64 SETTING PHOTOGRAPHY MENU PHOTOGRAPHY MENU Ä Self timer P 65 Use this setting for taking pictures such as group shots where the photographer is included in the shot A White balance P 66 Change this setting to suit for the surroundings and lighting â High speed shooting P 67 Use this setting to reduce the time required ...

Page 34: ...t to Suppressed flash P 53 The color tones may vary depending on the shooting conditions light source etc 0 1 0 2 WHITE BALLANCE WHITE BALLANCE 1 2 AUTO AUTO AUTO AUTO OFF OFF OFF OFF SET SET 0 A WHITE BALANCE SELECTING THE LIGHT SOURCE Available Photography modes N M Displaying the menus P 63 3 When the correct exposure is measured COMPLETED appears Press the MENU OK button to confirm the setting...

Page 35: ...amera changes the focusing position on the screen Use this setting when composing the shot using a tripod and changing the focusing position 1 Hold down the button 2Press a b d or c to move the target point to the focusing position 3 Release the button 0 1 0 2 0 3 Regardless of the AF frame location the exposure is always set using the area in the center of the screen To expose the shot for your m...

Page 36: ...pecified setting increments Flash photography cannot be used This feature always takes 3 shots However if there is insufficient space on the media for 3 shots no picture will be taken 1 BRACKETING BRACKETING 1 2 OFF OFF OFF OFF STD STD STD STD STD STD 1 3 EV EV EV EV 1 3 EV EV EV EV 2 3 1 1 After setting the exposure for bracketing 1 Hold down the f button 2 Turn the Command dial to select j 2 OFF...

Page 37: ...0 6 6 N N N or OVER OVER UNDER UNDER 72 PHOTOGRAPHY MENU PHOTOGRAPHY MENU Displaying the menus P 63 Select ON in this setting when using an external flash unit Synchronized shutter speeds up to 1 1000 sec can be used The image may appear dark when the shutter speed is set to speeds higher than 1 1000 sec Set the white balance P 66 to AUTO or custom white balance P 73 EXTERNAL FLASH EXTERNAL FLASH ...

Page 38: ... pixels is high with the distribution sloping upwards to the left Shadows Pixels Highlights Brightness The shape of the graph will vary depending on the subject 2 1Press a or b to select Ò ERASE 2Press c 1 2 ERASE ERASE FRAME FRAME ALL FRAMES ALL FRAMES 0 1 0 2 1 2 ERASE FRAME ERASE FRAME FRAME FRAME ALL FRAMES ALL FRAMES 3 1Press a or b to select FRAME or ALL FRAMES 2Press the MENU OK button 0 1 ...

Page 39: ...SP BACK button Pressing the MENU OK button repeatedly erases consecutive frames files Take care not to erase a frame file by mistake Protected frames files cannot be erased Unprotect the frames files before erasing them P 84 FRAME 0 1 0 2 IMAGE ROTATE IMAGE ROTATE SET SET 1 2 0 1 0 2 2 1Press a or b to select Ú IMAGE ROTATE 2Press c 0 1 0 2 3 1Press a or b to rotate and display the image 2Press ME...

Page 40: ...ludes a frame file with DPOF settings that were specified on another camera RESET DPOF OK appears Pressing the MENU OK button erases all of the DPOF settings already specified for each frame file Specify the DPOF setting for each frame file again Press the DISP BACK button to leave the previous settings unchanged RESET DPOF OK RESET DPOF OK YES YES NO NO SPECIFYING DPOF SETTINGS EASILY p PHOTO MOD...

Page 41: ...plete the settings h DPOF ALL RESET P 83 Total number of prints SPECIFYING DPOF SETTINGS EASILY p PHOTO MODE PLAYBACK WITH DATE WITH DATE WITHOUT DATE WITHOUT DATE RESET ALL RESET ALL WITH DATE WITH DATE 1 2 3 1Press a or b to select WITH DATE or WITHOUT DATE Selecting WITH DATE will cause the date to be imprinted on your prints 2Press the MENU OK button 0 1 0 2 When selecting the WITH DATE settin...

Page 42: ...utton Pressing the DISP BACK button while choosing settings will cancel all current settings If there were previous DPOF settings only the modifications are canceled 0 1 0 2 Canceling DPOF setting To cancel the DPOF setting for a specified frame file 1Press d or c to select the frame file with the DPOF setting you want to cancel 2Set the number of prints to 0 zero To cancel the DPOF setting for an...

Page 43: ...rased However the FORMAT function erases all the frames files including protected frames files P 104 1Set the Power switch to w 2Press the MENU OK button to display the menu on the screen 0 1 0 2 Ç PROTECTING IMAGES FRAME SET ALL RESET ALL PLAYBACK MENU RESET ALL OK RESET ALL OK IT MAY TAKE A WHILE IT MAY TAKE A WHILE YES YES CANCEL CANCEL SET ALL OK SET ALL OK IT MAY TAKE A WHILE IT MAY TAKE A WH...

Page 44: ...ct PLAYBACK 2Press c 1 1Set the Power switch to w 2Press the MENU OK button to display the menu on the screen AUTOMATIC PLAYBACK PLAYBACK MENU REC STANDBY REC STANDBY START START CANCEL CANCEL 30s 4 REC STANDBY appears on the screen Press the MENU OK button to begin recording Face the microphone on the front of the camera to record your comment Hold the camera about 20 cm 7 9 in away for the best ...

Page 45: ...the screen along with a progress bar When the sound is difficult to hear adjust the volume P 90 102 Playing back voice memos Playback Pause Resume Stop Fast forward Rewind Control Description The voice memo stops when playback ends Pauses the voice memo during playback Press b again to resume playback Stops playback Press d or c while voice memo playback is stopped to go back to the previous file ...

Page 46: ...to suit your condition Adjusting volume of voice memos  PLAYING BACK VOICE MEMOS PLAYBACK MENU Press c 3 1 2 SET SET TRIMMING TRIMMING 1Set the Power switch to w 2Press d or c to select the trimming frame file 1 0 1 0 2 1Press the MENU OK button to display the menu on the screen 2Press a or b to select TRIMMING 4 Press a or b to zoom in or out on an image A zoom bar appears on the screen Press th...

Page 47: ...mm Max zoom scale 10 7 h Focal range Wide angle approx 50 cm 1 6 ft to infinity Telephoto approx 2 m 6 6 ft to infinity 13s STANDBY STANDBY Because sound is recorded concurrently with the images make sure that you do not cover the microphone with a finger etc P 10 2 The available recording time and STANDBY appear on the screen r RECORDING MOVIES MOVIE MODE 1 Set the Mode dial to r Use r Movie mode...

Page 48: ...tes long at the setting can be recorded Visit website for information on available Microdrive CompactFlash card http home fujifilm com products digital 1Set the Mode dial to r 2Press the p button to display the menu on the screen In r Movie mode do not set the û sensitivity setting In r Movie mode do not set the ü FinePix COLOR setting 1 0 1 0 2 QUALITY SETTINGS IN MOVIE MODE p PHOTO MODE MOVIE 2 ...

Page 49: ...pears on the screen along with a progress bar Take care not to block the speaker When the sound is difficult to hear adjust the volume P 97 102 If the subject of the shot is very bright white vertical streaks or black horizontal streaks may appear in the image during playback This is normal Indicated by the r icon 0 1 0 2 0 1 0 2 1Set the Power switch to w 2Press d or c to select the movie file Pl...

Page 50: ...8 1 Press the MENU OK button to display the menu on the screen SELF TIMER SELF TIMER SET SET 1 2 AUTO AUTO OFF OFF OFF OFF 0 OFF OFF USING THE SET UP SCREEN PAGE PAGE 3 1 4 3 2 SET SET SET SET OK OK ENGLISH ENGLISH SET SET 3 1Press d to move to page number 2Press a or b to select the page 0 1 0 2 USB MODE USB MODE 1 4 3 2 SET SET SET SET ENGLISH ENGLISH OK OK SET SET 4 1Press c to move to menu ite...

Page 51: ...ifies whether an image checking screen photography result appears after taking a picture The image appears for a few moments and is then recorded The color tones in images recorded may differ from actual color Play back the recorded images to check them 101 102 éFRAME NO CONT RENEW CONT Specifies whether frame numbers are assigned consecutively from previous numbers or begin again 104 17 105 ïFORM...

Page 52: ...assigned consecutively from previous numbers or begin again CONT Pictures are stored beginning from the highest file number stored on the last media used RENEW Pictures are stored on each media beginning with a file number 0001 Setting this function to CONT makes file management easier as it makes sure that file names are not duplicated when images are downloaded to a PC When the camera settings a...

Page 53: ... SET UP menu P 98 When this function is enabled and the camera remains unused for 2 or 5 minutes it is turned off Auto power off function prevents leaving the power on The Auto power off function is disabled during automatic playing back and discharging and when a USB connection is being used î AUTO POWER OFF ON ON OFF OFF 2 MIN MIN 2 MIN MIN 5 MIN MIN OFF OFF 1 4 3 2 AUTO POWER OFF AUTO POWER OFF...

Page 54: ...ware is needed i Connection speed 56 k or better recommended 5 1 INSTALLATION ON A Windows PC 5 Software Installation Notes i Connect the camera directly to the PC using the USB cable mini B The software may not operate correctly when you use an extension cable or connect the camera via a USB hub i When your PC has more than one USB port the camera can be connected to either port i Push the USB co...

Page 55: ...software may not operate correctly if the connection is faulty i Additional USB interface board is not guaranteed i On Macintosh PCs allocate at least 400 MB of virtual memory when RAW FILE CONVERTER LE is used If other applications will be used at the same time allocate the additional amount required for those applications also 5 1 INSTALLATION ON A Windows PC 1 Install FinePixViewer as instructe...

Page 56: ... When a camera is connected open 5 2 INSTALLATION ON A Mac OS X 1 Turn your Macintosh on and start up Mac OS X Do not launch any other applications 2 When the bundled CD ROM is loaded into the CD ROM drive the FinePix icon appears Double click the FinePix icon to open the FinePix volume window 3 Double click on Installer for MacOSX 5 The Authenticate dialog appears Enter the name and password for ...

Page 57: ...luded and the AC power adapter correctly and push them in the terminals When there is a power outlet available connect the AC Power Adapter AC 5VX 2 Video yellow Audio white To terminals Plug the other end of the cable into the audio video input socket on the TV Then turn the camera and TV on and take pictures or play back images normally When connecting the A V cable to TV the camera s screen is ...

Page 58: ...button to cancel the printing Depending on the printer the printing may not be canceled immediately or printing may stop midway through When printing stops midway briefly turn the camera off and then on again PRINTING PRINTING CANCEL CANCEL 1 19SHEETS SHEETS Continued PRINT WITH DATE is not available when the camera is connected to a printer that does not support date printing 4 1Press a or b to s...

Page 59: ...ra at the same time images will be recorded onto the media selected as the MEDIA P 100 Continued Movies and images with CCD RAW cannot be printed Images photographed with a camera other than FinePix S9000 FinePix S9500 may not be printed 5 1Press d or c to display the frame file for which you want to specify PRINT settings 2Press a or b to set a value up to 99 as the number of copies of the frame ...

Page 60: ...h FinePixViewer automatically starts up and the Save Image Wizard window Save Image dialog box appears Follow the instructions provided on screen to save the images To proceed without saving the images click the Cancel button Screen for Windows 2000 Professional Windows 98 98 SE Me 2000 Professional Macintosh h A removable disk icon appears and you can use your PC to transfer files to and from the...

Page 61: ...ncluding batch processing and ordering prints 1Check that the camera is not connected to the PC 2Quit all currently running applications 3Open the My Computer window Then open the Control Panel and double click on Add Remove Programs Windows 4The Add Remove Programs Properties window appears Select the software to be uninstalled FinePixViewer or the driver and then click the Add Remove button To r...

Page 62: ...PC Card Adapter xD Picture Card FinePix S9000 FinePix S9500 Digital Camera Print creation Printer commercially available Digital Photo Printer CX 550 Personal Computer commercially available USB PictBridge TV monitor commercially available Audio Visual output FinePix S9000 FinePix S9500 Digital Camera Audio Visual output 6 4 USING FinePixViewer Macintosh 5When the message appears click the OK butt...

Page 63: ...me time h If you do not intend to use the camera for a long period of time remove the batteries from the camera Note if the camera is left with the batteries removed the time and date settings are cleared h The batteries feel warm right after being used Before removing the batteries turn the camera off and wait for the batteries to cool down h Since batteries do not work well in cold weather or lo...

Page 64: ... with the way Ni MH batteries are used if their original performance is to be maintained h Ni MH batteries left unused in storage for long periods can become deactivated Also repeatedly charging Ni MH batteries that are only partially discharged can cause them to suffer from the memory effect Ni MH batteries that are deactivated or affected by memory suffer from the problem of only providing power...

Page 65: ... after taking pictures This is normal h Do not put labels on the xD Picture Card Peeling labels can cause the camera not to work properly Using Microdrive h Do not use hard pointed pens to write on the Microdrive label h Do not peel off the Microdrive label h Do not stick additional labels onto a Microdrive h When carrying or storing a Microdrive keep it in the protective case provided h When a Mi...

Page 66: ...h a soft dry cloth It may be necessary to format the xD Picture Card If the message still appears replace the xD Picture Card i Contact your FUJIFILM dealer i Movies and images cannot be played back FRAME NO FULL The frame number has reached 999 9999 1 Insert a formatted media into the camera 2 Set RENEW as the FRAME NO setting in the SET UP menu 3 Start taking pictures The frame number starts fro...

Page 67: ...ssing the shutter button Focusing is slow Cannot set the camera to Macro close up mode Cannot select continuous shooting Cannot set exposure compensation Cannot use the flash The flash settings are restricted and cannot be selected The playback image is dark even though the flash was used The image is blurred There is speckling on the image i The batteries have run out i The AC power adapter plug ...

Page 68: ... Compressed Exif ver 2 2 JPEG DPOF compatible Uncompressed CCD RAW RAF Design rule for Camera File System compliant DPOF compatible Movie AVI format Motion JPEG Audio WAVE format Monaural sound Number of recorded pixels Still image 3488 2616 pixels 3696 2464 pixels 2592 1944 pixels 2048 1536 pixels 1600 1200 pixels 640 480 pixels 3 2 File size See the table on P 136 Lens Fujinon 10 7 optical zoom ...

Page 69: ...s and do not indicate a fault with the monitor This phenomenon will not appear on the recorded image The operation error may be caused in a digital camera by the strong radio interference i e electric fields static electricity line noise etc Due to the nature of the lens the edges of images may appear distorted This is normal Standard number of available frames recording time per media The number ...

Page 70: ...94662 cameras fujifilm pt If you have technical questions or if you need repair service ask the following local distributor Please present a warranty card and a purchase receipt when you ask for repair Refer to the warranty card for detail of warranty conditions There is a case that repair and Technical support cannot be accepted for some models which your local distributor does not deal with Thes...

Page 71: ...uilding 8th Floor Phayathai Bangkok 10400 TEL 662 2730029 ext 761 762 FAX 662 2730239 warin fujifilm co th Romania CTS Cardinal Top Systems Ltd Technical support 112 Calea Dorobanti street 4 flat 1sector Bucharest Romania Repair service TEL 4021 230 09 82 FAX 4021 230 09 82 cts_tirla hotmail com Russia ZAO Fujifilm RU Technical support Bld 1 10 Rozanova str Moscow 123007 Russia TEL 7 095 956 9858 ...

Page 72: ...battery terminals with insulation tape h Contact with other metallic objects or batteries could cause the batteries to ignite or burst Keep xD Picture Cards out of the reach of small children Because xD Picture Cards are small they can be swallowed by children Be sure to store xD Picture Cards out of the reach of small children If a child swallows an xD Picture Card seek medical attention or call ...

Page 73: ...26 30 Nishiazabu 2 chome Minato ku Tokyo 106 8620 Japan http home fujifilm com products digital Printed in Japan FPT 507107 FP Printed on recycled paper ...

Reviews: