background image

104

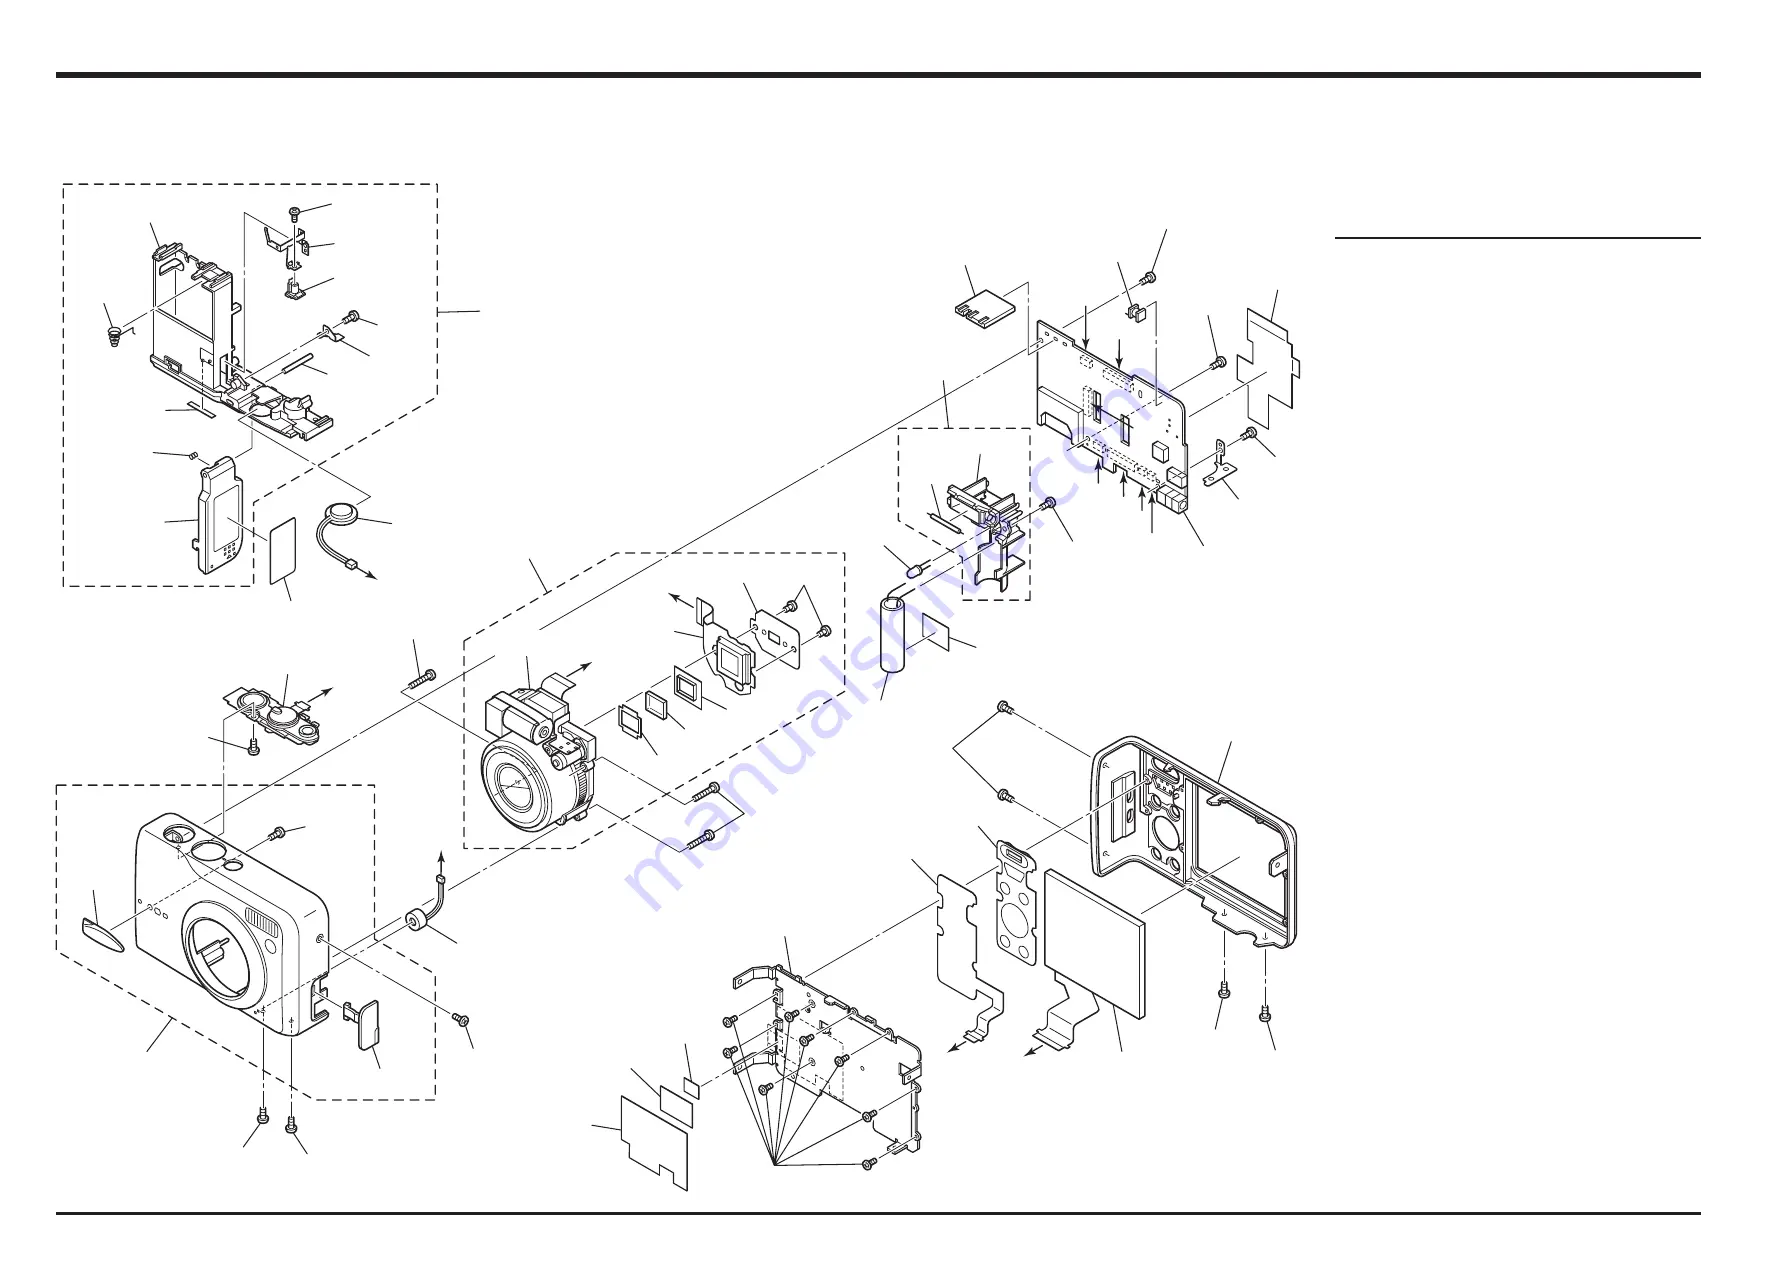
6. Parts List

FinePix F30 Service Manual

6-2-2. EU/EG/EE-model

Ref No.

Parts No.

Description

Comment

M201

BU03298-100

F PANEL ASSY

M202

BB19383-100

GRIP F

M203

BB19374-100

JACK COVER

M204

FZ06573-100

OPE UNIT

M205

FZ06598-100

MIC ASSY

M206

BU03300-100

BATTERY HOLDER ASSY

M207

BB19358-100

BATTERY HOLDER

M208

BB19359-100

BATTERY CSP

M209

BB19360-100

BATTERY LOCK

M210

BB19361-100

COVER TSP

M211

BB19362-100

BATTERY COVER

M212

BB14959-300

LABEL

M213

BB19364-100

BATTERY LOCK PLATE

M214

BB19398-100

BATTERY COVER PLATE

M215

BB19365-100

BATTERY SHAFT

M216

FZ06597-100

SPEAKER ASSY

M217

BF06011-100

LENS ASSY WITH DATA

M218

N.S.

LENS UNIT

M219

N.S.

OPTICAL  LPF

M220

N.S.

CCD PWB  ASSY WITH DATA

M221

BF06029-100

FLASH CONST

M222

FZ06467-100

LIGHT

M223

FAA74-856KN

LEAD E.CAP

M224

FQDL0139-01

LED

M225

CB1830-A100

MAIN PWB ASSY

M226

FLYT164-100

TRANSFORMER

M227

FGY096-0032

CONNECTOR

M228

BB19384-100

PLATE L

M229

BB19691-100

SHEET(PWB)

M230

BU03301-100

R PANEL ASSY

M231

FZ06574-100

KEY GUM

M232

FZ06575-100

KEY FPC

M233

BF05953-100

LCD CONST

M234

BB19373-100

REAR FRAME

M235

BB19690-100

TR SHEET

M236

FZ06656-100

EMI SHEET

M237

BB19363-200

PRODUCT LABEL E

M238

BB19673-100

BT2M1.4X2.5

M239

BB19635-D00

MS2M1.4X1.6A(FC)

M240

BB19339-100

BT2M1.4X2.5(FC)

M241

BB19338-200

BT2M1.7X3.0 (FC)

M242

BB19514-F00

PT23M1.7X7.0

M243

BB19341-200

MS2M1.7X3.0N (FC)

M244

BB17681-400

BT2M1.7X4.0

M245

BB18798-100

3N-MSBM1.7*2.5A

M246

BB19633-200

N-MS2M1.7X3.0A(FC)

N.S.=Not Supply

A

B

D

E

F

G

B

C

G

F

A

C

E

D

M220

M218

M242

N.S.

N.S.

N.S.

M217

M201

M219

M242

N.S.

M202

M204

M239

M238

M205

M240

M213

M209

M241

M215

M216

M206

M214

M207

M208

M212

M210

M211

M237

M243

M244

M226

M227

M221

M222

M224

UL-TAPE

M223

N.S.

M244

M229

M228

M225

M244

M245

M203

M245

M230

M231

M246

M232

M234

M235

M236

UL-TAPE

M240

M233

M244

M245

M244

Summary of Contents for FinePix F30

Page 1: ...IST IF YOU USE PARTS NOT SPECIFIED IT MAY RESULT IN A FIRE AND AN ELECTRICAL SHOCK FUJI PHOTO FILM CO LTD Ref No ZM00636 100 Printed in Japan 2006 05 DIGITAL CAMERA FinePix F30 US EU EG EE AS CH Model...

Page 2: ...ed connections Check the entire board surface for solder splasher and bridges 2 Check the interboard wiring to ensure that no wires are pinched or contact high wattage resistors 3 Look for unauthorize...

Page 3: ...s use a designated lead free solder bearing in mind the differing work practices for conventional solder eutectic and lead free solder Differences in the soldering work for lead free and eutectic sold...

Page 4: ...he correct bonding temperature refers not to the temperature of the heat source but to the bonding temperature that will give the best bond strength Precautions when soldering with lead free solder So...

Page 5: ...ol SnAgCu Solder wire thread Use the lead free solders specified below Solder type Sn96 5Ag3Cu0 5 Displayed symbol SnAgCu Wire diameter 0 6 0 8 or 1 0 mm Sample Flux Conventional flux can be used Sold...

Page 6: ...6 FinePix F30 Service Manual MEMO...

Page 7: ...ASSY 42 3 7 2 MAIN PWB ASSY 45 4 Adjustments 47 4 1 Important point before Adjustment 47 4 1 1 The handling of image files in internal memory 47 4 1 2 Adjustment when Replacing Major Parts 48 4 2 Meas...

Page 8: ...t telephoto approx 30 cm 1 0 ft to 80 cm 2 6 ft Sensitivity AUTO AUTO 400 AUTO 1600 Equivalent to ISO 100 200 400 800 1600 3200 Photometry TTL 256 zones metering Multi Spot Average Exposure control Pr...

Page 9: ...rately Power Supply and Others Power supply Rechargeable Battery NP 95 According to the CIPA Camera Imaging Products Association standard procedure for measuring digital still camera battery consumpti...

Page 10: ...oof Case WP FXF30 Power Supply and Others Standard number of available frames recording time per xD Picture Card and internal memory The number of available frames recording time or file size varies s...

Page 11: ...n JPEG A type of AVI Audio Video Interleave file format that handles images and sound as a single file Images in the file are recorded in JPEG format Motion JPEG can be played back by QuickTime 3 0 or...

Page 12: ...l cover A V OUT Audio Visual output socket USB socket DC IN 5V socket Microphone Indicator lamp 4 direction button LCD monitor Speaker Tripod mount W Wide zoom button T Tele zoom button Playback butto...

Page 13: ...F30 Service Manual 2 Disassembly 2 1 Names of internal Components LENS ASSY LED E CAP MIC ASSY F PANEL ASSY MAIN PWB ASSY KEY FPC GUM KEY SPEAKER ASSY BATTERY HOLDER ASSY FLASH CONST R PANEL ASSY LCD...

Page 14: ...ews M1 7 x 3 0 3 Remove the 2 screws M1 7 x 4 0 4 Lift off the R PANEL CONST in the direction of the arrow 5 Remove the 2 FPC from the connectors in the direction of the arrow Notes on Assembly Take c...

Page 15: ...l off the UL TAPE 3 Peel off the TR SHEET 4 Remove the 8 screws M1 4 x 2 5 5 Remove the REAR FRAME 5 3 2 1 4 6 6 6 6 Remove the KEY FPC KEY GUM and LCD CONST Notes on Assembly Take care not to trap or...

Page 16: ...5 Unlock the connector and remove the CCD FPC 6 Remove the wire harness SPEAKER from the connector 7 Remove the wire harness MIC from the connector 8 Remove the screw M1 7 x 3 0 9 Remove the 3 screws...

Page 17: ...e solder on the MAIN PWB ASSY 3 locations and remove the FLASH CONST 2 3 1 9 5mm 10 5mm K 2 1 Assembly Assemble by performing the disassembly procedure in reverse When replacing the LED cut the leads...

Page 18: ...he arrow Notes on Assembly Run the SPEAKER ASSY MIC ASSY leads along the BATTERY HOLDER groove Assembly Assemble by performing the disassembly procedure in reverse 2 8 Removing the OPE UNIT 1 Remove t...

Page 19: ...etely covers the specified area with the top and left sides securely folded back and stuck in place 2 9 2 Affixing the TR SHEET EMI SHEET and UL TAPE to the R PANEL CONST Affix the TR SHEET so that th...

Page 20: ...Manual 13 2mm 2 9 3 Affixing the UL TAPE to the LEAD E CAP Cut the UL TAPE to a size of 19 mm x 13 2 mm and stick it onto the LEAD E CAP so that it covers the section adjacent to the metal terminals...

Page 21: ...3 PROCESS BLOCK PW Power Input IC201 2 3 PROCESS BLOCK SYS System Control USB Communications IC201 3 3 CHG BLOCK Battery Charge Control IC501 IO BLOCK USB Signal IN OUT AV Signal Output LED BLOCK AF_L...

Page 22: ...CS_MCM IC102 to obtain the appropriate AE AF AWB Record processing to xD Card Image data stored in SD DRAM is sent one frame at a time to the internal signal processing section in the signal processin...

Page 23: ...ck Generator BU3073HFV CCDCLK 36MHz 48MHz 24 545 24 375MHz CCDCLK SEL 3 3V 5V CCD15V CCD 8V EVR CSI0_1 D3 3V UART BUS x32 D3 3V MDA_ON CARD BUS LCD DAT 7 0 LCD_CLK LCD_HD LCD_VD LCD_CS LCD_BL_EVR BEEP...

Page 24: ...24 3 Schematics FinePix F30 Service Manual 3 5 Overall connection Diagram...

Page 25: ...25 3 Schematics FinePix F30 Service Manual 3 6 Circuit Diagrams 3 6 1 CAMERA BLOCK...

Page 26: ...26 3 Schematics FinePix F30 Service Manual 3 6 2 DC DC BLOCK...

Page 27: ...27 3 Schematics FinePix F30 Service Manual 3 6 3 FLASH BLOCK...

Page 28: ...28 3 Schematics FinePix F30 Service Manual 3 6 4 KEY BLOCK...

Page 29: ...29 3 Schematics FinePix F30 Service Manual 3 6 5 LCD BLOCK...

Page 30: ...30 3 Schematics FinePix F30 Service Manual 3 6 6 MOTOR BLOCK...

Page 31: ...31 3 Schematics FinePix F30 Service Manual 3 6 7 PMG BLOCK...

Page 32: ...32 3 Schematics FinePix F30 Service Manual 3 6 8 PROCESS BLOCK IO...

Page 33: ...33 3 Schematics FinePix F30 Service Manual 3 6 9 PROCESS BLOCK PW...

Page 34: ...34 3 Schematics FinePix F30 Service Manual 3 6 10 PROCESS BLOCK SYS...

Page 35: ...35 3 Schematics FinePix F30 Service Manual 3 6 11 AUDIO BLOCK...

Page 36: ...36 3 Schematics FinePix F30 Service Manual 3 6 12 CCD FPC BLOCK...

Page 37: ...37 3 Schematics FinePix F30 Service Manual 3 6 13 CHG BLOCK...

Page 38: ...38 3 Schematics FinePix F30 Service Manual 3 6 14 IO BLOCK...

Page 39: ...39 3 Schematics FinePix F30 Service Manual 3 6 15 LED BLOCK 3 6 16 MEDIA BLOCK...

Page 40: ...40 3 Schematics FinePix F30 Service Manual 3 6 17 VIDEO BLOCK...

Page 41: ...41 3 Schematics FinePix F30 Service Manual MEMO...

Page 42: ...42 3 Schematics FinePix F30 Service Manual 3 7 Mounted Parts Diagrams 3 7 1 CCD FPC ASSY SIDE A...

Page 43: ...43 3 Schematics FinePix F30 Service Manual SIDE B...

Page 44: ...44 3 Schematics FinePix F30 Service Manual MEMO...

Page 45: ...45 3 Schematics FinePix F30 Service Manual 3 7 2 MAIN PWB ASSY 1 F E D C B A 2 3 4 5 6 7 8...

Page 46: ...46 3 Schematics FinePix F30 Service Manual MEMO...

Page 47: ...from the PC to the camera Turn the camera on without an xD Picture card inserted and format the camera s internal memory Without inserting an xD Picture card connect the camera to the PC and copy the...

Page 48: ...ework Version 1 1 http www microsoft com downloads details aspx familyid 262d25e3 f589 4842 8157 034d1e7cf3a3 displaylang en 4 2 Measuring Instruments Used Replacing parts Adjustment item LENS ASSY MA...

Page 49: ...Common with the FinePix S304 FZ03983 100 AC Cable For EG Use with Video adjustment jig Common with the FinePix A310 3 FZ03982 100 AC Cable For EU Use with Video adjustment jig Common with the FinePix...

Page 50: ...on of ZIP type file The FinePixF30_W folder can be done by extracting it by Compression software Copy the FinePixF30_W folder to the C drive on the Adjustment PC Step3 When all the folders have been c...

Page 51: ...ter it is not necessary to install it The procedure is given below Step 1 DSC jig driver ZJ00684 100 ZIP is downloaded from Web server http fujifilm di intranets com Step 2 Defrost the downloaded comp...

Page 52: ...m is rewritten the adjustment software will not startup Step 1 Double click on the FFW exe execute file of the adjustment software to open the FinePix F30_W Adjustment Software Startup screen Fig 4 6...

Page 53: ...If Disable OKNG display on the PC screen Fig 4 6 4 is set to OFF the PC screen displays OK if adjustment is OK and NG if adjustment is NG either setting is OK Step 5 Select the Hardware tab 1 in Fig 4...

Page 54: ...or Auto Adjust in user program Help Help Basic software help FF help User program help Focus Not used with this adjustment software Version Version information for basic software Table FFW exe Command...

Page 55: ...ith adjustment after reading the cautions here and the relevant cautions noted in the Service Manual Press the Enter key to proceed to the Jig Mode Setup screen Fig 4 7 2 FinePix F30_W Adjustment Soft...

Page 56: ...F30 Battery jig 3 7V 2 Set the Jig mode by using Power cable jig 5V 1 Set the mode to the Photography mode 2 Open the Battery cover 3 Connect the USB cable 4 Supply power to the camera using the jig a...

Page 57: ...ndicates the version number of the adjustment software 2 After running firmware download other adjustments may be required depending on the content of the download software In such cases the items to...

Page 58: ...completion of the adjustments In some cases the camera may be completely disabled If this occurs set the camera to jig mode again and then reset the flash memory Step 1 In the adjustment item selecti...

Page 59: ...PWB ASSY has not been replaced all the adjusted data reverts to the default settings In this event adjust all the settings Excludes firmware downloading Enter RESET from the PC keyboard R E S E T Inp...

Page 60: ...nsure that it is displayed 2 In addition to numbers letters are also used in the CCD serial No The data file name is instructed in the same manner in this case 3 Ensure that the CCD serial No is read...

Page 61: ...appears Use the pattern box for Camera adjustment Turn on the power supply in the pattern box Afterwards wait for about ten minutes so that the source of light may stabilize 1 Brightness 140 20cd m2...

Page 62: ...the OK button Lens is extended when the Enter key is pressed 50020520 Fig 4 9 2 Step 3 Step 4 Write the adjustment data to the flash ROM when adjustment has been completed correctly The CCD data adjus...

Page 63: ...63 4 Adjustments FinePix F30 Service Manual CCD data is completed Press the Enter key to return to the Adjustment Item Selection Screen Fig 4 9 4 Step 4...

Page 64: ...or about ten minutes so that the source of light may stabilize 1 Brightness 160 5cd m2 with LB140 filter No chart center of pattern box Minolta brightness meter LS 110 or equivalent Calibration method...

Page 65: ...nce of the pattern box PTB450 to 160 5cd m2 4 Fix the camera on a tripod and set it in front of the pattern box When preparations 1 4 are complete press the Enter key on the PC Lens is extended when t...

Page 66: ...ter Pattern box PTB450 CAMERA Setup for Camera Adjustment Fig 4 10 3 OFD sensitivity adjustment 1 Set the distance between the camera and pattern box 2 The LB140 filter is not placed in front of the l...

Page 67: ...Center Pattern box PTB450 CAMERA Setup for Camera Adjustment Fig 4 10 6 WB adjustment with filter 1 Set the distance between the camera and pattern box 2 Place the LB140 filter in front of the lens Wh...

Page 68: ...ter Pattern box PTB450 CAMERA Setup for Camera Adjustment Fig 4 10 8 WB adjustment with filter 1 Set the distance between the camera and pattern box 2 Place the LB140 filter in front of the lens When...

Page 69: ...ROM when adjustment has been completed correctly The Camera adjustment Complete screen appears Step 11 Transfer efficiency adjustment 1 Set the distance between the camera and pattern box 2 Place the...

Page 70: ...the Siemens star chart and the lens front of the camera to 611 5mm 2 Illuminate the AF chart with a light source Ensure that the brightness at the surface of the AF chart is between 9 0 and 11 5EV 3 P...

Page 71: ...chart at a distance of 611 5mm from the lens face of the conversion lens 2 Place the conversion lens at a distance of 11 2mm from the lens face of the lens 3 Adjust the position of the camera so that...

Page 72: ...72 4 Adjustments FinePix F30 Service Manual Fig 4 11 4 Step 5 The AF adjustment is completed Press the Enter key to return to the Adjustment Items Select Screen...

Page 73: ...ected by external light ensure that the vicinity of the gray chart is very dark 2 Ensure that distance is measured from the front of the camera during flash adjustment 3 When adjusting the flash alway...

Page 74: ...on the LCD monitor When preparations 1 and 2 are complete press the Enter key 1000 10mm Center CAMERA Setup for Flash Adjustment Fig 4 12 2 Step 3 Write the adjustment data to the flash ROM when adjus...

Page 75: ...efore setting the jig mode 2 Always measure input voltage in the vicinity of the DC IN terminal 3 When reducing the voltage adjust the stabilized power supply to ensure that the voltage is not reduced...

Page 76: ...e camera are connected If not return to the Jig Mode Setup screen and connect the FxF30 Battery jig and the camera 2 Supply power 3 70V to the camera from the FxF30 Battery jig When preparations are c...

Page 77: ...ations are complete press the Enter key Result 27 3 Supply 3 20V 0 02V 0 00V When preparations are complete press the Enter key Fig 4 13 3 Battery voltage adjustment 1 Supply 3 55V 0 02V 0 00V When pr...

Page 78: ...s are complete press the Enter key Result 34 2 Supply 3 35V 0 02V 0 00V When preparations are complete press the Enter key Result 27 3 Supply 3 20V 0 02V 0 00V When preparations are complete press the...

Page 79: ...s signal Y or color signal C does not appear in the WAVE No 0 window during adjustments check the connections of the video adjustment jig Step 1 Select F11 Video adjustment on the Adjustment Items Sel...

Page 80: ...using Multi cable AV USB for F30 2 Connect a yellow connector of the Multi cable AV USB for F30 with the video adjustment jig 3 Confirm Multi cable AV USB for F30 is connected with the camera When pr...

Page 81: ...t F3 LCD Adjustment on the Adjustment Items Select screen The LCD Adjustment Start screen appears Step 2 Run the adjustment in accordance with the instructions on the screen The LCD Adjustment Complet...

Page 82: ...at the center of the camera LCD monitor is in the LCD adjustment jig the sensor 2 Ensure that the periphery is as dark as possible 3 Confirm the VIDEO cable is not connected with the camera When prepa...

Page 83: ...the Adjustment Items Select screen The Download Complete screen appears if download is successful USB DC JACK FinePix F30 USB cable or Multi cable AV USB for F30 PC for adjustment and check Regulated...

Page 84: ...emove the Power cable jig from the camera 2 Turn off power switch 3 Reconnect Power cable jig 4 Switch camera power ON while pressing the shutter button 5 Press the Enter key after green LED lights on...

Page 85: ...e throughout the world For this reason each device has a unique ID as determined by the USB standard If multiple devices with the same USB ID are connected to a single PC the PC will be unable to iden...

Page 86: ...Fig 4 17 2 End Setting The End settings consist of the destination setting the USB_ID write and product mode settings Mass Storage recognition Press the Enter key Fig 4 17 1 Step 1 Select F12 End Set...

Page 87: ...model Press the Enter key Fig 4 17 3 Repair site ID input menu The repair site is selected from an undermentioned list A SAPPORO SS M BRITAIN B SENDAI SS N GERMANY C TOKYO SS O FRANCE D NAGOYA SS P SP...

Page 88: ...tment End screen appears Step 7 USB ID Selected U S A Press the Enter key Fig 4 17 5 Fig 4 17 6 FinePix F30 Adjustment completed 1 Remove USB cable from the camera 2 Press the Enter key The adjustment...

Page 89: ...Monitor TV monitor minimum resolution 600 lines LCD Inspection Data For LCD inspection ZJ00885 100 Dummy battery cover Create the dummy cover by catting the battery cover No BB19362 100 as shown in Fi...

Page 90: ...shock to the camera using the shock jig 1 Use a macro resolution chart as the subject 2 Set the camera to Macro mode 3 Set the camera up so that the chart fills the screen from corner to corner 4 Set...

Page 91: ...ra Turn the camera off 1 Check that STANDBY appears on the LCD monitor 2 Check that movie audio recording begins Check that REC appears on the LCD monitor 3 Check that movie audio recording ends and t...

Page 92: ...supply voltage 3 Attach the dummy battery cover 4 Set the Mode dial to Movie mode and turn the camera on 5 Set the power supply to half voltage 6 Set the pre end voltage 7 Set the end voltage 2 Press...

Page 93: ...2 3 70 V 0 05 V 5 550 mA or less 6 Backup check 4 Charge LED lights on 1 AUTO mode 2 New The default SETUP frame No setting is Continuous but to clear the number of frames in the frame number memory...

Page 94: ...100 200 A107 BB18166 101 HAND STRAP A108 FZ06639 100 AC ADAPTER A109 FZ05347 100 AC POWERCORD U A110 FZ06583 100 AV CABLE A111 FZ06584 100 USB CABLE W A112 FZ06578 200 BATTERY PACK A113 FZ06522 101 CD...

Page 95: ...FZ06639 200 AC ADAPTER A109 FZ05210 300 AC POWERCORD A110 FZ06583 100 AV CABLE A111 FZ06584 100 USB CABLE W A112 FZ06578 300 BATTERY PACK A113 FZ06522 101 CD ROM A114 BL00557 100 CAUTION W A115 BB180...

Page 96: ...AP A108 FZ06639 200 AC ADAPTER A109 FZ05210 300 AC POWERCORD A110 FZ06583 100 AV CABLE A111 FZ06584 100 USB CABLE W A112 FZ06578 300 BATTERY PACK A113 FZ06522 101 CD ROM A114 BL00557 100 CAUTION W A11...

Page 97: ...00 A107 BB18166 101 HAND STRAP A108 FZ06639 200 AC ADAPTER A109 FZ05210 400 AC POWERCORD A110 FZ06583 100 AV CABLE A111 FZ06584 100 USB CABLE W A112 FZ06578 300 BATTERY PACK A113 FZ06522 101 CD ROM A1...

Page 98: ...019 100 HDPE BAG 100 200 A107 BB18166 101 HAND STRAP A108 FZ06639 200 AC ADAPTER A109 FZ05210 300 AC POWERCORD A110 FZ06583 100 AV CABLE A111 FZ06584 100 USB CABLE W A112 FZ06578 300 BATTERY PACK A113...

Page 99: ...019 100 HDPE BAG 100 200 A107 BB18166 101 HAND STRAP A108 FZ06639 100 AC ADAPTER A109 FZ05210 300 AC POWERCORD A110 FZ06583 100 AV CABLE A111 FZ06584 100 USB CABLE W A112 FZ06578 300 BATTERY PACK A113...

Page 100: ...06 BB18019 100 HDPE BAG 100 200 A107 BB18166 101 HAND STRAP A108 FZ06639 100 AC ADAPTER A109 FZ05210 300 AC POWERCORD A110 FZ06583 100 AV CABLE A111 FZ06584 100 USB CABLE W A112 FZ06578 300 BATTERY PA...

Page 101: ...BAG NO 10 A106 BB18019 100 HDPE BAG 100 200 A107 BB18166 101 HAND STRAP A108 FZ06225 100 AC ADAPTER A109 FZ05432 300 POWER SUPPLY CORD A110 FZ06583 100 AV CABLE A111 FZ06584 100 USB CABLE W A112 FZ06...

Page 102: ...101 LDPE BAG NO 10 A106 BB18019 100 HDPE BAG 100 200 A107 BB18166 101 HAND STRAP A108 FZ06225 100 AC ADAPTER A109 FZ05432 300 POWER SUPPLY CORD A110 FZ06583 100 AV CABLE A111 FZ06584 100 USB CABLE W A...

Page 103: ...LED M225 CB1830 A100 MAIN PWB ASSY M226 FLYT164 100 TRANSFORMER M227 FGY096 0032 CONNECTOR M228 BB19384 100 PLATE L M229 BB19691 100 SHEET PWB M230 BU03301 100 R PANEL ASSY M231 FZ06574 100 KEY GUM M2...

Page 104: ...5 CB1830 A100 MAIN PWB ASSY M226 FLYT164 100 TRANSFORMER M227 FGY096 0032 CONNECTOR M228 BB19384 100 PLATE L M229 BB19691 100 SHEET PWB M230 BU03301 100 R PANEL ASSY M231 FZ06574 100 KEY GUM M232 FZ06...

Page 105: ...Y M226 FLYT164 100 TRANSFORMER M227 FGY096 0032 CONNECTOR M228 BB19384 100 PLATE L M229 BB19691 100 SHEET PWB M230 BU03301 100 R PANEL ASSY M231 FZ06574 100 KEY GUM M232 FZ06575 100 KEY FPC M233 BF059...

Page 106: ...B1830 A100 MAIN PWB ASSY M226 FLYT164 100 TRANSFORMER M227 FGY096 0032 CONNECTOR M228 BB19384 100 PLATE L M229 BB19691 100 SHEET PWB M230 BU03301 100 R PANEL ASSY M231 FZ06574 100 KEY GUM M232 FZ06575...

Page 107: ...M226 FLYT164 100 TRANSFORMER M227 FGY096 0032 CONNECTOR M228 BB19384 100 PLATE L M229 BB19691 100 SHEET PWB M230 BU03301 100 R PANEL ASSY M231 FZ06574 100 KEY GUM M232 FZ06575 100 KEY FPC M233 BF0595...

Page 108: ...108 6 Parts List FinePix F30 Service Manual MEMO...

Page 109: ...the set MAIN PWB ASSY BATTERY BT551 FZ04705 200 BACKUP ELEC PAPTS CONNECTOR CN101 FGB182 0391 CONNECTOR CJ 39P FB 0 3MM NH CN151 FGB173 0241 CONNECTOR CJ 24P FN 0 5MM NH CN401 FGY099 0201 CONNECTOR C...

Page 110: ...ual 7 Appendix 7 1 List of Related Technical Updates Issued To ensure that after sales srevice is performed accuratety keep a record here of the technical updates issued that cover this device Technic...

Page 111: ...26 30 Nishiazabu 2 chome Minato ku Tokyo 106 8620 Japan FUJI PHOTO FILM CO LTD...

Reviews: