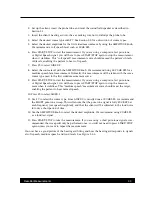


Real-Ear Measurements
107
5.8 Miscellaneous
This section describes a few real-ear features accessible from the Setup Menu.
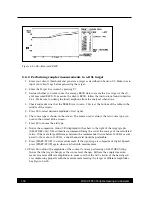
5.8.1 Single frequency response
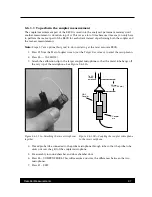
In some cases, it’s useful to be able to evaluate the real-ear response to a tone presented at a par-
ticular frequency. The single tone measurement in the Probe screens is always warbled.
To do this:
1. Enter the Probe mode by pressing F5 from the coupler screen.
2. Set up the client for testing as described in Section 5.1. Make sure to level the sound field
speaker.
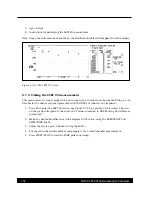
3. Press F1 to enter the Setup Menu.
4. Use the AMPLITUDE and FREQUENCY knobs to select SOURCE in the upper left corner of
the screen. If you don’t have the Composite Option, you will not have this selection, so skip
to step 6.
5. Press START/STOP to select TONE.
6. Use the AMPLITUDE and FREQUENCY knobs to select F7 DEFINITION in the PROBE
SETTINGS.
7. Press START/STOP to toggle SINGLE TONE.
8. Press F1 to return to the Probe mode.
9. Press F7 to highlight SNGL TONE.
10. Press START/STOP to start the measurement.
11. Use the AMPLITUDE and FREQUENCY knobs to make any desired adjustments to the tone.
The MIC SPL or MIC GAIN will be displayed in the lower right corner of the screen.
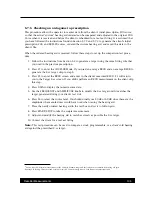
5.8.2 Smoothing
Smoothing is a way of averaging measurement results to limit testing artifacts caused by environ-
mental noise. The advantage of smoothing is that you will get a nicer looking curve that contains
fewer “spikes” that could be the result of the testing environment and not the aid itself. The disad-
vantage of smoothing is that it potentially gets rid of useful testing information.
To turn smoothing on/off:
1. Press F1 from a real-ear measurement screen.
2. Use the AMPLITUDE and FREQUENCY knobs to select SMOOTHING under PROBE settings.
3. Press START/STOP to toggle between ON and LOG.
4. Press F1 to return to the real-ear measurement screen.


