ASSEMBLY
OM 0437SB1388-A
13
T
RACTOR
P
REPARATION
See Dealer for Tractor Preparation information.
S
NOWBLOWER
A
SSEMBLY
The snowblower is assembled at the factory except for the parts in the hardware bag provided with the
snowblower, the chute and the options if appropriate. Use the present manual and lay out all parts for
assembly. Separate bolts and nuts into various sizes. After assembly, torque all the bolts according to the
Torque Specification Table
at the end of the manual.
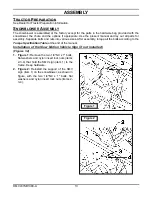
Installation of the Slow Motion Vehicle Sign (if not installed)
(Figures 1-2)
1. Figure 1:
Remove the two 1/4"NC x 1" bolts,
flat washers and nylon insert lock nuts (items
2-3-4) that hold the SMV sign (item 1) to the
frame. Keep hardware.
2. Figure 2:
Reinstall the support of the SMV
sign (item 1) on the snowblower, as shown in
figure, with the two 1/4"NC x 1" bolts, flat
washers and nylon insert lock nuts (items 2-
3-4).
Figure 1
Figure 2
Summary of Contents for SB1388
Page 1: ...OM0437SB1388 Rev1 11 15 Serial 1XFSB13X_E0140001 plus OPERATOR S MANUAL SNOWBLOWER SB1388...
Page 2: ......
Page 13: ...SAFETY DECALS OM 0437SB1388 A 11 Replace immediately if damaged...
Page 14: ...SAFETY DECALS OM 0437SB1388 A 12 Replace immediately if damaged...
Page 42: ...PARTS OM 0437SB1388 A 40 SNOWBLOWER ASSEMBLY FRONT PART...
Page 44: ...PARTS OM 0437SB1388 A 42 SNOWBLOWER ASSEMBLY REAR PART...
Page 46: ...PARTS OM 0437SB1388 A 44 THREE POINT HITCH...
Page 59: ......


