background image


15 

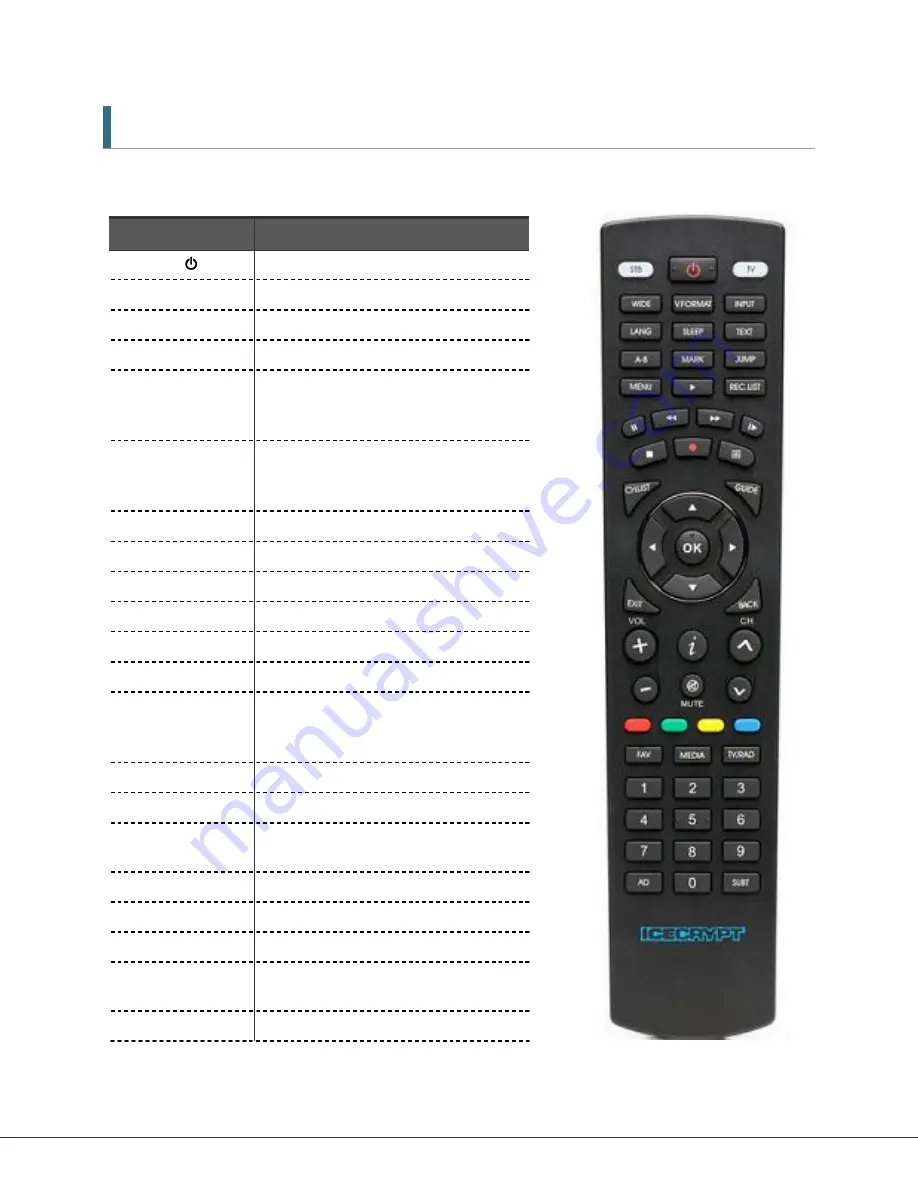
2.3 Remote Control Unit 

All receiver features can be controlled with the remote controller.   


Button 

Description 

POWER (    ) 

To turn the STB On/Off 

STB 

To switch to STB control mode 

TV 

To switch to TV control mode 

WIDE 

To select the Aspect ratio (4:3 and 16:9) 

V.FORMAT 

To select the video output mode to 
1080p, 1080i, 720p, 576p or 576i (HD 
Mode only) 

INPUT 

To switch the output of the TV SCART 
between the PVR‟s picture and the 
device connected to the VCR SCART 

LANG 

To select the audio language   

SLEEP 

To put the STB in Standby mode 

TEXT 

To activate Text or Interactive services 

A-B 

To set the block to Repeat, Copy and Cut 

MARK 

To set a bookmark 

JUMP 

To jump to bookmarked points 

MENU 

To display the main menu of the STB 
and come out from inner level to viewing 
mode (Exit all) 

Play (

To resume playback of the recorded file 

REC.LIST 

To display programmes to be recorded 

Pause ( 

II


To pause playing mode, recording mode 
and Time Shift 

REW (

◀◀ 

To rewind playback 

FF ( 

▶▶

  ) 

To fast forward playback 

SLOW (l

To playback in slow mode 

STOP ( 

  ) 

To stop playing mode, recording mode 
and Time Shift 

REC ( 

  ) 

To record the live channel 

Summary of Contents for T2400

Page 1: ......

Page 2: ...2 ...

Page 3: ...3 ...

Page 4: ...4 ...

Page 5: ...ol Unit 15 3 Connections 18 3 1 Connecting to the Antenna 18 3 2 Connecting to TV 19 4 Menu Overview 23 4 1 Menu Instruction 23 4 2 Menu Help 23 4 3 Menu Structure 24 5 Menu Operation 25 5 1 First Installation 25 5 2 Installation 26 5 3 Settings 29 5 4 PVR 32 5 5 Advanced 34 5 6 Information 37 6 Viewing General Information 38 6 1 Banner Information 38 6 2 Changing between TV Radio 39 ...

Page 6: ...vourite 43 6 7 GUIDE 44 6 8 Search 44 7 PVR 46 7 1 File List 46 7 2 PVR Banner 48 8 Multimedia 58 8 1 Media Player 58 8 2 MP3 Player 58 8 2 Photo album list 58 Additional Information 59 A 1 Troubleshooting 59 A 2 Technical Specifications 61 A 3 Remote Control Code List by TV Manufacturer 63 ...

Page 7: ...situations Caution Indicates a situation which if not avoided could damage the equipment or apparatus Warnings Indicates a hazardous situation which if not avoided could result in serious injury Note Indicates additional information to the user to make the user aware of possible problems and information of any importance to help the user to understand to use and to maintain the installation ...

Page 8: ...is is an official DivX Certified device that plays DivX video Visit www divx com for more information and software tools to convert your files into DivX video ABOUT DIVX VIDEO ON DEMAND This DivX Certified device must be registered in order to play DivX Video on Demand VOD content To generate the registration code locate the DivX VOD section in the device setup menu Go to vod divx com with this co...

Page 9: ...not blocked as this constitutes a serious fire hazard Do not clean the unit with petroleum based cleansers as this can damage the paintwork Use a dry dust free cloth Disconnect the power and antenna cables during long absences or during electrical storms Avoid dropping the Remote Control Unit If there is smoke or a burning smell turn off unplug the unit immediately Contact your local repair centre...

Page 10: ... and firmly pull the plug Do not move the unit while the power cord is plugged in Ensure that the unit is kept well away from magnetic sources such as speakers These can cause data loss from the HDD Ensure that the unit is placed in a position that is well ventilated and away from direct sunlight or sources of humidity Avoid use if the room air temperature exceeds 30 C or drops below 5 C Remember ...

Page 11: ...nnels and 24 Radio stations MPEG 4 MHEG5 Digital and fully DVB T T2 compliant Dolby Digital Plus Audio output Alphanumeric VFD with 16 characters and symbols Under 1W in passive mode standby power consumption Clock 2W Supports MP3 jukebox and DivX AVI movie playback Full High Definition video resolution 1920 x 1080P Click Wheel control from front panel 2 x USB for external storage and data transfe...

Page 12: ...12 1 2 Accessories HDMI cable User s Manual Remote Control AAA dry cell batteries x 2 Quick Start Guide ...

Page 13: ... cursor up down or left right in menu mode To transfer moving the cursor between up down and left right push the Menu button 3 Menu Button Shows the Main menu in viewing mode 4 EXIT Button Exits from the current menu or cancels the current operation if applicable 5 Display VFD module Shows channel information and indicates operating status In STAND BY mode the display shows local time 6 USB 2 0 po...

Page 14: ...dio L R Connect L R White Red analogue audio cables to your TV or amplifier 5 LAN Network Interface 6 USB2 0 USB 2 0 Host port 7 HDMI Connect to an HDMI input of TV 1080p 1080i 720p 576p resolutions supported 8 VCR SCART Connect a conventional VCR 9 TV SCART Connect a conventional TV 10 RS 232C Connect to a PC serial port for software upgrade 11 S PDIF Digital audio output for connection to an amp...

Page 15: ...CR SCART LANG To select the audio language SLEEP To put the STB in Standby mode TEXT To activate Text or Interactive services A B To set the block to Repeat Copy and Cut MARK To set a bookmark JUMP To jump to bookmarked points MENU To display the main menu of the STB and come out from inner level to viewing mode Exit all Play To resume playback of the recorded file REC LIST To display programmes t...

Page 16: ... to and previously tuned to channels VOL To change the volume level in viewing mode INFO i To show the information of the Banner and EPG MUTE To turn the sound on off CH To change channels in viewing mode F1 F2 F3 F4 To function as the corresponding colour option shown on screen FAV To select the favourite group list MEDIA To display the media contents MP3 DivX etc stored in the USB memory when th...

Page 17: ...V Manufacturer for your TV 2 Manufacturers often use several codes for different TV models so you may need to try a number of codes 3 Press and hold both the OK and TV buttons on the RCU for 3 seconds The TV button will turn on 4 Enter the 4 digit code 5 If the remote code is correctly recognized the TV button will turn off If the TV button still turns on please re enter the code 6 When the TV but...

Page 18: ... SIGNAL IN connector 2 To pass the antenna signal through to another device such as a VCR and your TV connect an appropriate 75 ohm co axial cable from the Loop Out connector of the STB The Loop Out connection will pass the antenna signal through to your Device even when the STB is in Standby mode or turned off at the switch ...

Page 19: ...onnect the HDMI output on the STB to the HDMI input on your monitor or TV 2 Select HD mode and set the video output mode to 1080p 1080i 720p 576p or 576i by pressing the V FORMAT button on RCU For access to HD programming at the highest available resolution use this connection method ...

Page 20: ...d Definition TV and VCR using the SCART output 1 Connect the Video TV SCART of STB to TV with fully featured SCART cable Select SD mode in Installation menu 2 Connect the VCR SCART of STB to VCR with fully featured SCART cable ...

Page 21: ...finition TV using the composite output 1 Connect the Video and Audio of TV to the Video and Audio Select SD mode in Installation Menu 2 Connect Red and White connector to Audio R and Audio L and Yellow into Video port respectively ...

Page 22: ...22 Connecting to A V receiver Dolby Digital amplifier 1 Connect the optical digital audio out on the STB to A V receiver 2 Set the audio out mode as AC3 ...

Page 23: ...hlighted 1 When you have selected the sub menu you want press button 2 If you want to return to the live screen press the MENU or EXIT button 4 2 Menu Help In the menu short information is displayed at the bottom on screen Using buttons Using buttons Using button Using the corresponding colour option shown on screen Using EXIT button Using numerical button ...

Page 24: ...anguage Parental Control To change the password and select the censorship classification Power Setting Select the Power save mode OSD Display To set OSD display time and transparency PVR Record Setting To change Record Setting Scheduled Recordings To move Timer List Library To move File list Format HDD To format HDD Advanced OTA To upgrade the receiver to the latest software version subject to bro...

Page 25: ...ple procedure 1 Select the desired language using the buttons 2 Press the button to confirm and begin scanning 1 Use the buttons to select HD when using HDMI or SD when using SCART connections 2 Press the button to confirm 1 Select the desired screen ratio using the buttons 2 Press the button to confirm 1 Select the desired display format using the buttons 2 Press the button to confirm ...

Page 26: ... previous step press the Red button and then you can reset options Menu button Resets options to default for that menu Cancel and Exit button If you want to skip First installation press the EXIT button 5 2 Installation 1 Press the Menu button to display the main menu 2 Press the button on the sub menu such as Auto Scan Manual Scan on the Installation is locked by password and the password pop up ...

Page 27: ...an 1 The left window shows TV channels and the right window shows Radio channels during the scanning process White channel names are new channels downloaded to your receiver Grey channel names are already existing channels 1 Choose Auto Scan menu and press button to begin scanning 2 You can press Exit at any time to stop scanning A pop up menu appears 3 If you allow the complete scan the same pop ...

Page 28: ... or Manual Scan menu and you receive signals from two or more transmitters the Multiple Region menu will open 1 To perform a Multiple Region selection simply press button 2 Use the Multiple Region menu to select which transmitter you would like to use 5 2 5 Reset to Factory Default 1 To perform a full factory reset to default value simply press button A dialogue will open 2 Use the numeric button ...

Page 29: ... only Dolby Digital DD If you set it to enabled you can hear Dolby Digital audio in preference to other audio formats when the broadcasting contents are encrypted with Dolby Digital audio format Digital Audio If you set it to enabled you can hear Dolby Digital audio through AC 3 decoder connected by RCA output Audio Delay Select the audio delay time to synchronize the audio with the video 5 3 2 La...

Page 30: ...buttons 2 Press the button to save and exit View All All channels can be watched 7 Channels rated over the age of seven are PIN protected 12 Channels rated over the age of twelve are PIN protected 15 Channels rated over the age of fifteen are PIN protected 18 Channels rated over the age of eighteen are PIN protected You have to enter the password to watch the channels which are blocked by the age ...

Page 31: ...the dialogue Banner display time Banner will remain onscreen for the selected time 1 9 seconds Screen Saver The Screen Saver function protects the screen from image burn on static images The following options can be selected Disable 5 10 20 30 60 and 120 Minutes Radio Screen Saver The Radio Screen Saver function protects from image burn when listening to a Radio channel The following options can b...

Page 32: ... Time shift If selected on the STB will automatically record the channel being watched to a temporary buffer not a file You can pause rewind etc live TV in this mode If selected off press the PAUSE button to activate the temporary record buffer Jump time If Yellow key is pressed during file playback when time bar is displayed the file playback will jump the set time 5 4 2 Scheduled Recordings Sche...

Page 33: ...ctions Play Delete Rename Lock PG button Change the Previous Page Next Page OK Operate the functions with selected File I Display selected File information RED button Delete the selected file Green button Copy and Move data to USB Yellow button Create folder Blue button Sort the selected file 5 4 4 Format HDD 1 If you press the button in this dialogue all files on the HDD will be erased 2 You will...

Page 34: ...ata in the selected frequency 5 5 2 USB Firmware Upgrade You can transfer the system software firmware between the STB and a USB drive memory stick or HDD 1 Connect the USB device to the Host port on the front or back panel of the STB 1 Select USB to STB and Yes to begin data transfer The warning dialogue shown below will remain onscreen during the update 2 The STB will reboot automatically once t...

Page 35: ... that plays DivX video Visit www divx com for more information and software tools to convert your files into DivX video ABOUT DIVX VIDEO ON DEMAND This DivX Certified device must be registered in order to play DivX Video on Demand VOD content To generate the registration code locate the DivX VOD section in the device setup menu Go to vod divx com with this code to complete the registration process...

Page 36: ...ws search of your PC for contact FTP site of STB Put in IP address of STB 5 5 5 Edit Channel 1 You can choose edit channel Group Select the Group or FAV If you have made Favourite Lists 2 If you choose The Channel Group you can delete the selected channel list on the Mode 3 If you choose The Favourite Group you can delete the selected favourite list on the Mode ...

Page 37: ...on such as Model ID Hardware version and Software version in this dialogue 5 6 2 HDD Information This window allows you to see the following HDD details Total size Free size Used size 5 6 3 Network Message This window allows you to see the Network Message at the booting time ...

Page 38: ...hannel information bar is visible to display the extended programme information The information bar remains onscreen when extended information bar is shown 2 Press the buttons to view further programme information page 3 Press the EXIT or INFO button to hide the information bar and extended programme information Resolution Shows the signal quality Shows the signal strength Time table for actual ev...

Page 39: ... Press the TV RAD button to switch between TV and Radio channels 6 3 TV or Radio Channel Lists Note HD channels will only be shown if available in your area TV Type TV or Radio Group Status Provider Name Group Delete Lock Rename View ...

Page 40: ... is required 6 3 2 Understanding and Using Mode Commands The icons shown at the bottom of the channel list provide access to a number of modes Modes are used to perform particular types of operations in the open window 1 Press buttons to select the desired mode 2 The selected mode icon is highlighted and the active mode name is shown on the label to the right of the icons 3 View mode is automatica...

Page 41: ...ons and press the button 3 Set the password A Lock icon will appear on the left of the Channel name This can be cancelled by pressing the button 4 Press the EXIT button to save and exit Favourite Mode Creating Favourites 1 Select the Favourite mode Two people icon with the buttons 2 Press the button and a small Favourite Window will appear to the right of the channel list 3 Choose the group number...

Page 42: ...udio using the buttons 2 Press the buttons to select a desired audio language 3 Press the button to change the audio language 6 4 2 Subtitle Language 1 Select the Subtitle using the button 2 Press the button to select a language 3 Press the button 4 If the selected language is different from what is available you can t watch the subtitle Audio Delay Pop up This function is to set synchronization f...

Page 43: ... Format 1 Press the V FORMAT button to set Video format of the STB 1080p 1080i 720p 576p 576i or Auto 2 Press the button to save and exit This option is not available in SD mode 6 6 Favourite While watching TV or listening to Radio press the FAV button You can see a small pop up window You can select a Favourite group 1 Select the Favourite using the buttons 2 Press the buttons to select a group 3...

Page 44: ... and then the detailed GUIDE information will appear The small screen in the left will only be changed if you press the button on the channel list 3 Press the EXIT button to exit Press the REC button to reserve channels by event If you want to know the detailed description about scheduling a recording refer to the description in chapter 7 2 3 6 8 Search 6 8 1 Keyword Search 1 Press the Search Gree...

Page 45: ...t and press button on desired programme to set a recording or reminder 6 8 2 Genre Search 1 Press Search Green button and then small dialogue will appear 2 Select the Genre Search option 1 A small window will be displayed 2 You can select Genre using the buttons and press button 3 Scroll through list and press button on desired programme to set a recording or reminder ...

Page 46: ...e file to play Delete Select the file to delete Rename Select the file to rename Lock Select the file to lock 7 1 1 Playback mode 1 You can see the detailed file information 2 Press the INFO button to see the information for the selected file 3 Press the EXIT button to hide the information Play Delete Rename Lock HDD Information ...

Page 47: ... And then a small selecting window will be displayed 3 You can select position to copy move and the button 4 Press the EXIT button to exit 7 1 4 Create Folder Mode 1 Select Create Folder mode using the Yellow button And then a small editing window will be displayed 2 You can write each letter of the foler name using the numeric buttons and select folder creation icon and button 3 Press the EXIT bu...

Page 48: ...corded 7 2 1 Time Shift Time Shift function automatically records the current playing programme temporarily 1 If Time Shift function is enabled in the PVR menu Time Shift is always working default is 2 hours The buffer is reset if you change the channel You can not disable the Time Shift function in enabled mode except when you choose to record the channel Record Time PVR Status Current Position P...

Page 49: ...inute intervals The yellow time on the time bar increases to show this 3 Record mode can only be cancelled by pressing the STOP button One recording and playback the same channel simultaneously 1 Press the REC button on the desired channel 2 If a recording is already in progress press the REW button then use the buttons to find the position you want to watch from 1 Press the PLAY button at the des...

Page 50: ...an record another channel pressing the REC button 3 Two channels will be recorded simultaneously 1 If you want to stop recording press the STOP button 2 Select the desired channel using the button and press the button on the desired channel to select 3 Press button on YES to confirm or NO to cancel Two recording and playback one file simultaneously 1 Press the REC button on the desired 2 channels ...

Page 51: ... If you press the REC on your selected programme again it deletes the recording 4 If there are options for Series Record or a Recommended Recording you will be prompted see next sections If you select a standard definition programme a message asking to replace with its high definition version will appear If HD broadcasting has the same data as SD 1 A successful recording booking is listed in the R...

Page 52: ...he time at which the entire series has started recording 2 Recorded programmes move to and shows in a Series Folder for that programme Recommendation Recording 1 When you make a Single or Series recording if the R icon shows you will be prompted to record other recommended programmes of the same genre 2 The Recommended programmes will be listed in a pop up box along with the options to record with...

Page 53: ...ramme Reminder Set a reminder message to view a programme without recording Once set the programme will be highlighted in Yellow in the EPG 1 In the EPG select the programme you want to be reminded of 2 Press the REC button on your selected programme 3 Select Reminder from the pop up menu 4 Selected programme will be highlighted in yellow 5 To delete reminder press REC button again Adding a Manual...

Page 54: ...e or PLAY button A Play B PLAY Resume 1 Press the buttons or trick buttons such as REW FF etc if you want to see the status of playback 1 Press the numeric buttons 0 9 in Playback mode 2 If you press 55 play position will jump to 55 of file duration 3 Press the STOP button to stop playback and return to File List 4 Press EXIT to return to Live TV ...

Page 55: ...rget a special position in that file 1 Play the file you want to watch 2 Move the control position to the favoured position using the buttons Then press the MARK button and a small bar will be placed at that position 3 To delete the Bookmark move the control position using the buttons to the desired Bookmark press the MARK button again 4 Press the JUMP button and the control position will jump to ...

Page 56: ...utton continuously speed will be increased up to 4 times Fast forward icon on Playback mode Fast forward icon on Time Shift mode Rewind Speed x2 x4 x8 x16 1 Press the REW button 2 If you press the REW button continuously speed will be increased up to 4 times Slow 1 Press the SLOW button 2 If you press the SLOW button continuously speed will be decreased up to 1 4 times ...

Page 57: ...ton again on the end point and then a pop up window is displayed 2 You can select the function such as Repeat block Copy block or Cut block using the buttons 3 Press the button to start repeating copying or cutting block 4 Press the EXIT button or the A B button to cancel setting block Repeat block Select to play and repeat the desired section Copy block Select to copy the desired section as a new...

Page 58: ...MP3 player Photo album Press to select the device 8 1 Media Player 1 Select the Media Player and Device 2 Select the File list 3 Press to Play the file 8 2 MP3 Player 1 Select the MP3 Player and Device 2 Select the File list 3 Press to Play the file 8 2 Photo album list 1 Select the Photo album and Device 2 Select the File list 3 Press to Play the file ...

Page 59: ...y connected Incorrect antenna connection Connect the antenna cable correctly No or Bad signal message is displayed Check other devices connected between antenna and the STB or adjust the antenna position Audio muting Press the MUTE button to unmute the sound Also check amp or TV volume and input settings if applicable TV Power is off Turn on the TV Wrong TV input Select the correct TV input The ST...

Page 60: ...ries if necessary Poor picture or audio quality Low antenna power or signal loss in cabling Add an antenna booster or turn on Antenna Power in the STB menus Check video cables and replace if necessary Broadcasting fault Wait until the broadcaster remedies the fault or electrical storm etc has passed Some channels are not found when scanning Low antenna power or signal loss in cabling Add an antenn...

Page 61: ...QAM 64QAM Code rate 1 2 2 3 3 4 5 6 7 8 Guards intervals 1 4 1 8 1 16 1 32 FEC decoder Reed Solomon Viterbi Decoder for 16 parity bytes Block lengths 204 byte MCPC and SCPC Supported 2 MPEG Parameter Specifications Transport Stream MPEG 2 ISO IEC 13818 Transport Stream Specification Video MPEG 2 MP ML MPEG 4 H 264 AVC Audio MPEG 1 2 Audio Layer 1 2 3 Dolby Digital Plus MPEG 2 4 AAC Video bit rate ...

Page 62: ...ort Host x 2ea LAN port RJ45 4 Power Supply Parameter Specifications Input voltage 90 260VAC SMPS type Power consumption Operation max 28W Standby under 1W Power save mode without clock Protection Separate internal fuse Lighting protection Lighting protection 5 Environmental Parameter Specifications Operating temperature 0 45 Storage 10 50 Storage humidity range 5 90 Rh Non condensing Operating hu...

Page 63: ... 0089 0085 0013 0058 A t ori 0001 0086 0066 0062 0061 A uchan 0013 0049 0072 0019 0024 A udi osoni c 0001 0005 0039 0103 0015 0040 0067 0115 0062 0012 0085 0086 0161 0048 0076 0129 0037 0024 0020 0051 0163 A udi ot on 0051 0037 0024 A kashi 0108 0001 A udi ow orl d 0081 A ki ba 0020 0025 0047 0005 A ut ovox 0023 0062 A VP 0161 A ki ra 0043 A W A 0002 0004 0001 0039 A ki t o 0005 0062 0042 0005 006...

Page 64: ...0004 0030 0063 0024 0005 0062 B randtEl ectroni que 0026 0028 C onti nentalEdi son 0012 0026 0052 B ri nkm ann 0005 0062 0080 0059 C osm el 0001 0005 0062 0043 0051 C rosl ey 0023 0013 B ri onvega 0005 0062 0034 C row n 0001 0084 0037 0051 B ri tanni a 0019 0005 0062 0052 0085 B rother 0024 0067 0086 0043 0018 B runs 0051 0078 0029 0115 B SR 0013 0033 C S El ectroni cs 0019 0020 0023 B TC 0020 C T...

Page 65: ...062 Evesham 0127 D i xi 0001 0005 0062 0023 Excel 0005 0062 D L 0113 0097 0005 0065 Expert 0013 0110 Exqui si t 0005 0062 0023 D om eos 0080 Fagor 0005 0062 D om l and 0174 Fai rTec 0168 D ream Vi si on 0155 Fam i l yLi fe 0005 0062 D SE 0109 0151 0103 Fast 0160 D TS 0001 Fenner 0039 0001 D ual 0030 0059 0005 0062 Ferguson 0007 0071 0026 0028 0173 0174 0013 0116 0175 0012 0063 0005 0072 0117 0115 ...

Page 66: ...0005 0062 G rundi g 0017 0056 0060 0016 G al axi 0005 0062 0033 0013 0006 0052 0005 0046 G al axi s 0037 0043 0005 0062 0083 0062 0065 0001 G al eri a 0001 0004 0037 0163 0161 G B C 0013 0001 0039 0020 0139 0015 0142 0030 0035 G runkel 0118 G E 0030 0015 0025 0063 H B 0101 0026 0012 0028 0071 H aaz 0083 G eantC asi no 0013 H ai er 0081 0024 G EC 0013 0033 0005 0058 H al i fax 0024 0019 0062 H am m...

Page 67: ... 0033 0061 0013 0048 H oshai 0020 0047 0025 0049 0165 0018 0029 H uanyu 0039 0019 0067 0069 0072 0035 H ugoson 0167 0125 I TV 0024 0005 0062 0023 H ygashi 0019 0039 H yper 0001 0019 0023 JD V 0164 H ypersoni c 0033 Jean 0004 H ypson 0005 0062 0085 0086 JEC 0003 0024 0025 0047 0161 JM B 0005 0055 0074 0039 0115 0080 0051 0062 0046 0161 H yundai 0005 0110 0062 0083 Jocel 0084 0108 0092 0153 0151 Jub...

Page 68: ...0024 M anesth 0005 0062 0024 0003 K yoto 0013 0019 0013 0035 L SEl ectroni c 0110 0085 M anhattan 0005 0062 0080 0115 LaSA T 0051 0037 0132 0013 0096 Lavi s 0115 0005 0013 M arantz 0005 0062 0042 Leader 0001 M ark 0005 0062 0019 0039 Lecson 0005 0062 0001 0085 0086 Legend 0001 M aster s 0055 0005 Lem ai r 0041 M asuda 0020 0038 0001 0024 Lenco 0005 0001 0013 0039 M asuda 0005 0062 0062 0065 0115 M...

Page 69: ... 0012 M i noka 0042 0005 0062 N oki a 0033 0013 0049 0061 M i rror 0159 0053 0048 0029 0018 M i stral El ectroni cs 0175 0039 0072 0067 0165 M i tsubi shi 0011 0009 0057 0005 0069 0012 0015 0004 0175 0060 N ordm ende 0012 0085 0113 0026 0062 0018 0115 0063 0030 0017 0005 M i tsuri G eneral 0013 0062 0028 0013 0129 M i var 0037 0019 0068 0058 N orfol k 0013 M onaco 0001 N orm erel 0005 0062 M organ...

Page 70: ...ProfiTroni c 0005 0062 0013 Prol i ne 0005 0062 0071 0074 Pal soni c 0024 0042 0005 0040 0041 0142 0020 0081 0062 0095 Prosoni c 0005 0062 0037 0039 0000 0043 0096 0122 0038 0080 0085 0019 Panam a 0001 0024 0019 0005 Protech 0005 0062 0001 0023 0062 0023 0024 0043 0080 0025 Panashi ba 0000 0013 0051 0115 Panasoni c 0077 0011 0022 0033 Proton 0015 0036 0058 0005 0062 Provi si on 0055 0005 0062 0115...

Page 71: ...005 0062 0162 0161 0164 0006 R i nex 0095 0043 Scotl and 0013 R oadstar 0115 0001 0043 0005 Scott 0121 0015 0062 0085 0080 0020 Sears 0015 0024 0025 0121 0159 Seaw ay 0074 R odex 0005 0062 Seel ver 0062 0115 0005 R over 0004 0111 SEG 0005 0062 0115 0145 R ow a 0024 0081 0084 0001 0080 0052 0001 0013 0019 0065 0005 0062 0024 0074 0004 0023 R oyalLux 0037 0042 0028 0034 0019 0118 0020 R TF 1065 0162...

Page 72: ... Tandy 0020 0023 0009 0013 Soni tron 0018 0037 0029 Tashi ko 0004 0014 0019 0013 Sonnecl ai r 0005 0062 0035 Sonoko 0005 0062 0001 0024 Tatung 0151 0005 0062 0058 0025 0002 0161 0158 0129 Sonol or 0018 0013 0149 0061 0168 0033 0025 TC M 0085 0135 0101 Sontec 0005 0062 0037 0001 Teac 0081 0057 0005 0145 Sony 0149 0002 0156 0031 0115 0062 0084 0080 0004 0005 0062 0047 0083 0024 0162 Sony 0009 0014 0...

Page 73: ...2 0001 U l travox 0039 0023 0019 0013 0010 0039 0038 0040 0005 0062 0023 0086 0013 0115 U ni c Li ne 0005 0062 0048 0047 Tenson 0001 U ni ted 0085 0005 0086 0062 Tesl a 0005 0161 0115 0065 0164 Tevi on 0059 0166 0129 0136 U ni versal 0005 0062 0005 0151 0062 0101 U ni versum 0165 0010 0017 0048 0076 0080 0116 0085 0060 0033 0023 0053 0115 0127 0135 0049 0037 0070 0043 Texet 0039 0001 0019 0020 000...

Page 74: ... l tech 0085 W el tbl i ck 0005 0062 W eston 0005 0062 W harfedal e 0005 0109 0059 0114 0062 0151 W hi te W esti nghouse 0019 0005 0062 0162 W i ndsor 0080 0115 W i ndstar 0025 W i ndySam 0062 W i ntel 0085 W orl d of Vi si on 0112 0167 0110 0135 0136 0111 0125 W orl dvi ew 0047 X Vi ew 0168 Xeni us 0074 XLogi c 0081 0108 Xoro 0122 0125 Xrypton 0005 0062 Yam aha 0077 0152 Yam i shi 0025 0047 0020 ...

Page 75: ...75 Cover will be inserted ...

Page 76: ...ss the buttons to select time period 4 Press button to select 5 Press the buttons to toggle between channels and timeline 6 Press the INFO button for more detailed information Check Disc mode 1 Press the MENU button 2 Press the buttons to select HDD Check Disc 3 Press the button 4 A pop up message appears select YES and press button Each time the PVR is switched on from being switched off at the m...

Reviews: