background image

6

6.) Slowly close the discharge valve until the cavitation is 
no longer heard.
7.) The pump is now adjusted so that the system 
demand will not exceed what can be supplied.
8.) If the supply pressure or water demand varies 
over time, this procedure may need to be repeated to 
eliminate cavitation.

DRIvE DIP SWITCH OPTIONS

The Inline System is factory set to properly operate in 
most installations without needing any adjustments 
or changes to the DIP switch settings. If changes are 
required, the following is a description of what control 
logic changes will occur as a switch’s position is 
changed.

WARNING

 Serious or fatal electrical shock may result 

from contact with internal electrical components. DO 
NOT, under any circumstances, attempt to modify DIP 
switch settings until power has been removed and  
5 minutes have passed for internal voltages to discharge! 
Power must be removed for DIP switch setting to  
take effect. 
UNDERLOAD SENSITIVITY SELECTION
The Inline System controller is configured at the factory 
to ensure detection of underload faults in a wide variety 
of pumping applications. In rare cases this trip level 
may result in nuisance faults. If the underload switch 
is activated it is best to observe the system’s behavior 
during the underload condition to be sure it will perform 
as expected. Once the controller begins to regulate 
pressure, check operation at several flow rates to make 
sure the default sensitivity does not induce nuisance 
underload trips. 
If it is necessary to adjust the underload sensitivity, 
remove power and allow the controller to discharge. Wait 
5 minutes to allow internal voltage to dissipate, locate 
the DIP switch bank. Use a small screwdriver (provided) 
to move position 1 to “ON” as shown. 
STEADY FLOW SELECTION
The Inline System is configured at the factory to ensure 
quick response to maintain constant pressure. In rare 
cases (as with a water line tap before the pressure 
tank), the unit may need to be adjusted to offer better 
control. If the unit is used on a system that has a water 
line tap before the pressure tank or where audible 
speed variations of the pump can be heard, adjusting 
the pressure control response time may be necessary. 
After enabling this feature, the installer should check 
flow changes for possible overshoot. A larger pressure 
tank and/or wider margin between regulation and valve 
pressure may be required as the steady flow feature 
reduces the controller’s reaction time to sudden changes 
in flow. 
If it is necessary to adjust the pressure control, remove 
power and allow the controller to discharge. Wait 5 
minutes to allow internal voltage to dissipate, locate the 
DIP switch bank. Use a small screwdriver (provided) to 
move position 2 to “ON” as shown.

restrictions in the plumbing and will be more pronounced 
the farther the taps are from the pressure sensor. This 
would be true of any system, and if observed, should not 
be interpreted as a failure in the performance of the Inline 
Constant Pressure System

.

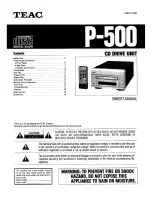
ADJUSTING THE PRESSURE SENSOR
The pressure sensor communicates the system pressure 
to the Inline Constant Pressure System. The sensor 
is preset at the factory to 50 psi (3.4 bar), but can be 
adjusted by the installer using the following procedure:
a. Remove the rubber end-cap (

FIGURE 4).

b. Using a 7/32" Allen-wrench (provided), turn the 
adjusting screw clockwise to increase pressure and 
counter-clockwise to decrease pressure. The adjustment 
range is between 25 and 80 psi (1.7 and 5.5 bar)   
(1/4 turn = approximately 3 psi (0.2 bar)).
c. Replace the rubber end cap.
d. Cover the pressure sensor terminals with the rubber 
boot provided (

FIGURE 4)

ADJUSTING PUMP SO SYSTEM DEMAND IS NOT 
MORE THAN SYSTEM SUPPLY
Inline Systems are typically used to increase municipal 
water pressure anywhere from 10 psi (0.7 bars) to 70 
psi (4.8 bars) above what is being supplied by the water 
utility. For the pump to operate properly as it boosts the 
municipal water to the desired pressure, a consistent 
and steady flow of water is required. The system will fail 
prematurely if it is set to operate at a point beyond what 
can be supplied.
PROCESS TO ENSURE PUMP IS RECEIVING 
ENOUGH WATER TO MEET DEMAND
1.) Install a shut-off valve in the plumbing near the 
discharge of the pump.
2.) Close the valve, but make sure that the supply water is 
allowed to freely flow into the pump without restriction.
3.) Adjust system for maximum flow demand.
4.) Turn on the pump, and begin opening the discharge’s 
shut-off valve.
5.) Continue opening the discharge valve until a very 
distinct noise is heard coming from the pump. This noise 
is called Cavitation (which can destroy the pump over 
time), and will sound like there is gravel inside the pump. 
STOP opening the discharge valve once cavitation  


is heard.

FIGURE 4: 

Non-Adjustable

Set at 100 psi

Quick Connect

Lead Connect

Pressure

Sensor

Boot

Remove Rubber End Cap To Adjust Pressure 

With 7/32" Allen Wrench Provided

Pressure Sensor

(Red/Black)

Pressure Shut-off Sensor

(Green/White) 

Optional

Summary of Contents for SubDrive Inline 1100

Page 1: ...dous voltage Can shock burn or cause death Ground pump before connecting to power supply Disconnect power before working on pump motor or tank WARNING Hazardous voltage Can shock burn or cause death Ground pump before connecting to power supply Disconnect power before working on pump motor or tank WARNI NG TERMINAL USING WIRE NO SMALLER THAN MOTOR CABLE WIRES TO REDUCE RISK OF ELECTRICAL SHOCK DIS...

Page 2: ...60 PSI 4 1 bar Stainless steel construction for all wetted surfaces Drive Controller Protection Features No in rush power on transient current Over pressure shut off optional See Replacement Parts Section Low water shut off Locked pump detection shut off High voltage lightning surge protection Low line voltage protection Motor under and overload protection Open and short circuit protection NEMA 4 ...

Page 3: ...roller will try to restart when the fault condition subsides INSTALLATION LOCATION OF THE Inline Constant Pressure System Decide on a location for the pump installation that is suitable based on the enclosure rating of the Inline System WARNING Liquid tight conduit and fittings must be used to maintain NEMA 4 rating Choose a clean well ventilated location that provides protection from freezing flo...

Page 4: ... electrical power at the main breaker 2 Drain the system if applicable 3 Mount the Inline System in the desired location using mounting screws Screw locations are shown in FIGURE 1 The Inline System may be installed in any orientation 4 Install inlet and outlet plumbing and pressure tank as shown in FIGURE 2 A check valve must be installed in the inlet and outlet plumbing The outlet check valve sh...

Page 5: ...y look like Ball Valve Check Valve Ball Valve Union Coupling Union Coupling To Home Water Supply Inline System Pressure Shut off Sensor optional 2 Gallon Tank Check Valve Power Ball Valve Pressure Sensor Discharge into drain rated for max pump output at relief pressure Pressure Relief Valve Pressure Gauge Flow Optional Bypass 5 feet or Less Check Valve Figure 2 NOTICE If system plumbing does not h...

Page 6: ...PERATION RATINGS CAUTION Maximum operating pressure should be limited to whatever level is needed to protect the rest of the existing system plumbing When required a pressure relief valve should be installed and or the optional over pressure sensor can be used Maximum suction pressure is 70 psi 4 8 bar Maximum water temperature is 104 F 40 C Avoid pumping abrasive or sandy water WARNING Hazardous ...

Page 7: ...s the steady flow feature reduces the controller s reaction time to sudden changes in flow If it is necessary to adjust the pressure control remove power and allow the controller to discharge Wait 5 minutes to allow internal voltage to dissipate locate the DIP switch bank Use a small screwdriver provided to move position 2 to ON as shown restrictions in the plumbing and will be more pronounced the...

Page 8: ...to pump before servicing unit DRAINING NOTICE Disconnecting the pump will not necessarily drain all other parts of the piping system If there are any concerns with the proper procedure or necessity of draining the suction plumbing contact a water systems professional All piping and water tanks exposed to freezing weather should be drained If there are any concerns with the proper procedure to drai...

Page 9: ...8 Overpressure Switch H 305707909 19 2 Gallon Pump Tank Kit I 305707910 1 Item ships with fastener kit D REPLACEMENT PARTS CONTINUED Spare Parts Kits for Inline 1100 LG Number Description Kit Grouping Identifier Repair Part Order Codes 1 Drive Assembly A 305707907 2 Mounting Posts 3 Pump Motor Assembly B 305707902 4 Mounting Feet C 305707903 5 10 24x1 625 Pan Head Torx D 305707904 6 10 Lock Washer...

Page 10: ... N A 5 OPEN MOTOR CIRCUIT Loose motor connection Wires to motor are open circuit Check motor connection 6 SHORT CIRCUIT When fault is indicated immediately after power up Short circuit due to defective cable motor or drive Check motor connections Replace drive or motor 7 OVERHEATED DRIVE High ambient temperature Improper ventilation Clogged heat sink Ambient temperature has exceeded 104 F 40 C Shi...

Page 11: ...Curves 5 10 15 20 25 30 35 40 45 50 0 10 20 30 40 50 60 70 80 Feet M 3 PH GPM LPM Meters PSI Recommended Continuous Operating Range 0 10 20 30 40 50 0 20 40 60 80 100 120 140 160 180 0 1 2 3 4 5 6 7 8 9 10 11 0 20 40 60 80 100 120 140 160 180 ...

Page 12: ... 15 8 103 56 6 18 0 87 7 1 1 4 Schedule 40 pipe 1 380 in i d Type L Copper tube 1 265 in i d GPM Velocity Ft S Friction Loss Ft Hd 100 of pipe Velocity Ft S Ft Hd 100 Pipe Fric Loss C 130 Steel C 100 PVC C 140 4 0 0 86 0 56 0 30 1 02 0 52 6 0 1 29 1 20 0 65 1 53 1 12 8 0 1 72 2 04 1 10 2 04 1 92 10 2 15 3 08 1 67 2 55 2 90 12 2 57 4 31 2 33 3 06 4 04 14 2 00 5 73 3 10 3 57 5 35 16 3 43 7 34 3 96 4...

Page 13: ...or 4 Product was damaged as a result of negligence abuse accident misapplication tampering alteration improper installation operation maintenance or storage nor to an excess of recommended maximums as set forth in the product instructions NEITHER SELLER NOR THE COMPANY SHALL BE LIABLE FOR ANY INJURY LOSS OR DAMAGE DIRECT INCIDENTAL OR CONSEQUENTIAL INCLUDING BUT NOT LIMITED TO INCIDENTAL OR CONSEQ...

Reviews: