– 11 –
CE-50 / CE-75 / TE-50 / TE-75 / TE-75S / TE-125 / TE-125BF
EN
DRAFT
ONL
Y
Air switch operated
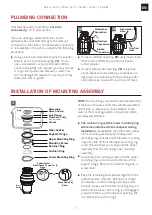
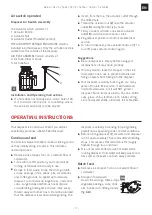
Disposer Air Switch Assembly
The Actuator which consists of:
1. Actuator Button
2. Actuator Nut
3. Actuator Outlet (Threaded portion)
THE AIR SWITCH SENSOR ENCLOSURE which is
installed into the disposer. Only the air tube nozzle is
visible from the outside of the disposer.
AIR TUBE ASSEMBLY which consists of:
4. Air Tube-Clear or black
5. Air Tube Nut
5
1
2
3
Installation and Operating Instructions
X
X
If a hole does not already exist - drill a hole of 35
mm to 40 mm into the sink or countertop where
the actuator button (
1
) is to be placed.
X
X
Insert, from the top, the actuator outlet through
the drilled hole.
X
X
Thread the actuator nut (
2
) onto the actuator
outlet (
3
) and tighten firmly by hand.
X
X
Firmly connect air tube: one side to actuator
outlet (
3
) and one side to sensor inlet.
X
X
Plug disposer power cord into main electrical
service.
X
X
To turn on disposer, press actuator button (
1
). To
turn off, press actuator button again.
Suggestions
X
X
Be sure disposer is empty before using your
dishwasher so it may drain properly.
X
X
You may want to leave the stopper in the sink
drain when not in use to prevent utensils and
foreign objects from falling into the disposer.
X
X
Your disposer is sturdily built to give you many
years of trouble free service. It will handle all
normal food wastes, but it will NOT grind or
dispose of such items as plastic, tin cans, bottle
caps, glass, china, leather, cloth, rubber, string,
clam and oyster shells, aluminum foil or feathers.
OPERATING INSTRUCTIONS
Your disposer is Continuous Feed if you did not
specifically purchase a Batch Feed Disposer.
Continuous feed
The Anti-Jam Swivel Impellers make a clicking sound
as they initially swing into place. This indicates
normal operation.
X
X
Remove sink stopper. Turn on a medium flow of
cold water.
X
X
Turn switch to ON position; your motor will be
turning at full speed and ready to use.
X
X
Scrape in food waste. Down the drain go table
scraps, peelings, rinds, seeds, pits, small bones
and coffee grounds. To speed up food waste
disposal, cut or break up large bones, rinds and
cobs. Large bones and fibrous husks require
considerable grinding time and are more easily
thrown away with other trash. Do not be alarmed
that the disposer slows down while grinding. The
disposer is actually increasing torque (grinding
power) and is operating under normal conditions.
X
X
Before turning disposer off, let water and disposer
run for approximately 15 seconds after shredding
stops. This assures that all waste is thoroughly
flushed through trap and drain.
X
X
It is not recommended to use hot water while
running disposer. Cold water will keep waste and
fats solid so disposer can flush away particles.
Batch feed
X
X
Remove sink stopper. Turn on a medium flow of
cold water.
X
X
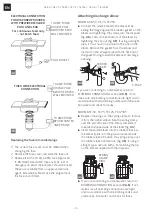
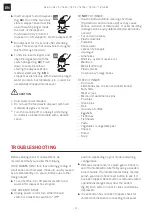
Scrape in food waste.
6A
Down the drain go table scraps,
vegetable peelings, cobs, rinds,
pits, bones and coffee grounds
(fig.
6A
).
Summary of Contents for CE-50
Page 2: ...2 CE 50 CE 75 TE 50 TE 75 TE 75S TE 125 TE 125BF EN...
Page 63: ...63 CE 50 CE 75 TE 50 TE 75 TE 75S TE 125 TE 125BF ES...
Page 65: ...65 CE 50 CE 75 TE 50 TE 75 TE 75S TE 125 TE 125BF EL FRANKE X X X X Z Z X X 9 9 Z Z...
Page 67: ...67 CE 50 CE 75 TE 50 TE 75 TE 75S TE 125 TE 125BF EL...
Page 74: ...74 CE 50 CE 75 TE 50 TE 75 TE 75S TE 125 TE 125BF EL X X X X OFF X X 3 X X X X 7...
Page 75: ...75 CE 50 CE 75 TE 50 TE 75 TE 75S TE 125 TE 125BF EL 7...
Page 76: ...76 CE 50 CE 75 TE 50 TE 75 TE 75S TE 125 TE 125BF EL Z Z 15 25 2002 96...
Page 77: ...77 CE 50 CE 75 TE 50 TE 75 TE 75S TE 125 TE 125BF EL...
Page 103: ...103 CE 50 CE 75 TE 50 TE 75 TE 75S TE 125 TE 125BF RU FRANKE X X X X Z Z X X 9 9 Z Z...
Page 105: ...105 CE 50 CE 75 TE 50 TE 75 TE 75S TE 125 TE 125BF RU...
Page 112: ...112 CE 50 CE 75 TE 50 TE 75 TE 75S TE 125 TE 125BF RU X X X X X X 3 X X...
Page 113: ...113 CE 50 CE 75 TE 50 TE 75 TE 75S TE 125 TE 125BF RU X X 7 7...
Page 114: ...114 CE 50 CE 75 TE 50 TE 75 TE 75S TE 125 TE 125BF RU Z Z 15 25 2002 96 EC...
Page 115: ...115 CE 50 CE 75 TE 50 TE 75 TE 75S TE 125 TE 125BF RU...
Page 127: ...127 CE 50 CE 75 TE 50 TE 75 TE 75S TE 125 TE 125BF TR...


