


31
ENGLISH
N.B. It is strictly forbidden to connect any inter-
changeable attachment not in compliance with the
safety and health regulations in force and therefore
without the «EC» («CE») brand. It is better not to
use accessories that are not approved by the manu-
facturer, under penalty of warranty voiding.
4.1.4 PRELIMINARY CHECKS
Before you begin to use the machine:
- Check to make sure that all the bolts are tightly
clamped.
- Make sure that the wheels have been assembled
correctly and that the arrow stamped on the tyre
flanks corresponds to the direction in which the
machine advances.
WARNING
The engine does not have lubricant. Before start-
ing the engine, it is necessary to read the instruc-
tions reported in the engine instructions manual and
fill it with the right type and quantity of oil.
4.2 STARTING
Before working and starting the engine, always check:
- the engine oil is at level (make reference to the en-
gine instructions manual);
- the engine air filter is clean;
- the tank has enough fuel.
As for the fuel type, make reference to the engine in-
structions manual by checking the identification data
reported on the engine identification plate.
The fuel tank is placed on the engine (fig.1 rif. 7).
DANGER
Do not refuel the machine near sparks, lighted ciga-
rettes or whatsoever fires.
Always shut the engine off before removing the tank
cap and wait till it is cool enough.
Before restarting the machine, check that there are
no oil or fuel leaks; otherwise, clean them thor-
oughly and wipe them. If some gasoline is spilled
on the machine parts, wipe it immediately. The fuel
tank shall not be filled up to the full capacity of the
tank to prevent overflow.
After having ensured that all bystanders have moved
well away from the range of action of the machine,
start this latter in the following way:
1) Move the throttle (Fig. 1 ref. 14) to the position
indicated in the engine’s instruction manual (about
halfway along its travel).
2) Make sure that the engine’s cut-out switch is in
the “ON” position.
3) Move to one side of the machine and proceed as
described in the next chapter.
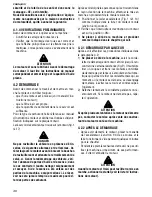
4.2.1 PULL-STARTING
After having complied with the procedures described
in section 4.2:
1) Go to one side of the machine, take hold of the
starter cord and pull it slowly until you feel a cer-
tain resistance (fig. 9). Now give a sharp, decisive
pull on the cord. The engines have a self-winding
pull starter that allows the cord to be pulled but
which disconnects as soon as the engine fires, thus
preventing the operator from being subjected to
jerking actions and kickbacks.
2) Slowly release the cord as it rewinds. Repeat the
operation if the engine fails to start.
WARNING
If the engine fails to start after several attempts,
contact the relative after-sales service center of the
engine installed in the machine.
4.2.2 AFTER START-UP
- After the engine has started, move the throttle to
about 1/4 of its travel and allow the engine to idle
for a few minutes to warm it up.
- Do not use the machine at top rate during the first
hours of work. The engine should not be pushed
too far at this stage.
WARNING
Use the choke or starting jet to make the engine
easier to start in cold weather (consult the engine’s
instruction manual).


