background image

27

  Downloading Results

FORA COMFORAT pro GD40

 has 2 types of transmission methods; your 

meter uses either serial or Bluetooth to transmit the data, please check 
your meter box for the transmission method of your meter.

Data Transmission Via Cable(for GD40a) 

You can use the meter with an serial cable and the Health Care Software 
System to view test results on your personal computer. To learn more 
about the Health Care Software System or to obtain an serial cable 
separately, please contact local customer services or the place of 
purchase for assistance.

1. Obtaining the required cable and installing the software

To download the Health Care Software System, please visit the ForaCare 
Global Inc, website at www.foracare.com.

2. Connecting to a personal 
computer

Connect the cable to a serial port 
on your computer. With the meter 
switched off, connect the other end 
of the serial cable to the meter data 
port. 


 will appear on the meter 

display, indicating that the meter is in 
communication mode. 

3. Data transmission 

To transmit data, follow the instructions provided with the software. 
Results will be transmitted with date and time. Remove the cable and the 
meter will automatically switch off.

Summary of Contents for COMFORT pro GD40

Page 1: ...Owner s Manual Blood Glucose Monitoring System COMFORT pro GD40...

Page 2: ......

Page 3: ...System This manual provides important information to help you to use the system properly Before using this product please read the following contents thoroughly and carefully If you have other questio...

Page 4: ...ting equipment away from young children Small items such as the battery cover batteries test strips lancets and vial caps are choking hazards 7 Use of this instrument in a dry environment especially i...

Page 5: ...erforming a Control Solution Test 17 TESTING WITH BLOOD SAMPLE 20 Preparing the Puncture Site 21 Performing a Blood Glucose Test 22 METER MEMORY 25 Reviewing Test Results 25 Reviewing Blood Glucose Da...

Page 6: ...resh whole blood samples to test patient s blood glucose Using other substances will lead to incorrect results We do not recommend using this product on severely hypotensive individuals or patients in...

Page 7: ...be drawn from the fingertip and in the case of neonates from the heel The system is only used with single use auto disabling lancing devices It can only be used with FORA COMFORT pro GD40 test strips...

Page 8: ...Eject the used strip by pushing up this button Data Port for GD40a Download test results with a cable connection Bluetooth Switch for GD40b Download test results with a Bluetooth connection Bluetooth...

Page 9: ...sult Ketone Warning Warning Symbol Face Low High Symbol Memory Symbol Measurement Mode 1 2 3 5 4 6 7 8 Date Time Day Average Alarm Symbol Measurement Unit Low Battery Symbol Test Strip Symbol 9 11 14...

Page 10: ...Using other test strips with this meter can produce inaccurate results Test Strip 1 3 4 2 Absorbent Hole Apply a drop of blood here The blood will be automatically absorbed Confirmation Window This is...

Page 11: ...il the correct month appears Press SET With the day flashing press Main button until the correct day appears Press SET 2 Setting the time format Press Main button to select the desired time format 12h...

Page 12: ...press Main button to add an hour 3 Setting the time With the hour flashing press Main button until the correct hour appears Press SET With the minute flashing press Main button until the correct minut...

Page 13: ...hange from ON to OFF At the time of your alarm the meter will beep and automatically turn on You can press Main button to silence the alarm and insert a test strip to begin testing If you do not press...

Page 14: ...FOUR MEASURING MODES The meter provides you with four modes for measuring General AC PC and QC MODES General displays as Gen AC PC QC USE WHEN any time of day without regard to time since last meal n...

Page 15: ...Make sure the code number on display code strip and test strip vial are the same BEFORE TESTING Calibration You must calibrate the meter every time you begin to use a new vial of test strips by setti...

Page 16: ...the problem persists contact Customer Service for help NOTICE The code number on the display is only for your reference it may not be actual code for this meter WARNING It is important to make sure th...

Page 17: ...you begin using a new vial of test strips you suspect the meter or test strips are not working properly patients blood glucose test results are not consistent with how they feel or if you think the re...

Page 18: ...d in the memory Failure to do so will mix up the blood glucose test results with the control solution test results in memory 3 Apply control solution Shake the control solution vial thoroughly before...

Page 19: ...e printed on the test strip vial the meter and strips may not be working properly Do NOT test your blood Contact the local customer service or place of purchase for help 4 Read and compare the result...

Page 20: ...cet or the lancing device Only auto disabling single use lancing devices may be used with this device Avoid getting hand lotion oils dirt or debris in or on the lancets and the lancing device We recom...

Page 21: ...le Preparing the Puncture Site Stimulating blood perfusion by rubbing the puncture site before blood extraction has a significant influence on the glucose value obtained Blood from a site that has not...

Page 22: ...a click indicates that the puncture is complete 1 Insert the test strip to turn on the meter Wait for the meter to display and Performing a Blood Glucose Test You will need Test Strip 2 Lancing Devic...

Page 23: ...at a titled angle Confirmation window should be completely filled if enough blood sample has been applied Do NOT remove patient s finger until you hear a beep sound NOTE Do not press the punctured sit...

Page 24: ...ect the test strip point the strip at a disposal container for sharp items The meter will switch itself off automatically after the test strip is ejected Always follow the instructions in the lancing...

Page 25: ...ts 1 Press and release Main button will appear on the display Press Main button again and the first reading you see is the last blood glucose result along with date time and the measurement mode 300 m...

Page 26: ...tored in each measuring mode in the order of Gen AC then PC 3 Exit the meter memory Keep pressing the Main button and the meter will turn off after displaying the last test result NOTE Any time you wi...

Page 27: ...al customer services or the place of purchase for assistance 1 Obtaining the required cable and installing the software To download the Health Care Software System please visit the ForaCare Global Inc...

Page 28: ...he meter to add it into app 3 After successfully pairing the APP with the meter the Bluetooth function on the meter will then start to transmit your data to your APP Bluetooth indicator on the meter B...

Page 29: ...b Error and low The power is not enough to do a test Please change the batteries immediately Replacing the Battery To replace the batteries make sure that the meter is turned off 1 Press the edge of...

Page 30: ...ter To avoid the meter and test strips attracting dirt dust or other contaminants please wash hands thoroughly with soap and water before and after use When to clean and disinfect the meter All surfac...

Page 31: ...ter malfunction If you have a question please contact local customer service for assistance This device has been validated to withstand up to 260 cleaning and disinfection cycles using the recommended...

Page 32: ...Meter Storage Storage conditions 20 C to 60 C 4 F to 140 F below 95 relative humidity Always store or transport the meter in its original storage case Avoid dropping and heavy impact Avoid direct sunl...

Page 33: ...tightly Touch the test strip with clean and dry hands Use each test strip immediately after removing it from the vial Write the opening date on the vial label when you first opened it Discard remainin...

Page 34: ...months It is recommended that the control solution test be done at room temperature 20 C to 25 C 68 F to 77 F Make sure your control solution meter and test strips are at this specified temperature r...

Page 35: ...t to repair by yourself and never try to disassemble the meter under any circumstances Result Readings MESSAGE WHAT IT MEANS 10 mg dL 0 5 mmol L 10 69 mg dL 0 5 3 8 mmol L 240 mg dL 13 3 mmol L 600 mg...

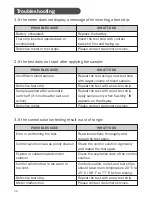
Page 36: ...work please contact the customer service for assistance Appears when test strip is removed while counting down or insufficient blood volume Repeat the test with a new test strip If the problem persis...

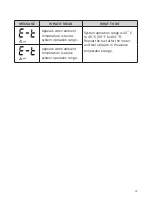
Page 37: ...bient temperature is below system operation range System operation range is 10 C to 40 C 50 F to 104 F Repeat the test after the meter and test strip are in the above temperature range Appears when am...

Page 38: ...of blood sample Repeat the test with a new test strip Repeat the test with a new test strip Apply sample only when flashing appears on the display Please contact customer services 3 If the control sol...

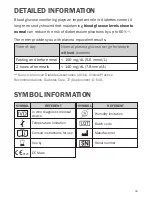
Page 39: ...s 1 Source American Diabetes Association 2014 Clinical Practice Recommendations Diabetes Care 37 Supplement 1 S16 Time of day Fasting and before meal 2 hours after meals Normal plasma glucose range fo...

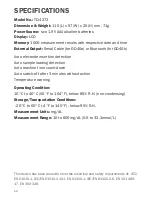
Page 40: ...e loading detection Auto reaction time count down Auto switch off after 3 minutes without action Temperature warning Operating Condition 10 C to 40 C 50 F to 104 F below 85 R H non condensing Storage...

Page 41: ......

Page 42: ......

Page 43: ......

Page 44: ...orized by ForaCare Suisse AG CH 9000 St Gallen Switzerland www foracare ch TaiDoc Technology Corporation B1 7F No 127 Wugong 2nd Rd Wugu Dist 24888 New Taipei City Taiwan www taidoc com Blood Glucose...

Reviews: