background image

FUNCTIONAL DESCRIPTION 

2.3 Construction 

6.452


13


2.3.2  Rotating Head Ro 65 

The rotating head is the main component of the sensor system.  
It consists of: 


Rotor 


Transmitter 


Drive  


Housing 


Rotating head electronics  

 
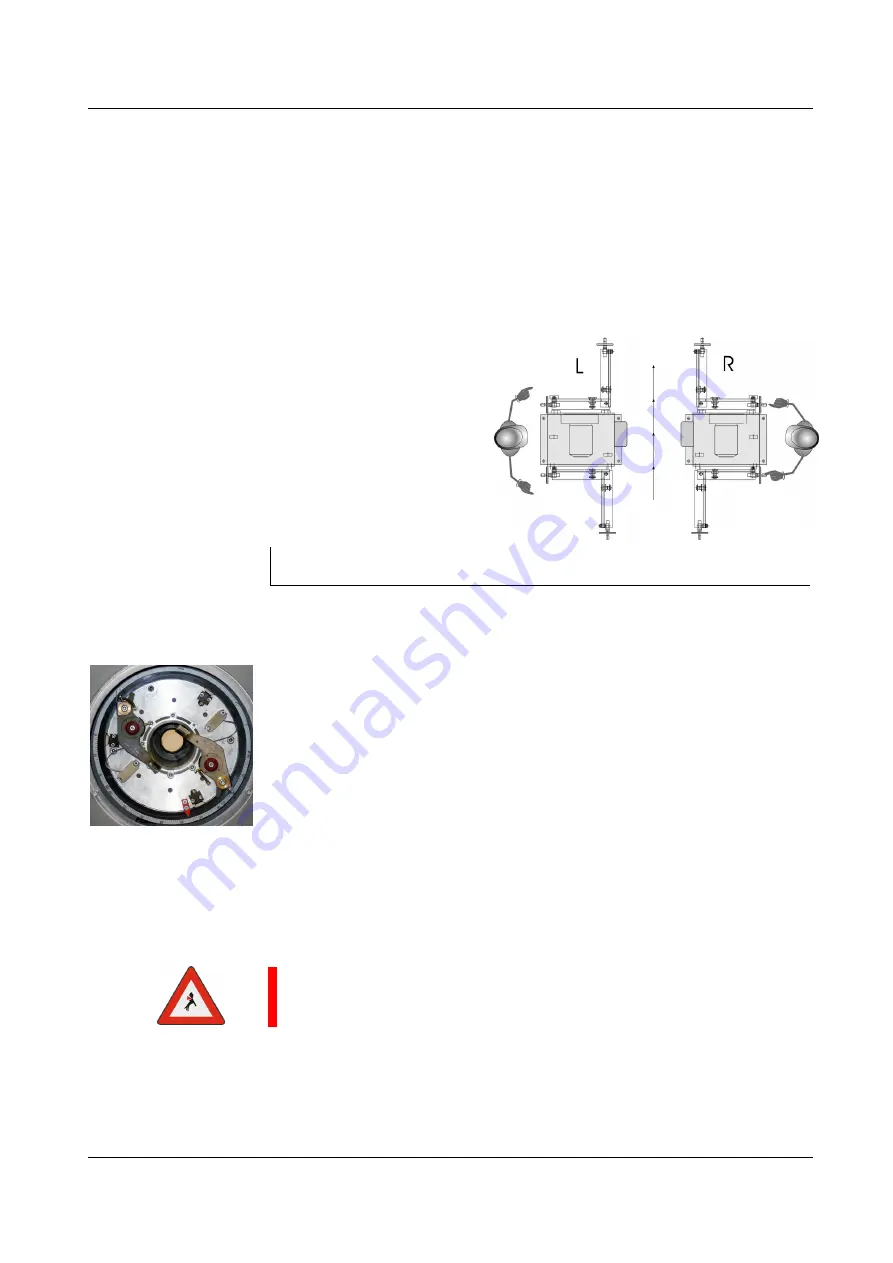
The operating side is to be  
selected as right or left in the  
order! 


Rotor 

The rotor consists of a hollow shaft, a rotor disc and the movable part of 
the transmitter. 

The rotor is driven by the motor by means of a V-ribbed belt. It is sup-
ported in the housing by two high-speed bearings. 

The high-precision rotating disc for holding the test heads is fitted on the 
front side. 

A pivot-mounted spiral disc with an actuating gear and automatic blocking 
facility is fitted in the rotating disc for precise and simultaneous test head 
diameter adjustment. 


DANGER

Never run the rotating head without test heads! 
Always use test heads in pairs with the spring in the same position! 

Rotating disc with test heads 
left: head in lift off position 
right: testing position 

Fig. 2.4   CIRCOGRAPH sensor system Ro 65, operating side left (L) or right (R) 

Summary of Contents for CIRCOGRAPH DS

Page 1: ...CIRCOGRAPH DS Sensor system Ro 65 6 452 Operating Instructions Original Instructions...

Page 2: ......

Page 3: ...rating Instructions is essential for avoiding equipment faults and for ensuring trouble free operation It is therefore of the utmost importance that the entire Operating Instructions are made known to...

Page 4: ...direct or indirect reproduction and transmission to unauthorized third parties is not permitted Registered trade mark CIRCOGRAPH is a registered trademark or brand name of INSTITUT DR FOERSTER GmbH C...

Page 5: ...rs 3 1 9 Personal safety equipment 4 1 10 Safety measures at the installation location 4 1 11 Protective safety devices 4 1 12 Behaviour in the event of an emergency 4 1 13 Declaration of Conformity 5...

Page 6: ...eter 30 4 3 1 Preparation 30 4 3 2 Removing Entry Nozzle 31 4 3 3 Adjusting nominal diameter 32 4 3 4 Fitting protective nozzles 36 4 3 5 Setting the roller guides 38 4 3 6 Positioning the sensor syst...

Page 7: ...I 5 5 Maintenance of the roller guides 51 5 5 1 Lubrication 51 5 5 2 Replacing the track rollers 52 5 5 3 Removing the roller guide levers 53 5 6 Checking and changing the V ribbed belt 54 5 7 List of...

Page 8: ...Table of Contents IV 6 452 Notes...

Page 9: ...nce of the machine must be appropriately qualified and must strictly follow the information provided in these operating instruc tions Your safety is at stake 1 2 Safety information and tips The follow...

Page 10: ...with a suitable conveying mechanism and a lifting table On no account may you convert or modify the sensor system arbitrarily for reasons relating to safety DANGER Masses rotating at high speed pose...

Page 11: ...devices or render them inoperable by making modifications to the system 1 7 Workstations The workstation is located on the electronic equipment cabinet or on the operating panel of the sensor system...

Page 12: ...n and unobstructed by issuing appropriate in company instructions and con ducting inspections 1 11 Protective safety devices The CIRCOGRAPH sensor system is shut down when opening the housing safety s...

Page 13: ...requirements of following European Directives and corresponding Standards European Directive 2006 42 EC Safety of machinery European Standards EN 12100 1 2 EN 14121 1 EN 60204 1 European Directive 200...

Page 14: ...1 13 Declaration of Conformity SAFETY 6 6 452 Notes...

Page 15: ...l 5 to 65 mm Preferably continuous testing also separate piece testing Surface free of scale wherever possible bright Testing without physical contact at rotational speeds up to 6 000 rpm End conditio...

Page 16: ...s a signal Thus the rotating system generates a high number of consecutive signals that reliably indi cate a flaw of a certain length The testing speed is a result of the number of rotating probes int...

Page 17: ...the sensor system which scans the test material and generates the eddy current signal A separate leaflet CIRCOGRAPH DS System 6 430 Order No 163 852 1 will inform you about the according test electron...

Page 18: ...0 6 452 Fig 2 2 CIRCOGRAPH Sensor system Ro 65 main view legend ref to Chp 2 7 Fig 2 3 CIRCOGRAPH Sensor system Ro 65 basic components Throughput Roller guide Clamping ring Entry nozzle Outer sleeve E...

Page 19: ...contact and burst protection as well as dust collection This chamber is provided to connect an external extraction system to be provided by customer The sensor system consists of the following compuls...

Page 20: ...athematical relationship between the number and track width of the test heads the rotational speed and the testing speed The following table shows these relationships and gives typical examples for a...

Page 21: ...f a V ribbed belt It is sup ported in the housing by two high speed bearings The high precision rotating disc for holding the test heads is fitted on the front side A pivot mounted spiral disc with an...

Page 22: ...nt for the rotat ing probes from the stator to the rotor and in the opposite direction transmits the test signal to the test electronics for evaluation Rotating head electronics The rotating head elec...

Page 23: ...ational speed to test speed For applications with changing testing speeds The motor control supplies the required voltages and currents and contain the necessary switching and safety devices contactor...

Page 24: ...ies are observed Protective nozzles are available in nominal sizes of 5 0 to 67 mm They limit the maximum eccentricity of the test material within the zone to be tested to a narrow dimension within wh...

Page 25: ...les can be ordered from INSTITUT DR FOERSTER or can be manufactured by the customer on the basis of drawings WARNING Operation without protective nozzles is not permitted for damage and safety reasons...

Page 26: ...mply since the rotating probes periodically scan the test flaw and dis play the signal quasi statically For setting of clearance compensation there is no need to hold the cali bration piece centricall...

Page 27: ...adjustable according to a scale Probe track width of TH 2x2 5 mm 2x5 and 2x10 mm Testing speed for gapless testing 2x5 mm track width vmax _ for 2 TH rpm 3 000 1 m s rpm 6 000 2 m s Dimensions see di...

Page 28: ...2 5 Dimension sheet FUNCTIONAL DESCRIPTION 20 6 452 2 5 Dimension sheet Fig 2 9 Dimension sheet I Entry side...

Page 29: ...FUNCTIONAL DESCRIPTION 2 5 Dimension sheet 6 452 21 Fig 2 10 Dimension sheet 2...

Page 30: ...ckaging e g fragile store in a dry place this way up etc Storage conditions storage in unopened original packaging in closed rooms temperature range 20 C to 70 C max relative humidity 95 condensation...

Page 31: ...452 01 1001 50 1253158 9 1 Inner sleeve 6 452 01 1001 5002 1254421 9 2 Outer sleeve 6 452 01 1001 5001 1254430 2 Clamping ring exit 6 452 01 1001 0006 1253751 6 Housing flange 6 452 01 1001 0001 1253...

Page 32: ...2 7 Standard Components FUNCTIONAL DESCRIPTION 24 6 452 Notes...

Page 33: ...ble skid for protecting the cables against damage when traversing the lifting table The two horizontal end positions of the lifting table service position test position should each be monitored with a...

Page 34: ...the electronic cabinet and the other system components e g control cabinets motor control ro tating heads with the next main protective conductor terminal 16 mm2 A green yellow lead with 16 mm2 Cu is...

Page 35: ...nsion change WARNING Risk of injury Do not intervene manually in the sensor system when the rotating unit is running Switch off drive before carrying out any work Wait for machine standstill Decelerat...

Page 36: ...epending upon test material diameter Test results Protective Nozzles Diameter DD mm Test material Diameter D mm optimal normal limited The protective nozzles can be selected more precisely depending o...

Page 37: ...river warped a f 5 mm extended 012 561 0 Hexagon screwdriver warped a f 6 mm extended 012 562 8 Hexagon screwdriver warped a f 8 mm extended 012 563 6 Hexagon screwdriver warped a f 4 mm with pin 016...

Page 38: ...r system out of the testing section Opening the roller guides Turn the locking bolt in ccw direction up to the stop Swivel out the roller guide WARNING For safety reasons a safety switch interrupts th...

Page 39: ...452 31 4 3 2 Removing Entry Nozzle Unscrew three Allen screws M 6 x 22 DIN 912 A Open and remove the clamping ring 8 Remove the nozzle 7 out of the housing flange 6 Fig 4 2 Changing the entry nozzles...

Page 40: ...ter OPERATION 32 6 452 4 3 3 Adjusting nominal diameter Housing flange Unscrew three Allen screws M 6 x 10 DIN 912 C Turn ccw and remove housing flange NOTE Mass housing flange approx 7 kg Allen screw...

Page 41: ...on APK A of minimum 0 2 mm is given With worse testing conditions e g drawing line with bented ends or reduced guidance quality a higher probe protection is given with that scale setting bright materi...

Page 42: ...lamped when reverse winding Untighten two clamping screws C approx turn Adjust probe lever to the new nominal diameter with hexagon screw driver a f 5 according to the scale Tighten two clamping screw...

Page 43: ...DIN 912 E Remove inner sleeve 12 1 with exit nozzle fitted 3 from outer sleeve 12 2 NOTE Outer sleeve 12 2 remains fitted Remove exit nozzle 3 with dovetail from inner sleeve 12 1 Nozzle 30 mm Untight...

Page 44: ...me nominal diameter WARNING Adjust the test heads to the nominal diameter of the protective nozzles before inserting the nozzle Inserting the nozzle into a test head arrangement that is too narrow can...

Page 45: ...etail guide of the inner sleeve 12 1 Insert the inner sleeve 12 1 with exit nozzle 3 fitted into the outer sleeve 12 2 Tighten three Allen screws M 6 x 16 DIN 912 with 6 Nm E Exit nozzle 30 mm NOTE Th...

Page 46: ...e stop If required set track roller approx 0 4 to 1 0 mm closer in diameter ro tating by 40 max 100 at the hand wheel NOTE A lower pretension of the track rollers protect both the test material and tr...

Page 47: ...pm The motor control supplies the required voltages and currents and contain the necessary switching and safety devices contactors motor protection switches protective circuits Achievable throughput s...

Page 48: ...0 sec 6 000 rpm Deceleration times without braking approx 210 sec 3 000 rpm approx 360 sec 6 000 rpm Deceleration times with braking approx 15 sec 3 000 rpm approx 30 sec 6 000 rpm The rotating head m...

Page 49: ...sary test heads may be pretensioned by a spring to achieve wide opening when the motor is switched off for feeding the test material in and out Dimension change definitions Position of the test heads...

Page 50: ...zzle robust 6 452 01 3212 Exit nozzle robust 6 452 01 3222 DD Test material 0 5 mm 5 0 to 7 9 DD Test material 1 0 mm 8 0 to 15 DD Test material 1 5 mm 15 1 to 25 DD Test material 2 0 mm 25 1 to 50 Ta...

Page 51: ...ions a sufficient probe protection APK A of minimum 0 2 mm is given With worse testing conditions e g drawing line with bented ends or reduced guidance quality a higher probe protection is given with...

Page 52: ...4 6 Application drawing line OPERATION 44 6 452 Notes...

Page 53: ...are valid for maximum rotational speed 6 000 rpm Important Parts which are worn or damaged must be replaced immediately when changing dimensions each shift each week each month Roller guide clean chec...

Page 54: ...r Make sure the areas around the rotating parts are clean Remove abrasion and dirt with an industrial vacuum cleaner Clean rotating disc and test heads Clean test piece sensor external with a soft clo...

Page 55: ...10 DIN 912 C Turn and remove housing flange Loose the test head Remove three Allen screws 6 M3 x 8 DIN 912 Remove cover 7 Remove Allen screw 8 M5 x 10 DIN 6912 Remove washer 9 Remove the test head Un...

Page 56: ...sa Note the correct installation position The stop on the test head must contact the control edge of the rotating disc Do not kink or twist the ribbon cable Check mobility of the test head Engage the...

Page 57: ...NANCE 5 3 Removing and fitting the test heads 6 452 49 Fig 5 3 Test heads fitted lid 7 not assembled spring in standard position Fig 5 4 Test heads fitted lid 7 not assembled spring in position drawin...

Page 58: ...th worn slide on or protective strips can be repaired prop erly only by the manufacturer Fig 5 6 Wear parts in the test heads Fig 5 5 Wear parts of the test head slide ring 1481649 collared bush 11965...

Page 59: ...5 5 Maintenance of the roller guides 5 5 1 Lubrication The lubrication points marked with CLP 68 must be lubricated 1 x weekly with lubricant oil of ISO viscosity class 68 DIN 51519 or similar Fig 5 7...

Page 60: ...ollers at the same time When roller leaver 4 fitted open the roller guides to the maximum diameter Unscrew the Allen screw 1 M 6 x 40 DIN 912 Draw off track roller 3 with roller pin 2 inserted Push ro...

Page 61: ...of leaver 4 Remove fishplates 11 Unscrew groove nut 8 Remove washer 9 shim washer 10 if present O ring 2 and thrust washer 3 Pull leaver 4 thrust washer 3 and O ring 2 off bearing pin 1 Reassemble vic...

Page 62: ...Checking and changing the V ribbed belt Set the belt s bowing under load so that it does not whistle or lisp during accelera tion NOTE For exact tensioning check with a spring balance Fig 5 10 Checki...

Page 63: ...crews M8 x 25 DIN 912 accessible through the 4 holes in the belt pulley In order to tension the belt adjust the hexagon screw M8 x 25 DIN 933 and lock with nut M8 DIN 934 Fig 5 12 Setting the belt ten...

Page 64: ...ve the belt cover Loosen the clamping screws M8 x 25 DIN 912 ref to Fig 5 12 Loosen the hexagon screw M8 x 25 DIN 933 and lock M8 DIN 934 ref to Fig 5 13 lower the motor Unscrew eight Allen screws M 6...

Page 65: ...rews must be checked for damage earth fault They must be replaced by new ones if necessary Put on faceplate tighten eight Allen screws M 6x16 DIN 912 with max torque of 4 Nm Tension the belt according...

Page 66: ...5 6 452 01 2321 1664514 6 452 03 2321 2 4 Test head track width 2 x 10 1447033 6 452 01 2331 1664522 6 452 03 2331 2 4 Tension spring 0163309 Fa Gutekunst 2 4 Collared bush 1196588 4 8 Slide ring 1481...

Page 67: ...TS Semi finished Product Testing In Laisen 70 72766 REUTLINGEN GERMANY Telephone Fax E mail Internet 49 7121 140 270 49 7121 140 459 ts foerstergroup de www foerstergroup de 6 452 Order no UA06 EN 18...

Reviews: