


Electrical
Installation
Tester
Maintaining the Tester
41
Maintaining the Tester
Cleaning
Periodically wipe the case with a damp cloth and mild detergent. Do not use
abrasives or solvents.
Dirt or moisture in the terminals can affect readings.
To clean the terminals:
1. Turn the meter off and remove all test leads.
2. Shake out any dirt that may be in the terminals.
3. Soak a new swab with alcohol. Work the swab around each terminal.
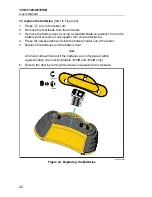
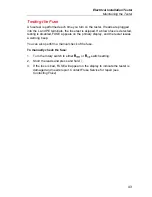
Testing and Replacing the Batteries
Battery voltage is continuously monitored by the tester. If the voltage falls below
6.0 V (1.0 V/cell), the low battery icon
appears on the display, indicating
that there is minimal battery life left. The low battery icon continues to appear
on the display until you replace the batteries.
Warning
To avoid false readings, which could lead to possible electric
shock or personal injury, replace the batteries as soon as the
battery icon (
) appears.
Be sure that the battery polarity is correct. A reversed battery can
cause leakage.
Replace the batteries with six AA batteries. Alkaline batteries are supplied with
the tester but you can also use 1.2 V NiCd or NiMH batteries. You can also
check the battery charge so that you can replace them before they discharge.
Warning
To avoid electrical shock or personal injury, remove the test
leads and any input signals before replacing the battery. To
prevent damage or injury, install ONLY specified replacement
fuses with the amperage, voltage, and speed ratings shown in the
General Specifications section of this manual.
To test the batteries:
1. Turn the rotary switch to the V position.
2. Press
to initiate the battery test. The Voltage function display clears and
is replaced by the measured battery voltage in the secondary display for 2
seconds, the Voltage function display then returns.


