background image

11

DVR 300i Connection 
Location Selection Criteria

Position A

Position B

Position C (Normal)

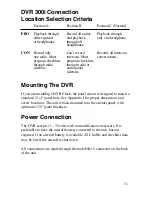
PRO

Playback through 

Record all radios 

Playback through

either speaker 

and playback

only one headphone.

or headphones.

through all 
headphones.

CON

Record only

Can’t record

Records all intercom 

one radio. Must

intercom. Must

conversations.

program checklists

program checklists

through radio

through radio or

sidetone.

audio panel
sidetone.

Mounting The DVR

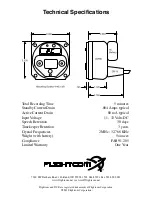
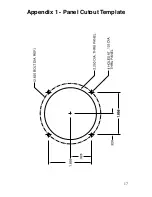
If you are installing a DVR Clock, the panel cutout is designed to match a
standard 2 1/4" panel hole. See Appendix I for proper dimensions and
screw locations. The unit is back-mounted into the aircraft panel, with
optimum .125" panel thickness.

Power Connection

The DVR accepts 11 - 32 volts with no modifications necessary. It is
preferable to have the aircraft battery connected to the unit, but not
required. If no aircraft battery is available, ATC traffic and checklist data
may be lost if the aircraft is shut down.

All connections are made through the male DB-15 connector on the back
of the unit.

Summary of Contents for DVR 300i

Page 1: ...OPERATION AND INSTALLATION MANUAL DVR VOICE RECORDER DVR 300i Digital Voice Recorder Clock Rev 2 ...

Page 2: ...h Retention 30 days Timekeeper Retention 3 years Crystal Frequencies 2 MHz 32 768 KHz Weight with battery 5 ounces Compliance FAR 91 205 Limited Warranty One Year 7340 SW Durham Road Portland OR 97224 503 684 8229 Fax 503 620 2943 www flightcom net service flightcom net Flightcom and DVR are registered trademarks of Flightcom Corporation 2001 Flightcom Corporation ...

Page 3: ...back 5 Manual Recording and Playback 5 Periodic Alarm System 6 Audio Checklists 6 Changing DVR Speech Quality 7 Backup Battery 8 Troubleshooting 8 Part II Installation Power Considerations 9 Audio Considerations 10 Mounting the DVR 11 Power Connection 11 Fig 1 Power Schematics 12 Audio Connections 13 Fig 2 Mono Audio Hookup 14 Fig 3 Stereo Audio Hookup 15 Testing the Audio Circuits 16 Volume Adjus...

Page 4: ...your voice and the controllers Therefore your cockpit audio is recorded as part of the voice acti vated loop Remember though that the endless loop accounts for only one minute of the total recording time and it is written over with the next recording cycle It does not wear out the recorder to constantly record all audio Furthermore you may want to hear what you told that controller What happens wh...

Page 5: ... instant replay we see on TV football games Since the DVR is voice activated it doesn t record the dead air between radio transmissions making efficient use of its internal speech memory This also means you don t have to push any buttons to initiate recording insuring all audio is captured automatically Each DVR Clock features LOCAL OR ZULU TIME DISPLAY ELAPSED TIME DISPLAY FLIGHT TIME PSEUDO HOBB...

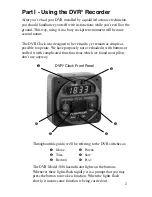
Page 6: ...rried out 2 Part I Using the DVR Recorder After you ve had your DVR installed by a qualified avionics technician you should familiarize yourself with its functions while you re still on the ground This way using it in a busy cockpit environment will become second nature The DVR Clock was designed to be versatile yet remain as simple as possible to operate We have purposely not overloaded it with b...

Page 7: ...master The center position of the Power switch is Off If for any reason you need to shut the DVR down flip the switch to the center position Setting the Time Your clock was shipped from the factory with Greenwich Mean Time GMT or Zulu time already set You may have to set your local time To set local hours and minutes make sure the Mode switch is in the far right position displaying the time of day...

Page 8: ...k of how many total hours you have flown NOTE The elapsed timer is cleared every time the clock is turned off To clear the Hobbs meter you must reset the clock This means all previous program ming will be erased and you ll need to reset time etc To reset the Hobbs meter first turn the unit off then press and hold down the time play record and skip buttons at the same time Then turn the unit back o...

Page 9: ...udio monitor feature When audio is detected the red LED on the Record button flickers This indicates that audio is being properly detected and recorded Manual Recording and Playback Sometime during your flight you may want to record material which you don t want overwritten by cockpit conversation or other radio traffic for examples in flight weather briefings IFR clearances or ground control taxi...

Page 10: ...cord to record your message and begin speaking after you hear the beep Hit Play to hear the message you just recorded You may record and replay your message as many times as you d like until you re satisfied with it Hitting Skip now will get back into normal time mode From now on your message will sound twice at the interval you have set You may turn it off again by getting back into functions mod...

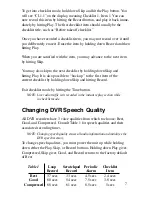
Page 11: ...tem of the current checklist by holding down Skip and hitting Record Exit checklist mode by hitting the Time button NOTE Live radio traffic isn t recorded in the instant replay section while in checklist mode Changing DVR Speech Quality All DVR recorders have 3 voice qualities from which to choose Best Good and Compressed Consult Table 1 for speech qualities and their associated recording times NO...

Page 12: ...e unlikely event of an accident the most recent radio traffic will be preserved Troubleshooting The DVR was designed to be maintenance free requiring only a one time volume adjustment In rare cases however it may be possible for the unit to lock up in noisy aircraft power environments If your unit appears to be hung up you can reboot the system by switching the power to Off center position and swi...

Page 13: ... DVR 300i Yes This could mean that there is no accessible power for the DVR and power wires from the battery and or the breaker panel will need to be connected No This means there is probably at least one source of power for the DVR It still may be necessary to run a power wire from the battery or from the breaker panel IMPORTANT NOTICE Although simple to install DVR recorders are sophisticated el...

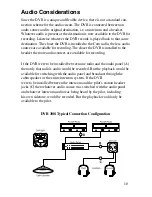
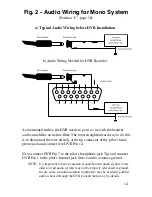
Page 14: ...closer the DVR is installed to the headset the more audio sources are available for recording If the DVR were to be installed between one radio and the audio panel A then only that radio s audio would be recorded But the playback would be available for switching with the audio panel and broadcast through the cabin speaker or the entire intercom system If the DVR were to be installed between the in...

Page 15: ...sidetone Mounting The DVR If you are installing a DVR Clock the panel cutout is designed to match a standard 2 1 4 panel hole See Appendix I for proper dimensions and screw locations The unit is back mounted into the aircraft panel with optimum 125 panel thickness Power Connection The DVR accepts 11 32 volts with no modifications necessary It is preferable to have the aircraft battery connected to...

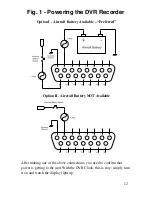
Page 16: ...one of the above connections you need to confirm that power is getting to the unit With the DVR Clock this is easy simply turn it on and watch the display light up Option II Aircraft Battery NOT Available Option I Aircraft Battery Available Preferred ...

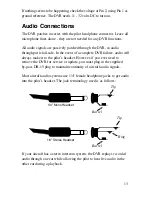
Page 17: ...plete DVR failure audio will always make it to the pilot s headset However if you ever need to remove the DVR for service or update you must plug in the supplied by pass DB 15 plug to maintain continuity of aircraft audio signals Most aircraft audio systems use 1 4 female headphone jacks to get audio into the pilot s headset The jack terminology used is as follows If your aircraft has a stereo int...

Page 18: ...one jack and connect it to DVR Pin 14 Next connect DVR Pin 7 to the pilot s headphone jack Tip and connect DVR Pin 1 to the pilot s headset jack Sleeve and to avionics ground NOTE It is important to have a common ground between audio signals Some older aircraft audio systems may not be properly referenced to ground In rare cases an audio isolation transformer may be needed if garbled audio is hear...

Page 19: ...io channels through the clock when working with stereo Send the left audio channel of the stereo intercom to DVR Pin 14 and the right audio channel to DVR Pin 15 Then connect Pin 7 to the audio jack Tip and Pin 8 to audio jack Ring Again make sure you have a common ground from the audio system to the headset When the pilot plays a message replayed audio will be heard through one ear while live rad...

Page 20: ...at your wiring matches the diagrams Volume Adjustment There is a small hole above the DB 15 connector for DVR playback adjustment This has been set at the factory to replay radio traffic at about the same volume at which it was recorded This trimpot may however need to be adjusted to account for variations in certain aircraft audio systems Warning Don t twist or pry the volume pot or you will pop ...

Page 21: ...17 Appendix 1 Panel Cutout Template ...

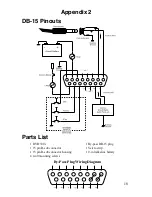
Page 22: ...ix 2 DB 15 Pinouts By Pass Plug Wiring Diagram Parts List 1 DVR 300i 1 15 pin D sub connector 1 15 pin D sub connector housing 4 4 40 mounting screws 1 By pass DB 15 plug 1 Velcro strip 1 9 volt alkaline battery ...

Reviews: