background image

3.4.6

3.4.7

In the event of loss of the remote handset, as a backup the stove 

can be controlled from the valve, which is located below the stove,

see section 3.2 for full manual operating instructions.  If your 

stove does not operate manually please consult the 

troubleshooting chart on the rear page of this manual.

3.4.8

If the handset is misplaced you can “page it” by pressing the (+) button 

only on the control valve on the stove for a period of 5 seconds.  The 

handset will flash and make an audible noise to help you locate it.  

Once you find the handset with one hand ensure your hand 

is wrapped around the back and that your hand is in contact with both 

sides of the handset then the audible noise will cease.  The flashing 

and sound will last for 60 seconds each time the handset is paged as 

described.  If not found in 60 seconds page the handset again until 

located.

3.5

ADVANCED SETTINGS MENU OF THE REMOTE CONTROL

3.5.1

Snooze mode in manual operation

3.5.1.1

Snooze mode is a time period which can be set which will turn the stove

automatically off after a certain time period has elapsed.  

3.5.1.2

Hold the handset with one hand ensuring your hand is wrapped around 

the back and that your hand is in contact with both sides of the handset.

The green light of the “unlock” symbol should light. The snooze time 

period can be set either before or during manual operation of the stove.

3.5.1.3

With the handset held as described above, press the mode button to 

scroll through the functions until the symbols MAN and Zzz are 

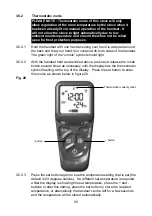
flashing at the top of the display as shown overpage in figure 26.

3.5.1.4

Press and release the set button and this will put the control into the 

manual snooze mode.

3.5.1.5

The default time period in snooze mode is 1:00 hour.   

26

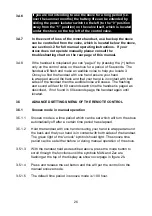
If you are not intending to use the stove for a long period (i.e.

over the summer months) the battery life can be extended by

sliding the power isolator switch to the left (to the “0” position

away from the “1” position) on the valve itself, which is located

under the stove on the top left of the control valve.

Summary of Contents for FBFL00RN

Page 1: ...NCED FLUE LOG EFFECT STOVE Installation Maintenance User Instructions Hand these instructions to the user Model No FBFL RN is for use on Natural Gas G20 at a supply pressure of 20 mbar in G B I E denotes cosmetic variance ...

Page 2: ...ciency at Nominal Heat Output 84 2 Useful Efficiency at Minimum Heat Output Indicative 50 0 Auxilliary Power Consumption at Nominal Heat Output 0 0000010kW Auxilliary Power Consumption at Minimum Output 0 0000010kW Auxilliary Power Consumption at Standby Mode 0 0000005kW Permanent Pilot Flame Requirement Not Applicable Type of Heat Output Room Temperature Control With electronic room temperature c...

Page 3: ...lly 19 3 3 Setting the time date and temperature on the remote handset 20 22 3 4 Lighting the stove via the remote handset 23 26 3 5 Advanced settings of the remote control 26 30 3 6 Fitting the cover plate 30 Section 4 Maintenance 4 1 Removal of the burner assembly 31 32 4 2 Removal of the gas control valve 32 33 4 3 Removal of the pilot 33 4 4 Parts shortlist 34 Section 5 User Instructions 5 1 I...

Page 4: ...W Gas Rate 0 421 m3 hr Cold Pressure 20 0 1 0 mbar Ignition 4 5v battery electronic ignition Electrode Spark Gap 4 0mm Packed weight without fender 65kg Fig 1 3 Please Note An optional flue duct extension is available to increase the flue duct length to 830mm Please quote part number CV MARLT Height A 568mm Width B 413mm Depth C 305mm Height to Centre of Flue Duct D 450mm ...

Page 5: ...Regulations Scotland Consolidation issued by the Scottish Development Department and all applicable requirements of the following British Standard Code of Practice 1 B S 5871 Part 1 Installation of Gas Fires 2 B S 6891 Installation of Gas Pipework 3 B S 5440 Parts 1 2 Installation of Flues and Ventilation 4 I S 813 1996 Domestic Gas Installation issued by the National Standards Authority of Irelan...

Page 6: ...an opening air brick 300mm 12in opening window C Horizontally to an opening air brick 300mm 12in opening window etc D Below gutters soil pipes or drain pipes 300mm 12in E Below eaves 300mm 12in F Below balconies or car port roof 600mm 12in G From a vertical drain pipe or soil pipe 300mm 12in H From an internal or external corner 600mm 24in I Above ground roof or balcony level 300mm 12in J From a s...

Page 7: ...e the gas controls located beneath the stove Remove the loose items pack Remove the loose item packaging carefully from the the pack Check the contents as listed DO NOT UNDER ANY CIRCUMSTANCES USE THIS APPLIANCE IF THE GLASS PANEL IS BROKEN OR NOT SECURELY FIXED TO THE DOOR ASSEMBLY Packing Check List 1 off Stove body burner assembly and controls 1 off Boxed ceramic 4 piece log fuel bed set bark f...

Page 8: ...ning of the fire place must be a minimum of 620mm in height 515mm in width and 315mm in depth excluding door handle and made of non combustible materials Fig 3 Fig 4 7 515mm minimum Stove Opening 620mm minimum 50mm minimum 50mm minimum 50mm minimum 50mm minimum ...

Page 9: ...m sized distances between the stove mounting flange and external wall face are shown below in figure 5 Fig 5 8 Standard flue duct Minimum flue length 100mm Maximum flue length 440mm Optional flue duct Maximum flue length 830mm ...

Page 10: ...eight from the floor to the centre of the flue is shown on figure 6 below Fig 6 2 5 PREPARATION OF THE FLUE HOLE 2 5 1 Mark the position of the centre of the flue on the inner wall 2 5 2 Cut hole for outer flue pipe There are two possible methods to achieve this either core drill or via hammer and chisel 2 5 3 To core drill proceed as follows Drill a pilot hole through the wall in position as spec...

Page 11: ...box from the left right or rear and connect to the inlet elbow See below 2 6 2 If concealed pipe work is required plan the pipe run to enter the opening in the rear of the opening and connect to the inlet elbow See figure 7 8 below for a suggested concealed pipe layout Fig 7 Fig 8 10 Stove L H Gas Supply Route Stove Approx 320mm R H Gas Supply Route Approx 70mm Rear Gas Supply Route ...

Page 12: ...7 3 Due to the varying lengths of flue that will be required via differing installations it will be necessary to drill the flue pipe using the 3 off holes in the mounting flange on the rear of the combustion chamber as a guide for positioning When the holes have been drilled and the screws fitted wrap the joint with the foil tape supplied 2 7 4 Re fit the wall plate ensuring the outer set of holes...

Page 13: ...of a flue terminal guard where regulations do not demand that it be fitted A suitable flue terminal guard is supplied with the appliance 2 8 MAKING THE GAS CONNECTION PRESSURE TESTING THIS APPLIANCE IS INTENDED FOR USE ON A GAS SUPPLY WITH A GOVERNED METER 2 8 1 The gas connection should be made to the appliance inlet elbow to using 8mm rigid tubing 2 8 2 Remove the pressure test point screw from ...

Page 14: ...on the valve in the position as shown below in figure 10 Fig 10 2 9 3 Fit 2 off AA batteries to the handset by unclipping the rear cover fitting the batteries then replacing the rear cover Switch the white power isolation switch to the on position on the valve after fitting the battery pack 13 Battery location Power isolation switch location slide to on position after connecting battery pack ...

Page 15: ...e glass assembly is secured by 9 off M5 screws as shown below in figure 11 2 10 3 Use a screwdriver to remove the 9 off M5 screws then lift the glass assembly clear Fig 11 2 10 4 Re assemble in reverse order DO NOT UNDER ANY CIRCUMSTANCES USE THIS APPLIANCE IF THE GLASS PANEL IS BROKEN OR NOT SECURELY FIXED TO THE DOOR ASSEMBLY 14 ...

Page 16: ...the burner Make sure that the ceramic log base is positioned centrally in the stove Ensure that the fuelbed base fits fully down onto the fuel bed support and is not lodged on the burner See figure 12 below Fig 12 3 1 2 Place the vermiculite front log support onto the burner front rail as shown below in figure 13 Fig 13 15 ...

Page 17: ...1 3 Place a single layer of bark onto the front log support as shown below in figure 14 Fig 14 3 1 4 Place log A onto the left hand end of the base ceramic log as shown below in figure 15 Fig 15 16 Log A ...

Page 18: ... log B onto the base ceramic log at the right hand side as shown below in figure 16 Fig 16 3 1 6 Place log C onto the groove in the centre of the base ceramic log as shown below in figure 17 Fig 17 17 Log B Log C ...

Page 19: ...minimum To ensure that the release of fibres from these R C F articles is kept to a minimum during installation servicing we recommend that you use a HEPA filtered vacuum to remove any dust and soot accumulated in and around the fire before and after working on the fire When replacing these articles we recommend that the replaced items are not broken up but are sealed within a heavy duty polythene...

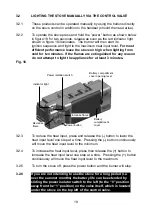
Page 20: ...at input press and release the button to lower the heat input level one step at a time Pressing the button continuously will move the heat input level to the minimum 3 2 4 To increase the heat input level press then release the button to increase the heat input level one step at a time Pressing the button continuously will move the heat input level to the maximum 3 2 5 To turn the stove off press ...

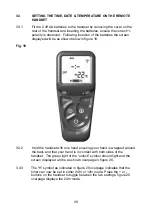
Page 21: ...gure 19 Fig 19 3 3 2 Hold the handset with one hand ensuring your hand is wrapped around the back and that your hand is in contact with both sides of the handset The green light of the unlock symbol should light and the screen displayed will be as shown overpage in figure 20 3 3 3 The H symbol as indicated in figure 20 overpage indicates that the timer can now be set in either 24hr or 12hr mode Pr...

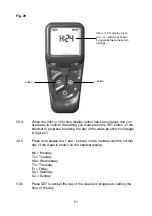
Page 22: ...rpage in figure 21 3 3 5 Press and release the and buttons on the handset until the correct day of the week is shown on the handset display Mo Monday Tu Tuesday We Wednesday Th Thursday Fr Friday Sa Saturday Su Sunday 3 5 6 Press SET to accept the day of the week and progress to setting the hour of the day 21 24hr or 12 hr display press the or buttons as shown to toggle between these two settings ...

Page 23: ...emperature setting screen as shown overpage in figure 22 the option to choose either Celsius or Fahrenheit can be chosen these settings are shown as either C or F Use the and buttons to toggle between these two options then press SET to store The important settings have now been completed so press and hold the SET button for a few seconds and this will exit the set up menu 22 Celsius or Fahrenheit...

Page 24: ...eft hand side of the display as shown in figure 23 overpage NOTE If the power button is pressed for too long or too short a time or the grip on the handset is not firm or is released too soon the lighting sequence will be interrupted and not complete The reason for the remote control having this strict start sequence is for safety reasons so that the starting operation of the stove will be most un...

Page 25: ...3 PILOT displayed Fig 24 MAX large flame symbol displayed 24 PILOT displayed on handset during ignition sequence typically takes two seconds MAX FLAME displayed on handset when burner is lit to maximum rate ...

Page 26: ...gure 25 below Fig 25 3 4 4 To increase the heat input level of the stove s burner hold the handset as described in section 3 3 2 to unlock the keypad then press and release the button Pressing and releasing the button will increase the heat input level one step at a time Pressing the button continuously will move the heat input level to the maximum 3 4 5 To turn the stove off hold the handset as d...

Page 27: ...ze mode in manual operation 3 5 1 1 Snooze mode is a time period which can be set which will turn the stove automatically off after a certain time period has elapsed 3 5 1 2 Hold the handset with one hand ensuring your hand is wrapped around the back and that your hand is in contact with both sides of the handset The green light of the unlock symbol should light The snooze time period can be set e...

Page 28: ...d the handset with one hand ensuring your hand is wrapped around the back and that your hand is in contact with both sides of the handset The green light of the unlock symbol should light Press the set button and the screen will show how long is left of the snooze period as shown overpage in figure 27 27 MAN Zzz symbols flashing illuminated Press mode button to scroll through to MAN Zzz symbols th...

Page 29: ...on to store the required time period or alternatively the handset can be left for a few seconds and the period will be stored automatically 3 5 1 10 When the countdown timer for the snooze period has reached zero the stove will turn off as if you had turned the stove off manually Handset showing snooze time period remaining this can be adjusted from 1 minute to 4 00 hrs by using the buttons on the...

Page 30: ...emperature setting that is set the default is 24 degrees celsius If a different set temperature is required whilst the display is showing this set temperature press the and buttons to alter this setting press the set button to store the required temperature or alternatively the handset can be left for a few seconds and the temperature will be stored automatically 29 Thermostatic model symbol butto...

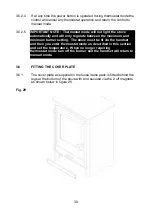
Page 31: ...legs at the bottom of the stove with and secured via the 2 off magnets as shown below in figure 29 Fig 29 IMPORTANT NOTE Thermostat mode will not light the stove automatically and will only regulate between the maximum and minimum burner setting The stove must be lit via the handset and then you enter thermostat mode as described in this section and set the temperature When no longer requiring the...

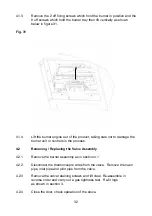
Page 32: ...ed and if necessary the whole set should be replaced with a genuine replacement set The burner assembly is designed to be removed as a complete unit for ease of access After any servicing work a gas tightness check must always be carried out 4 1 Removing the Burner Assembly from the Stove 4 1 1 Ensure the stove is cool open the door 4 1 2 Isolate the gas supply then remove the ceramics Remove the ...

Page 33: ...burner unit or controls in the process 4 2 Removing Replacing the Valve Assembly 4 2 1 Remove the burner assembly as in section 4 1 4 2 2 Disconnect the thermocouple wires from the valve Remove the main pipe inlet pipe and pilot pipe from the valve 4 2 3 Remove the valve retaining screws and lift clear Re assemble in reverse order and carry out a gas tightness test Re fit logs as shown in section ...

Page 34: ...emove two screws retaining the pilot assembly 4 3 3 Disconnect the ignition lead from the electrode and remove the thermocouple from the pilot body 4 3 4 Re assemble in reverse order with a new pilot gasket ensuring an even seal around the pilot is obtained and carry out a gas tightness test Re fit logs as shown in section 3 4 3 5 Close the door check operation of the stove 33 ...

Page 35: ...ide liner B 168440 Glass door panel B 185390 Complete log set B 1000183 Base log B 165640 Log A only B 165650 Log B only B 165660 Log C only B 167880 Front rail B 185360 RC gas control valve B 160780 Ignition lead B 34690 Remote handset B 168970 Thermocouple B 170220 34 ...

Page 36: ... at least 200mm above the top of the appliance and the depth of the shelf does not exceed 150mm The stove may be installed below combustible shelves providing that the clearance above the stove is a minimum of 225mm This stove is a heating appliance therefore all external surfaces of the product are classified as a working surface and will become hot during use of the stove DO NOT UNDER ANY CIRCUM...

Page 37: ...ruction of the fuelbed components ensures long and trouble free operation Please take the time to fully read these instructions as you will then be able to obtain the most effective and safe operation of your stove see figure 1 below for details of door opening Fig 1 36 To open the access door on the Flavel Gas Stove turn clockwise ninety degrees as indicated Air slider handle is for decoratve pur...

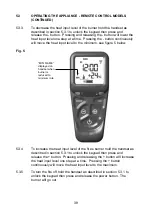
Page 38: ...tove on high when lighting from cold for ten minutes NOTE If the power button is pressed for too long or too short a time or the grip on the handset is not firm or is released too soon the lighting sequence will be interrupted and not complete The reason for the remote control having this strict start sequence is for safety reasons so that the starting operation of the stove will be most unlikely ...

Page 39: ...3 PILOT displayed Fig 4 MAX large flame symbol displayed PILOT displayed on handset during ignition sequence typically takes two seconds MAX FLAME displayed on handset when burner is lit to maximum rate 38 ...

Page 40: ...e figure 5 below Fig 5 5 3 4 To increase the heat input level of the fire s burner hold the handset as described in section 5 3 1 to unlock the keypad then press and release the button Pressing and releasing the button will increase the heat input level one step at a time Pressing the button continuously will move the heat input level to the maximum 5 3 5 To turn the fire off hold the handset as d...

Page 41: ...nd that your hand is in contact with both sides of the handset then the audible noise will cease The flashing and sound will last for 60 seconds each time the handset is paged as described If not found in 60 seconds page the handset again until located 40 IMPORTANT NOTE THE BATTERIES SHOULD BE REPLACED WITH GOOD QUALITY ALKALINE BATTERIES WHEN REQUIRED THE BATTERY LIFE IS EXPECTED TO BE A MINIMUM ...

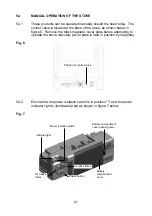
Page 42: ...te before attempting to operate the stove manually cover plate is held in position by magnets Fig 6 5 4 2 Ensure that the power isolation switch is in position 1 and the power indicator light is illuminated red as shown in figure 7 below Fig 7 41 Indicator light Power isolation switch Battery compartment cover opening lever Battery compartment cover Power button Increase flame Decrease flame Posit...

Page 43: ...lide the power isolator switch to the 0 position to the left 5 5 2 Remove the battery cover and replace the 3 off AA batteries with good quality Alkaline items BFM Europe recommend the use of Energizer batteries It is important that only an alkaline battery is used otherwise premature battery failure and leakage may result 5 5 3 Replace the battery cover and turn the power isolator switch to the 1...

Page 44: ...figure 8 Fig 8 5 6 2 Hold the handset with one hand ensuring your hand is wrapped around the back and that your hand is in contact with both sides of the handset The green light of the unlock symbol should light and the screen displayed will be as shown overpage in figure 9 5 6 3 The H symbol as indicated in figure 9 overpage indicates that the timer can now be set in either 24hr or 12hr mode Pres...

Page 45: ...rpage in figure 10 5 6 5 Press and release the and buttons on the handset until the correct day of the week is shown on the handset display Mo Monday Tu Tuesday We Wednesday Th Thursday Fr Friday Sa Saturday Su Sunday 5 6 6 Press SET to accept the day of the week and progress to setting the hour of the day 24hr or 12 hr display press the or buttons as shown to toggle between these two settings but...

Page 46: ...lay the temperature setting screen as shown overpage in figure 11 the option to choose either Celsius or Fahrenheit can be chosen these settings are shown as either C or F Use the and buttons to toggle between these two options then press SET to store The important settings have now been completed so press and hold the SET button for a few seconds and this will exit the set up menu 45 Hour and Min...

Page 47: ...nd the handset with one hand ensure your hand is wrapped around the back and that your hand is in contact with both sides of the handset then the audible noise will cease The flashing and sound will last for 60 seconds each time the handset is paged as described If not found in 60 seconds page the handset again until located 46 Celsius or Fahrenheit temperature display press the or buttons as show...

Page 48: ...snooze time period can be set either before or during manual operation of the fire 5 7 1 3 With the handset held as described above press the mode button to scroll through the functions until the symbols MAN and Zzz are flashing at the top of the display as shown below in figure 12 5 7 1 4 Press and release the set button and this will put the control into the manual snooze mode 5 7 1 5 The defaul...

Page 49: ...t of the snooze period as shown below in figure 13 Fig 13 5 7 1 8 To adjust the snooze period use the and buttons to increase or decrease the snooze period for any period between 1 minute and 4 00 hours 5 7 1 9 When the correct snooze period is indicated on the handset press the set button to store the required time period or alternatively the handset can be left for a few seconds and the period w...

Page 50: ...temperature setting that is set the default is 24 degrees celsius If a different set temperature is required whilst the display is showing this set temperature press the and buttons to alter this setting press the set button to store the required temperature or alternatively the handset can be left for a few seconds and the temperature will be stored automatically 49 PLEASE NOTE Thermostatic mode ...

Page 51: ...MPORTANT NOTE Thermostat mode will not light the stove automatically and will only regulate between the maximum and minimum burner setting The fire must be lit manually via the handset and then you enter thermostat mode as described in this section and set the temperature When no longer requiring thermostat mode turn off the burner and the handset will return to manual mode ...

Page 52: ...the stove can be turned off via the main valve located below the stove 5 8 2 To turn the product off firstly locate the valve which is situated below the stove as shown below in figure 15 5 8 3 Press and release the power button as indictated below in figure 15 5 8 4 The appliance will now remain in the off position until activated by the remote handset Fig 15 51 Position of valve on stove Positio...

Page 53: ...e glass assembly is secured by 9 off M5 screws as shown below in figure 16 5 9 3 Use a screwdriver to remove the 9 off M5 screws then lift the glass assembly clear Fig 16 5 9 4 Re assemble in reverse order DO NOT UNDER ANY CIRCUMSTANCES USE THIS APPLIANCE IF THE GLASS PANEL IS BROKEN OR NOT SECURELY FIXED TO THE DOOR ASSEMBLY 52 ...

Page 54: ...urner Make sure that the ceramic log base is positioned centrally in the stove Ensure that the fuelbed base fits fully down onto the fuel bed support and is not lodged on the burner See figure 17 below Fig 17 5 10 2 Place the vermiculite front log support centrally onto the burner front rail as shown below in figure 18 Fig 18 53 ...

Page 55: ...0 3 Place a single layer of bark onto the front log support as shown below in figure 19 Fig 19 5 10 4 Place log A onto the left hand end of the base ceramic log as shown below in figure 20 Fig 20 54 Log A ...

Page 56: ... log B onto the base ceramic log at the right hand side as shown below in figure 21 Fig 21 5 10 6 Place log C onto the groove in the centre of the base ceramic log as shown below in figure 22 Fig 22 55 Log B Log C ...

Page 57: ...t to a minimum during installation servicing we recommend that you use a HEPA filtered vacuum to remove any dust and soot accumulated in and around the fire before and after working on the fire When replacing these articles we recommend that the replaced items are not broken up but are sealed within a heavy duty polythene bag clearly labelled as RCF waste This is not classified as hazardous waste ...

Page 58: ...changed in the product or handset are chargeable a If the red indicator light flashes ONCE every ten seconds the batteries in the control valve require changing see section 5 5 b If the red indicator light flashes TWICE every ten seconds the batteries in the handset require changing see section 5 5 c If the red indicator light flashes THREE times every ten seconds the batteries in the control valv...

Reviews: