background image

Troubleshooting • Solución de problemas • Guide de dépannage 

 service.fi sher-price.com

9

X6222pr

-0720

ASSEMBLY     MONTAJE     ASSEMBLAGE

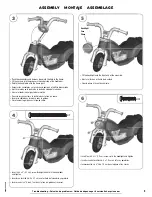
•  Push the connectors and harness down into the hole in the frame.
•  Fit the harness into the groove in the underside of the handle bar.
•  Rotate the handlebar onto the frame post.

•  Empujar los conectores y el arnés hacia abajo en el orificio del armazón.
•  Ajustar el arnés en la ranura de la parte de abajo del manubrio.
•  Girar el manubrio en el poste del armazón.

•  Pousser les connecteurs et le câble dans le trou du cadre.
•  Insérer le câble dans la rainure sous le guidon.
•  Faire tourner le guidon sur la tige du cadre.

•  Insert a #8 x 2" (5,1 cm) screw through the hole in the handlebar 

and tighten. 

•  Insertar un tornillo 

 8 x 5,1 cm en el orificio del manubrio y apretarlo.

•  Insérer une vis nº 8 de 5,1 cm dans le trou du guidon et la serrer. 

3

4

x1

x4

•  Insert four #8 x ¾" (1,9 cm) screws into the headlight and tighten.

•  Insertar cuatro tornillos 

 8 x 1,9 cm en el faro y apretarlos.

•  Insérer quatre vis nº 8 de 1,9 cm dans le phare et les serrer.

6

•  Fit the headlight onto the front end of the assembly.

•  Ajustar el faro en el frente de la unidad.

•  Fixer le phare à l’avant du véhicule.

5

Headlight
Faro
Phare

• Push the connectors and harness down into the hole in the frame.

3

Summary of Contents for POWER WHEELS X6222

Page 1: ... no incluido Doit être assemblé par un adulte Outils requis pour l assemblage un tournevis cruciforme non fourni Requires 1 6V 4 Ah 3 cell non spillable sealed lead acid battery included Requires 1 6V 4 Ah charger included Funciona con 1 batería de 6V 4 Ah de 3 células de plomo ácido sellada que no derrama líquido incluida Funciona con 1 cargador de 6V 4 Ah incluido Fonctionne avec une batterie au...

Page 2: ...s Después de que un fusible se bloquea dejar de presionar el botón y esperar 25 segundos antes de echar a andar el vehículo otra vez Para evitar bloqueos automáticos seguidos evitar condiciones de manejo severas Si el fusible térmico de la batería se bloquea continuamente bajo condiciones de manejo normales llámenos al 1 800 348 0751 EE UU y Canadá o al 59 05 51 00 Ext 5206 ó 01 800 463 59 89 Méxi...

Page 3: ...Evitar lesiones y la muerte Utilizar bajo la vigilancia de un adulto No usar en la oscuridad Mantener a los niños en áreas seguras Se recomienda que estas áreas estén lejos de piscinas y otras áreas con agua para evitar accidentes niveladas para evitar que el vehículo se voltee lejos de escalones pendientes autos calles y callejones Reglas para manejar Cerciorarse de que los niños sepan y sigan es...

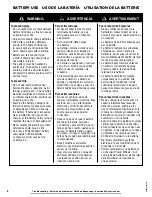
Page 4: ... daños o gasto en exceso no usar el cargador ni la batería hasta que haya reemplazado la pieza dañada Nunca modificar el sistema eléctrico Las alteraciones podrían causar un incendio Usar solo una batería y cargador de Power Wheels Otras baterías o cargadores podrían causar un incendio o explosión To prevent injury Do not make direct contact between battery terminals as this can cause an explosion...

Page 5: ...atería en una superficie tal como la cubierta de la cocina que se pueda dañar con el ácido contenido en la batería Tomar las debidas precauciones para proteger la superficie donde vaya a colocar la batería Cargar la batería en un área bien ventilada S assurer de charger la batterie pendant au moins 18 heures avec le chargeur Power Wheels de 6 V fourni avant d utiliser le véhicule pour la première ...

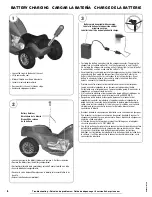
Page 6: ...r de la batería Brancher d abord le connecteur de la batterie sur le connecteur du chargeur Puis brancher le chargeur sur une prise de courant standard Brancher le chargeur uniquement sur une prise murale Ne pas brancher le chargeur sur une prise située au plafond Si l arrivée du courant à la prise murale est contrôlée par un interrupteur s assurer que celui ci est à ON MARCHE Une fois la batterie...

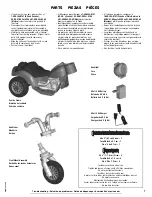
Page 7: ...minar cualquier suciedad o aceite No se muestra hoja de adhesivos S il manque des pièces composer le 1 800 348 0751 Canada et États Unis ou le 59 05 51 00 poste 5206 ou 01 800 463 59 89 Mexique plutôt que de retourner le produit au magasin Ne pas jeter l emballage avant d avoir terminé l assemblage pour s assurer qu aucune pièce n est jetée par erreur Les pièces métalliques sont enduites d un lubr...

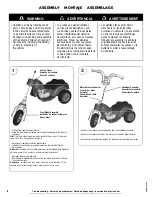
Page 8: ...icle frame Slide the front wheel assembly up through the opening in the front of the frame Hint The front wheel assembly is designed to fit one way If it does not seem to fit turn it around and try again Levantar el frente del armazón del vehículo Introducir la unidad de la rueda delantera en el orificio del frente del armazón Atención La unidad de las ruedas delanteras está diseñada para ajustars...

Page 9: ... cadre Insérer le câble dans la rainure sous le guidon Faire tourner le guidon sur la tige du cadre Insert a 8 x 2 5 1 cm screw through the hole in the handlebar and tighten Insertar un tornillo 8 x 5 1 cm en el orificio del manubrio y apretarlo Insérer une vis nº 8 de 5 1 cm dans le trou du guidon et la serrer 3 4 x1 x4 Insert four 8 x 1 9 cm screws into the headlight and tighten Insertar cuatro ...

Page 10: ...s exactamente como se muestra en las ilustraciones Para mejores resultados evitar reposicionar las etiquetas Apposer les autocollants exactement comme indiqué dans les illustrations Pour de meilleurs résultats éviter d apposer un autocollant plus d une fois sur le véhicule FRONT VIEW VISTA DEL FRENTE VUE AVANT 7 16 16 LEFT VIEW VISTA DE LA IZQUIERDA VUE DU CÔTÉ GAUCHE 2 3 RIGHT VIEW VISTA DE LA DE...

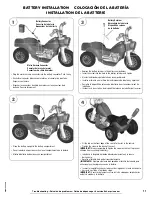
Page 11: ...ten Ajustar la abrazadera de la batería en el compartimento Insertar el tornillo en el orificio de la abrazadera de la batería y apretarlo Remettre le dispositif de retenue de la batterie dans le compartiment de la batterie Insérer la vis dans le trou du dispositif de retenue de la batterie et la serrer Battery Retainer Abrazadera de la batería Dispositif de retenue de la batterie 4 Fit the tab on...

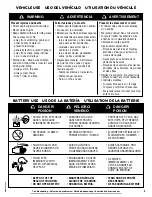
Page 12: ...the daytime in a well lit area Driving near steep inclines can cause The vehicle to gain unsafe speed even if the button is released to stop The vehicle to tilt and tip over The wheels to lose traction causing the vehicle to slip The vehicle could roll backwards at an unsafe speed To prevent unsupervised use of the vehicle disconnect the motor harness from the battery when the vehicle is not in us...

Page 13: ...ERIE CONTAINS SEALED LEAD BATTERY BATTERY MUST BE RECYCLED Recycle or dispose of the battery in an environmentally sound manner Do not dispose of a lead acid battery in a fire The battery may explode or leak INCLUYE UNA BATERÍA DE PLOMO SELLADA RECICLAR LA BATERÍA Debe ser reciclada o eliminada de manera que no afecte al medio ambiente No quemar la batería de plomo ácido La batería podría explotar...

Page 14: ... cause them to corrode and could cause switch or motor failure Avoid operating the vehicle on sand loose dirt or gravel Sand loose dirt or gravel in the motors or electrical switches can cause them to jam and could cause switch or motor failure Wipe the vehicle with a soft dry cloth For a shiny finish use a non wax furniture polish and soft cloth Do not use automotive wax Revisar periódicamente to...

Page 15: ...on 1 800 348 0751 This warranty gives you specific legal rights and you may also have other rights which vary from state to state PLEASE SAVE YOUR ORIGINAL SALES RECEIPT In order to qualify for this warranty your original sales receipt must be provided This warranty is valid in Canada and the United States of America only One year limited warranty from the date of purchase on the Power Wheels vehic...

Page 16: ...not used or stored Do not return your vehicle to the store we can help Visit us online for our Troubleshooting Guide service fisher price com Cargar la batería por 18 horas antes de usar el vehículo por primera vez Cargar la batería inmediatamente después de cada uso Cargar la batería por lo menos una vez al mes incluso si no se ha usado el vehículo No devolver el vehículo a la tienda Nosotros pod...

Reviews: