e
Assembly
f
Assemblage
S
Montaje
e
This package contains small parts. Adult assembly
is required.
f
Petits éléments détachables susceptibles d’être
avalés. Doit être assemblé par un adulte.
S
Este paquete incluye piezas pequeñas. Requiere
montaje por un adulto.
e
CAUTION
f
MISE EN GARDE
S
PRECAUCIÓN
e
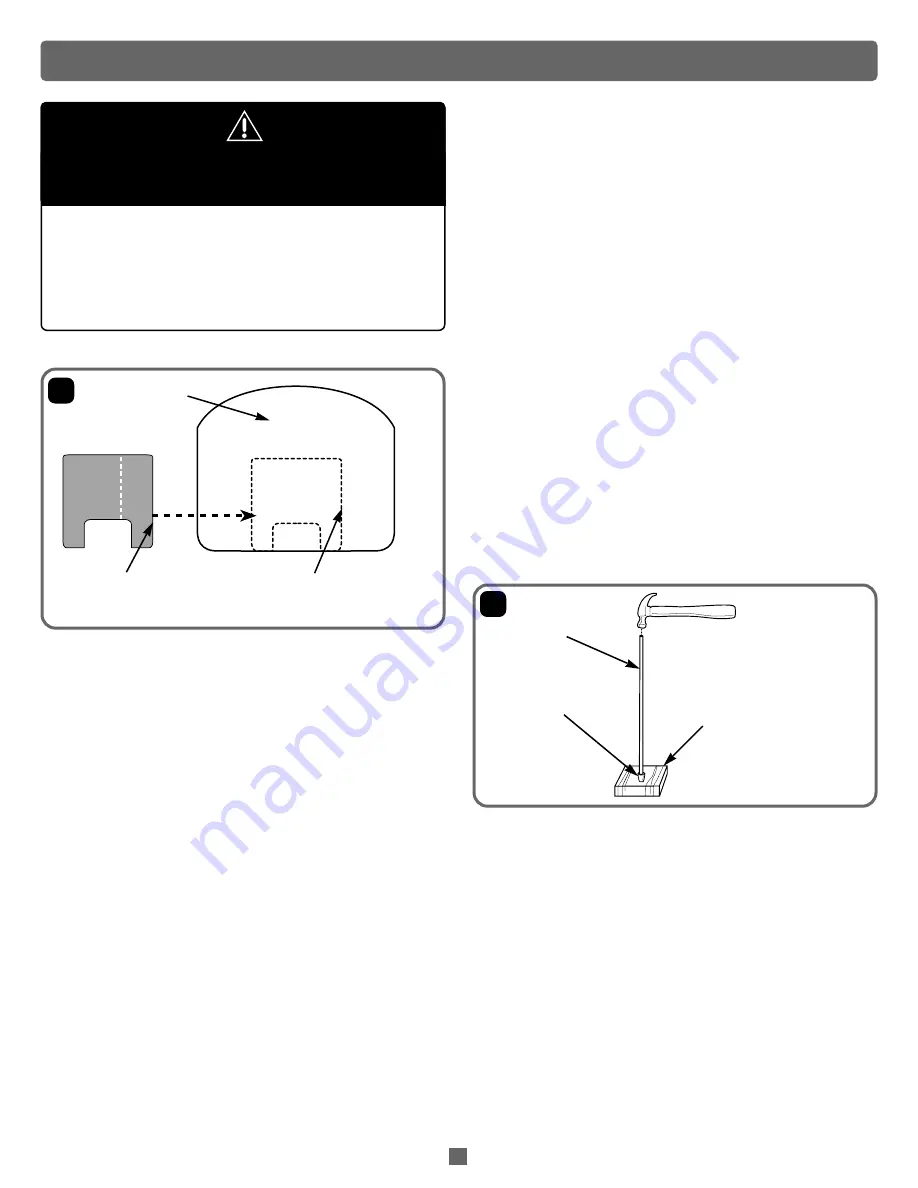
Backboard
f
Panneau
S
Tabla
1
e
Proper label application will help to keep the label looking
its best!
• Wash your hands before applying the label.
• Make sure the area where the label will be applied is clean
and dry. Wipe the backboard with a clean, soft, dry cloth to
remove any dust or oils.
• For best results, avoid applying the label more than once.
• Peel the backing from one half of the label. Do not remove all
of the backing!
• Align the side edge of the label (where backing is removed)
with the side edge of the label area on the backboard.
• Carefully apply the side edge of the label to the side edge of
the label area on the backboard.
• While rubbing the label in place, continue to peel the backing
from the other half of the label.
• After applying the label, rub the label firmly with a cloth to
make sure the label is adhered to the backboard.
• Dispose of the label backing properly.
f
Coller l’autocollant avec soin pour un résultat satisfaisant
et durable !
• Se laver les mains avant de commencer.
• S’assurer que l’endroit où sera apposé l’autocollant est propre
et sec. Essuyer le panneau à l’aide d’un linge propre, doux et
sec pour enlever la poussière et les dépôts graisseux.
• Pour de meilleurs résultats, éviter de coller l’autocollant plus
d’une fois.
• Enlever une moitié de la pellicule protégeant l’autocollant.
Ne pas enlever toute la pellicule !
• Aligner le bord de l’autocollant (où la pellicule a été enlevée)
avec le bord de l’endroit où il doit être apposé sur le panneau.
e
Side Edge
f
Côté
S
Borde lateral
e
Side Edge
f
Côté
S
Borde lateral
• Apposer soigneusement le bord de l’autocollant sur le bord de
l’endroit où il doit être apposé.
• Tout en frottant l’autocollant pour qu’il adhère bien, enlever la
pellicule protégeant l’autre moitié de l’autocollant.
• Une fois l’autocollant apposé, le frotter vigoureusement avec
un linge pour s’assurer qu’il adhère bien au panneau.
• Jeter la pellicule dans un conteneur réservé à cet usage.
S
La colocación correcta del adhesivo ayudará a que éste luzca
de manera óptima.
• Lávese las manos antes de pegar el adhesivo.
• Cerciórese de que el área donde va a pegar el adhesivo esté
limpia y seca. Limpie la tabla con un paño limpio, suave y seco
para eliminar el polvo o grasa.
• Para óptimos resultados, evite pegar el adhesivo más de
una vez.
• Despegue el dorso de una parte del adhesivo. ¡No despegue
todo el papel del dorso!
• Alinee el borde lateral del adhesivo (parte de la que despegó
el papel del dorso) con el borde lateral del área del adhesivo
en la tabla.
• Pegue cuidadosamente el borde lateral del adhesivo en el
borde lateral del área del adhesivo en la tabla.
• Mientras frota el adhesivo para que se adhiera bien, despegue
el papel del dorso del otro lado del adhesivo.
• Después de pegar el adhesivo, frote el adhesivo con firmeza
con un paño para cerciorarse de que el adhesivo se adhiera a
la tabla.
• Deseche el papel del dorso del adhesivo en un contenedor.
e
Axle
f
Essieu
S
Eje
e
Cap Nut
f
Écrou
borgne
S
Tuerca ciega
e
Block of Wood
f
Bloc de bois
S
Bloque de madera
e
• Place a cap nut on a scrap block of wood.
• Place one end of the axle into the cap nut.
• Tap the other end of the axle with a hammer. Make sure the
cap nut is securely attached to the axle.
f
• Placer un écrou borgne sur le bloc de bois.
• Insérer une extrémité de l’essieu dans l’écrou borgne.
• Frapper l’autre extrémité de l’essieu avec un marteau.
S’assurer que l’écrou borgne est solidement fixé à l’essieu.
S
• Coloque una tuerca ciega en un bloque de madera.
• Coloque un extremo del eje en la tuerca ciega.
• Golpee el otro extremo del eje con un martillo. Verifique que la
tuerca ciega quede bien fija al eje.
2
3


